Corner Shelves
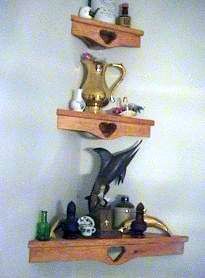
I made these corner shelves for my granddaughter's bedroom so I put a heart in place of the diamond showing in the picture. These plans let you choose a motif that might have some personal meaning to you or the person you are making the shelves for.
I also used some sanded cedar that was around the shop for a while and was good and dry. This is the beauty of making personal items like this, using up what is around and varying the design to match the person receiving it.
List of Materials
- Solid cedar, fir, oak or pine boards
- Nails
- Glue
Tools Needed
- Cut off or table saw
- Drill
- Jigsaw
- Router
Instructions
Rip the front faces about 2 1/2" or 3" wide and about 24, 18 and 12" long.
Determine your theme's design and layout in the center of the board. Drill a hole to start the jig saw and cut out the heart, spade, diamond, tiger or whatever. Layout and cut out around this motif and rip the rest of the board referring to the drawing. Clean up with a course file or rasp and then with the router round over inside the motif and the bottom. If the solid boards are not wide enough, lay them up (place them side by side and glue the joints and clamp together) before cutting them on a 45° angle.
Rip ledger strips of 3/4" x 1 1/2" wide material to support the shelves and fasten these to the wall under the shelf.
Set your cut off saw on a 45° and cut off each side of the shelf to fit in the corner forming a 90°. Cut the front face on a 45° to match the length of the shelf.
Stain, finish or paint and install this little beauty in your favourite nicknack room.
Dave
(Ask Dave) (About Dave)Your source for building tips, woodworking & furniture plans, house plans and building advice directly from Dave...
Hi, I'm Dave Osborne. With over 50 years experience as a journeyman carpenter, foreman and contractor in heavy construction I enjoyed working with apprentices and sharing the tricks of the trade that others shared with me. Now I get emails from Members all over the world and we include many of my answers in our Free Monthly Newsletters. Some of my answers include drawings and instructions specific to a project, but may also answer your questions. I use correct construction terminology, so you can confidently inform your building supply dealers or contractors exactly what you need.
ASK DAVE!
The Benefits of Membership
Membership gives you full access to our hundreds of how-to articles, woodworking plans, converters, calculators and tables. Our Stair Calculator is one of the most popular on the internet. We have projects you can build for (and with) your kids, furniture for your wife, and sheds and gazebos. If you run into a problem or need advice your Membership includes unlimited email questions to me through our Ask Dave quick response button.
Join us!
Copyright © 1999-2025 DDFM Enterprises. All Rights Reserved. DDFM ENTERPRISES, DAVE'S SHOP TALK and the Dave Osborne logo are trademarks and service marks owned by DDFM Enterprises. All other trademarks on this site are the property of their respective owners. Site design by Design Strategies, Inc.