Bedroom Furniture: Queen Bed & Drawers
These wood working plans include:
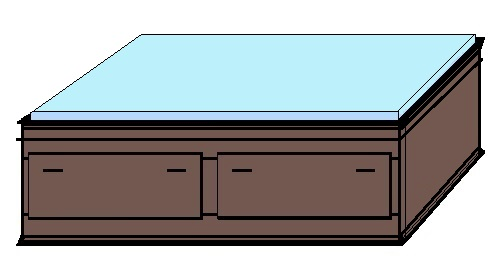
Here is a design for a queen bed frame including a pair of drawers on each side.
These wood working plans include:
The following drawings:
- Artist View
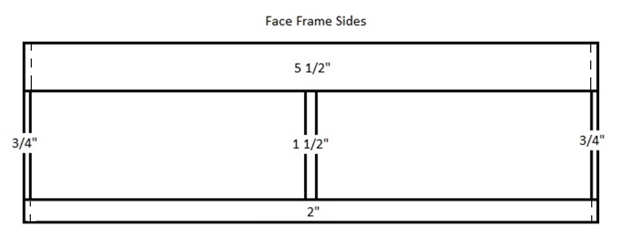
- Face Frames show the dimensions of the stiles and rails on the side gables and the head and foot of the bed
- Slide Placement Detail shows the position of the slides on the gables
- Plan View shows the size of the mattress support
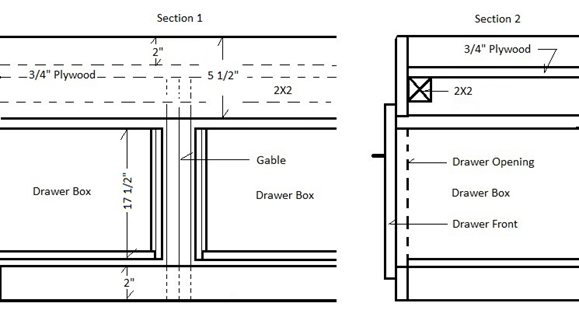
- Sections 1 and 2 referring to Plan View
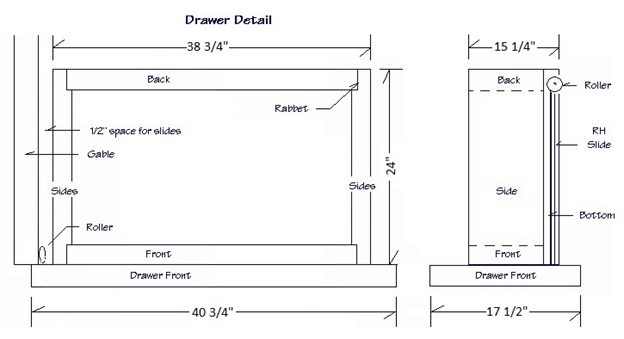
- Drawer Detail shows the construction of a typical bottom mount drawer box and front with manufactured slides on the bottom
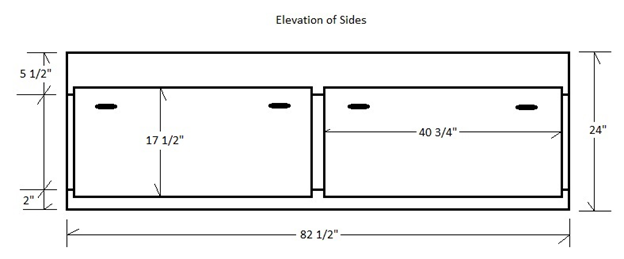
- Side Elevation shows dimensions and layout of the drawers
The List of Materials include materials for all the parts required to complete the project including: the gables, top support, face, drawer, slides, pulls and fasteners.
The Cutting List, The Face Frame, The Gables, The Drawers, The Finishing, Installing the Drawer Fronts and Tips.
List of Materials
- 3 sheets - 4x8x3/4" G1S grade plywood for gables, stiles, rails and mattress support
- 3 sheets 4x8x3/4" G2S plywood for drawers
- 1 sheet - 4x8x1/2" G1S plywood for drawer bottoms
- 4 pieces - 2x2x8' for ledger to support plywood for mattress support
- 4 pairs bottom mount 24" drawer slides (Blum)
- 1 box flathead wood screws #6 x 3/4" for slides
- 4 drawer pulls and 8 - 1 1/2"x#6 machine screws
- 80' hot melt glue wood tape
- 2 lb 1 1/2" bright finish nails or air nails
- 12 - 1 1/2" #6 drywall screws
- Carpenter's yellow wood glue
- Wood filler, stain and Polyurethane finish
Instructions
Rip the plywood to the sizes in the following cutting list. I recommend a hardwood cabinet grade plywood, such as alder or maple or more exotic, if you like.
Cutting List
- 2 gable ends at 24"x61", head and foot. See Note about rounding over the edge.
- 2 center gables nailed and glued together 24"x61"
- 2 top rails 5 1/2"x81"
- 2 bottom rails 2"x81"
- 4 pieces 3/4" stiles to fit between the rails
- 2 pieces 2x2 ledger 61"
- 2 pieces 2x2 ledger 78"
- 2 pieces 3/4" plywood for mattress support at 40 1/2"x61
Cabinet plywood is exactly 3/4" thick and is considered G2S (good 2 sides), but one side is usually a bit better than the other. Always rip plywood with its best side facing up on a table saw and the best side facing down if you are using a circular saw. Use a sharp blade with the highest number of teeth for finishing work. We want to dado the front and back edge of the drawers for the 3/4" side panel. For the dados cut in 1/4" deep the full thickness of the panel, that's 1/4 x 3/4 . Either use a dado blade with the table saw (preferred) or use a router and jig. Assemble the top to the gables, as shown in the drawings.
The Face Frame
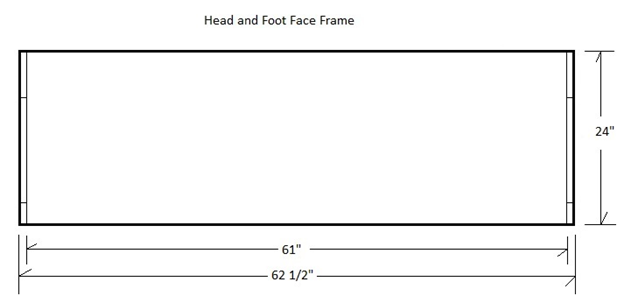
The Face Frame drawing shows which piece overlaps and which piece comes to the other. The light hatched line shows the head and foot gables behind the side gables. Refer to the Cutting List. These are exact sizes. The more accurate you are here the better the cabinet will turn out. Assemble the pieces with glue and nails. The rails help keep the frame square.
The face frame is made up of vertical pieces called stiles and horizontal pieces called rails. The stiles between the 5 1/2" and 2" rails are ripped, from the 3/4" plywood, according to the sizes shown in the face frame drawing and cut to length by holding the piece against the frame and marking in place. These should be face nailed to the box and glued. Set the nails with a nail set just below the surface if not using an air nailer.
The end grain of the plywood showing on the side edges should be covered with a hot melt glue, wood edging tape. Cut the wood tape to length with sharp scissors. Apply to the surface, covering the edge grain and hold in place as you iron on the tape, with an old clothes iron. Get a block of wood and go over the tape again with the iron, following it with the block, to force the tape on the edge as the glue is melting. Use the block to avoid burning your fingers. Trim off the excess tape with a sharp utility knife or plastic edging block made for this purpose. Sand the edge of the tape smooth, very lightly with 120 grit sandpaper, cut in quarters and wrapped around a sanding block. Feel the edge with your fingers to be sure any splinters are gone and the tape is flush. The tape is very thin, so don't over sand it. If you mess up, iron the tape again to melt the glue and peel it off and start over. You'll get the hang of it with a bit of practice.
Note: The top edge of the head/foot and sides can either have edging tape applied or rip thin 1/2"x3/4" strips to glue and nail on, then round over the edge using a router and 3/8" round over bit. Miter the strips at the corners. Allow for this edging when ripping the plywood. Place your nails in the center of the strip to avoid hitting them with the router bit. All nails should be set about 1/16" below the surface to allow filling them with a putty made for this purpose, discussed later.
The Gables
On the inside of the gables, layout the position of the drawer slides. The slides come in matched pairs, with one for the drawer and one for the gable. They are marked LH and RH for left and right hand. The drawer mounts install on the bottom of the drawer with the roller at the back. We'll get to the drawers later.
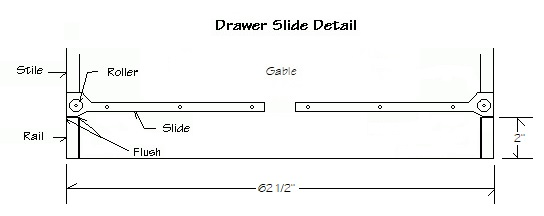
The gable mount slide is shown in the above drawing. The end with the roller goes to the front and is flush with the outside of the face frame and rests on top of the 2" rail. Screw these in position using #6 x 5/8" screws, 3 per slide. Make sure they are installed square across the gable.
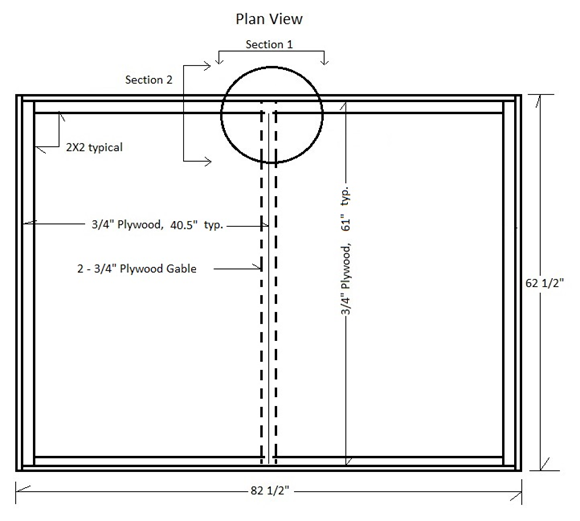
Now that the frame is assembled and the drawer slides are installed, let's assemble the 2x2 ledgers to hold the 3/4" plywood support for the mattress or foam. See the Plan View and Sections above. Nail and glue the 2x2 strips onto the inside of the bed frame. Drop and screw the plywood pieces into place on top of the 2x2s. This should square up the frame. If you wish to add moldings to the frame, as shown in the artist conception, do so now.
With the bed frame complete, we can now assemble the drawers.
The Drawers
The drawer boxes are made of 3/4" plywood. The sides are rabbeted to receive the front and backs, which are the same size. The front/back and the sides are also rabbeted 1/4" deep x 1/2" wide on the bottom to receive the 1/2" ply for the bottom of the drawer. The outside width of the drawer must be 1" less than the opening between the stiles to allow for the drawer slides. Check your measurements before cutting the drawer parts. You'll notice that one slide mounted on the drawer is flat on top and the other side has a rounded top which grabs the roller. There is a bit of adjustment with this design; it's better to be a bit too wide on the 1/2" gap rather than too tight. I'm talking a maximum of 1/16". At 1/2" on each side the drawer will slide nicely. The bottom is simply nailed and glued to the sides, back and front in the dado. With plywood, glue and nails work well. Don't fasten the drawer front onto the drawer box yet; wait for this step later. The height of the drawer is about 1 1/4" less than the vertical opening to allow for clearance to get the drawer in place, 1" clearance on top and 1/4" clearance on the bottom. Cover the top of the drawers with edge tape.
Cut the drawer fronts out of the 3/4" plywood. The drawer fronts should overlap the rails and stiles by at least 1/2". Check your measurements. The edge grain can be covered with wood edging tape or rip a profile out of solid wood stock, to match your choice of plywood. If going to router a profile on the drawer fronts be careful where you place your nails. We don't want to hit them with the router, since it is easier to router the edge after it is fastened to the front.
Time to sand and apply the finish to your project. Fill all nail holes with a putty pre-stained to your liking. Most fillers do not stain well when dry. Plywood and lumber have a mill glaze on its surfaces when purchased. This must come off before applying a stain or clear finish. Use about a 100 grit sandpaper for the first pass. It doesn't take too much to remove this. Don't sand any finer than 150 grit before the application of stain. I've had people wonder why stain won't grab the wood when they sand with 400 or 600 paper. They sealed it off by trying to do a perfect sanding job. Don't sand too much of the veneer off the plywood, it is very thin. Remove any saw or router marks on the edges of the solid lumber, if used. Sand the drawer fronts before installing them on the drawers.
The Finishing
For a choice of finish, I prefer a satin or semi-gloss clear Polyurethane product. Varathane is such a product. I use the Varathane Professional Clear Finish, which can accept several coats in a day, yet is oil based. If you prefer to stain, it goes on before the final finish. I prefer a gelled stain applied with a lint free rag. Rub it on and wipe it off. Allow the stain to dry overnight before applying the finish. In my opinion, stay away from the stain and finish applications in one step. If the stain is not to your liking, after it dries, you can't change it easily. By pre-staining you have the option to sand it lightly to lighten the color or add a bit more to darken it. Apply at least two coats of the clear finish after the stain has dried, overnight.
Installing the Drawer Fronts
Insert the drawer box into the slides by tipping the drawer down to engage the roller and lift again and slide the box in. Start by drilling 3/16" holes through the front of the drawer box about 2" in from each corner. Clamp the drawer front into place with the drawer open with the use of spring clamps or C-clamps. Don't mark the surface. From the inside of the box, screw through 2 holes into the front, to start. Careful with the length of screws, you don't want to go through the face of the front. Remove the clamps and slide the door in. When happy with the position, screw the other 2 screws in at the corners. Install the pulls by drilling with the same bit through the face of the front as well as the box front to match the spacing of the holes in the pulls. Most times the pulls come with a 3/4" machine screw as well as a longer one. You may have to cut off the screw to fit the length of going through the two pieces or buy a longer screw to fit.
Tips
- When cutting a machine screw to length, thread on a proper size nut first, cut the screw and back off the nut which cleans the threads in the process.
- When drilling through a finished frame, as when installing drawer pulls, hold a scrap block of plywood on the inside to prevent the drill from chipping the wood as it penetrates the frame.
- If the drawer is slightly too large for the opening and is binding on the sides, remove the slide on the left side of the drawer and with the table saw remove a thin slice the height of the slide off the drawer side. It is better to be 1/16" too small than too large.
Enjoy your new bed frame.
Dave
(Ask Dave) (About Dave)Your source for building tips, woodworking & furniture plans, house plans and building advice directly from Dave...
Hi, I'm Dave Osborne. With over 50 years experience as a journeyman carpenter, foreman and contractor in heavy construction I enjoyed working with apprentices and sharing the tricks of the trade that others shared with me. Now I get emails from Members all over the world and we include many of my answers in our Free Monthly Newsletters. Some of my answers include drawings and instructions specific to a project, but may also answer your questions. I use correct construction terminology, so you can confidently inform your building supply dealers or contractors exactly what you need.
ASK DAVE!
The Benefits of Membership
Membership gives you full access to our hundreds of how-to articles, woodworking plans, converters, calculators and tables. Our Stair Calculator is one of the most popular on the internet. We have projects you can build for (and with) your kids, furniture for your wife, and sheds and gazebos. If you run into a problem or need advice your Membership includes unlimited email questions to me through our Ask Dave quick response button.
Join us!
Copyright © 1999-2025 DDFM Enterprises. All Rights Reserved. DDFM ENTERPRISES, DAVE'S SHOP TALK and the Dave Osborne logo are trademarks and service marks owned by DDFM Enterprises. All other trademarks on this site are the property of their respective owners. Site design by Design Strategies, Inc.