| NEWSLETTER from DaveOsborne.com | ||
| “Building Confidence” | October 2005 | |
Welcome
Welcome to another issue of our newsletter. Thanks for your comments and questions.
What's New
We added a new plan this month, similar to last month. This one is the 10x10 gazebo with skylight, thanks to the request of a member.
Ask Away!
Here are member questions and my answers for the last month. Maybe you can relate these to some of your own projects.
Hi Dave,
I was wondering if you could tell me how to build drawers for a futon.
I just purchase a futon and saw in some magazine that they have a couple
of drawers that must be on wheels under the futon. I measured the space
under the futon and it is about 7 inches high and 72 inches long.
hope you can help me. The futon is all wood and I think when I saw the
drawers that they were not attached to it but I'm not sure.
Elaine
Hi Elaine,
This is the way I would do it, to look like a piece of furniture:
The gables would be cut full height of the space under the futon and fastened to the wooden legs. The center gable is attached to the chair frame with angle brackets. Drawers are made to fit as shown in the drawing using bottom mount drawer slides. Leave about 3/4" space for clearance between top of gable and top of drawer, to be able to get the drawer in.
The drawer boxes can be made of 1/2" plywood or 5/8" melamine. The sides are rabbeted to receive the front and backs, which are the same size. The outside width of the drawer must be 1" less than the opening between the gables, to allow for the drawer slides. You'll notice that one slide mounted on the drawer is flat on top and the other side has a rounded top which grabs the roller. There is a bit of adjustment with this design, better to be a bit too wide on the 1/2" gap rather than too tight. I'm talking a maximum of 1/16". At 1/2" on each side the drawer will slide nicely. The bottom is simply screwed to the sides, back and front since the slide supports the bottom, anyway. For melamine, since glue won't hold too well, except at the raw edges, I prefer to screw the box together. I use # 6 x 1 1/2" drywall screws. With plywood, glue and nails work well. Don't fasten the drawer front onto the drawer box yet, wait for this step later.
To install the drawer fronts, insert the drawer box into the slides. Tip the drawer down to engage the roller and lift up again and slide the box in. Start by drilling 3/16" holes through the front of the drawer box in the center of the front and near the sides. Clamp the drawer front into place with the drawer open with the use of spring clamps or c-clamps. Don't marr the surface. From the inside of the box, screw through the two holes into the front. Careful with the length of screws, you don't want to go through the face of the front. Remove the clamps and slide the door in. When happy with the position, install the pulls by drilling with the same bit through the face of the front as well as the box front to match the spacing of the holes in the pulls. Most times the pulls come with a 3/4" machine screw as well as a longer one. You may have to cut off the screw to fit the length of going through the two pieces or buy a longer screw to fit.
Dave
We're building a home and are at the trim stage. We have a bay window
area. The right wall of the bay contains a door. The other two walls
contain windows. I've noticed that the top trim for the door is
three-quarters of an inch lower than the top trim for the windows.
This is quite noticeable (at least to me) since the door is right
next to the window. Our contractor says this is standard with a
pre-hung door. I think someone didn't frame correctly to assure even
trim heights. Am I all wet, and should I just let it go?
It really bugs me to see the uneven trim, but I don't know for sure
if this is acceptable practice. If standard practice is to have a
consistent trim height, what options for fixing it should I discuss
with my contractor?
Hi,
Your contractor is correct. In the framing stage we put all the headers in at the same level. The doors will come out different than the windows. In a case like yours where the window and doors are so close, may I suggest a wider or different casing on the door to make it obvious that it is different rather than off a bit to look like a mistake.
do you give measurements in metric?
Yes, I answer in metric or English depending on how the question comes. I'm from Canada where we use both, actually. We were hot to change over to metric until The States voted their conversion down. So our powers to be decided to relax on our change over.
We have a few members from the UK, Australia, New Zealand, Fiji which is metric. Our building code is metric in Canada. Dave
Hi Dave,

I just bought a house that recently had a concrete basement installed.
The owner did not get to put the staircase to the basement. This is
now left to me. I have bought 2x12's for stringers and a membership
of your website and am ready to go at it. I am a handy cabinet maker
(hobby) and feel I can tackle this carpentry project. My ? is, how do
I frame the opening well for the access to the new basement? I know
that double headers have to be made but am not sure ho to go about
this. Can you give me some pointers?
Thanks
Laurence in Elliot Lake Ontario
Hi Laurence,
Here is a drawing to start with of a floor opening:
Notice the double joists on each side of the opening and the double header if the tail joists are longer than 6'. The header to double joists have joist hangers and the header to tail joists have joist hangers if longer than 6'. the length of the opening is determined by using the Stair Calculator on our website. It has full instructions with it.
Let me know if you understand this so far.
Dave
I am adding stairs which run the length of one side of my deck (18feet)
and I want the run to be 14 inches so people can sit on them. The rise
will be 6.25 since the lowest end of the deck is 26 inches. I figure
4 risers and three runs. How do I make these stairs since I usually
use 2 x 12s for the stringer. I was thinking a series of box frames
sitting on top of each other.

Thanks, I appreciate any insight you have.
Hi Dick,
Actually 4 rises of 6.5 = 26. I agree, the boxes is the better idea with long stairs like this and just a few runs.
If you rip down a 2x6 to 5" for the box and use 1 1/2" treads it would work well. I would put 2x4s under each box to tie everything together, as shown and use 4 - 2x4s for the treads.
Notice the scabs, made from 3/4" plywood, that tie everything together with the cross pieces every 2'.
Dave
Thanks, Should I pour any concrete footings for the bottom? The deck
has a high point on 29" and a low of 26". I figured I would use 26"
and pour footings to level the rest and then fill around the sonotube
with earth.
Yes, that's a good plan.
Dave
Sorry, one last question. How would you recommend I attach the stairs
to the deck?
If the box joist on the deck doesn't come low enough, we usually tie the stairs to the deck with some sort of tie, such as shown in gray. Either on the side as shown or under the box joist tied to the long 2x4s underneath, before the treads are installed. These will be hidden.

Dave
I'm cutting common rafters for a gable roof, I find the heel and seat
cuts difficult to do . What type of saw would be the most effective.
Also, what sort of margin or error is allowed in producing common
rafters. It's going to be impossible to make them identical, but how
close must I be?
I use a circular saw for cutting out the seat cut and finish it off with a reciprocating saw or handsaw. In construction we have certain tolerances. In cutting your rafters you should be able to keep them withing 1/16" of each other. To make them identical use the first rafter as a template for the others. When cutting them out remove the pencil line that marked them out. In this way you should be within tolerances. It is good to have nice tight joints in roof construction to aid in the strength of the joints.
A tip for starting the cut using a circular saw when cutting a sharp angle is to lift the guard up a bit and line the saw up with the guide notch in front of the sole plate. Watch the saw blade where it cuts the line. A circular saw will start the cut for you and get it 90 degrees with the face of the lumber. A handsaw or other can be then used to keep the remaining cut 90 degrees and not go past the intersection of the cut weakening the lumber.
Dave
Hello Dave

Great site. Being a DIY I have tools but not always the know-how and
your site is where I come to get it.
I have a colonial home. The problem is that the front entrance is
getting water damage. I was thinking of putting a roof over the
front porch, but not sure how too.
The porch is 36"x72" I have attached a photo.
I would appreciate any advice you could give.

Best regards

Kevin
Hi Kevin,
Here are two drawings of a gable roof.
 You can either support the end of the beam on a post to the ground and
concrete pad or by an angled brace to the wall. The brace will only support a roof coming out about 4' max.
You can either support the end of the beam on a post to the ground and
concrete pad or by an angled brace to the wall. The brace will only support a roof coming out about 4' max.
Is this what you had in mind?
Dave
Hi Dave
Thanks that is what I am looking to do. Any help you could provide me
would be great. This is my first attempt at a roof.
The angled brace would be the way I like to go. I would like to come
out about 3 feet and to be about 8 feet wide and that would put the
lights just under the roof.

Kevin
Hi Kevin,
Sorry for my delay in getting back with you, things have been hectic at this end.
First of all you have to lay out on the siding where the framing for the roof will be. We need to remove the siding down to the sheathing. Without removing the siding we can't flash between the wall and the new roof. If the outside of the beams are at 8' with a 5/12 pitch allow the top of the roof clearance to be about 30". This will allow room for the flashing, as well. Remove the siding to this height and the width of the overhang on the sides. Remove the siding by making a vertical cut with your circular saw from the high center point down to the bottom of the ceiling joist. Then remove the siding on each side of this cut back to the original joint (if not too far back). Stagger the joints on the siding.
Remove the siding for the verticals by laying out exactly where the 4x4 verticals will be, giving an extra 1/8" for clearance. Remove this siding by setting your circular saw to the siding depth and cut out this space. Then when the 4x4s are installed just caulk up the joint all around the 4x4s.
I'm going to leave you with this for now. If you don't understand anything here, let me know. Also let me know if you can carry on from this point with the help of the drawings, alone.
Dave
Thanks Dave
That's ok about the delay it gave me time to read up on Rafter Tables
and Calculating Roof Pitch that gave me a better understanding of the
5/12 pitch.
I laid out the siding for the roof framing. I think I want to redo it
because I measured the 30" clearance from the top of the door trim and
that will put my ceiling joist about 6 1/2 " above the top of the door.
I think I want to bring it down to about 3 1/2 " above the door.
What do you think? Well I guess this time I am glad it started to rain
it made me take a second look at my lay out.
I also look at the placement of the 4x4 instead of 96" I want to make
them 74 1/2 " to the outside. This would put the 4x4 inside of the
lights and the lights would be covered by the over hang.
Also I want to bring the roof out 36" off the house Should I make the
horizontal 4x4 36" ? How would I also calculate the length of the 4x4
vertical and brace length?
Well got to put the kids to bed and see if I can figure some of this
out myself.
Look forward to hearing from you.
Thanks doesn't seem to be enough , but thank you so munch for your help.

Kevin
Hi Kevin,
3 1/2" is good for above the door casing.
For a 36" roof come back a bit on the beam so there will be a bit of an overhang, such as 12". I think it looks better. It also protects the siding on the gable end of the new roof.
For the brace itself put the brace in on a 45 degree, which means that the level beam and the vertical will have the same length of arm and each end of the brace is cut on a 45 degree. Don't come right to the end of the beam or the vertical when putting in the brace, allow a bit of overhang. A cleat placed at the bottom of the brace against the vertical adds more strength. If you cut the vertical about 12" longer than the beam you will have enough for the brace and cleat. A cleat can also be fastened to the underside of the beam to even things out.
Dave
How to use a speed square for cutting rafters, hips, valleys and seat
cuts. Thanks! Nick
Hi Nick,
A speed square is not a magical tool that will figure everything out for us. It is a tool which enables us to easily mark the rafter cuts by only worrying about the rise per foot. On a rafter square we use, for example, 5 and 12 for common rafter cuts or 5 and 17 for hip or valley cuts. Using the speed square, if we place the pivot point against our rafter and pivot the square to match up with rise of 5 on the same side of the lumber, we mark along the top of the square to get the plumb cut. We look further on the square and come to the degree scale and read that for a 5/12 pitch the plumb cut is 22 1/2 degrees off of 90. For a hip or valley rafter we place the square on the board, pivot the square out until the 5 is lined up with the same side of the board as the pivot under the hip or valley scale. We mark the top of the square under the 5 which gives us the plumb cut for the hip or valley as well as the angle of 17 degrees.
 For a seat cut, bird's mouth or heel cut, names for the same thing, scribe a plumb cut for the common rafter at the measurement of the outside wall line. The square has a line etched on it at 90 degrees to the hypotenuse. Line up this line with the plumb line to form 90 degrees. Scribe a line along the hypotenuse up to the 45 degree mark on the square, which is 3 1/2". Cut this out to form the seat cut.
A seat cut for the hip is similar, except use the Hip-Val scale for the plumb line and make sure the heel of the rafter is the same height as on the common rafter. The hip is usually dropped about 1/4" or so depending on the pitch. Refer to this article for further instructions on laying out rafters and dropping the hip: http://daveosborne.com/dave/articles/how-build-hip-roof.php
Dave
Hi Dave,

We built some pine shelves, stained them and now applied polyurethane
and they are still "tacky"...not "tacky-wet but "tacky-so if you put
a glass on them, it would not glide across the top"...I thought it
might be a humidity problem (we live in FL) but has been 3 days now
and they have been inside and it's not much better. We want to put
another coat on but should we "fix" this problem first (if so, how?)
or should we just light sand and apply a 2nd coat and it'll fix
itself (yeah, right)....was also wondering if it was because we put
a high gloss polyurethane on and maybe we should've used a satin
finish...would it hurt to put a stain finish on top of the high gloss?
Look forward to your response!
It may be because the can of urethane was old and some of the driers evaporated, or that the can was not stirred thoroughly. The stain may not have dried enough before the urethane was applied, too. I would lightly sand it again and if the can is old add some Japan Dryer to it. Follow the direction on the label. This is quite common at paint supply stores. It only takes a few drops. Stain won't take very well once urethane seals the wood. If you want a darker finish you could try a varnish stain type of product where the urethane is pre-mixed with stain. Minwax makes a good one. Make sure you lightly sand between coats just to remove the gloss.
Dave
Dave,
Do you have plans for building good sturdy shelving for basement storage?
Jim O
Hi Jim,
I don't have anything on our website. I'm out of town right now answering from my nephews computer. I'll be home on Sunday and try to draw you up a drawing. Basically what I do is frame the shelves with 2x4s and then install plywood over the frame. I've made shelves like this for commercial garages in their shop for parts.
Hope you are not in a hurry for this,
Dave
Hello Dave,

Thanks for getting back to me so quickly. Would appreciate a simple
drawing at your leisure.
Jim
Hi Jim,
Here are the drawings:
 Depending on the weight of material on the shelves the 2x4 ledgers that are nailed to the legs can have cleats under them which would be solid between ledgers down to the floor. Otherwise the ledgers should be plenty strong to support average weights with 3 - 3"x#10 deck screws through them to the legs.
These are made in modules of 2'x8'. Screw the long ledgers to the wall to prevent movement, otherwise use bracing if not attached to the wall (not recommended).
Dave
Dave: I live in a 150 year old stone farmhouse in Perth On, near Ottawa.
I want to replace my tired front steps
Nothing too fancy but suitable for the age of house. The rise is 24",
the current steps are 96" wide and as I am aging want to incorporate
handrails for secure winter access.
The veranda is 24 feet long by 8 feet wide with round pillars
supporting the ceiling/roof. the 2 round pillars on either side of the
step access are 90" apart from their bases and I wonder about squeezing
the handrails in between the pillars which rest on 14" square bases.
These pillars are hollow,enclosing 4x4 PTs supporting the roof.
Any suggestions about style/design of steps? weather is
definitely a concern. Wish I had a scanner so as to forward a sketch,
am not well schooled in carpentry.
wonder if I managed to get my point across.
Allan
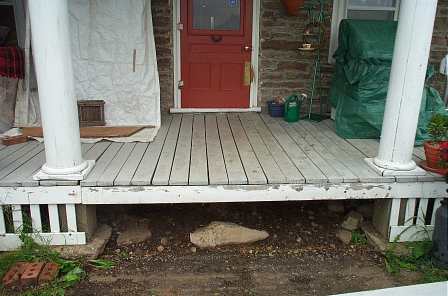
Great picture, Allan,
Here are a couple of drawings as suggestions:

 I would put in 6 stringers. Keep the handrails centered on the columns and attached to them. If the nailing is good on the columns you could eliminate the top handrail post. Support the outside stringers at their top with posts coming down onto the concrete column footing. The other stringers should be supported the same onto a 2x10 pressure treated sill lying on the flat. Bed it down in sand. Same thing at the front of the stringer, a 2x10 is bedded down in sand. Allow for this thickness in height if above the ground level.
Checkout this article for other ideas: http://daveosborne.com/dave/articles/deck-stairs.php
Dave
Well, that's about it for this time. Thanks for the interest.
Dave
|
home | contact | articles | plans | downloads | dictionary assurance | cancel | newsletters Copyright © 1999-2026 by David E. Osborne. All Rights Reserved.
|