| NEWSLETTER from DaveOsborne.com | ||
| “Building Confidence” | December 2005 | |
Welcome
Another year is upon us. Dan and I wish you all a happy and prosperous 2006.
What's New
Dan successfully twisted my arm to write a book. I will include the articles on our website as well as write some new ones. This way our website benefits from the book, as well. We will keep you posted on its progress.
I have written two new articles this month, both on construction basics: Power Tool Safety ( http://daveosborne.com/dave/articles/power-tool-safety.php ) and Dimensions and Grades of Lumber and Engineered Wood ( http://daveosborne.com/dave/articles/lumber.php ).
Ask Away!
The following is a string of emails from Bill on a porch roof extension that I helped him with, you may have a similar project on the go.
The following is an example of the questions I receive and answer during the month:
Hi Dave,
What is a wet vent?
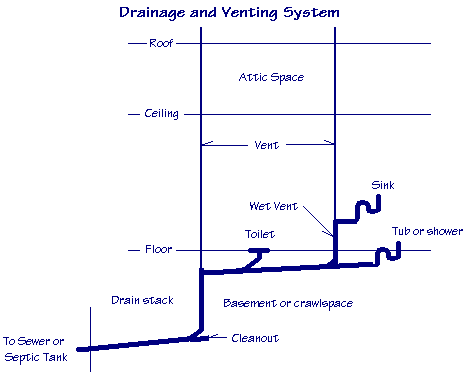
How do you vent tubs and showers. If possible please send me a example drawing.
Thanks!
Hi,
A wet vent is a vent that is also used as a drain. Maximum trap arm length is 10' for a toilet to the vent and a sink and tub or shower is 5' from the vent.

The wet vent as shown on the drawing drains the sink as well as acts as a vent for the tub or shower.
The vent off the sink, tub or shower may also return to the main vent as an option to have only one pipe protruding through the roof.
Usually the drain stack is below the toilet and close to it, with a cleanout on the bottom.
Toilet drains are 3", sinks and tubs are 1 1/2" and showers are 2". A tee is allowed for a vent connection but only Y's are allowed for drains.
Dave
hi dave
what is the height to fit internal door handles
thanks, simon
Hi Simon,
The old height was 36", but now it could be 40" half a 80" door. I always measure the existing doors in a house to see what range they fall into and match them. For a new house go with 40".
Dave
Hi there
my basement walls are about 7 ft high I do have some mold from a couple of
in house leaks. I know basements are vulnerable to leaks the floor is
concrete. The basement was partially finished before but has been gutted.
I would to try and sound proof the ceiling
any suggestions for my over all projects
Hi Derek,
Before doing anything I would investigate the reason for the leaks and get rid of the mold. The basement may have been gutted because there was an existing problem. Washing the mold with 10% bleach and 90% water will help get rid of the mold. Repairing cracks in the wall with a hydraulic cement such as Bondex Quik Plug will help stop the leak.
Depending where you live it may be a good idea to strap the concrete walls with 2x4s, insulate and apply 6 mil UV poly vapor barrier from the slab to the ceiling.
The best way to sound proof a ceiling is by putting in fiberglass insulation to deaden the ambient sound (sound from the air like radios, voices, etc). For the impact noise such as banging, walking on floors, etc. layers of drywall is the best defense. This is aided by a resonant strip, also called a Z strip. One flange is screwed to the joists, the other to the drywall. This separates the drywall from being attached directly to the joists.
Dave
Hi Dave;

I'm going to start hanging drywall in a bathroom addition I've been working on
for several weeks. And I wanted to know whether or not it's ok to use 14 guage
medium crown 2" staples from a paslode gun instead of screws. I used the stapler
in the ceiling after I cut out the HVL hole where the sheetrock began to sag and
it seems to do a fine job. Do you know of any reason I should not use staples?
Thanx
Randy
Hi Randy,
I would definitely not use staples. They will set themselves past the paper of the drywall and not hold. An inspector on a commercial job will not okay a drywall screw that has torn the paper. I prefer screws to nails. Screwing drywall is an easy part of the job, mudding, painting, etc. comes after that. You don't want the drywall to loosen after the work of finishing it.
Dave
Dear Dave,
I have a finished inside stairs. The stairs have been carpeted. I would like
to add a skirt board to both side of the stairs to give it a finished look.
How do I do this?
Hi,
Make a pattern from cardboard. Cut these strips a bit wider than the skirt board to allow for scribing against the tread and riser for a tight fit. Once you are happy with the fit of the pattern, copy it onto the skirt board material and install. This should have been done before the carpets were installed.
Dave
How do I make a pattern? How long should the pattern be?
The pattern should be the length of the stairs.
Install the pattern along the nosing of the stairs. Take measurements to the front and back of the treads and scribe a line for the risers. Scribe the risers and treads for coming straight down on them from the plumb position. This is a very tedious job. I actually prefer to use a 1/8" plywood for the pattern instead of cardboard. With a carpet you don't have to be as accurate as with hardwood. It depends on how accurate the stairs were made originally. If the skirt is to be painted rather than a hardwood stained you could use the actual piece instead of a pattern. A pattern just saves the cost of the more expensive material. The skirt itself should be 3/4" thick and at least 1" above the nosing. Make the joints just above the nosing where it is the shortest.
You can make a short template and try it on the remaining stairs, it may work, too, depending on the accuracy of the stairs.
Dave
What is the best method for insulating a basement. I wasn't sure what material
to use.
Dick
Hi Dick,
I like to strap the walls with 2x4s and insulate with R-12 fiberglass insulation and 6 mil poly UV protected vapor barrier on the inside. Leave about 1" airspace from the concrete to the inside of the studs. You may want to put fiberglass insulation in the ceiling as well, mainly for noise. Make sure you don't miss the box joist spaces on the outside walls with insulation and vapor barrier.
Use red Tuck tape for vapor barrier splices and around protrusions, acoustic sealant on the bottom plate for the poly and plastic insulated boxes for exterior walls.
Dave
My house is a rural frame style with large porch. I'd like to spruce-up the
look of the 4x4s holding up the porch roof. I once saw a porch with posts
made to look like boxed in wood pillers. I'd appreciate any help on how
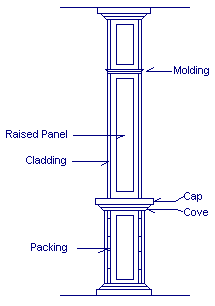
to do it. See my sketch for the look I'm after.
Thanks. By the way your site is awesome for a newbie woodchuck like me.
Hi Tom,
 Install the caps first, wrap them around the post. They should be mitered.
Then install the post cladding itself. Usually they are not mitered. This is an option though. Put the overlapped side to the front which looks better. The cladding will help support the caps. It should be solid wood such as cedar or pine, not plywood which may de-laminate in the weather.
The caps may also need cove molding under them for appearance as well as support. You can also pack out the cladding on the post in the lower section to make the post have a larger base.
I would use 2x4 for the caps, 1x... for the cladding on the posts and molding to fit.
Raised panels as shown may also be an option depending how fancy you want. You can even put a profile around them if you have a router.
Possibly get ideas from magazines on old houses, etc.
Hope this helps,
Dave
Hey there doc...........you can answer a question for me if you would.
We're putting hard wood 4x8 sheets of ply on a brick fireplace wall, cutting
to fit with firring strips under. No problem there but I want to run the ply
horizontal,and my wife says the graining will be all wrong for staining.
She wants it vertical. Does it matter which way the grain runs on the wall??
Make peace in my house please. By the way, my oak stair case project came out
like gangbusters.
Thanks Dan...............bob
Hi Bob,
Okay, you two, you are both right:
Plywood should go across the studs when thinking structurally, as in bracing a wall on the outside or a floor or roof, etc.
When we put plywood panels on the wall for design and effect we usually put them on vertically. In this particular instance the wife wins my vote. Sorry, Dude!!
Dave
BTW: Dan is just the the webmaster and coincidentally my brother. He is just the computer nerd!! Don't tell him that, though. [ HEY! I READ THAT! ]
Good job on the oak stairs!!
(This letter was never received by Bob, for whatever reason. He asked the question again and I still was unable to reach him. Be sure when you ask me a question that my email is not considered spam, so it gets automatically deleted.)
Hi Dave,
Thanks so much for your great advice on our banister, it looks beautiful!
Now, we are just looking for those metal coin-like decorated plates that
you use to hide the bolt holes on old wooden bed frames. Any idea what
those are called and where we can get them?
Isabel
Hi Isabel,
Glad the banister looks good!!
Actually in handrail work, we use wooden plugs to hide the bolt holes then sand them off smooth. You can buy plug cutters to make plugs out of your own scraps.
You may be able to get those metal plates or escutcheon plates in a specialty hardware shop, if you prefer them. Dave
Thanks! Yes, we need to remove the banister frequently, so a permanent plug
is not as convenient.
Isabel
Hi Isabel,
Sorry about that, I forgot about your predicament until I read your old emails.
I mentioned this to my knowledgeable wife, Frances and she said, "You mean like the ones we have on our own bed?" I looked and took this picture for you. Take a copy of this to a furniture store that sell parts or manufacture new furniture or a specialty hardware shop.
Hope this helps,
Dave and Frances
terrific! Except... no attachment?
 Sorry about that, my wife should have done that for me too!!
Here it is:
It must be Monday!!
Dave
Well, that is about it for this issue. Hope you all enjoy your holiday and are looking forward to a great new year.
Dave
|
home | contact | articles | plans | downloads | dictionary assurance | cancel | newsletters Copyright © 1999-2026 by David E. Osborne. All Rights Reserved.
|