| NEWSLETTER from DaveOsborne.com | ||
| “Building Confidence” | February 2006 | |
Welcome
Welcome, new members of our website, as well as to new subscribers to this newsletter. Thanks to those who are hanging in there with us, as well. With March on the horizon and good weather not too far behind we wish you well on your projects around the home.
What's New
I just got back from helping my daughter, Sabrina, Curtis, her husband, and three kids out on a major unexpected project concerning her clothes washer drain and the strata titled townhouse they own. It seems that a previous owner wanted to install a washer and dryer in the unit. They chose the easy way out for the washing machine discharge hose and connected it through a hole in the outside wall to the perimeter drains. This drain eventually connects to a storm sewer drain and dumps into the Fraser River where most of the surface water flows. The townhouse strata council was in the middle of a parking lot do-over, including new paving, sidewalks and down spouts from the gutters spilling out onto the sidewalks to eventually drain into the storm sewer catch basins. Of course, one of the workers discovered that Sabrina's washing machine drain hose hooked into the downspout hole into the perimeter drain and declared that this practice is illegal.
She was not alone, as another townhouse owner's drain was also connected in this way. Naturally Sabrina COD'ed (Called On Dad) and, just as naturally, I said I would take a look at it on New Years when we were planning on going to visit her. I've written it up here to illustrate what can be involved in a home renovation.
Sabrina lives on the lower mainland in British Columbia in a town called Ladner. We live on Vancouver Island off the West Coast of BC, Canada. I went over there and helped Sabrina take out a plumbing permit for $50. We talked to the plumbing inspector to find out the way he preferred us to connect to a line coming from a toilet across the hall. I pulled up her laminate flooring in two pieces, one from the hallway and the other from the powder room. I had to destroy the connecting strip between the two, since they were glued instead of click-on strips.
I erected polyethylene around the perimeter of my work area to help keep the dust out of the home. I rented a jack hammer from the local rental yard and proceeded to find the pipe under the concrete floor from the toilet. My instructions from the inspector were to find the 2" wet vent draining, as well as to vent the lavatory and kitchen sink and connect into the vertical part of the 2" with a 2" ABS connected to the pipe coming from the standpipe and p-trap of the washing machine, about 7 feet away.
When I removed the concrete slab over the 4" line from the toilet, meeting at the 2" wet vent, I found the connection of the two was above the concrete leaving me no alternative but to connect the washing machine drain to the horizontal 4" cast iron pipe as close to the 2" vent as I could. The inspection was called with the pipe full of water according to the rules. I was very apprehensive about the inspector allowing a horizontal connection to a wet vent. I also noticed that the existing 2" wet vent was connected to ABS with a mechanical joint not normally approved for such connections, although showing no problems with leaks. The inspector came, looked at my work of art, thought for a few moments and declared that the job passed. "I can't see a better way of doing it, myself", he said, "It is not exactly the way I'd like to see it, but a lot better than the way it was connected before." He then left as quickly as he came after a friendly pat on the head of the neighbor's cat. What a relief! I compacted some sand around the exposed pipes very carefully and mixed up some concrete and poured it over my fine plumbing job. The inspector never mentioned the light duty mechanical joints and I didn't bother asking about them!
My daughter's reaction when she heard the washing machine discharging into the stand pipe next to the machine meant more to me than a month's pay, "It's working!"
I replaced the laminate flooring, luckily the previous owners saved two pieces of original laminate out in the back shed, which I used. I then I installed the vanity, lav and toilet. Nobody could foresee the work that was required for this renovation as a result of the earlier workman choosing to not do the job right the first time.
Ask Away!
Here are some of the questions and my answers for the month:
A friend wants to build a 5x8 walk in cedar closet. Since I've never
worked with cedar, I would like to get tips on how to complete the
closet once it's all framed and whether to us special molding and door
and venting and lighting to retain the integrity of the cedar.
Any help you can provide me would be appreciated.
Thanks
Victor
Hi Victor,
Your friend is probably referring to aromatic Eastern red cedar for a closet. This keeps out moths, roaches, silverfish and mildew. You need backing for this first since it usually comes in 3 1/2" wide x 5/16" thick T&G boards or 4x8x1/4" panels. Drywall is a good backing, then line the drywall with the cedar by gluing it on, using construction/subfloor adhesive in a caulking tube. Use regular cedar molding for inside corners, base, etc. Venting in the door is good or cut the bottom of the door off to 1" clearance. Outside venting is not required. I don't know about lighting problems. I don't think that is an issue.
Dave
How can I go about cutting a rake rail to fit? I need to cut the 6010
rail at an angle to fit with an oval rossete and I also have to cut the
bottom plate. Can these cuts be at 22 1/2? What tool is used for these
cuts, a small circular saw or miter saw?
Hi,
Refer to my article on this: http://daveosborne.com/dave/articles/stair-handrails.php
Install the newel posts first then the rails to fit between. These should be cut on a miter saw. Lay a straight board down the stairs resting on the nosing and against the newels. Make sure the newels are plumb and scribe the inside of the newel to the board. This is the angle to cut on the miter saw. If both newels are plumb this angle should be the same on both ends of the rail.
Hello Dave, one of my clients asked me the following questions and
I wondered what your input would be?

I have a neighbour upstairs, and the the plywood/concrete have
settled over the years and certain spots create a loud 'crack'
sound in my condo when the neighbour walks on certain spots.
Can you do the following:

1. Pull up the carpet.
2. Use concrete screws to fasten the plywood/concrete to the
   floor joists.
3. Replace the existing carpet.
4. Also, would it be possible to somehow insulate the floor to
   make it more sound-proof? e.g. make small holes in the concrete
   (after the carpet has been pulled up) and fill the floor with
   soundproofing foam?
Hi Steve,
The concrete poured over wood joists usually is a top coating of 2". If he could find the joists it would seem probable to screw the concrete and plywood down.
I wouldn't waste my time and money to drill holes in the concrete and insulate. He may not get permission from the strata council anyway. It may jeopardize the integrity of the fireproofing of the floor. The best insulation for impact sounds is the concrete itself. Insulation is only good for ambient sounds, like radios and voices, etc.
If it is really bothering him he could cut a patch out of his ceiling and glue a feather wedge between the joist and the offending joint of plywood. This way he doesn't bother his neighbor.
Dave
Hi Dave.

I am interested in installing hinged raised panel double doors in a bedroom
closet to replace the sliding doors. Can you provide advice regarding the
installation and in particular how the double doors lock into place when
closed.

Thanks,
Dan
Hi Dan,
Will you be getting a pre-hung unit?
Checkout this article from our website: http://daveosborne.com/dave/articles/how-install-prehung-door.php
You have 2 choices to latch double doors:
1. Install a ball catch at the top of the doors with dummy knobs. 2. Install flush bolts in the edge of the non-active door. The active door latches to this one. This is quite an expensive choice.
I recommend in a closet, which doesn't need to be locked, to go with the ball catch. This will come with hardware when ordering a pre-hung unit, if you want. If you want to lock the closet doors, you would install one door active and lock the other door to it. Both doors can open if wanted.
Let me know if you need more info.
Dave
Dave,

I am finishing my basement stairs. The stairs have no skirt boards
on them but have a gap between the wall and the treads and risers
of 3/4" to 1 1/4". Can I just router the edge of a 1X12 and nail it
to the studs of the wall?
Currently the treads are made of 2X10's ripped to 9" with no nose
on them. Can I add pre-made treads on top of these make up the gaps
between the current treads and new skirt boards?

Or is it easier to just rip out the treads and risers and start over?

Also, What is the best way to fasten newel posts to concrete at the
bottom of the stairs?

Thanks,
Joe
Hi Joe,
Yes, you can install the skirt board this way. With the new treads or replacement treads, be careful here with heights. When stairs are originally installed they are considered temporary stairs until the new treads are installed or replaced. The builder usually allows for this. When carpet or hardwood is installed above and below the stairs as well as on the treads the heights do not change. I'm talking about the first step from the bottom floor and the last step onto the upper floor. So measure the difference in these two measurements if the treads are replaced or if added to the existing treads and go with the lesser amount of difference. Take the measurements from finished floor to finished tread. According to the building code the difference in riser heights between landings should not be greater than 1/4" to 3/8" depending on which code your area goes by. Allow 1" for pre-fab treads with nosing.
The newel post is usually attached to the second riser from the bottom floor rather than the floor itself. It should go through the tread to the floor below. You could anchor it on two sides, if you have the room and access, on the floor itself with 90 degree metal angles screwed into anchors in the concrete and into the newel posts. Install backing behind the riser to hold the newel securely. Any holes in the face of the newel are plugged with the same species of wood as the newel itself.
Dave
hi, Dave. It's Mickey from Reading, Pa. It's been awhile since
I wrote you. My question is in regards to a coworker who has extra
moisture in her attic. Let me explain. She had a 2 story addition
put on about 4 years ago with wooden shingles. A roofer did the
roof leaving the "proper gap" between the shingle so they could
breath. she has 12" soffits by 30' long on each side of the house.
she has no side wall vents, but 2 windows which are decorative and
not functional opening windows in the attic. she claims to get so
much moisture in the attic that the particle board get spounge and
the windows steam or frost up. she even gets frost on the rafters.
she thinks the heat from the house is venting up into the attic
and being retained there.
can you tell me why so much moisture is being retained and what
the cure is?
Mickey
p.s. my workshop with the gambrel roof that i had e-mailed you
questions about over the summer turned out great and quite
functional. I'll try to send you pictures.
Hi Mickey,
You say her soffit vents are 12"x30'. Should this read 12"x30"?
This is what she should have:
- Continuous vents in the soffit, at the very least a vent every other truss or rafter space.
- Either roof vents or gable end vents, or a combination of both depending on the length of the house, near the ridge.
- Bath and kitchen vents should be insulated in the attic space and exit out the roof or wall.
- Roof strapping for a wood shingle roof.
- Vapor barrier installed on the warm side of the ceilings and walls, as a continuous barrier against moisture.
She should not have:
- Bathroom and kitchen exhaust vents exiting into the attic.
- Insulation crammed into the joist cavity over the outside walls, closing off air movement from the soffit vents into the attic.
- Solid sheathing for a wood shingle roof.
The venting of an attic should be 1/300 of the insulated ceiling area . That is if the insulated area of the ceiling in an attic is 30'x50'= 1500 ft, the amount of venting required is 1/300 x 1500 = 5 square feet. This is for a roof slope of or greater than 4 in 12. For less than 4 in 12 the venting area is 1/150 of the insulated ceiling area, or 10 square feet in our example. The venting should have at least 25% of the total area along the vents and 25% of the area along the ridge, evenly distributed across the attic space.
Glad to hear your shed went up well. I'd love to see some pictures of it. Thanks.
Dave
Dave,

I have been trying to fix a window crank on two casement windows.
The homeowner thinks they are Anderson but I can not find them in
any catalog. The crank handle is broken on both and the inside looks
like sheared metal. If I unlock the window I can open it 1/4-1/2"
on that side but no more and there are no visible screws on the base.
Is there some way to remove the crank so I can replace it?

Thanks,
Dick
Hi Dick,
Some cranks have set screws which hold them onto the shaft. Others have a trim over the mechanism which pops off. Others have a wood stop on the bottom covering part of the mechanism. This wood stop must be removed first by prying it off. Break any clear finish or paint between the stop and the jamb first.
Once you get the handle off, you should check out why the thing broke off in the first place. Clean the track or replace the mechanism if it needs it. Once the mechanism is unscrewed slide it along the end of the track into the keyhole slot and remove it.
Dave
Hi Dave,
this is Greg again with a question for you. I am now planning
my plumbing and my question is whether or not I should consider
pvc waterlines throughout the home rather than standard copper
water lines? What disadvantages do pvc waterlines pose me?
Hi Greg,
Don't use PVC, but Pex. This is rated for hot and cold water. I don't know of any disadvantages with the Pex pipe. Maybe one is that you use insert fittings which decrease the size of the volume of water a bit. We usually end up with 3/8" OD supply tubes anyway, so that evens out. You have to rent a crimper which is not much. I did so much of this I bought a 1/2" crimper, but they are about $300, just rent one!
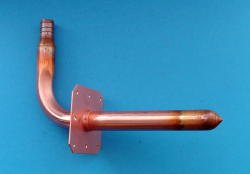
Before running your Pex pipe, install all the stub out elbows in place, first. When completed turn on the water to see if everything is good without leaks. Then you can cover the wall. To hold the pipe solid for the shower nozzle use a drop ear elbow with pex fitting and 1/2" female pipe threads. I screw a short 2" nipple into the threads to make sure the drywall has a hole to fit the shower arm, later. Make sure you leave about 1/4" between the end of the pipe and the crimp sleeve.
I love working with pex pipe and fittings, beats the heck out of copper, soldering and the price.
Dave
Thanks a lot Dave�do you have any additional info you can supply me, such as any details on the stub-out elbows? Running PEX doesn't cause concern for exterior walls? We get pretty cold in Illinois�where have you experience with PEX, in Canada? If so, you haven't experienced any problems. Also, what does the crimper crimp? Is it the fittings into the PEX? Best Regards, D. Greg
Greg,
 The end of the tube has a bullet end on it, like a cap. You can run the water under pressure, before installing the wall board to check for leaks. After the wall finish is on, simply turn the water off and put on an escutcheon plate and cut the tube off to the required length. I then put on a 5/8" OD x 3/8" OD compression shut off. Turn the shut off , off, turn the main water on and connect your fixtures.
 The crimp rings go over the pex pipe at a fitting to secure the fitting. The crimper tool then is used to crimp this ring onto the pipe. Notice the space from the end of the pipe to the crimp ring, which is about 1/4".
Try to avoid putting plumbing in the outside walls in cold climates. If you have no choice, insulate on the cold side of the pipe and leave the warm side without insulation to keep it from freezing. Sometimes under cabinets you can bring the pipe up the face of the wall, rather than inside an outside wall.
 Here is a picture of the crimp tool over the ring.
I live on Vancouver Island in British Columbia (West Coast). I built the home I live in now and used Polybutylene pipe and never had any problems. Even the outside hose bibb freezes sometimes but never has been a problem. The pipe seems to give enough. Poly B is not used now, replaced with pex.
Dave
Hey Dave,
I'm struggling a bit with a pre-hung set of French doors for an
interior closest. The doors are 30" each and they pull open back
into the room. They came framed in appx. 3/4 wood. Everything gap
wise looked decent as they were laying horizontally with about 1/4
gap between the doors top to bottom with the packing wood on and
temp sill underneath. This is a remodel project with hardwood floors
thru out the room into and including the closet.
The floor is a not level at the closet entrance about 3/8-1/2 of
an inch side to side.. The house is 60 years old and these are the
original floors. I don't want to put a sill down. What is the common
practice shim under one side and cover it up somehow or cut the high
side down? The frame also seems a bit wimpy for these two doors
sagging a bit in the middle at the top where the ball catches are
cut in. After setting them in place, with both door level front to
back, the doors touch at the top and have a 3/4 gap at the bottom.
Of course i can shim the sides and top out there is about a ½-3/4"
clearance all around. This is the first set double door I've hung.
is there a sequence for leveling double door which make thing easier?
Should i beef up the jamb on top or just shim the heck out of it.
If i do shim up one side to compensate for unlevel floor do you
just cut a small jamb piece to fill as common practice? Basically
just want to know what a rea
l carpenter does in this situation in what order to make this install
easier and faster. Thanks in advance,
Mike
Hi Mike,
If the finished floor is already in, I would cut the jamb on the high side of the floor to drop both doors down a bit. You may have to scribe the bottom of the doors, as well. There is always extra room at the bottom of a door for scribing to the floor. These days we leave about 1 inch under the doors for air circulation. Make sure the side jambs are plumb and the top jamb is level. The doors should be even at the top. Usually with a single door we don't fasten the top jamb, but with doubles we have to. The shims go between the jamb and the studs and header so won't be seen. They are covered up by the casing.
If the finished floor was not in, I would just shim up the the jamb on the one side and remove the shims after the jamb is fastened. Then the hardwood floor guys cut the bottom of the jambs off to lay the floor in under the jambs. Since the hardwood is already installed you want the jamb going down to it on each side for a nice fit.
If this is your first time, lets do it the slow and careful way. Get an accurate level difference of the floor. If the floor is 1/2" higher on one side than the other, cut this amount from the high floor side of the jamb. Make sure you are cutting the correct side of the jamb!! Start on the high side of the floor. Use 3" screws for fasteners in the middle of the jamb, this way you can remove them easily if a mistake is made. Fasten the jamb to the stud with a shim behind it. Split the difference of gap between the jamb and the stud from one side to the other. Screw about 4" down from the top of the jamb. If the jamb is only 3/4" thick with separate stops added, you may need to pre-drill the screws. Use a 3/16" bit and #8x3" flat head screws. I use cedar shingles for shims. To help hold the jamb in place I put in temporary shims right at the top of the jamb on each side to hold the header in place tight to the studs on each side. If you are by yourself, open the doors to 90 degrees and shim under the doors to the floor to help hold the jamb from falling out until you have a few screws in place.
Now with the one screw in the top of the jamb, plumb the jamb with a good level and shim and screw the jamb in place. Go to the other side of the jamb. If the low side of the floor is resting on the floor and the jamb is plumb the doors should be even at the top. Don't worry about the jamb header for now. Just adjust the door side jambs in or out to get the doors even at the top and the jambs plumb. If the jambs are both plumb and the doors are not even, the jambs are not cut right to compensate for the uneven floor. Try raising the one side that needs it if less than 1/16". If greater than this the jamb needs to be cut again. The jambs should have at least 3 screws on each side, more if the jambs are warped and need straightening. The header should have at least one in the center, more if straightening is needed.
Okay you may have another problem. If the original wall studs on each side of the door opening is not exactly plumb with each other, this will throw the face of the doors out of line when the doors are closed. We can play with this a bit by moving the bottom of the jambs in or out very slightly across the studs. I say move the bottom of the jamb rather than the top so the casing will fit nice in the top corner. On the bottom the casing can twist a bit to cover the stud and jamb without being too noticeable. When happy with the side jambs, shim and screw the jamb header into the wall header, just so the ball catches properly. This should give the same margin of gap on the top.
If the doors need scribing, which they probably will, being 1/2" difference in height, go into the closet and scribe the bottom of the doors using a scriber, compass or block of wood. Pop out the hinge pins to remove the doors. If you are cutting doors off with a circular saw, always cut from the back side to lessen the chance of chipping the front of the door. Sand the door bottom edge to remove any chips and re-install.
Hope this helps,
Dave
Hi Dave, I'm building a closed cornice on my gable roof workshop,
but I'm unsure as to complete the gable ends of the cornices.
No siding has yet been applied.

Thanks
John
Hi John,
Here is instruction taken from our plan of the 12x16 utility shed:
"For a 12" soffit, there's no need to cross-frame pieces every 16" or 24". Since this is a utility shed and is not finished inside, there is no need to worry about soffit venting. The soffit could be installed using the same material as the siding if you wish or use 3/8" plywood or OSB. One edge is nailed to the bottom of the rafter trimmer. The other to a 1x2 or 2x2 nailed to the wall, level with the trimmer bottom, as shown on the front framing elevation drawing. There are three ways to frame and finish a soffit, which these pictures show."
My article on Insulation and Soffits explains installing an aluminum soffit. (See article at http://daveosborne.com/dave/articles/insulation-soffit.php)
Dave
Continuing House Project: We hired someone to sheetrock the house
we are building in rural Kansas. The basement floor is of course
covered now with sheetrock mud. We have swept and cleaned and
shop vac'd, but the floor needs to be thoroughly cleaned to apply
sealer to it (we stained the floor long ago before the framing
was done). We are not carpeting - just using the concrete as
the floor. Trying to "mop" up sheetrock mud and remaining dust does
not seem to work. Any thoughts? I wondered if a steam cleaner like
you use on carpet might work (rented at Home Depot for example).
I am concerned about trying to use a scrub brush and just pouring
gallons of water on the floor because I do not want water to run
under the edges of the sheet rocked walls. I need something to
clean and suck up the water I think? A pressure washer seems a
bad idea indoors :) What is the best way to do this cleaning
project without getting the walls wet?
Hi Jeff,
Actually drywall mud is one of the easiest products to clean up. It is water soluble until painted. Get a 6", or so wide drywall trowel, like a wide putty knife and scrape up the worst amounts of the mud. You can rent long handled scrapers, also. Sweep up the worst of the removed mud, then use a damp mop, a string mop and bucket work well. Don't saturate the floor too much. You'll notice it will dissolve without too much trouble and keep the dust down with the damp mop. The secret is to scrape most of the mud up first.
Those mudders are the messiest guys in the building industry, aren't they?
Dave
Hi Dave,
we are beginning to hang OSB soon on our new home and I have a question.
Do I line the bottom of the OSB with the wall track that meets my
basement floor or do I let the OSB hang below the wall track? I think
my attached diagram my assist???
Got the drawing, thanks. Yes, the OSB should extend below the top of slab by about 1 1/2". The siding then can be extended slightly below the OSB to prevent any rain from entering between the bottom plate and top of slab. Make sure there is 8" clearance between the bottom of siding and the grade. Dave
Well, that's it for this time.
Remember to do the job properly the first time. This prevents a lot of headaches further down the road.
Thanks for those emails.
Dave
|
home | contact | articles | plans | downloads | dictionary assurance | cancel | newsletters Copyright © 1999-2026 by David E. Osborne. All Rights Reserved.
|