| NEWSLETTER from DaveOsborne.com | ||
| “Building Confidence” | August 2006 | |
Welcome
Welcome to the end of Summer and another newsletter. Thanks for subscribing and your interest in our website.
What's New
We had a most enjoyable Summer. Dan and I both were able to get away from it all for short times. We didn't get too far away since we both have laptops now and tied to our site, as long as we get Internet access. I was able to stay in touch pretty well with only one complaint about no response within a day and a half of an email question. I had a chance to put two new plans on our website: Octagon Gazebo and 10x12 Garden Shed.
Ask Away!
Here are some of the questions from our members during the month and my responses to them:
Hi Dave!

Pat here with a question about 'grades' and 'span values'.

We are going to build a deck, I think I told you about it in the past?

Well, I got the thing permitted OK and when we actually did the lay out
recently, spraying paint where the holes would be dug, I realized I
could get by with fewer posts (good!). Then after thinking about it
I realized I could probably increase from 16 oc to 24 for the floor
joists because we are using Ipe deck boards and Ipe is really
hard wood.

This afternoon I spoke with the permitting agent (nice guy) to ask
about changing to 24 oc, but he had never heard of Ipe. He said I
would need to supply him with proof of the wood 'grade' and a span
value chart. I found a span chart on the web but nothing showing
any grade. This guy is looking for something to show
e.g. '#2 Lumber, southern yellow pine'. Like the government grades it(?).

Have any suggestions? I've printed several things showing Ipe to
be much stronger than pine with an 'Ipe decking span value' chart
but again, nothing about grade.

thanks Dave!
Pat
Hi Pat,
Your inspector is like an ostrich with his head in the sand. Unless you can show him a grade stamp on the lumber, no matter how good it is, he won't be satisfied.
Here is a web page showing the grade of this stuff as clear, which means no knots. http://www.austinwholesaledecking.com/ipe_general_information.htm It is the knots that create the grade so this stuff is No. 1. I would talk to your dealer about this and see if they can get the decking graded with a lumber stamp. Tell them it is useless to you without a stamp, since it won't be passed by the inspector.
Dave
Hi Dave!

The building inspector (and his entire office) is now educated re Ipe,
has the span chart (thank you) and a personal call from the lumber
company to boot. They have decided that Ipe is an A-OK building product.
(can I get an AMEN!)

The inspector has asked me since Ipe is such high quality 'why in the
world' would we want the substructure to be built out of something that
would eventually rot (pressure treated) (in 20-30 years) (we will
probably be dead by then) but Ipe will last for 50-100 years (at which
time we will definitely still be dead). I really didn't want to build
the frame from PT lumber, but at a previous meeting he kind of made me
feel like I had to. Now he says we can use concrete pads with block
with pt girders sitting on the block and pt floor joists (makes no
sense to me, all that pt substructure he doesn't like still being
there...) also if we poured pads we would have to get the holes
inspected, then pour the pad and set the block and frame work and get
it inspected, then a final inspection.

Why couldn't we just use Dek Blocks right on the ground with 2x6 pt
for floor joists (and stubby 4x4 pieces in the Dek Block here and
there if needed for leveling)? The joist would be high enough off
the ground and under a roof so I would think this would help preserve
them. The total deck height is only 16". He said Dek Block would pass
the building code. This is the easy way out, I know and it only
requires the joist inspection and a final. No muss, no fuss.

I would like to know what you think of Dek Block? This building
inspector is having a good time with me I think. I'm trying to keep
a cheerful attitude about it but he's wearing me down some.

thanks
Pat : )
And the congregation said, "Amen"!!
Way to go, Pat!! That's a real feather in your hat to educate a building inspector!!
Pressure treated lumber is actually guaranteed up here for 40 years. Tell the inspector that you want to use PT wood for the framing for the same reason a person frames his house in spruce, pine or fir and puts expensive hardwood on top of the framing where you will see it and it does the most good. Oh never mind, he already knows this, don't want to rile these guys!! Never let him know he is winning or wearing you down, the inspector thrives on this. It has been said in the trade that we should always leave something for the inspector to fault, just to make him happy, so he doesn't have to hang around the job longer looking for something to get us on.
Dek blocks are good. They may not be approved in certain areas that need frost protection, though. I would venture a guess that you have a frost depth of around 5 - 6 in. Your inspector should know what this depth is. If slight like this Dek blocks should be acceptable. Either PT wood or roofing felt under untreated wood is required on top of concrete.
Dave
thanks Dave! I really enjoyed your email : )  You made me laugh out loud!
(needed that!)

frost depth is 4" here so I think we just might give those Dek Blocks
a try. I will try to remember to set one of the blocks at the wrong
span distance so it will allow the inspector to (Ta-Da!!!) save us
from ourselves ! (I will also strive to keep a really stupid and
confused look on my face while listening to his instructions.) then
he can happily go on his merry way knowing that without him our planet
might have just ceased to exist !

take care
Pat
I have to interject here. This is not the first email I received from Pat. I have the utmost respect for this woman. She is willing to tackle anything, including a building inspector. The thing I respect about her most is that she is not ashamed or too proud to ask questions. Her sense of humor is a bonus.
Research your projects, learn all there is about installation, new products, licensing and permits and ask questions. I never heard of Ipe - pronounced eepay, before. I had to learn about this product for the first time to answer Pat's question. The Internet is a wealth of information. If you are having trouble finding info on something send me an email, we'll learn together.
Hello Dave,

I'm the one that sent you pictures of my 16' X 16' gambrel roof
storage shed. You gave me advice about the rafter tails. Thanks.

I'd like to make my own skylight to put in the top level of the
roof. I'm considering making my own, using Lucite mounted in
2 x 4s or 2 x 6s. I was thinking about cutting a channel in the
2x's to slide the Lucite into, and caulking it on the top and
bottom. The ends of the 2x's would be beveled at 45-degrees, and
connected with wood glue and nails or screws.

Although I'd like it to be flush with the roof, I'm assuming it
would have to be raised a little (how much?) in order to add
flashing around the perimeter.

What do you think?

Larry
Hi Larry,
You know, a 2'x4' skylight is only around $100 to $120 and is made of safety glass to fit between 22 1/2" truss space. Lucite will scratch, fade and yellow over time. If I was making a custom size skylight, I would lay the safety glass in putty tape above and below the glass and install wood stops over the glass, screwed down. This would make it easier to replace the glass in case of breakage. The skylight is designed to lap the curb and flashing. The curb should be either 2x4 or 2x6. Skylight flashing comes in 3" and 5" heights for these two sizes of curb. If you live in an area with snow, use a 2x6 curb, otherwise a 2x4 is okay.
Checkout this article on installing a skylight: http://daveosborne.com/dave/articles/how-install-skylight-roof.php
Dave
HI Dave,
Finally a question... What do you recommend for flooring when
finishing a basement that is prone to dampness and potential,
minimal water entry? The home is 30 yrs old and so we are dealing
 with an older slab. Would installing a treated subfloor be a
possible solution? We had considered tiling the entire area
however the floor would be quite cold. Looking forward to hearing
your feedback!

Regards,
Jared
Hi Jared,
I agree with you about ceramic being the best choice, but it is a cold floor. I had a leaky crawlspace in a new duplex I was building. It was water coming up from underground springs along the joints of the slab and the walls. After awhile I had a swimming pool in their. I drilled holes at the lowest point of the slab (sealcoat) which wasn't level and tied the holes into the perimeter drainage around the building, installed a layer of drain rock above the concrete, then installed a layer of 6 mil poly on top of that. I poured another layer of sealcoat, about 2" of concrete, on top of the poly. This did the trick. The crawlspace is dry as a bone. The water still comes up between the layers, but flows outside and away with the perimeter piping. You may want to do something like this to eliminate the moisture problem.
You could use the treated wood for framing and also for the sub-floor, install underlay over the subfloor, then vinyl or carpet. The problem is if the floor leaks the carpet and lino will be ruined. I would try to correct the problem first - cover the floor with 6 mil poly, vapor barrier quality and lay on a topcoat of concrete - 2" thick at least.
Dave
Dave,
What is the best way to cut vinyl siding that has the one inch foam attached to it.
Thanks,
Lorne
Hi Lorne,
Some of this is 14" and 18" wide so you need to use a circular saw with a fine blade. Some say to put the blade on backwards, I prefer to use the blade the correct way, but move it very slowly along the cut. Other narrower siding can be cut on a cutoff saw, again with a fine blade. A good blade to use on the circular saw is the panel blade, usually not carbide, but has small teeth. For the cutoff saw, use a carbide blade with as many teeth per inch as you can afford. Apply little pressure to the siding as you cut it. When ripping the siding with foam use a table saw with fine blade. Try to have the cut end under a corner board or J-mold, rather than a butt joint. Keep the factory cuts for the butt joints.
Dave
Not a question but rather a "heads up!"
I am building our summer home near Kingston Ontario Canada.
Recently we had the 'occupancy inspection' as required prior to the
final building inspection.
The inspection went well EXCEPT: the inspector did not approve of the
'single-coated' galvanized nails used in the outside decking joist
hangers. The inspector stated we must now use a triple-coated
galvanized nails and hangers suitable for use in pressure treated
lumber. Apparently this is to prevent corrosion of the fastener
hardware when applied to the 'new' type of PT.
So, I have to replace ALL the nails used in the deck joist hangers etc.
Luckily the hangers are the correct ones per the coating spec.
requirement.
So be warned, check it out locally.
As always, I enjoy your web site.
Terry
Thanks, Terry,
I'll put this in our newsletter. Good point!!
Dave
Alright I need to build concrete front stairs for my house. I believe
that I can build some type of box form to shape the concrete alright
but I'm a little confused to the order to build these. I've included
a picture of stairs that are almost identical to what I want. Luckily
my door is only 16" off the ground so I will only need two steps.
The top step would be a platform about 3'6" X 5' with about 12" brick
walls on either side. The only difference I'm attempting to flair the
stairs and sidewalls out ever so slightly so it focuses attention on
the front door so obviously the lower steps would be wider than the 5'
but not dramatically.
I'm attempting to do this project on my own and I'm fairly confident
with my ability to pull this off and comfortable taking the risk that
I might screw it up too. Also I don't care about going the extra yard
to make sure this thing is sturdy and I'd rather overdo something than
skimp.
At what point do I build the walls? Can I just pour a foundation for
the whole front steps area and then on top of that form the front steps
shape with cinder blocks and then just pour in the concrete behind the
cinder blocks? I'm covering the steps with slate so i would be able to
cover the cinder blocks. How much rebar is too much and what is the best
pattern and can I also use those rolls of metal farming fence as
reinforcement of the concrete? (Only reason I ask is because those farm
fences look similar to stuff I vaguely remember seeing put down before
they poured concrete for a warehouse I watched being built.). The walls
are going to be brick so at what point do I lay the brick in the process,
before or after I put don the slate or flagstone? I'm know I sound like a
novice and I am but with absolutely no construction experience I somehow
fumble around from designing this house, getting it built, passing
inspections so far in a strict town, and by the end of the week!
I think I'll have the electricity turned on for the first time and water
running. All that I need now is my front steps to get my certificate of
occupancy.
Hi,
Sounds like you know what you want which is the toughest stage. You can lay a foundation for you stairs, first or pour the foundation and stairs together, which is a bit trickier. If pouring the foundation first leave it rough so the next layer will bond well. If the steps are flaired use 1/4" plywood strips laminated to make 3/4" thickness. So use three strips of 1/4" ply. To form any curve, rip the plywood across the grain, for your width, rather than with it so the veneer will bend easier.
Re-bar is not required for house foundations, etc. but you can always put it in to make the concrete closer to the properties of steel. Use 5/8" re-bar at 12" centers held up by wire, from the forms, to the middle of the depth of the concrete for large pads. For individual steps just use one or 2 bars the length of the step. Wire mesh, 6"x6" can also be used, for this purpose.
Rather than using cinder blocks for forms, use 2x8 or equivalent and remove them. This gives concrete right to the nosing of the step which is stronger.
Checkout my article on building concrete steps: http://daveosborne.com/dave/articles/concrete-steps.php Also my article on foundations: http://daveosborne.com/dave/articles/build-house-foundation.php
Since the flagstone may be irregular, I would lay the brick first. This puts the weight of the brick directly on the concrete, which is better.
To get an occupancy permit, all you need is functional stairs. They can be made from wood as temporary and replace them as you have the time. I actually moved into my house before I got an occupancy permit. I built the kitchen cabinets as my family and I living in the house. The outside was finished and temp stairs in.
Dave
Dave ,
I am currently in the process of installing an underground electric
entrance. I have run approx. 250' of triple cable in 2" conduit.
I was instructed at the time to also run a #6 copper wire with this
cable. I guess at this point I am not sure where it hooks. I have
spoken to some of the local electricians and they tell me they have
never done this and think it may be something new. Any help would be
appreciated. Also is there any site to show how to hook up the
grounding rods. I have an idea but want to do it right the first time,
before inspection.
According to my electrical code books:
The #6 bare copper ground wire will come up from the grounding system to the neutral buss in the panel. This is where one of your triple wires connects, usually the white neutral wire. I am not a certified or qualified electrician. I have wired my own home under a homeowners permit, including the mast and panel. I believe you have been misinformed as to the #6 bare wire going in the conduit with the triple service wire. Check this out again and be very specific with your questions. I would only talk to your inspector, since he is the guy to pass or fail the installation. Don't be hesitant to talk to these guys, that's part of their job. Even the pros want to get the procedure correct the way a particular inspector wants it done.
The grounding or bonding part of the service is a very important one.
1. The chosen system of grounding the service is by using an existing copper water pipe that is buried at least 10 feet in length before coming into the house.
2. Driving two grounding rods into the ground close to the service panel. The rods must be 10' separated from each other; must be driven into the ground their full length, plus one inch; the rods are 5/8" in diameter if galvanized or 1/2" if copper; are connected to the service panel with continuous #6 bare copper wire, or larger, connected to the first rod with copper or bronze ground clamps, the wire is then buried and connected to the other rod. The inspector may require more than 2 rods, although this doesn't happen too often.
3. Connecting a grounding plate to the service if in a rocky area
4. Connecting to a metal well casing at least 3" in diameter and 50' deep
5. Covering a #4 copper conductor into the concrete footings of a house. There are restrictions to this type of grounding.
The service end of the #6 conductor is attached to the neutral buss, entering into the service section of the panel. A grounding strap or wire is led from there to ground the panel itself.
When connecting to the service side of the panel be very careful and informed that the service side is always hot and is directly from the meter. When the main switch is open the lower branch circuits are cold, but the service section is still hot.
Hope this helps,
Dave
I looked at your door building plans as you recommended in my last
question. However my real question is how to build a double door
frame if I buy 2 single doors or build the doors. Is there something
I have to ad to the single door (such as a stop) to make them work
as double doors?
Hi,
On a set of double doors, one door is called the active door the other the inactive door. On inside doors the inactive door is locked to the jamb with either barrel bolts on the face of the door into the jamb or by flush bolts that are mortised into the jamb. On outside doors the inactive door has a center (astragal) strip for weatherproofing attached to it with flush bolts into the jamb header and threshold and the active door locks to it.
Dave,
I want to cantilever (2ft) off the 1st floor of my flat front colonial
to install a two window bay area. 2/3 of my home has joist running
perpendicular to the front wall 1/3 the joist run parallel to front
wall. This section I wish to build off of runs parallel. Question:
Concerns support requirements on the bump out (2x8) from the front
of house. Is bolting to the rim board adequate to support the extension
of the floor and walls into the window bay? If I wanted to run the bump
out all the way to roof line and add the bay into the above master
bedroom would I need to put in a foundation?

Membership to site has been worth the price of admission. Look forward
to hearing from you.
Thanks,
mark
Hi Mark,
The code says that if a cantilever floor supports the roof or another storey at the end of the cantilever it can be 16" with 2x8 joists and 24" with 2x10 joists. The joists should have a tail back to the floor of 6 to 1. That is if the cantilever is 2' the tail joists should be 12'. To alleviate this put in a header before the bay window starts so that the roof is still supported by the original wall line rather than supported out on the cantilever. The bay then would have its own roof which is supported off the wall rather than the floor.

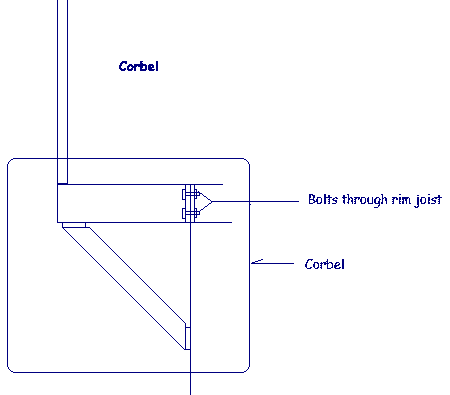
Yes, you can bolt the 2' extension on the rim board but you would need to support the load down to a new foundation, but this would be much more work. Maybe put in a corbel under the 2' extension. This is like a brace up to the joists from the wall.
Dave
Hi Dave,
I need help in the creativity dept on a stairway that has no handrail.
I was hoping that you might have seen something similar in your
profession and can give me an idea of where to start. Looking at the
photo, I need to put a handrail with balusters on the left and i
assume just a handrail attached to the wall on the right. I've never
seen a stairway done like this so i have no idea on how it really
should be designed. Any help would be appreciated!
John
Hi John,
This looks like a non-conforming set of stairs. More like a ladder, similar to the lapeyre stairs in my article: http://daveosborne.com/dave/articles/lapeyre-stairs.php
A handrail for this type of stairs would be closer to the treads than a conventional set, due to the body hugging the stairs closer as in climbing up a ladder.
Could you give me more details on the total rise, total run, the opening in the floor above.
Dave
The total rise is 99", the total run is 124-1/2", and the opening at
the top is 36" deep x 41-1/2" wide. Each step's rise is between 7-1/4"
and 7-1/2", and it's tread depth is 10" to 10-1/2". Thanks very much
for your help.
John
Hi John,
I was wrong, your stairs are closer to conventional than not. One more question. How wide are your treads? If wide enough you could mount your newel posts on the face of the treads, rather than the stringer. You would lose about 3 1/2", though. Also what size is your stringer and the treads, too?
Dave
Dave,

The stringers are approx 3-1/2", but the stringer on the left (not
against the wall) has a ½" beveled edge. The treads are 11" deep by
33-1/2" wide. I've included another pic that shows what the builder
did at the top, nothing fancy, just 2x2 balusters and a 2x4 for the
top rail. The treads are not actually attached to the stringers...
they are fit snug inside them through notched holes, which you can
vaguely see in the pics. One of the steps actually moved a bit so
that we had to put door shims in the notched hole to keep it from moving.

On a separate note, I wanted to ask about a custom plan. These stairs
lead to a loft area. I have a recessed wall that would be perfect for
a built-in desk/work area. Once again, my lack of creativity prevents
me getting any further than this. If and when you had the time, how
much would this approx cost?

Thanks very much again!

John
Hi John,
Since the newel post at the top of the stairs is attached on top of the stringer, you should do the same with 2 other newels. One at the bottom and one in the middle. Install the bottom newel against the vertical part of the stringer and to the floor. The center newel goes on top of the stringer. A 2x4 top rail can either come into the newel or on top of it, depending how the top guard is done. The 2x2 spindles should be installed at maximum 4" between and on top of the stringer and under the top rail. This is a bit different than attaching the spindles to the side, as on the top guard.
Checkout this article for further instruction: http://daveosborne.com/dave/articles/stair-handrails.php
Dave
Ok, I'm clear on the bottom and the middle, but how do I get this to
work at the top? As the top rail goes past the second story floor,
the spindles attached to the side are in the way.  Do you think it
would be a good idea to trash the upper level guard rail and rebuild
it so that it ties in with the new top rail coming from the first floor?

John
You could re-do the top guard, but it seems a lot of work and expense. How about revising the stair handrail a bit to match the existing rail. You could install the 2x2 spindles on the inside of the stringer and notch the newels by 1 1/2". The bottom newel would come up the stairs, attached to the side rather than on the end. The spindles would come down onto the tread, two per tread. The existing top newel would have a 2x2 on its side and the 2x4 handrail would be notched to fit around the newel. There should be a 2x4 or 2x6 on edge, which the 2x2s are nailed to. The top rail, then covers the spindles and the 2x4/6. Here is a revised drawing:

Dave
One last thing, how high should I have the handrail? Your drawing makes
it appear that it should be maybe 2-3 ft.

John
When you get over 6' above the ground or floor a handrail is considered a guard rail and should be at least 36" high. You measure this from the top of the handrail vertically down to the nosing of the tread.
I forgot to tell you that the width of the stairs determines whether you need a handrail on each side. In your case the stair is narrow enough not to require a handrail along the wall side.
Dave
Well, that's it for another month. It's just about time to start thinking about Fall approaching and how to prepare the house for the coming cooler damper weather.
Until next time, happy renovations.
Dave
|
home | contact | articles | plans | downloads | dictionary assurance | cancel | newsletters Copyright © 1999-2026 by David E. Osborne. All Rights Reserved.
|