| NEWSLETTER from DaveOsborne.com | ||
| “Building Confidence” | December 2006 | |
Welcome
Hello again for another month and welcome to our newsletter: Dave's Shop Talk.
What's New
This newsletter is a bit different in that rather than full of questions from a variety of our members, I'm dedicating this issue to a single project and to a special hard working couple, Pete and Pat. Pete is the silent partner, at least he never talks in our emails, smiles a lot, though. Pat is a good emailer when she isn't getting her hands dirty along with Pete. They both have my utmost respect for researching a project, listening to advice, doing the work themselves and enjoying it. Their story starts, complete with pictures...
Ask Away!
Hi Dave!

Hope you are having a restful Sunday!

I have a question regarding decking materials, here goes:

If you had your choice, what material would you use for deck
boards? In reading about various products it seems they all
use pressure treated for the underneath framing....

I read composite is not strong and coupled with pressure treated
the fasteners loosen due to the different materials expanding
and contracting for different reasons, not at the same time.
This slowly loosens the fasteners.

I read pressure treated warps and gets really bad splinters even
if it's kept up.
And that cedar degrades when in contact with moisture almost worse
than other woods because it's so soft and requires actually more
maintenance than pressure treated.

The deck we are planning for the house will be under roof. There
will probably be a 6 month gap between when the deck is built and
the roof is built. In course the portion of deck near the side of
the house will be exposed to rain storms blowing rain in.

The deck we are planning for Pete's workshop will be fully exposed
to weather.

I would like to use whatever will increase the value of our home
the most and would last the longest. We are not intending to sell,
I would just like to get the most value all round for the money
and effort.

What do you think?

thanks!
Pat
Hi Pat,
Call me "Old School", but I still prefer the cedar look. It is softer than pressure treated which is usually hemlock, around here, but not that soft. It does take maintenance, though, to keep looking nice. When it gets dirty looking, I give it a pressure wash and the grain comes up beautiful again. I clean it up about every other Spring. I live on the West Coast of Canada where we get a lot of rain in the winter causing mold, etc. I notice that my deck after the wood dried out required a quick re-hammering of the nails to tighten everything up.
For maintenance free, although a bit more expensive is vinyl lumber which is becoming popular with the "Yuppy" crowd. It may need to be washed every couple of years too, though. Is anything truly maintenance free?
Definitely, use pressure treated for the framing if within 2' of the ground.
Dave
Hi Dave, another question....

I hope you don't think I'm crazy for asking but regarding
the deck --
would it be possible/feasible to build the framing etc. out
of pressure treated as discussed but instead of deck boards
could a person put 4 x 8 sheets of 3/4" plywood screwed down
directly to the joists? The thought I had was to do something
different and maybe have slate floor instead of just running
deck boards across the joists as usual. This probably won't
work because of the flex in the joists, right? Just wondering

Thanks!
Pat
Hi Pat,
This is a good question!!
You are right about the flex in the joists, but there is a solution to that, as well. Ceramic tile, slate, etc. can be installed on a wooden floor as long as the joists are on 16" centers, are the correct dimension for the span and the subfloor is at least 1 1/4" thick. The subfloor is 2 layers of 5/8" tongue and groove plywood laid across the joists, but staggered and well screwed and glued. Another option is to design the joists to support a 2" thick concrete slab, then your slate or ceramic.
Another thing if you want a solid deck is to have one layer of 5/8" tongue and groove plywood subfloor with a vinyl decking installed on the top of it. I've got 2 decks with the vinyl covering and they have stood up very well in the past 13 years, like new. When building a solid deck such as the vinyl or ceramic you should have a slight slope of 1/4" per foot so if it is 8' wide it should slope about 2". You can hardly tell this is sloped, actually when walking on it.
Dave
Hi Dave!
As always, thanks for the instant reply -- I honestly don't know
how you do it!!!

When you refer to vinyl decking are you talking about composite
decking - like TREX or something else?

I am glad to hear from you because now I know I have the option
of making a pretty cool
deck that doesn't have to conform to the norm!

Pat
Hi Pat,
No the vinyl decking is a sheet cloth material that is glued to the subfloor plywood. When putting down the subfloor for a vinyl deck we use the 5/8" tongue and groove Select Sheathing, which has a better surface for gluing the vinyl down on. The vinyl come in rolls about 6' wide and different backings and thicknesses.
Dave
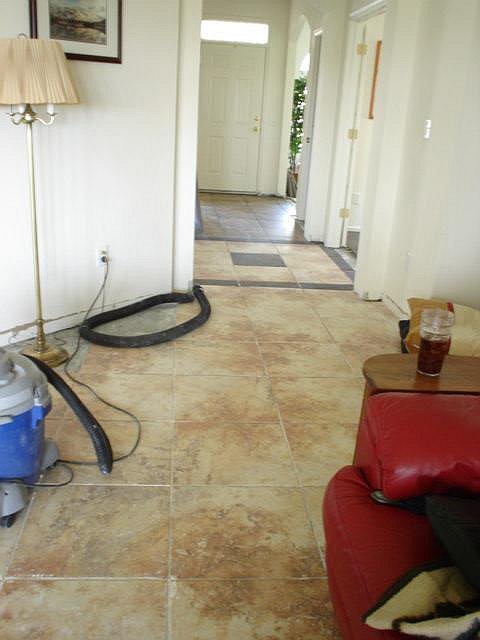
Thanks Dave. I checked out the website and thought it was interesting
and very neat looking appearance. Unfortunately there are no dealers
anywhere close to where we live (Maryland was the closest).

I wonder how it is installed at the seams so that it remains leak
proof? Maybe there is an overlap?

Again, cool stuff. I had been wanting to put something like this on
our garage floor. The interior of Pete's workshop is almost complete
(thank God!) I put down almost 400 sq ft of vinyl tile last weekend.
Wore me out, let me tell you, but worth it. (I did it because Pete has
bad knees and I knew he wouldn't be able to take it.) Looks good!
He still has to pick his molding for the ceiling and corners,
baseboard then we will be able to move all his stuff (and it's a lot
of stuff !) into the workshop. I can then sort out all the (you know
what) remaining in the garage and actually start using it! Can't wait!
I want to put the white pine tongue and groove plank flooring on the 2
long walls of the garage, then do the floor in some vinyl or rubber
covering. Then if we want to use it to entertain sometime it will look
good and very clean. Or if we just park our cars in there it will
still be a happy place!

Pat
I'm sure there are other brands available locally. This is a very popular way of doing a deck, especially if below the deck is used for storage. Most building supply stores around here sell vinyl decking by the foot.
Yes, the decking is overlapped and the joint glued with a special adhesive. Also where it comes up against a post is also glued with special adhesive. Then it is trimmed nicely along the outside edge.
Dave
Hi Dave,

Pat here again with questions on a new topic.

We want to add a deck and slab to the back of our house. I had
previously asked you about the deck portion. Now I have questions
regarding the roof.

I spoke with one of the engineers from the company who manufactured
our trusses regarding allowable weight, etc. He suggested knee
walling up from the outside walls to support the weight then we
would not have to worry about stressing the trusses.

Please take a look at the following pictures so you can get an idea
of what we are facing.
The deck will be off the short roof section of the house and the
slab will be off the longer roof section of the house. The deck will
have 2' gentle steps down to the slab. We are going to use 6 x 6
posts to support each roof. We are going to try to maintain the
'stagger' of the original roof to some extent, obviously not to the
original offset.

We will anchor the roof to the knee wall and then I am assuming we
will strip back some of the shingles and nail a 2 x 6 or 2 x 8
across the existing roof and attach the rafters to it.

We are also concerned about accidentally causing a situation which
might allow leaks in the existing roof.

Do you have any suggestions or comments?

Thanks!
Pat
Hi Pat,
You may have enough height on the roof to avoid using a knee wall. Instead just go off the top of the sheathing, remove the shingles, nail on a 2x4 across the roof directly over the wall. The sheathing will nail into the sheathing of the roof at the top. The shingles will be replaced without flashing over the joint. The siding should be removed along the wall. the shingles are replaced with the addition of step flashing for this intersection. The siding then goes back over the step flashing.
Here are two drawings one with, the other without the knee wall. Notice the different slopes of the roofs. The one without the knee wall is slightly less than the existing roof


Dave
Dave, could you please explain the area that shows 'beam, scab
and post in a little more detail?

I understand the beam would sit on the post but what is the 'scab'?

thanks!
Pat
Hi Pat,
As a scab is a growth over a sore to protect it, a construction scab is a member nailed over two joints to strengthen it and keep it rigid. In this case the scab is a 2x6 and fastened over the beam where it sits on the post. This keeps the beam from wanting to twist off the post under load.
Beam and post are also in the dictionary on site.
Dave
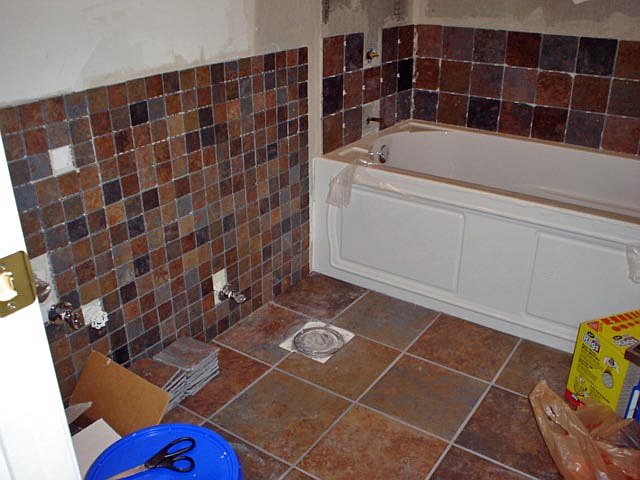
Thanks Dave !

For some reason checking the dictionary didn't even enter my mind!
I think my brain might be on vacation from putting down all that
porcelain tile!

Pat

(See photo of Pat's tile floor at http://daveosborne.com/dave/photos/images/pat2.jpg)
No problem, Pat,
And a fine job it was, too!!
Dave
Hi Dave!

Just wondering what your opinion would be of buying wood flooring
over the internet...

thanks!
Pat
Hi Pat,
I've never done that before. I kinda like to go to a store and see what I'm buying, touch and feel it. I know people in my family who have bought things over the internet and have not had any problem.
Dave
Please enlighten me, Oh Wise One!

We want to put a deck right outside the back door (sunroom).
It will be 20" off the ground so you can walk out the sunroom door
the deck will be at the same level as the house, then step down to
the yard.... here's the question: we are on a raised slab with a
brick over block apron. The bottom plate is two 2x4's with
hurricane bolts coming up through them every so many feet and a
big nut (no jokes please!)torqes them down. They are really long
and extend down into the concrete footer.

We would like to use a ledger board attached to the house on 2 sides
but I can't get it through my head - how. Would we be drilling (for
the lag bolts) into the bottom plate or the block? or.......
We would like to attach to the house for a more sturdy deck.
Also I'm sure we would have to use some sort of hurricane strapping.

We have pictures of the house as it was being built but I haven't
been able to put my hands on them - still searching! That would most
likely help my thought process

thanks Dave!
Pat
Hi Pat,
Pictures would help me, as well!! I'm away from home right now, visiting my daughter and family. I'll be checking my email from her computer.
I'll wait for your pics.
Dave
Didn't mean to interrupt your visit Dave!
Visits with daughters are a lot more important than this!!!

If you'd like to wait until you get home to respond, that's OK with me!

The wall to the right is where the 20' porch will be. The wall is just
under 12' wide and we were going to come out 20' into the yard.

The height of the deck would be 20" to match the height of the sunroom
floor so we could walk out the door and be on the deck at the same
level as the sunroom.
The slab is 'raised'. The footer is 30" of rock with 3' of concrete
over that. 3 or 4 courses of block over that. (haven't been able to
locate the construction pictures yet but I'm still looking)

From the corner of the house (left of the door) to just before the a/c
power supply box is about 18'-19'. We would like to step
down from the porch to a second deck in front of the 6 windows.
This would also be under roof. Deck dimensions will be 18' long
by 10'. Height on this deck would be so low (10" or under) we considered
a concrete slab but in our area a deck adds quite a
lot to the value to the home but a slab actually detracts from it.

The wall where the door is is just over 9' wide. In the process of
building the porch we will be changing the door to a larger sliding
glass door and the doggy door will be removed and transferred to the
garage.
Hi Pat,
No problem, actually my daughter is at work, her two kids are in school, her husband is a pilot so is off for periods of time, starting tomorrow. So answering a few questions keeps me from being bored. It is awkward using someone else computer though.
I remember your pics, thanks. Okay it looks like you need to attach your ledger to the house over the brick. Usually we like to keep the finished floor level of the deck just below the threshold of the sliding door. If the brick is just a veneer maybe plan on putting a beam at the house supported by concrete pads and tied to the brick just to keep it tight to the house and for stability, but depend on the beam and footings to actually hold up the floor. This beam and footing pad idea is used on the outside perimeter of the deck as well as between these to take any flex out of the floor joists and to cut the span to the required dimension. The beam posts and floor joists, at least, should be pressure treated wood being about 12" or less from the soil. An option for the outside perimeter is a solid footing and foundation wall, depending where you live. It sounds like you live on the Gulf Coast with the hurricane straps. Where do you live? I don't have my files with me, but I could tell you what the snow and wind loads and depth of frost is if you give me the State and major city you live in or close to. I'll be back on May 12th. We can fly standby, with my son-in-law a pilot, so that keeps the cost down. We flew to Germany, prior to 9/11, to visit our other daughter and family while they were over there for $350 for myself and wife return. Crazy, eh?
I'd like to see the pics of the hurricane straps and that big nut!!
Dave
Thanks for the explanation -- if I were more knowledgeable in the
field it probably would have occurred to me what the word should
have been.
I sure wasn't trying to embarrass you or anything, hope you didn't
take it that way : )

Hope you got a laugh from the pics.
I asked for a picture of the big nut Pat was describing. She sent me this picture.
(See photo of Pat's big nut at http://daveosborne.com/newsletters/images/patsbignut.jpg)
Hi Pat,
No offense taken, for sure and I did laugh at the pictures.
Dave
Hi Dave!

Pat here with a question about 'grades' and 'span values'.

We are going to build a deck, I think I told you about it in the past?
Well, I got the thing permitted OK and when we actually did the lay
out recently, spraying paint where the holes would be dug, I realized
I could get by with fewer posts (good!). Then after thinking about it
I realized I could probably increase from 16 oc to 24 for the floor
joists because we are using Ipe deck boards and ipe is really hard wood.

This afternoon I spoke with the permitting agent (nice guy) to ask about
changing to 24 oc, but he had never heard of Ipe. he said I would need
to supply him with proof of the wood 'grade' and a span value chart.
I found a span chart on the web but nothing showing any grade. This guy
is looking for something to show e.g. '#2 Lumber, southern yellow pine'.
Like the government grades it(?).

Have you any suggestions? I've printed several things showing Ipe to be
much stronger than pine with an 'Ipe decking span value' chart but again,
nothing about grade.

thanks Dave!
Pat
Hi Pat,
Your inspector is like an ostrich with his head in the sand. Unless you can show him a grade stamp on the lumber, no matter how good it is, he won't be satisfied.
Here is a web page showing the grade of this stuff as clear, which means no knots. http://www.austinwholesaledecking.com/ipe_general_information.htm It is the knots that create the grade so this stuff is No. 1. I would talk to your dealer about this and see if they can get the decking graded with a lumber stamp. Tell them it is useless to you without a stamp, since it won't be passed by the inspector.
Dave
Hi Dave!

The building inspector (and his entire office) is now educated re Ipe,
has the span chart (thank you) and a personal call from the lumber
company to boot. They have decided that Ipe is an A-OK building product.
(can I get an AMEN!)

The inspector has asked me since Ipe is such high quality 'why in the
world' would we want the substructure to be built out of something that
would eventually rot (pressure treated) (in 20-30 years) (we will
probably be dead by then) but Ipe will last for 50-100 years (at which
time we will definitely still be dead). I really didn't want to build
the frame from PT lumber, but at a previous meeting he kind of made me
feel like I had to. Now he says we can use concrete pads with block with
pt girders sitting on the block and pt floor joists (makes no sense to me,
all that pt substructure he doesn't like still being there...) also if we
poured pads we would have to get the holes inspected, then pour the pad
and set the block and frame work and get it inspected, then a final
inspection.

Why couldn't we just use Dek Blocks right on the ground with 2x6 pt for
floor joists (and stubby 4x4 pieces in the Dek Block here and there if
needed for leveling)? The joist would be high enough off the ground and
under a roof so I would think this would help preserve them. The total
deck height is only 16". He said Dek Block would pass the building code.
This is the easy way out, I know and it only requires the joist inspection
and a final. No muss, no fuss.

I would like to know what you think of Dek Block?

thanks
Pat : )
And the congregation said, "Amen"!! Way to go, Pat!!
That's a real feather in your hat to educate a building inspector!!
Pressure treated lumber is actually guaranteed up here for 40 years. Tell the inspector that you want to use PT wood for the framing for the same reason a person frames his house in spruce, pine or fir and puts expensive hardwood on top of the framing where you will see it and it does the most good. Oh never mind, he already knows this, don't want to rile these guys!! Never let him know he is winning or wearing you down, the inspector thrives on this. It has been said in the trade that we should always leave something for the inspector to fault, just to make him happy, so he doesn't have to hang around the job longer looking for something to get us on.
Dek blocks are good. They may not be approved in certain areas that need frost protection, though. I would venture a guess that you have a frost depth of around 5 - 6 in. Your inspector should know what this depth is. If slight like this Dek blocks should be acceptable. Either PT wood or roofing felt under untreated wood is required on top of concrete.
Dave
Hi Dave !
I'm having trouble with my AOL email so could you please ask Dan to
add this email address to my account?
Thanks! : )

I have a couple questions regarding the porch roof we're getting ready
to build. I sent you pictures of the back of our house in the past -
hope you still have them? If not let me know and I'll send them again
so you can see what I'm talking about.

I need to build a knee wall at the edge of the roof to help support
2 X 12 porch rafters. I know - 2 X 12 is big but the inspector said
if we wanted to hang any type of ceiling material other than vinyl
pans we would have to use 2 X 12's. We intend to put up the white pine
tongue in groove flooring like we used in the workshop.
The weight really won't be held up as much by this knee wall as it will
by the roof itself and the header across the posts, but the building
inspector suggested we build one to 'cut the span' of the 2 X 12 so it
wouldn't exceed the max. (I can't find the right chart to show me what
the max span of an untreated white pine 2 x 12 is. I remember the
inspector saying max span on a 2X10 is 20', so a 2 X 12 would have to
be more than 20'. I'm using 24'
2 X 12's for rafters.
How exactly should this knee wall be constructed? With double 2x4 top
and bottom and stud every 16" like a regular wall? Do I nail the studs
to the house's trusses? Then nailed it's bottom plate to the house
wall's top plate? That's the only way I can think of to construct it.
The top plate would be angled to accept the angle of the rafters.
Do I just lay the rafter across the knee wall or should I toe nail
each rafter to the top plate?

Next question: both roofs extend out to 6 X 6 posts. Across each post
(and notched in to each post) are 2 sandwiched pressure treated 2 X 12's,
which are bolted to the posts, 2 bolts each. My question here is this --
how far apart can these posts be? Is there a 'load chart' for the 6 X 6
or would I go by the span chart for the 2 X 12's? (which at this time I
do not have a chart showing either one!) The smaller roof is really no
problem since it is less than 12' wide I can set each post in 2' and have
an 8' span in between. For some reason 8' sticks in my head as the max
distance they can be apart but I have nothing to verify this. The longer
roof is 18' 6". I was going to set a post 1' in from each corner, then
measure 8' in the center of the roof and put a post at each end of the 8'
measurement. We thought that might look nice.

OK Dave, I hope you indulge me on this one with one of your beautiful
emails! Thanks and I hope you are having a nice evening. PS: here's a
couple pix of our hall bath I'm tiling - see what you think. The rest
of the tub surround will be the smaller tiles like the ones on the wall
with a design of some sort made using green glass 3X3 tiles.
Pat

(See photo of Pat's green glass tiles at
http://daveosborne.com/dave/photos/images/pat6.jpg)
Hi Pat,
I drew up this floor plan of your decks to be sure I understand what you are going to do. Let's start with getting this correct first:

The knee wall will go on the sheathing on top of the trusses. The roofing should be removed as well as the overhang. The knee wall should have a bottom plate nailed to the slope of the roof. It should be plumb so the bottom and top of the studs are tapered. The studs should match up with the roof joists above them. The 2x12 roof joists will be nailed to the double plate with 3 - 3 1/4" common nails.
The span for the joists do not include the overhang. A span is from the inside face of the knee wall to the inside face of the beam on the posts.
If you could save my drawing to a file on your computer, then open it in MS Paint and add the posts etc. or any corrections.
The span of a 2x12 pine roof joist is 23.66'
The span of a pine 2x12 double lintel is 10.96'. That is the span is between posts not their centers.
By the way the tile job looks good!!
Dave
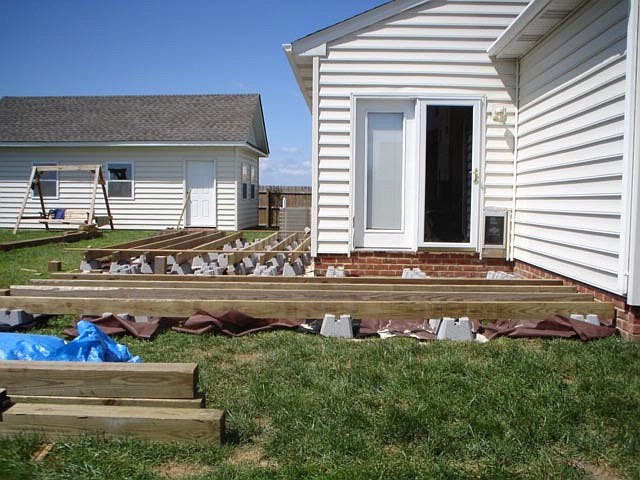
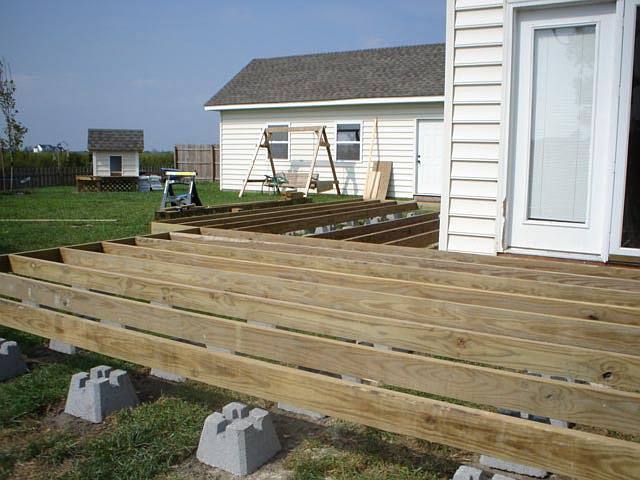
Dave here are some pictures of the deck laid out. (it' not completely
laid out). I hope you will be able to see the captions I put at the
bottom of each picture - that will tell you the answers to your questions
and a little more info.

(See photo of Pat's deck at
http://daveosborne.com/dave/photos/images/pat8.jpg)

Regarding posts - we would like to use as few as possible because the
holes have to be 3' 6" deep ! So if they aren't needed for support we
would rather not use them. It would be cool if we could just put one post
on each corner of the roofs. then later if we wanted more posts for
framing up screen work or what-have-you, we could mount them directly on
the deck.

I was glad to see the directions re the knee wall (will have to read them
again later - I'm waiting on a lumber delivery). I thought we might have
to attach DIRECTLY to the truss (open the roof). I knew we would have to
remove the overhang, I don't think that will be a big deal.

Well, thanks and can't wait to hear what you have to say about this!
Pat
Hi Pat,
Sorry to throw a wrench in the gears, but you should remove all the grass and top soil under the deck. The dek blocks should sit on undisturbed soil which has no vegetation or organic substance in it. The inspector won't pass the deck the way you have it. The grass will eventually rot away and settle taking the dek blocks and deck with it. There will be a lot of weight on these blocks by the time you get the roof on. Actually, it would be better to level beams on the dek blocks with the joist on top of the beams rather than level each joist. Did you read my article on building decks? http://daveosborne.com/dave/articles/raised-backyard-wood-deck.php I thought the decks were at different levels? I've got to run right now. Hope to have a response from you, later. Hope I didn't mess up your day too much.
Dave
Hi Dave - no you didn't ruin my day! But I am just a little confused...
Re your article on building decks - yes, I've read it a couple times
but it really doesn't apply for our deck for several reasons: our deck
is not attached to the house, it is very low to the ground, we aren't
using posts and we don't have enough space to have a beam and floor
joists- just enough space to have the dek block and floor joist, along
with a small chunk of 4x4 in between for leveling.
About the grass being removed - every where I've read about dek block
it says to put the block directly on the ground, that the grass doesn't
have to be removed. Here's an excerpt from Popular Mechanics:

Setting Piers And Posts
The floor-joist frames are supported by a series of 4 x 4 posts set in
the concrete pier blocks. Begin by setting the first pair of blocks
directly onto the ground beside the pool. You don't have to remove the
grass, but if the ground is uneven, use a shovel to level it out.
Position the first pier block so its center is 12 in. from the pool wall.
Place the second pier farther away from the pool, with its center 18 in.
from the center of the first (Photo 2).

Also, remember, the roof is totally separate from the deck. the deck is
not attached to the house and the roof is not attached to the deck.
The posts for the roof are 3' 6" in the ground and nothing is attached
to them but the roof.

Does this mess up your mind? ; )

I'm happy to say I'm going to bed in 5 minutes and I swear I'm not going
to be dreaming about this deck! haha
Not tonight anyway!

please write back soon with all thoughts on the matter...
pleasant dreams!

Pat
Hi Pat,
For some reason this email ended up in my junk file. I go through it every day or so, good thing.
You'll notice that the instructions for the deck is an independent deck. The roof over this deck has its own footing 3'-6" below grade and not attached to the deck.
In your case you have a floating deck and a roof which is attached to the house. Could you send me a copy of the plans you submitted to your inspector? If you don't have a scanner, you could fax them to me. I feel I'm missing something here.
My fax number is 250-743-5609. Remember I'm on Pacific Time, 3 hours earlier than your time. Please don't fax before 11 am your time which is 8 am my time.
Dave
Hi Dave

I'll fax the plans to you but it may not be until tomorrow.
I don't know of any place close where I can have them faxed so I'll
send them to work with Pete tomorrow.

Thanks!
Pat
Okay, thanks, Pat,
Dave
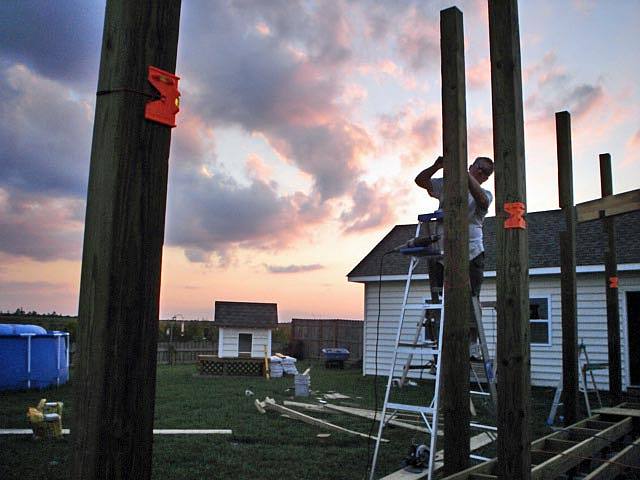
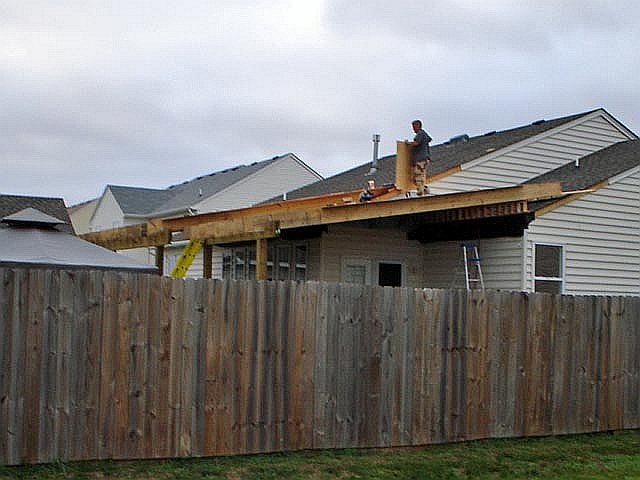
Hi Dave

How are you doing? Sorry for the long silence and not getting those
deck/porch roof plans faxed to you.
Let me fill you in on what's transpired so far.

First of all, Pete and I haven't killed each other yet and yes, we're
still married! After all the renovating we've done, that's quite a
testament of l-o-v-e , wouldn't you say? You know, after 23 years and
this porch project especially, that thin line is getting a little
fuzzier every day! haha

OK. First of all I was standing out in the backyard sweating to death
in the sweltering heat the other day, pondering the grass beneath the
Dek Blocks. I thought to myself, hmmmm, since this seemed pretty
important to Dave, I wonder how hard it would be to strip the grass
out of the block rows. So, I move the blocks, one row at a time and
with a shovel, 'went to town' on that grass. I have to say a big
THANK YOU DAVE! because I now know WHY my grass will not take off and
really grow well. I've done everything Scott's told me to and it gets
just so far and just doesn't get that real 'grass thing' going on.
I have GRUB WORMS! I would've never known. I had put down the GrubX
from Scott's as directed at the preventative rate but since I already
had the problem the treatment had no effect. So now I am taking care
of those little buggers and next year I am expecting great improvements
in our lawn! (by the way, Mattie and Lucy seem to think grubs taste GREAT!)

Back to the Dek Block. I stripped out all the grass and replaced the
block row by row until finished. It was a very good workout.
We followed all other Dek Block instructions attaching 2x6's and 4x4
posts pieces for leveling as needed than called for inspection.
Cha-Ching! Passed with flying colors.

Today we notched out the posts for the double lentil and put one up -
fit like a glove. Pete does good work! He got a rafter pattern cut also,
which is a total pain in the (you-know-where). You make using a steel
square sound soooooo easy : ) It's not for us, let me tell ya!!! I wish
I understood it better so finding the angle for the smaller roof would be
easier but I don't think it's going to happen in my lifetime. I need one
of those sing a-longs, like 'hooked on phonics' - 'hooked on steel
squares', all together now!

OK, it's getting late, past my bedtime. I get most of tomorrow off -
have a hair appointment (oh darn!). Pete will be working alone.
(He is probably dreaming about that very thing right now!!!)

couple pix attached for you (See photos at
http://daveosborne.com/dave/photos/images/pat20.jpg
http://daveosborne.com/dave/photos/images/pat19.jpg
http://daveosborne.com/dave/photos/images/pat18.jpg
http://daveosborne.com/dave/photos/images/pat12.jpg)
take care and thanks again about the grass thing : ) You are such a smarty!!
(I mean that in a GOOD way !)
Pat

Hi Dave!

Here are the pix - too bad I didn't think of that before!

Several changes were made and the inspector and I both wrote
notes all over the plans changing things and notes about hole
size for certain size posts and other things, so some of what's
in the picture is actually going to happen. For instance,
the posts on either the side of the porch won't be there because
they aren't needed for support.

So if you have any questions, just ask and I'll try to fill you in.

thanks!
Pat
Got them, thanks.
Dave
Hi Dave!

Just wondered if you have a favorite 'invisible deck board fastener
that you might recommend.
It seems there are quite a few out there all about the same price.

thanks!
Pat
Hi Pat,
I've never used these, but the eb-ty looks like the best. You need to use a biscuit joiner for the slots. These are not cheap, though, about $1 per biscuit and screw.
Dave
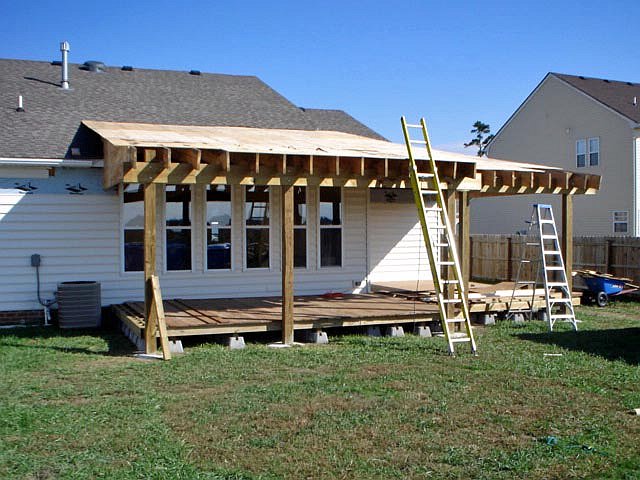
Hi Dave!

Thought I'd forward a few pix to show how the porch is coming along.
We're almost ready for the nailing inspection.

Sent a pic from inside so you could see how the ceiling of the
porch will be seen from inside the house. Ceiling will be the
white pine trimmed in Ipe so it should look nice with a warm feeling.

I want to tell you thanks again for telling me to strip up that
grass from under the Dek Block. It probably wouldn't have passed
inspection and I would never have been able to grow grass in our
yard because I wouldn't know about the grubs.

Hope you're doing well and having some fun!

Pat (& Pete)

See photos at: http://daveosborne.com/dave/photos/images/pat13.jpg
http://daveosborne.com/dave/photos/images/pat10.jpg
Thanks, Pat, lookin' good!
You guys amaze me, nothing seems too difficult for you!!
Dave
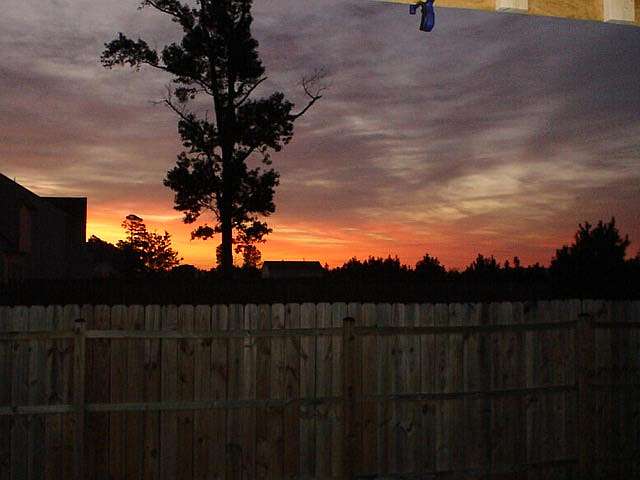
Here's a couple pix of the porch/deck. It's looking awesome and so
much bigger as it gets closer to completion. I finished putting
the Ipe down on the deck under the sunroom windows yesterday.
Eb-ty clips are very good and worth the price, but don't use the
glue. The reason I say this is several times I got almost to the
last clip and either found a sly crack or previously unseen flaw
or the board was so 'bent' I couldn't get it to slide in.
Ipe boards are so hard and they all LOOK pretty much straight and
perfect, however some things don't become apparent until you're
actually working the board. Glue added to the mix would have been
a disaster. On the web all instructions say to use glue but the
forums say pretty much use glue only if you are a total perfectionist.

This deck reminds me of an old fashioned country porch, nice and
relaxed feel and hey! where's my rocking chair?!! Dogs love it too.
especially crawling under it-maybe we'll need to leave an access
panel for them to get under.

Here's a view of a sunrise from the porch (red sky in the morning,
sailor take warning!) (Pete's Coast Guard 26 years).
I think we'll be putting a table just outside the door, we might
enjoy eating breakfast looking at something that pretty instead of
staring at the bad news in the newspaper.

See photo at: http://daveosborne.com/newsletters/images/morning.jpg

OK - staining base boards today - it's a little cold out and I need
a little break!

Hope you have a great day Dave!
Pat


Hi Dave!

How in the world are you? It's been quite sometime since I last wrote!

wanted to send a few pix your way, thought you might be interested to
see how the porch is coming along. We almost finished it but now the
rest of the ceiling and eves will have to wait,the weather is pretty cold
right now. The UV protectant we used on the ipe did an awesome job with
absolutely no problems - it's Messmer's U.V. Plus for Hardwood Decks/Natural,
just in case you wanted to know. Let me tell you, it is a beautiful product.
Pete and I (novices to deck coatings) put the stuff on with paint pads,
a soft brush screwed to a broom handle, a chunk of foam - we tried all
sorts of things just to test them out and everything we used worked
just fine. The stuff spread incredibly evenly regardless of what we used
to apply it. We didn't rush either. The can said to apply one entire board
length at a time, apply evenly etc. - well, they don't live in our world
obviously. We started out trying to follow the rules but when we realized
how easily it was going down, we even put it on sideways with a final
stroke in the direction of the board and no problems. We let it soak in
about 45-50 minutes then took a couple old T-shirts and wiped it down
for excess. Next day I wiped a couple small spots and that was it. result
was not the least bit sticky - feels good barefoot or in shoes. Dogs found
it a little slippery for about a day after application. Due to temperature
changes we were only able to apply 1 coat and although the can says most
decks require only one coat, I would have liked to apply a second coat anyway.
What I think I will do is wait until spring - april-ish and lightly sand
the 2nd deck which didn't get as much sanding attention as the first deck,
then apply again and wipe down again. We should be good to go then for
a few years.
In the middle of putting the UV product down it began to really bring up
the grain in the wood -- Pete and I saw it at the same time and just stood
there looking at each other grinning from ear to ear like idiots, like WOW!
we were so happy with the way it turned out! Result made all the pain
worth it!

Bathroom is awesome. The husband has now proven he is capable of just about
anything I can think up. He completed it to the point I could have it as a
private bath. When I'm all better he will finish painting etc.
Here's something cool he did. One day I said - Pete, I have an idea (his response
to that is always 'oh, no') wouldn't it be cool if we could put a door up
to the hallway so I could come and go from the bedroom to bathroom with no
fear of doggies getting in by accident. we still had a few sliding closet
doors sitting in the garage. Pete took 2 of them, attached them together,
installed temporary hinges and attached it to the hall entrance with a hook
so it can be secured from either side- works great!

One day I thought how cool it would be to install an old fashioned big grade school
looking door with the oversized transom at the top (left open for air flow)
in that space. You know the type of door that's had one too many coats of
paint and looks a little charmingly banged up? No glass in the door - just
a painted wood door with a large oversized transom.
Have any ideas? I was thinking we could maybe get the door & jamb from
Home Depot or somewhere then somehow build a casing around the hallway
opening to receive the jamb but how about the transom? are there any hard
and fast rules about them? or can we just be creative and use the rule 'if
you nail it, it will stay' ... I tried to google but there's really not
much out there.
writing to you is more fun anyway! Dave, I missed saying Merry Christmas and
happy holidays to you and I hope you had a very
enjoyable time with your family. Hope your daughter is doing well.

take care and let me know if you have any ideas
Pat
Hi Pat,
Wow! The pics of the porch are awesome, alright. The beauty of the wood sure stands out.
The bathroom looks good too. Not good enough to put in tile, you guys have to put them in on 45's, etc. Another, Wow!
Regarding the door and transom. We had those on all our doors at my old, turn of the century, schoolhouse. Never did figure out why they called them a transom when they were on top of the door. Oh well, somebody smarter than me had a good reason, I guess. Those were installed above the doors when the ceilings were 10' and up for control of air movement. I don't see a problem in installing them in your house. Just remember that for a bearing wall there is a header above the door to carry the load over the door opening, so pick on a non-bearing wall.
Do you mind me using your porch as the subject of my newsletter? Your anonymity will be preserved, of course. I just use first names and no email addresses, of course. Our motto of the website is building confidence and your story certainly will do that for our readers!!
I hope y'all had a good Christmas and New Years, too. We spent Christmas with all 3 daughters and 7 grandchildren. It was great!!
Hi to Pete and the pets,
Dave
Dave I enjoyed receiving your email! it really made me realize
how much I missed talking with you these past couple months!
It's always cool to realize when there's another human on the
planet we can identify with, right? Good feeling. and there
never can be enough of those!

You have helped me (and therefore 'us', Pete & I) so much with
our projects I will never be able to thank you enough.
YES you may use our porch in your newsletter -- we would be honored!
Thank you so much for asking!!!
How cool is this!!!
I'm so excited : ) We are so totally flattered and surprised! WOW!
Pete's trying hard not to show it but he can't hide that sly smile
from me - he's very happy!

Let me know if you need any pix - we took plenty at different stages.
We aren't concerned about being anonymous, you can use our names and
location if you'd like, that's fine, whatever you would like to do.
Mattie and Lucy said they would like a 'shout out' as chief hole
diggers and expert scrap lumber shredders, I mean 'yard supervisors'.

you know the really cool part I like the most about the things we've
built (beside knowing you would be there for me 24/7 to answer my
questions)? Just starting with an idea and just letting it morph.
We never carve anything in stone and make all kinds of changes along
the way 'going with the flow 'and then the end result has a really
good energy about it. It's nice.

OK, I'll let you go for now! I think I'll pop the top off a nice tall
ice cold Pepsi, put my feet up and bask in the glow of it all for a
few more minutes : ) You just made my day!

Pat
PS: thanks for the cudos on the bathroom - I wish I had a before pic.
Floor space is only 5X5 but after tiling and beadboarding 3 walls and
the ceiling it just looks huge. We can't believe it's the same room.
Everyday I look at it and just shake my head

See photos at
http://daveosborne.com/dave/photos/images/pat17.jpg
http://daveosborne.com/dave/photos/images/pat16.jpg
http://daveosborne.com/dave/photos/images/pat14.jpg

And the guy that never speaks, but puts it all together...
http://daveosborne.com/dave/photos/images/pat15.jpg
Well, Dear Reader, if this story doesn't build your confidence, I don't know what will.
Thanks to Pete and Pat for sharing the ins and outs of their project with us. I feel grateful to be part of such a successful conclusion to a large renovation like this. Although my part was a very small one, it shows what can be accomplished with the use of email, communicating, including sending pictures over long distances.
Congratulations, you guys, hope you enjoy the deck. You deserve a rest.
Thanks for the smiles, Pete and the good communications, Pat!!
Dave
|
home | contact | articles | plans | downloads | dictionary assurance | cancel | newsletters Copyright © 1999-2026 by David E. Osborne. All Rights Reserved.
|