| NEWSLETTER from DaveOsborne.com | ||
| “Building Confidence” | July 2009 | |
Welcome
Welcome to our newsletter. Dan and I hope your projects are going well.
What's New!
Dan and Marillyn have a new grand daughter! What's better than that?
Dan has completed two more students at his Drug Recovery Center. One was addicted to crystal meth and the other to crack cocaine. All physical cravings vanished while they were on the sauna detoxification step of their programs (which happens routinely). Dan has been achieving 100% success at his center handling addictions to drugs other centers refuse to accept! If you have a loved one addicted to drugs or alcohol give Dan a call toll-free at 1-877-856-4349. He's got four beds available right now, so don't delay!
Ask Away!
Here are the questions I have answered this month:
Dave, putting down the sill plates on our slab. Plans call for flashing
(termite control), sill plate sealer, 2X6 PT plate. Question is How is
the flashing installed? in between the plate and the foam sealer or
under the foam sill sealer. Does the flashing get bent down and remain
against the foundation wall? how much of the flashing needs to extend
from under the sill plate? thanks ,DKD
Hi Dave,
The flashing goes down first, tight to the concrete slab on the top and the side forms a drip edge as shown in this drawing:
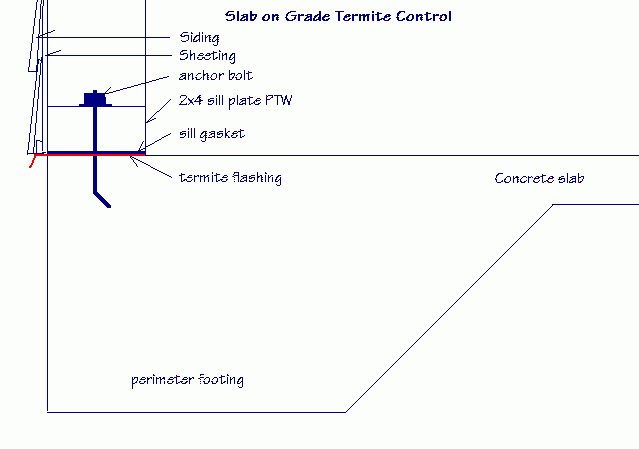
Other things for termite control include:
- keep finished grade at least 8" below top of slab
- slope grade away from slab 5%
- keep wood and organic material out of backfill
Dave
Good morning,
I have a 1975 era house where the original builder used 1" white
styrofoam on the basement walls. Some of the material is covered. The
remaining I want to cover because of problems with the material if it
comes in contact with flame. Is the density of the white styrofoam
comparable to the pink in that I can get away without a vapour barrier?
Secondly, what would the "R" value of the white be assuming 1" thick?
Thanks for your time.
Dennis in Ottawa
Hi Dennis,
The National Building Code for Canada requires R-12 insulation in a basement for 24" below grade. Usually, the house builder glues 24" styrofoam SM 2" thick to the concrete which gives a R-value of 5 per inch equaling R-10. Today this is not enough to satisfy the code. In 1975 a basement was designed for storage space rather than living space. Now, with the high cost of land, basement homes are used to their full potential as living and playing space.
Your existing 1" white styrofoam is probably less than R-5 since it is not as dense as the SM type.
I recommend removing the old 1" styrofoam and installing a 2x4 wall about 1" clear of the concrete foundation wall. Install R-12 3 1/2" fibreglass insulation between the studs. Construct the 2x4 wall with a single top and bottom plate with the studs on 24" centres. Since this is not a bearing wall, 24" centres are okay. You can also use #3 - utility or #4 economy studs for this to save money. Sometimes a building supply has a sale on econo studs that are finger jointed. During the process the pieces didn't get flush on both sides. Since you only need a good surface on one side for the drywall, you can use these cheaper studs, as long as they are straight. You can use the old styrofoam in the stud spaces by cutting them to fit, if you want or around a plumbing stack, etc. for noise insulation. The fibreglass is much cheaper than the styrofoam so that's another reason to go this way. Install vapour barrier on the warm side of the room, as usual, then drywall or apply your choice of wall finish. Drywall is a good fire barrier which keeps the fire back for a certain time period depending on the thickness.
Dave
Hi Dave
Joel from Milwaukee WI - 3 story old house, my son is trying to add
a new stairway between 2nd and 3rd floors. all calculations came out
fine but how do you support the posts since there is a first floor
below it and no way to put in a post to the basement. how do you
calculate load and support requirements? can you refer me to an
article? also how to box out the open area on the third floor when
2 x 6 at 16 inch intervals are run across floor to support third
floor? how to know what members to put around open area of staircase
to relieve load from missing stringers? thank you very much -
love your site
Hi Joel,
Any chance of getting some digital pictures?
If you can't support the stringers with side walls or posts, here is another couple of tricks, as shown in these drawings:
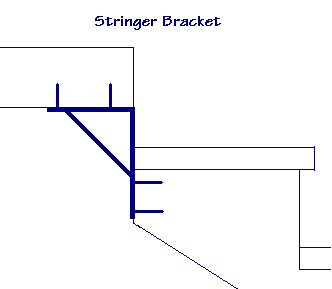

Remove the thickness of the plywood from the end of the stringer, before attaching the plywood to the stringer and the 1st riser.
Here is a drawing of the stair opening:

Notice the double joists on each side of the opening. If the tail joists are over 6' long, their header is doubled.
I hope this is what you are after.
Dave
Thank you SO much Dave. I never expected an answer so soon.
I am going to get pictures today but what you have sent me really
helps. Do you ever have to triple instead of double the header
if the opening is like 11 feet 6 inches instead of 10 feet?

Here was the first drawing my son got from the stair guy

He said the city might require a wall on each side to support the
steps but did not know for sure. He said every place can be a
little different which I guess makes sense.

Thanks again dave. I am telling everyone about your great site

Joel

I have included the results of the stair calculator but I have
to verify a 4 inch floor thickness on the third floor.

The opening is quite big so I wonder if doubling up is adequate
or is their a formula for when you must triple the boxed out
areas support?

As you can see I don't know what I am talking about too much here
and am trying to help my son get this done correctly and make
sure the stair guy really knows what he is doing. That's why
these questions are not very professionally worded. Thanks for
your indulgence.
Hi Joel,
I happened to be on the computer last night doing a custom plan. Answering your question gave me a break from the plan.
Thanks for your nice comments and spreading the word about our site. Your stairs drawing looks good, also the drawing of the joists going 90 degrees to the stringers, that's all useful stuff. I notice the riser says 7 3/8 to 7 1/2. The riser is 7 7/16. You are allowed only 1/4" max. variation between risers if the stars are inspected. I actually had 1 inspector take his tape and measure each riser as he went up the stairs. With 15 risers, if each is 1/32" out that's a total rise of almost 1/2" out. So be careful laying out the stringer.
Yes, there are times when you need to triple up beams or even 5 layers, depending on what the beam is holding up - more than one floor and roof, etc. Then there are the engineered beams for longer spans.
The doubled up joist in my other email can be considered a beam even though it is flush in the floor. In fact it is called a flush beam.
Your stair calculator input for thickness of the floor was incorrect. The thickness of floor refers to the parts making up the floor, so the joist, the ceiling finish, the floor finish. It really is the difference between the ceiling height and the total rise. So if your joists are 2x10 add 9 1/4" and the floor has 5/8 subfloor with 3/4 hardwood, plus 1/2" drywall on the ceiling the floor thickness would be: 11 1/8". If this is plugged into the stair calc. this is the result:
Stair Measurements from Dave's Easy Stair Calculator at DaveOsborne.com
Total Rise entered: 111.5 inches
Floor Thickness entered: 11.125 inches
Head Room entered: 80 inches
Number of rises: 15 rises
Number of runs: 14 runs
Height of each rise: 7 7/16 inches
Length of each run: 10 1/2 inches
Total Run: 147 inches (12'-3")
Length of board needed for the stringer: 16 feet
Length of opening in upper floor: 136 1/2 inches (11'-4 1/2")
The 10 1/2" run is what I put in, without the nosing. With the nosing the tread is 11 1/2 with a 1" nosing.
For an 11' opening across the joists, you need to reinforce this with posts and a beam or a solid wall, alright. I need some more info before I can advise you on this. I need to know the total span of the floor joists. How far the beam or wall is from the edge of the opening and if there is a bearing wall over this beam or close to it that supports the roof. The size of the floor joist, as well.
Maybe pictures of the area around the stairs showing walls, etc. If this is being inspected the inspector will tell you what you need, anyway.
Hope this is clearer than mud!!
Dave
Hi Dave

Its me again Joel
Is there a simpler way to calculate a header - below is an article I read:

I have 9 2x8's that are being cut as I mentioned in my previous email but
one side is supported on a load bearing wall but I have almost 16 feet of
span to the end of the roof.
Calculating header size is complicated. You have to take into account:
- the length of the window or door opening;
- the combined weight of the floors, walls and roofs above;
- the building width;
- the snow load in the area;
- whether it's a bearing wall (where joists, trusses and rafters rest) or a non-bearing wall (to which joists, trusses and rafters run parallel);
- whether it's an exterior or interior bearing wall; and
- what species of wood you're working with.
The 2000 International Building Code book contains two full pages of mind-numbing charts for calculating proper header sizes in different situations. Fig. B shows the maximum allowable spans for different size headers in just one situation. As you'd expect, the deeper the header, the longer the distance it can span. But trust me, you don't want to wade into all the technicalities. There's no simple formula. My advice is this:
Have an engineer or architect calculate the required header size for your window and door openings.
Ask your local building code official to help you calculate header size. It's usually not in their job description, but the nice ones will help you out.
When in doubt, build a double 2x12 header sandwich like we explain next. In all but the most bizarre situations, they'll easily carry the weight for 4-ft. wide window and door openings and, in most situations, be code compliant for openings up to 6 ft. wide—a common patio door width.
HEADER SIZE   MAXIMUM SPAN   NUMBER OF TRIMMERS

Double 2x6    4 ft., 0 in.          One
Double 2x8    5 ft., 0 in.          Two
Double 2x10   6 ft., 2 in.          Two
Double 2x12   7 ft., 1 in.          Two

what is a trimmer?
Hi Joel,
You are getting way ahead of yourself by worrying about all the headers in the construction industry. All you need to worry about is the size of header you need for your stair opening. This is not an exterior wall so you don't need to worry about snow loads, etc.
Like I said in my previous email:
For an 11' opening across the joists, you need to reinforce this with posts and a beam or a solid wall, alright. I need some more info before I can advise you on this. I need to know the total span of the floor joists. How far the beam or wall is from the edge of the opening and if there is a bearing wall over this beam or close to it that supports the roof. The size of the floor joist, as well. Maybe pictures of the area around the stairs showing walls, etc.
The article is correct in saying you use the tables to get your header size, but they are not that hard to figure out if you are accustomed to them. I've been using these tables for years. When we build a house we know the size of headers we need for most of the circumstances, in our area. My span book has 175 pages of metric then another 175 of imperial. I only need one page at a time with the correct info.
If you could get me the info I asked for in the highlighted text, I'll see what I can do for you.
Dave
Hi Dave,

I have a small hip roof house that I have added another roof to
from over my patio deck. The shingling I won't have a problem with
however, the 2 valleys have me concerned. Many people have offered
suggestions on the right way to complete the roof tie in at the valley.
My existing roof was done last year with 30 yr shingles, felt paper and
ice/water shield. I have installed the roof trusses over the existing
roof and have the sheathing installed.
Would you kindly explain the correct way for me to finish my roof.
Kindest regards.
Dennis in Ontario
Hi Dennis,
There are two ways to shingle a valley, both are acceptable by the National Building Code.
1.) This is what the roofers refer to the old school way, my way. It is the closed valley procedure:
I start by laying out the starter protection, whether it is 30 lb non-perforated roofing felt, or rainguard, by going to the rake of the roof and extending my tape over the eaves by 1 1/2", then going to the other rake or valley and doing the same. I then mark the roof deck at the width of the roll of eave protection, then snap a line at these two marks. Apply the 30 lb felt along the eaves, overlapping the fascia board by about 1 1/2" with the upper edge of the felt on the snap line. This allows the shingles to bend into the gutter which stiffens them up in the wind. Nail, with 1 1/4" galvanized roofing nails, along the top edge of this first sheet at every other truss intersection, so it won't tear off when you walk on it. Also nail up from the bottom edge where there is good nailing at about 12" centers Then run the roll of 30 lb felt down the valley, from the ridge to the eaves. Cut off a single length. Now take this length and fold it in half lengthwise and cut it in half. The width should be 36" or 39" from the roll depending if it was metric or not. After cutting it in half you should have two pieces 18" or 19 1/2" (500mm). Place one strip down the center of each valley, nail the edge on both sides only. At no time should you nail closer than 6" from the center of the valley. What I do when I'm nailing this strip in place is kneel down, with my knee protection on, in the middle of the valley to keep the strip tight into the valley. This is important. Okay you have an 18" strip nailed down in the center of the valley. Now roll out another strip from the roll, full length from the ridge to the eaves. Nail this strip on full width, this time, centered in the valley, nailing at the edges again and with your knee forcing the strip into the valley. So you have two strips of 30 lb felt centered in the valley. The manufacturers, today, require the installer to cover the entire roof deck with 15 lb non-perf roofing felt. Otherwise they won't warranty their shingles. So cover the roof deck that is not already covered with the 30 lb felt. Apply the 15 lb felt parallel to the eaves, overlapping the previous strip by at least 4". If you do this carefully and accurately, you can use the lines marked on this felt to keep your shingles in line, although as you approach the ridge, measure from the ridge to the shingle line to see if you are parallel to the ridge. Run this 15 lb felt into the valley, overlapping the 30 lb felt by about 6". Don't cut the 30 lb felt when you do this.
Okay, let's lay some shingles. Start at the eaves, you need to lay a starter row of shingles. You can't rely on the felt for protection between the shingles on the first row. Follow the manufactures instruction, printed on the outside of the bundle. Usually, you can use part of the shingle as the starter, just be sure to start the starter row with a half shingle so the row on top will be staggered with the joint over a solid shingle. The starter row and the row on top of it should both be flush with the 30 lb felt overlapping the fascia board by about 1 1/2". Continue up the roof running the shingles into the valley and up the other side at least 12". We call this running them wild. Continue up the roof, stay on the one side of the valley right up to the ridge, or until over the valley. Now start on the other side of the valley, at the eaves, as before, except when you come to the center of the valley, run the shingles up the other side, for at least 4" from the center of the valley. Run the shingles up the roof to the ridge as before. At this point I continue with shingling the roof. When the roof is done, measure about 2" up from the center of the valley, at the ridge and at the eaves and snap a line. I get a piece of sheathing, 3/8" OSB or plywood about 12" wide by 8' and slip it under the shingles overlapping the first side and trim the top shingles off along the snap line. When done, you should have a neat cut edge of shingles about 4" up the valley. You don't see any metal flashing, just shingles. In the valley is the greatest chance of having a leak on a roof, since the valley is not as steep as the rest of the roof and a lot of water is directed into the valley from the rest of the roof.
2.) The open valley procedure:
Start with the roofing felt along the eaves, then apply a valley flashing centered in the valley, continuous from the ridge to the eaves. This flashing is about 24" wide and has a ridge in the center, not flat, as in the old days. This is a good improvement over the old flat valley flashing. Now start the shingles as above, but when you come to the valley, cut off the shingle about 2" parallel to the center of the flashing. The shingles are cut off neatly on each side of the flashing center, leaving a 4" trough which exposes the flashing with its center ridge. When the water runs down the valley, it hits the center ridge, supposedly preventing the water from going under the shingle on the opposite side of the valley. When cutting the shingles use a piece of plywood or OSB or flashing under them for protection.
Another tip I should mention is to use a hook blade on your utility knife for cutting the shingles off at the rake and the valley.
Hope this helps,
Dave
Dave,

I am rebuilding a shower enclosure in my apartment and have two walls
of 35 year old concrete.
I plan to glue to the concrete a 1 inch thick insulation board and
face this with 1/2 inch aquaboard before tiling.
Is there a concrete gun procedure that can be used to affix the
aquaboard or should I use a hammer drill with plugs and screws?
Thanks Dick
Hi Dick,
I prefer to see the wall strapped, first, with minimum 2x2. Then the insulation fit in tight between the studs with vapor barrier installed on the warm side of the room. You could try screwing the aquaboard through the insulation to the concrete with anchors. I can't see how the finished wall would be straight and true doing it this way, though. Concrete walls are not the straightest walls to begin with.
Another accepted procedure is to strap 1x2s over the styrofoam insulation at 2' centers.
Screws and anchors give you more of a chance to shim the board or stud out a bit if needed, especially at the joints rather than shooting the fasteners on with a concrete gun.
Dave
Dave,
Brandy here!  I have a question on the " How To Fix "  My
daughter-in-law was using a coffee maker with the steam vent directly
under the edge of our kitchen wall cabinets, The clear cover finish is
Lacquer, the wood is Oak, with a possible Golden Oak stain or very close
there by. Would you have an answer on how to fix? I believe it's just
the clear coat that has turned white, but won't know for sure. I don't
know if the damaged area is of significance but the strip is about 1
1/2" wide, and about 1" up from the bottom edge....
Thanks In Advance for your help here.
Brandy!
Hi Brandy,
You could try to sand the finish, very lightly with 220 sandpaper. Try not to go below the lacquer layer, if possible. Apply some Flecto Varathane Professional Finish over the sanded area. This is a black label. It dries quicker than the regular stuff, so apply thin coats only. You shouldn't have to sand the white completely off, just remove the roughness caused by the grain raise.
Dave
Dave,
The only place that I can find The Flecto that you were talking about
is on the internet. One Gallon is the minimum purchase. Would you consider
some other brand, and should it be a petroleum base or go with water base???
It may or may not make a difference, but gut feeling is the petro base!  I
re-read the message you sent me, and as long as I went with the lacquer with
the fastest drying time, will that get me by, not being able to get the
Flecto product locally. One other thing, should it be gloss, or semi gloss.
My cabinets are 20+ years old, but the finish is extremely good, but the
extreme Gloss is long gone, but "knock wood", there is no blistering or
peeling. I thought that I might try to make a special sanding tool, so I
could get into the wood grain, or would just a surface sand do the job?  I'm
thinking that the new lacquer may re-melt the old, and flow together. I
really don't know if it works that way, as resanding, when giving 3-4 light
coats, all you are doing is roughing up the prior coat! I hope that I'm
tring to "Reinvent the Wheel", just following your
suggestions/directions.
Thanks again
Brandy!
Hi Brandy,
That seems strange not to be able to purchase Flecto products. I solicited my wife for some info, as well. She worked many years in the consumer paint industry, actually managing a retail outlet for the manufacturer of some local paint. She has taken extensive courses on paints and painting and her knowledge has surpassed mine long ago. So Frances says to use any brand of polyurethane. Another brand she is very familiar with is Minwax. She doesn't recommend using lacquer. If the finish was polyurethane, originally, lacquer will lift it.
Polyurethane is the "new age" varnish which has an oil or alkyd base. They are soluble in paint thinner which is used for thinning and cleaning up. A lacquer finish has a very strong solvent which is not compatible with urethanes, varnishes or shellacs. Lacquer is mainly used in the cabinet and furniture production industry because it dries very quickly. They spray it on, mixed with stains giving numerous coats in a very short time. It leaves a very smooth surface, but it is not as hardy as the urethanes. Alcohol will turn the finish white as did the old shellac finishes.
Polyurethane is the same finish they use on hardwood floors, these days. It is a hard and durable finish.
I would not use a gloss finish on cabinets, but go with a semi-gloss. Try to match the sheen level with what you have on the original cabinet. Even if you match the stain perfectly, you can tell the difference if the sheen is not identical. Sand very lightly to remove any roughness. Don't sand to remove any wood, just the finish. If you are sure the original finish is lacquer you could buy a can of lacquer spray -clear coat and see how it works. If the finish was urethane originally you will notice the finish get wrinkly. Stop right away and let it dry then sand again and start over with a polyurethane finish. Frances says to try a spot on the underside of the cabinets first to see what the lacquer does. It is not a problem to apply a polyurethane on top of a lacquer finish after sanding lightly to remove any gloss.
Yes, I remember the projects for the kids. I'm glad they went well.
Thanks for your interest in our site, Brandy.
All the best,
Dave
That's it for this month. Hope some of these questions are similar to your own and are helpful. Please checkout our website if you need to build a little confidence. http://daveosborne.com/dave/index.php
We welcome any suggestions for articles and/or plans.
Enjoy our Summer!
Dave
|
home | contact | articles | plans | downloads | dictionary assurance | cancel | newsletters Copyright © 1999-2026 by David E. Osborne. All Rights Reserved.
|