| NEWSLETTER from DaveOsborne.com | ||
| “Building Confidence” | January 2010 | |
Welcome
Welcome to the new decade and our eighth year of monthly newsletters about home renovation questions.
What's New
Going Green is such an important subject that I'm writing a series of articles about it. You can see the first one here: Going Green 1: Tips. This article can be accessed by non-members of this site.
Going Green can save you money as well as help make the world a little better for your kids and grandchildren.
Ask Away!
Here are some of the questions I have received from our readers this month:
Hi Dave, I have a room that I am installing hardwood floors. They are 3/4" thick 5" wide planks of brazilian teak. I have included a drawing of the room.My flooring will be running parallel to wall "A" and perpendicular to the joists. I have the carpet removed, the baseboard molding removed and the 15 felt laid down. I'm sure you have seen this problem before. I plan on having approximately 1/2" space on walls a, c, and d for expansion. Everyone tells me the first row is the most important row. My problem is I have a bit of a wavy wall on wall A, so I can't measure out a 1/2" from the wall because of the waviness. I need to know how I can get a square line to start laying my flooring and everyone seems to have a different suggestion on how to start my first row. I need your advice and direction, because I don't want to end up with a crooked floor. thanks, jim

Hi Jim,
You need to scribe the first row, but before you do that, measure across the room to see what the last board's width will be. Try to start and end with equal widths on opposite walls, since these are wide boards. I explain this in my article on laying ceramic floor tile: How to Lay Ceramic Tile
The previous article tells How to Install a Hardwood Floor.
Dave
I need to figure out my first starting line. Maybe I don't understand
how to scribe. If a scribe a line using wall A, the line isn't really
going to be straight because the scribe follows the contour of the wall,
correct?
I just can't seem to get my hands around this :-(
Thanks,
Jim
I see your problem of not being able to check the width of the room from both corners of wall A. Allowing 1/2" on both sides should give you a full board when you get to the other side. Probably a little less, to be practical, leaving tiny spaces between the boards.
Okay, first, measure from the corners of wall A out 1/2" + 5" + 1/4" for the tongue = 5 3/4" and snap a line. Check the measurements from the corners of walls C, d to determine if they are parallel. Not much you can do if they are not, but it is good to know if the walls are wider than first measured. Also see what the largest gap is from this line to wall A. You don't want too large a gap or the baseboard won't cover it, with out an added molding.
Since the wall is wavy, you may be able to eliminate having to scribe the first board. By the way, if you don't understand a term used in my articles or plans, these words are linked to our construction dictionary. Just click on the highlighted word and go directly to the dictionary. You can also go there by clicking on the link at the bottom of all of our web pages. Look up scribe to see what it means. I wrote this construction dictionary in everyday language so you can understand the terms used by carpenters and other construction professionals. Please let me know if a definition isn't easy to understand!
If the wall has drywall on it you can squeeze the 1/2" to 3/8". If the bottom of the drywall is flush with the top of the hardwood, you can place the first row flush with the wall, since the expansion would be under the drywall to the plate. If not you need to scribe the first board, which means to remove some of the board to match the shape of the wall. You do this with a scriber which is similar to a kids compass, for drawing circles. You have the pencil on the board and the sharp end rubbing against the wall, scribing the same distance from the wall on the board. If the waviness of the wall is not more than 1/2" it may be better to cut off the bottom of the drywall just a bit above the hardwood thickness. Then you don't need to trim the board off along the scribe line.
Try to take the least amount off the first board as you can, since you need a full 32 boards. My article on hardwood flooring gives the full step-by-step procedure: How to Install a Hardwood Floor
Hope this helps,
Dave
1) I was wondering how to rough in a drywall arch on the top of a 2.5" inset
in the wall where I plan to store billiard cues.
2) I was also wondering how to frame in a stand alone soffit 6'x10'x9"
above a billiards table.
Dale
1) This article should cover this question: How to Make a Rounded Doorway
Maybe modify between the two pieces of plywood with a strip of solid wood (light-blue), cut on a 45 on both ends. Like so:
2) Depending which way the ceiling joists are going, screw a 2x4 on the flat for the 6'or 10', less the thickness of the sides. If the joists go across the 6' dimension, it would be good to put 2 or 3 across in the center to help support the 10' span. If the joists go above the 10' span, put in an extra support. This gives a span of roughly 3' between supports. I would also screw a 2x4 onto the outer perimeter, on the flat, as well. Here is a drawing:
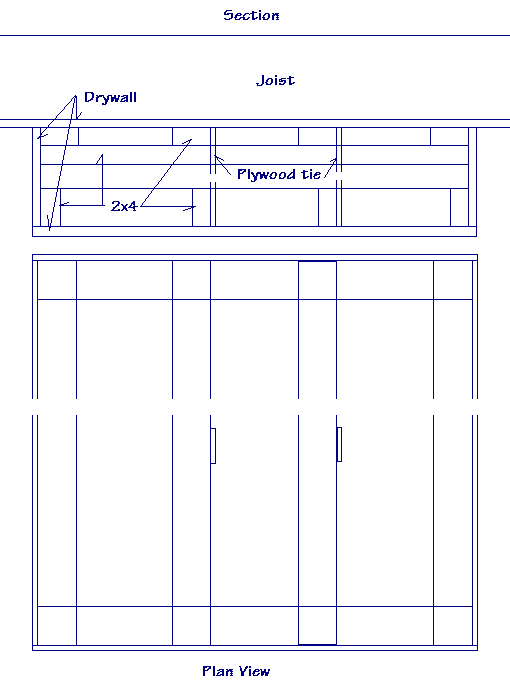
The ties are a couple of plywood pieces 3" wide to tie the 2 layers together.
Hope this helps,
Dave
Thanks Dave.
One question. Are the two 3" plywood ties the only thing holding the top
and bottom frame together before the drywall is attached or are there more
vertical wood framing I am missing?
Suggestion: I tried searching for how to do an arch on your website but
could not find it. You may want to add the word "arch" to the rounded door
article so it can be found by either word.

Dale
[Dan, my brother and webmaster, changed this after Dale gave his excellent suggestion. See article on How to Install an Arch in an Opening]
Hi Dale,
Thanks for the tip on the "arch".
If there are 2 cross pieces, they each should have a tie. The ends are also tie together with the drywall, itself, so a plywood tie in the middle of each cross piece should be good. Notice, too, that the 2x4, on the bottom, holding the new ceiling is vertical for more strength.
Just so you don't miss anything:
4 - 2x4x10' - upper layer
2 - 2x4x6'- upper layer
4 - 2x4x10'- lower layer
2 - 2x4x6'- lower layer
2 - 3/4" plywood 3"x9" approximately
The 10' and 6' are not exact lengths.
Dave
I am studing your 10 X 10 gazebo without the sky roof.
I have a concern about the beam the rafter fits on. You are putting a
2 x 10 beam used as the outside wall which the rafters sit on. I am not following
how to mount the beam on the top of the 6 X 6 post. You mention to allow for the
concrete posts correct width so that the wooden 6x6 post will be 10' exactly to
the outside.
This would then need the outside 2 X 10 beam to be flush with the
outside of the post. You suggest placing a scab on to the post to mount
the beam, but your drawing shows the scab flush with the top of the beam. With a
scab flush to the top of the beam would not allow 10 X 10. Should the
scab be dropped to allow the crown of the outside wall (beam) allow the
rafter to fit on top the 10 foot span? I am interperting your plan
correctly, I have other question I would like to get to later refering
to dropping the hip rafter but first am concern on how to mount the
heavy 2 - 2 X 10' beams first so they are secure. I was thinking to
scale down the beam to 2- 2 X 8' and lower the post to 7' as not being
as large when finsihed.
What do you mean - Make sure the bearing of the beam has 3" on the post.
Can you explain where the 3" refer to on the post.
I am trying to follow every thing to get it correct before starting.
I do have a few questions on the dropping the hip rafter but will ask
that later - thanks.
Thank you very much.
Hi,
This is a good question regarding the scab. With the hip rafter coming off the diagonal corner, I would rather extend the bird's mouth of the rafter rather than drop the scab down 1 1/2". With a 2x8 hip rafter you have lots of wood there.
Don't change the size of the beam, unless you live in an area without any wind or snow load. Put the 2x10 beam together on top of the posts, single 2x10 at a time to keep the weight down (easier to handle). The 3" bearing is required for a beam over 8' long. With a double beam on a 6x6 post, the bearing is not a big issue. In the 12x12 gazebo, I go into more detail on this.
Bearing is the amount of surface area that the beam sits on, be it a post or a sill plate, etc. The outside beam has a bearing of 1 1/2"x6" if the post is a full 6" square. The outside beam on the corner 90 degree from the first side has a bearing of 1 1/2"x4 1/2". It is better to go around the perimeter with the outside half of the beam so you can nail the vertical corners together. Then install the inner side of the 2x10 beam- the first one bearing would be 1 1/2x4 1/2 and the side 90 degrees to it would be 1 1/2x3 which is minimum. If the posts are 5 1/2" square rather than the full 6" square the bearing is less. As long as the outside beam has the full 3" bearing x beam thickness you will be okay.
Dave
How do you clean out ventilation pipes connected to your plumbing
drainage pipes?
Interesting question, nobody has asked me this before. Here is a question of my own. What makes you suspect the vents are plugged in the first place, can you smell sewer gas?
The purpose of a vent is not to allow the drain to flow easily. The drain has lots of air available to it through the sink opening, the shower/tub opening and through the toilet bowl. The purpose for the vent in a plumbing drainage system is to protect the water in the p-trap. Without a vent, the water will drain out of the sink, the shower or tub or toilet and pull or siphon the water in the p-trap out with it. Without water in the p-trap we have the problem of sewer gas escaping into the house.
How could a vent get plugged? Probably something sitting on the top of the vent pipe, like a bird with its nest, although most birds seem smarter than building their home on top of a smelly pipe. It could be snow and ice built up plugging the opening. Or it could be a shoddy job of plumbing where the plumber did not slope the horizontal vent pipe towards the drain. Since the vent pipe is open at the top, drops of rain could accumulate over the years, blocking the pipe at a point where the pipe could be sloping the wrong way, or something could have fallen into it.
To check this out, I would start on the roof to make sure the pipe is not physically blocked at the top. Smell it to see if you can smell the dreaded gas. Remember there could be more than one plumbing fixture hooked to the same drain, so the line could be plugged at one fixture and not the other. If you can smell gas from one of the fixtures in the house, that is an indication you may have a plugged vent near the fixture.
It is required by the plumbing code to have a cleanout at every fixture. Under the sink, the p-trap may have a cleanout, or a cleanout nut above where the drain ties in. Most drywallers just cover these over. Usually, sinks have a slip joint coupling on the tailpiece coming out of the sink and a union p-trap with a nut that will separate the two pieces of the p-trap, enabling part of the p-trap to be removed. This gives a nice access to the drain. With a small sewer snake, you can go up into the vent a ways or down into the drain to feel a blockage. Most blockages in a sink are right in the p-trap itself. I've found all sorts of good stuff in p-traps, dinner knives, tooth brushes, engagement rings, hair balls, etc. If you don't smell any gas coming from a slow draining fixture, I would suspect a plugged p-trap rather than a vent. For a blocked toilet you need to remove the toilet itself, for a shower or tub it is more of a challenge, since the p-trap is hidden in the floor space. You should be able to find a cheap plastic tool to remove hair, etc from a p-trap for a tub or shower. I go more into removing fixtures in my article: How to Remove and Replace Plumbing Fixtures
Hope this helps,
Dave
Dear Dave, This is a question that I am asking for my husband, Buster.
He has built a beautiful log home all by himself (he is 74) and now he
wants to build the frames for the windows. Of course, he wants to make
them out of wood. Do you have any basic instructions for making wood
frames? I took a quick look at all your articles but didn't see any
instructions for this difficult job.
Thank You
Nancy
Hi Nancy,
First, I want to be clear on what you are referring as the frames. Is Buster installing store bought windows and he wants to frame the opening to match the windows, so the windows will slip into these frames? This is a rough opening.
Or is he making custom windows up himself, including the glass, etc., to fit his particular openings?
I can help you design a rough opening or the windows themselves.
I don't have this mentioned on our website, because not too many people these days have the initiative of Buster to build their own log house or construct their own windows, if this is the case.
With a log house everything is special to the way the builder chooses to build it. Usually, they have a spline to stiffen up the logs on the side, then a liner around the opening in which the window is fastened. Then the challenge is to trim the window to keep it weatherproof. Shrinkage of the logs is a factor to be considered, as well.
A small digital camera would be a good asset to have to send me photos of the progress so far. This is invaluable to me to see what you are talking about.
Looking forward to hearing from you,
Dave
Thank you Dave, I will take some pictures and get back to you. I have a
feeling you will be able to help us alot.
You're welcome, Nancy.
Looking forward to your pictures.
Dave
Hi Dave,
I got myself one of those bostitch 6 gallon pancake compressors for some
light woodworking. I have sort of a dumb question. How long (can
you/should you) leave compressed air in the tank? Should you release
the air everytime you finish?
Nothing dumb about this question. Air left in the tank is no problem at all. Mechanics in shops keep their compressors on 24/7. The reason you can drain the tank is for getting rid of the water, not the air. One of the bi-products of compressed air is water. This should be drained out every week or so, depending on how much you use it. Don't leave water in the tank for extended periods or it may rust, as well as taking up volume of air space. Also, be aware that if used outside in freezing temperatures the water may freeze.
What is important is to give the gun a few drops of oil every time you use it or at the start of every day, if using it regularly.
So to answer your question - no, don't release the air every time you finish with the compressor.
Dave
Dave,
I have a lot of oak doors and trim to stain and varnish. I was thinking of
using a HVLP (high volume low pressure) sprayer. Any tips on the best way to
do this or tricks in using the HVLP sprayer?
Note: On my last house I think that the painter diluted the stain (3 parts
thinner and 2 parts stain) and then used the sprayer. I think this allowed
them not to have to wipe off the extra stain. Have you used this approach
and what is the right dilution?
It would be helpful, for me, to know the brand and model of the sprayer and the air capacity of your compressor.
All I can tell you is how I operate my sprayer.
- Start with thinning your finish with 10% paint thinner. Use an oil base (alkyd) finish. I prefer Flecto Professional Finish in semi-gloss. Read what the label says for thinning. Your manual should explain about using a viscosity cup.
- Your compressor should have a large air tank on it.
- You should have a small oil filter/separator just before the gun, you don't want any oil dropping onto the finish. It is also a good idea to keep a set of hoses only for painting and another set only for the tools needing oil.
- Turn the pressure down on the compressor to about 30 psi to start with, your sprayer may be less.
- Play with the adjustment on the sprayer - material adjustment and air volume adjustment. These should be explained in your manual. If you have no manual, you can often find one on the Internet. I could help you with that.
- Practice on a piece of cardboard. Keep the sprayer perpendicular to the surface, both ways, and between 6" to 8" away. Spray to just before the point of run off.
Hope this helps,
Dave
Well, that's it for another month. Hope you receive something useful from these questions and answers.
Dave
|
home | contact | articles | plans | downloads | dictionary assurance | cancel | newsletters Copyright © 1999-2026 by David E. Osborne. All Rights Reserved.
|