Building Confidence
| Volume 10 Issue 8 ISSN 1923-7162 |

Welcome to Dave's Shop Talk's Home Improvement Newsletter of questions from our members on their construction projects, a Tip of the Month and a home remodeling article, both from our website at http://daveosborne.com.
Tip of the Month
Use WD-40 to remove paint transfer from a vehicle bumper after a slight scrape. Ref: Jigs 7: Woodworking Compass.
And a Bonus Tip:
Sprinkle Borax powder, lightly, on carpet or furniture to kill flees in the home, then vacuum up after 24 hours. Ref: Remodeling 16: How to Install a Prehung Door.
Ask Dave!
My customer wants me to wrap the 6x6 treated posts on the deck I just built. Looking to see if you have an easy way to do that. Looking to use 1x8 pine.
Thanks
Here is a drawing of what I have done before. I prefer mitering the corners, rather than over lap them. Notice some type of base around the bottom using extra packing to bring it out further than the rest.
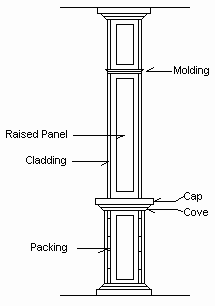
Molding always helps. The raised panel is simply the 1x8 trimmed down to fit. You could go either way, with a raised panel or inset it. The price is what determines how fancy your customer wants.
Dave
Hi Dave,
I need to reseal the bathtub, the part where the walls meet the bathtub. I have done this before but just wanted to check with your excellent skills ie what brand is best...etc..I have always filled the tub with water etc.
Thanks,
Marillyn
Hi Marillyn,
Any one of the 100% Silicone out there is good. I prefer a white or off coloured silicon, since the clear usually has no mildew resistant stuff in it because it is used for aquariums, etc. Some of the tubes say Kitchen and Bath on them which is good. I also prefer the 300ml tube which requires a gun to apply it, easier control.
If you find you are messy with the caulking, a trick is to put painter's masking tape on the wall and on the tub, leaving a 1/4" gap between the two. This way you can use your wetted finger to smooth the silicon into place and pull up the tape right away, before the silicon starts to set. Smoothing the silicon into the intersection of the wall and tub is an important part of the procedure. The silicon will not adhere properly by just applying it from the tube. Besides the finger gives it the smooth edge.
When cutting the end of the tube, try to cut the smallest part off, just enough to get a wire or the small rod attached to the caulking gun down into the tube. Most people apply way too much caulking, then find themselves smoothing it all off with the finger. So apply the least amount you need to fill the 1/4" gap. Wetting the finger with water helps the silicon not stick to your finger.
Hope this helps,
Dave
Could I use MDF to box in a post on a front porch if all edges are painted with oil based paint.
Personally, I would not use MDF outside, even if it is painted. Inside, yes, except in a bathroom with tub or shower. MDF absorbs moisture and swells to the point of crumbling away. If you lived in a desert with no rain or high humidity, maybe. MDF is a very nice product to work with, but not in areas of any humidity in the air or moisture contact. Paint would protect it for a year or two, but then, once installed the humidity will get in behind where you can't re-paint and make the MDF go mushy.
I won't even use plywood outside if exposed, due to delamination of the veneers.
Dave
Feature Article of the Month
(taken from our website: DaveOsborne.com
Basics 3: How to Read a Tape Measure
One of the most useful tools in a tradesman's toolbox is the common tape measure. Let's see how to read a tape measure.
The tape measure can be marked with US or English measurements (feet and inches), metric measurements (meters and parts of meters: centimeters, millimeters, etc) or both shared on the same tape. Most tape measures have common elements to be able to use them easily. Most US tape measures have both inches and foot marks. Notice that the 16", 32", 48", 64", etc. are marked differently than the other inch markers. Some tape measures have small black arrows or pointers with a box around the number, other tape measures have these numbers highlighted in red. These numbers refer to the 16" centers for laying out studs and joists. Most carpenters have the 16" centers memorized up to 8', but a little help on the tape measure is well received when you get to 128". As well as the 16" marks, notice a black diamond mark every 19.2 inches, also called the black truss mark. It was put on the tape measure originally to designate the on-center position of residential roof trusses. Rather than placing 6 trusses in 8', every 16", they saved a truss every sheet of plywood by spreading them out. We don't use this position today with our trusses, which are commonly designed for 24 inch centers.
When you read a tape measure a little knowledge of math is needed. We know that 1/2 is the same as 4/8, 8/16, 16/32, etc. We could refer to the 1/2" mark as the 16/32" mark but we usually use the simplest numbers possible. Since we know that 16/32 is 1/2, when looking for 15/32" on the tape measure, for example, it is the first 32nd before the 1/2" mark.
Actually, in the field a carpenter refers to a 32nd as plus or minus a major fraction. For instance, 13/32 is 1/32 less than 14/32 or 7/16, so we say "7/16 minus" and 11/32 is 1/32 more than 10/32 or 5/16, so we say "5/16 plus". This is a fast way of reading the tape measure on the job when taking a measurement of something to cut it to fit. What you should do is memorize the common fractions down to sixteenths.
Here they are:... Read more at http://daveosborne.com/dave/articles/how-to-read-a-tape-measure.php
Almost the End
Not too many questions this month. It must mean you are enjoying our great outdoors.
Well, that does it for another month. I appreciate your emails, with your questions and comments.
If you need more advice, please become a member of our website, then send me an email.
Your source for building tips, woodworking & furniture plans, house plans and building advice directly from Dave...
Hi, I'm Dave Osborne. With over 50 years experience as a journeyman carpenter, foreman and contractor in heavy construction I enjoyed working with apprentices and sharing the tricks of the trade that others shared with me. Now I get emails from Members all over the world and we include many of my answers in our Free Monthly Newsletters. Some of my answers include drawings and instructions specific to a project, but may also answer your questions. I use correct construction terminology, so you can confidently inform your building supply dealers or contractors exactly what you need.
ASK DAVE!
The Benefits of Membership
Membership gives you full access to our hundreds of how-to articles, woodworking plans, converters, calculators and tables. Our Stair Calculator is one of the most popular on the internet. We have projects you can build for (and with) your kids, furniture for your wife, and sheds and gazebos. If you run into a problem or need advice your Membership includes unlimited email questions to me through our Ask Dave quick response button.
Join us!
Copyright © 1999-2024 DDFM Enterprises. All Rights Reserved. DDFM ENTERPRISES, DAVE'S SHOP TALK and the Dave Osborne logo are trademarks and service marks owned by DDFM Enterprises. All other trademarks on this site are the property of their respective owners. Site design by Design Strategies, Inc.