Building Confidence
| Volume 12 Issue 1 ISSN 1923-7162 |

Welcome to Dave's Shop Talk's Home Improvement Newsletter of questions from our members on their construction projects, a Tip of the Month and a home remodeling article, both from our website at http://daveosborne.com.
Tip of the Month
Make a small wedge cutting jig. Ref: Jigs 4: Feather Wedge Table Saw Jig.
And a Bonus Tip:
Make a table saw tapering jig for tapering legs, etc. Ref: Jigs 5: Table Saw Tapering Jig.
Ask Dave!
Hi, Dave,
I've got a long slope going down to a lake, on which I want to put a long stairway, about 120 feet. The angle going down is 25 degrees. How can I use this info to figure my unit rise and run for the steps (Obviously, I can't measure the total rise and run directly)?
Jerry
Hi Jerry,
There are two ways that you can do this - get the angle and length of the slope and measure the rise and run down the slope.
How accurate is your angle and your measurement?
As I mention in my article on building stairs, carpenters don't use angles for laying out the stringers, we use rise and run. Having said that, it is very useful to use trigonometry to arrive at the total rise and run, then convert that info into something we can use to actually layout the stringers, individual rises and runs.
Based on your info being accurate, a slope of 120' and 25 degrees, we can determine the base of the triangle - the total run and the height of the triangle - the total rise. BUT, it isn't as easy as that. A slope of 120' needs to have a landing no more than 12 vertical feet. This is the building code.
If you confirm with me your measurements and angle - within reason, I can give you a better idea of how and what your stairs will be like.
Happy New Year,
Dave
Hi, Dave,
Actually, this is a project for when I get back up to my cottage, which is 400 kilometres away. The angle and length of slope are just guestimates. What I was hoping to get from you was the method.
Now, I'll take this one step farther, and tell you that I plan to make concrete steps: I plan to use the "stringer", which would actually be a series of planks, nail the risers on, and, with the whole thing lying on the ground, pour concrete into it in order to make concrete steps. Every section will have at least one pocket or trench going down below the frost line, and I plan to do this in series. Looks like cracking open my high school Trig book may well be in order.
Having access to someone like you is a phenomenal find.
Happy New Year right back at you, Dave!
Jerry
Hi Jerry,
Hmm! I'm confused with your "stringers" - planks on the ground. Is the concrete poured onto the planks?
My questions:
- what does the slope consist of: sand, rock, fill, soil?
- how did you arrive at the 25 degree slope?
- is this drawing the general idea?

For a total rise of 50.7' we need to put in 5 landings.
Here is my scenario, strictly hypothetical until you give me accurate measurements of the angle and slope or total rise and run:
100 rises at 6.08" = 608" = 50.7'
94 runs at 11.37" = 1068.8" + 5 landings at 47.4" = 236.8 = 1305.6"
5 landings at 36" square - a landing is considered 1 run (takes the place of 1 step). This makes all the rises the same above and below the landings.
The reason the Code says no greater height than 12' between landings is that if someone falls, he will roll down the stairs to a landing and not go all the way to the bottom. A rise of 6" with a run of 12" is perfect for small kids and older people. This is what they have in public buildings.
To build these stairs out of wood or concrete, is to layout the position of the landings, first, then build or pour them. Then layout the stringers and build or pour them. I can go into details later.
By the way, did you get those attachments open okay for the shed drawings?
Hi, Dave,
Yes, I got all your attachments for the shed drawings.
The concrete will be poured into the planks. (Unit risers will have planks on them.
The ground is extremely rocky soil.
I have a rotary angle metre, which will give me the exact angle when I get up there, but your total rise figure of 50.7' tells me that my guestimate is pretty close, if not bang-on!
The slope consists of extremely rocky soil - I'll say that again-"extremely rocky".
How did you arrive at your figures?
Jerry
Hi Jerry,
Okay good on the shed drawings.
Okay on the planks for risers.
Rocky soil (solid rock out-cropping) is good for support for the landings.
Cool on the rotary angle metre - never took that in school!
Arrived at my figures with a bit of Trig and simple arithmetic. Trigonometry is just the ratios between the lengths of the sides of a right triangle (a triangle with one angle at 90 degrees).

In the diagram you can see that if the angle is small then the length of O divided by the length of H (ratio of O to H) is going to be small (because O gets smaller compared to H) and if the angle is bigger then O divided by H will also be larger.
There used to be books of Trig Tables which gave the ratios of the different sides for every size angle, but now we have $10 calculators that give this data (and with much greater precision).
All we have to do is know that a sine (generally abbreviated "sin" on a calculator and in formulas) is the ratio of the length of the side opposite the angle of the triangle you're working with divided by the hypotenuse (the side of the triangle opposite the right angle of the triangle).
In our case, we know that the angle is 25 degrees, so the calculator says the sine of 25 degrees is .4226, so we just plug that into the formula to calculate the length of the side opposite (which in this case is the total rise of the steps) and we have:
Length of side opposite = .4226 X 120' (the length of the slope our
stairs are going to be on)
Total rise = 50.714 feet.
To calculate the total run of the stairs on the 120' slope we just use the formula to calculate the length of the side adjacent to the 25 degree angle. First we calculate the cosine (abbreviated "cos" on calculators) of 25 degrees, which comes to: .9063
Length of side adjacent = .9063 X 120'
Total run = 108.757 feet.
To check my figures I used good ole Pythagoras or what we call 3 - 4 - 5 method. Pythagoras discovered 2500 years ago that the longest side of a right triangle multiplied by itself equals the sum of the smaller sides each multiplied by themselves. From the diagram:
H x H = (O x O) + (A x A)
It's called the 3 - 4 - 5 method because a triangle with sides that have lengths in ratio of 3, 4 and 5 is always a right triangle.
5 x 5 = (3 x 3) + (4 x 4) or 25 = 9 + 16.
So, our long staircase down the 120' slope with a total rise of 50.714' and a total run of 108.757' should satisfy this formula:
120 x 120 = (50.714 x 50.714) + (108.757 x 108.757)
14400 = 2571.91 + 11828.085 which checks out.
From the total rise we can see that we need 5 landings to stay under our 12' requirement.
The landing must be as long as its width.
Total rise breakdown: convert to inches: 50.714' x 12 (inches per foot) = 608.57", which is 100 rises at 6.08" each.
Total run available is 1305.12". We need 5 landings at say 36" = 180", so we need 1125.12" for runs. 100 rises means 99 runs at 11.37" = 1125.12". Actually, 5 of the runs are landings so: 36" + 11.37" = 47.37" for the landings, leaving 94 steps, each with a run of 11.37". The runs can be played with a little, but the rises cannot be, unless you divide the total rise equally by one or more of the total number of rises. In other words, the total rise is a constant which is divided up by a whole number to give the individual rise an amount that is within the envelope of safety for the rise to run ratio.
A more complete process is explained in my article on our website: Stairs 1: How to Build Stairs at http://daveosborne.com/dave/articles/how-build-stairs.php and Stairs 2: How to Cut a Stair Stringer at http://daveosborne.com/dave/articles/stair-stringer.php as well.
Dave
Hi, Dave,
You may be shocked to know that I never took Trig in high school, because, at the time, I assumed there was no practical application for it. Boy, was I wrong! I did take Geometry and Algebra, though, and really enjoyed both. In University, I opted to enter into StupidLand by taking political Science, something which I now regret greatly. Thanks for opening my eyes to Trig - amazing!
Jerry
No, I'm not shocked, because I missed Trig in school, as well. A few years ago, I had a client ask a question about stairs to a loft. I needed trig to figure it out. My webmaster brother, Dan, showed me the tricks to figure it out. I also recruited my Math nerd daughter who tutors kids in Math, including Calculus. I find it very useful when only one side and angle are given in a right angle triangle. I too liked Algebra and Geometry in school and have used both of these in the field. I remember one job up North. I was foreman doing fancy form work. Two young carpenters were having trouble mitering an angle. I laid it out full size on a piece of plywood. Made a large "compass" with a strip of wood and a nail in it and bisected the angle. They were impressed. Ha! It became one of my articles: Jigs 7: Woodworking Compass.
Dave
Three notes:
1.) Your woodworking compass is practical, simple and down-to-earth. A mental keeper!
2.) With regard to the stairs, wouldn't a five 3-ft.-square landings throw the plane of my stairs off in a big way?
3.) Do you have a transit in your arsenal of tools. Is it necessary?
Jerry
Hi Jerry,
1.) Thanks lol!
2.) Not really, this is figured into the total run. If the total run is correct, the whole stair system will finish at that point in the triangle where the total run ends. Without the landings and their run added, the stairs will have to be dug into the slope. Your slope is perfect for the landings and stairs. Of course, the slope won't be a perfectly straight line as in our triangle, you need to dig here and fill there, type of thing. A concrete set of stairs, such as this, is not the easiest thing to actually build, since the slope of the stairs isn't exactly like the slope of the ground. With a wooden set of stairs we can over come this quite easily with posts. With concrete we can put down posts alright, but we need more support for concrete than for wood. For example, with wood landings in place, all the stringers will be attached to the landings and the odd post coming down to solid rock or a pad to take the bounce out. With concrete we need to pour the concrete right down to the rock or compacted fill and the stairs need compacted fill under them as well. The concrete steps could be designed to be self supporting with re-bar, etc from landing to landing, but this requires more work. This is something to consider - pressure treated wood lasts for 40 years, they say. Concrete will last virtually forever, but at a greater cost - financial as well as your body. Someone needs to pour the concrete. It all depends on the budget!
3.) Yes, I have a builder's level, not a transit, though. A surveyor could give you the actual total rise and run, but there again it affects the budget.
Dave
Hi, Dave,
I plan to use compacted fill and re-bar. I have a very big gas-powered cement mixer, and plan pour it myself. I like the landings idea, and, it conforming to code, is even better (that's something I wouldn't have known without your input!). My neighbour made his steps out of wood, and just laid the stringers on the ground, attaching them to posts at regular intervals. I don't know, I like the look of concrete instead of wood.
I was considering adding a lot of stone, about the size of a man's palm into the concrete. Would this be a bad idea?
As to the transit, this was something I was considering in case I dug a cellar, putting in footings, etc. for an addition to the cottage.
Thanks for all your input. This thing is already starting to take shape, and I'm not even there yet!
Jerry
Mixing the concrete is one thing, getting it to the forms is my concern. You can rent a concrete pump which would be the easiest if he has access from the top and the bottom, but they aren't cheap.
The large stones is okay as long as concrete surrounds all the stones, don't have one stone up against another, for instance.
A transit has a scope on it that can swing up and down. It can swing angles and the scope can be fastened in place as a level. The builders level scope is permanently fixed so it can only view level (when properly setup) and a lot smaller than a transit.
Yes a transit is good, but usually all you need is a builder's level to get everything good and level. Usually we can get things pretty square with a measuring tape - measure the diagonals. Rental yards have laser levels which emit sound and a beam. One guy can do the job himself, rather than with my old school level, I need a guy to hold the rod. Old school would be better for laying out the landings.
Dave
Hi, Dave,
My mixer is positioned right beside the forms. I have a winch on top, and will be able to jimmy it up as I go along (I'm planning to start at the bottom, and work up). I'm still having trouble imagining the landings, and them not throwing the steps out of line.
Jerry
Hi Jerry,
Here is a screen shot of a quick drawing I made to help visualize the slope of the ground with the placement of the steps. I would put a landing on the top, as well as the bottom, maybe as a sidewalk.

This drawing isn't to your design, but it should give you an idea of the relationship of the landings, steps and the slope. You can see you need to dig out in places and fill in others. What the drawing also shows is how to layout the positions of the landings. This is why you need to get the angle and measurements of the slope as accurate as possible. Obviously, the slope isn't going to be as straight as the drawing, you can adjust this as you form the steps up the slope. What is important when building stairs is that the risers and treads are within 1/4" between landings. I build my steps with the the landings as extensions of the runs or treads. This gives the entire staircase the exact same risers and treads. I've had inspectors actually walk up the stairs, measuring the risers as he goes. It is not that hard when you lay it out carefully. With 100 risers in a set of stairs, you can see how important accuracy is - 1/16" out for every riser, puts the total rise out by 6 1/4". This is not that big a deal though, considering you can make adjustments to the dirt on top, easy enough.
Sounds like you have got the plan together for pouring the concrete.
Dave
Hi, Dave,
So, as I suspected, I won't be able to lay the stringers right on the slope, but will have walls to which I attach the stringers to build up cement leading up to each landing, is this correct?
Also, do I have to worry about the steps heaving because of frost?
Jerry
Hi Jerry,
Snow is a good thing. It is like insulation, keeping the frost from going too deep. You get heaving in soil, usually not in rocks where there is good drainage.
Sounds like you got the forms idea, okay.
Dave
Hi Dave,
I'd like to build a place in my hall closet to store the many pairs of gloves and stocking caps that now are thrown onto one shelf in a giant jumble.
I came across a design that would work; it's really a ladies shoe storage unit. I'm not ready for cabinet making but this seems like something I could tackle.
I was reading your info on cabinet making. It seems the same basics apply (rails, stiles, dadoing forget the names of the shelves and dividers now) or am I making this more complicated than it needs to be for this kind of storage without doors or drawers? Picture attached.
PS Have not started on the log holder yet. Still doing it the old fashioned way: Lay log over stump and fight.
Thank You,
Hi Trace,
Happy New Year!
Yes, you can do this. The picture shows it looks like 1/2" vertical dividers and shelves in the inside without dadoes. We usually do dadoes where they intersect with themselves in 3/4" material. The dado is 1/4" deep leaving 1/4" in the middle for support. With 1/2" material you could just dado the top side of the shelf and nail the bottom divider in below before you slide the top divider in place.
Dave
Dave, I am painting a concrete floor in a large refrigerator in a warehouse. it is 34*F all the time. Any suggestions on what type of paint I should use.
This is a good question and one that I'm unable to answer with no background in the food industry. Here is a link to a good article that gives a few answers: http://ezinearticles.com/?FDA---Approved-Food-Processing-Facility-Coating-Materials&id=3618220
Any coating you get will give off fumes when drying or curing and needs a temperature of over 10*C when applied. So everything should be out of there and the heat on when applying your finish. The page that I gave the link to has other links to go to for more info.
Sorry I can't be more helpful,
Dave
Thanks Dave,
I have another question for you. I have your plans for a Shop Work Bench Table and I am slightly modifying it and I would like to add 4" swivel casters to the bottom so I can move it around my garage. My question is can I just cut the legs a little shorter and lag the casters to the bottom? I'm not sure if that would hold. If there is a better way can you modify the drawing or let me know . Thanks
Eric
Hi Eric,
Yes, cut the legs shorter to allow for the castors. One thing that I use my table for is to back it up to my table saw for use as an extended table to rip long boards or plywood sheets by myself. So keep that in mind when cutting the height to fit the table saw. the design of my workbench shows double 2x4 legs - so the bottom area of the leg is 3"x3 1/2". If this is large enough for the plate on the castor to be screwed to the bottom, fine. If not, cut the legs another 1 1/2" less and fasten a 2x4 or 2x6 plate to the bottom of the legs. If you won't be using the table for hammering over the center legs you could cut the 2 center legs off and eliminate the castors at those points. With the 2x4 ledgers at the top and the bottom, you don't really need the support there, just for light work. Watch the location of the bottom shelf, this is getting too close to the bottom of the legs that you need to cut off - counting the 4" wheel and plate + the 1/2" for the 2x6 plate. Another thing, if you will be using the bench as a table with your table saw - get two castors with a brake, or devise another way to stop the table from rolling when you want it fixed.
You mentioned lagging the castors to the bottom, I would just use wood screws - the end grain splits easily if the screws are too large. Go with 4 - #10 x 2" flat head screws maximum for each castor. If screwing into the end grain of the leg, drill a pilot hole, first, if in the plate, you don't need to drill a pilot hole for #10.
Dave
I'm in the process of replacing my carpeted "L" shaped staircase with red oak treads that measure 1 X 11 1/2 X 48. My first challenge is providing a 10 1/2 run to facilitate the new treads, and my current stringer has a 9" run and 7 1/2" rise; I realize new stringers may be the only option here. That's what brings me to the next challenge; I used the Stair Calculator to generate new stringers with a 10 1/2 run, but I'm dealing with a fixed "Total Run Length" of 89" which is the distance from the floor to the Landing. I can't increase the Total Run Length to the 105" as suggested by the Stair Calculator due to code restrictions. (must provide 36" clearance from the bottom stair to the 1st obstruction which is a Wall). I'll attach pictures and drawings of the issue's and hopefully you can help me come up stringer measurements for 1st floor to Landing, and Landing to 2nd floor.
Current Staircase Measurements
Run 9
Rise 7.5
Total Rise 83.75 (1st Floor to Landing)
Total Rise 37.00 (Landing to 2nd Floor)
--------------------------------------------------------
Total Rise 120.75 (1st Floor to 2nd Floor)
Total Run 89.00 (1st Floor to Landing)
Total Run 38.00 (Landing to 2nd Floor)
------------------------------------------------------
Total Run 127.00 (1st Floor to 2nd Floor)
Lower Stringer Constraints
-------------------------------------
Total Run 89.00
Total Rise 83.75
Length of each Run 10.50
Upper Stringer Constraints
-------------------------------------
Total Run 38.00
Total Rise 37.00
Length of each Run 10.50
The Total Rise of the Staircase is 120 3/4" and the Total Rise up to the Landing is 83 1/2". My problem is the calculator doesn't account for landings, and doesn't allow a user defined Total Run Length. I've tried several iterations of calculating the stringers, but I'm really stuck. Please help. Please advise.
I've also attached a drawing that illustrates the measurements of my current staircase. Is it possible to send multiple pictures or documents? I can forward more pictures...just send me an email I can reply to.
Thank You!
Mark
Hi Mark,
First of all welcome to our website.
By the way, good info for your question.
You have two options - replace the stringers or you can keep the old ones and add the new treads. Let's start with keeping the old stringers with the 9" run. You have limited run so why replace them if you don't have to. I'm concerned with the 48" width. Is there a center stringer and what is the width of the existing tread now the full width of the tread with nosing, after the carpet is removed?
Pictures or drawings of your situation are really helpful. I am on a cable internet so can receive about a maximum of 10 Mega bytes of memory for each email. All I need for a resolution is 640x480, so resizing your pics helps.
I'll wait for your response, before going further.
Dave
Dave,
Anyway here goes...thanks in advance for your patience, but believe me I've already consulted a few so-called stair professional's and you are my last resort.
I've already removed the carpet, finish trim, and railings and I'm at the point of no return. Your concern about the tread width is noted, and I do have 3 stringers; but the actual tread width will be 46"; which factor's the Kick Panel (wall), the current tread width, drywall, and open side trim/kick panel. Long story short, these will have to trimmed down a couple inches from the original 48" width to fit my current stair width. None the less there still is a center stringer present.
History:
The original (2X8) riser and (2X10) run lumber has been removed from the stringer's and replaced with yellow pine (3/4 X 6 1/2) riser panels and (1 X 9 3/4) treads. These panels were introduced so that the Red Oak Treads and Primed / Painted Riser Panels could be glued on top of the yellow pine. Obviously, the nose can not exceed 1" due to code restriction.
Thanks Again,
Mark
Dave,
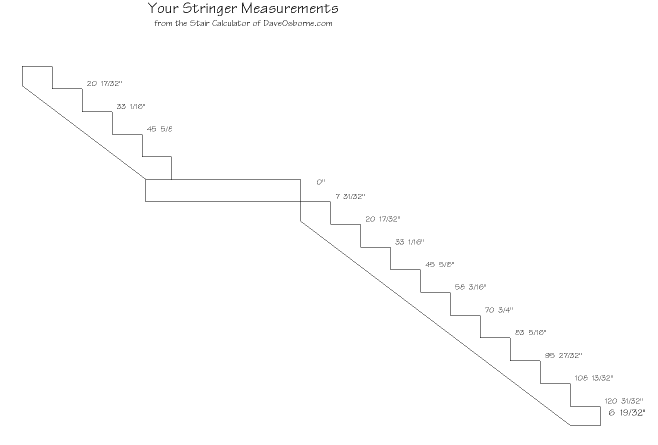
Thanks again for all your time and effort reviewing my stairway geometry. Just wanted to take a moment to clear up a couple things. The longer stair section goes from the 1st floor to to the Landing (10 Treads, 11 Risers), and the shorter section starts at the landing to the 2nd Floor (4 Treads, 5 Risers). The reverse of "Your Stringer Measurements" you provided.
Hi Mark,
The code requires that the landing be square with no overlap, as you have drawn. This causes a tripping situation. If you go with the original then I don't think the inspector will say anything with the grandfather clause in effect.
Here is the drawing you requested.
Dave
Hi Dave I have to cut curves in 24 - 4X 10 x 6'6". The width in the center of the 6"6" is 5 1/2 " curved to 0 at the ends. What is the best tool to use for the Job.
Hi Vic,
I say a band saw would be the best tool, if you have one.
Dave
Feature Article of the Month
(taken from our website: DaveOsborne.com
Jigs 6: Circular Saw Guide
In the good ole days before the time of fancy power miter and cut off saws, when framing a house, we would use nothing but our trusty old circular saw—Skilsaw, we called them—for cutting and ripping our lumber. We used plywood, so I'm not that old. This was also the time before pre-cut studs came onto the market. In order to cut our studs quickly and accurately, we would make ourselves a jig or circular saw guide.
Basically it would consist of a 2x10 floor joist with 2x4's nailed along one side as a circular saw fence and a short 2x4 block opposite on the right hand end. Spanning the 2x4 and block was a piece of 3/8" or 1/2" plywood with a strip nailed to the left side of it to act as a guide for the circular saw base plate. We wedged the circular saw blade guard up, not a healthy thing to do, but safe as long as the circular saw was left on the circular saw guide. About a foot or so to the left of the circular saw guide we notched the circular saw guide fence about a foot in length to enable us to grab the stock and move it easily. This circular saw guide was designed to... Read more at Jigs 6: Circular Saw Guide
Almost the End
Thanks for your emails this month.
If you need advice on your projects at work or home, please become a member of our website, then send me an email. Check out our website! http://daveosborne.com
Your source for building tips, woodworking & furniture plans, house plans and building advice directly from Dave...
Hi, I'm Dave Osborne. With over 50 years experience as a journeyman carpenter, foreman and contractor in heavy construction I enjoyed working with apprentices and sharing the tricks of the trade that others shared with me. Now I get emails from Members all over the world and we include many of my answers in our Free Monthly Newsletters. Some of my answers include drawings and instructions specific to a project, but may also answer your questions. I use correct construction terminology, so you can confidently inform your building supply dealers or contractors exactly what you need.
ASK DAVE!
The Benefits of Membership
Membership gives you full access to our hundreds of how-to articles, woodworking plans, converters, calculators and tables. Our Stair Calculator is one of the most popular on the internet. We have projects you can build for (and with) your kids, furniture for your wife, and sheds and gazebos. If you run into a problem or need advice your Membership includes unlimited email questions to me through our Ask Dave quick response button.
Join us!
Copyright © 1999-2026 DDFM Enterprises. All Rights Reserved. DDFM ENTERPRISES, DAVE'S SHOP TALK and the Dave Osborne logo are trademarks and service marks owned by DDFM Enterprises. All other trademarks on this site are the property of their respective owners. Site design by Design Strategies, Inc.