Building Confidence
| Volume 15 Issue 9 ISSN 1923-7162 |

Welcome to Dave's Shop Talk's Home Improvement Newsletter of questions from our members on their construction projects, a Tip of the Month and a home remodeling article, both from our website at http://daveosborne.com.
Tip of the Month
To help hold up a set of stairs when the box joist is not large enough, install a plywood riser onto the stringer and then fasten the stringer, etc. onto the riser.
And a Bonus Tip:
Save worn out cotton and polyester socks (not wool) for staining wood projects.
Ask Dave!
I'm very much an amateur and just joined your site.
Building a U-shaped staircase with a small (4'x3') landing after five 7 1/4" risers. This is followed by nine more risers to loft. (total rise 101 1/2") all for a very "tiny" studio. I assume I first have to site and construct the landing and your instructions are clear except 1- do I need one or two 2x4s for each corner, and 2- what is a "scab"? The other thing I'm not sure of is how to attach the upper run to the loft joist since it's only a 2x8 and so I can drop it below that?
Yes, build the landing first. I would go with 4 legs - 1 in each corner.
A scab is a small piece of plywood or lumber, which is fastened over a joint to keep it rigid. This is from our Construction Dictionary, via the menu at the top of each page of our site.
Normally with a large or high landing, I would build the supporting posts with two 2x4s nailed together, one under the 2x4 frame of the landing and one along side it but to the under side of the sub-floor, ie. 3 1/2" longer. If the posts are against a wall, just cut the 2x4 post under the 2x4 ledger of the landing and fasten the post and the ledger to the wall. It would be good to put a scab over the joint, as well. This scab would be 1/2" to 3/4" thick plywood, not OSB or fiberboard, as shown in this drawing:

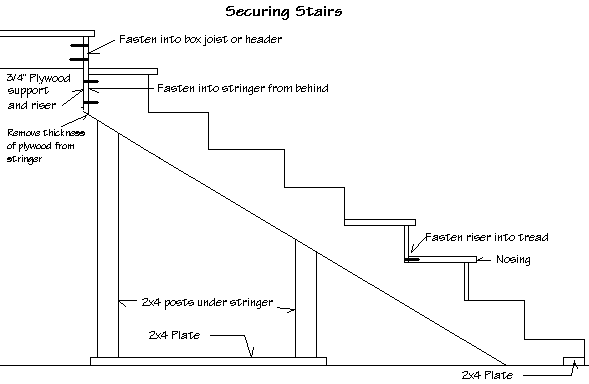
It is important, when securing stairs or a landing to support the stringer or ledger under it rather than nail a 2x4 over it. Don't depend on nails alone to support a structure. Support it rather with blocking or support underneath it.
Hope this helps and welcome to our website. If you need more clarification, please don't hesitate to ask.
Dave
Thanks Dave. Unfortunately, I screwed up in my assumptions. I was trying to design a U-shaped stair and my calculations worked fine, but only for a 90 degree turn. Are there any instructions on your site for building a U-shaped stair with a landing? Given the limited space I have, to make that 101.5" rise, it looks like it'll have to be 6 risers to the landing and another 6 to the loft. Total working width (both runs) is only 39" and I'm assuming roughly a 7 1/4" rise per step. Looks like the platform will be 43 1/2" high and I'm hoping to make storage in the space underneath it. Thoughts?
Best, Steve
Hi Steve,
Could you give me all the measurements of the space you have, including the headroom and I'll try to figure something out for you.
Dave
Hi Steve,
A couple of notes on a U-shaped stairway:
- the width of the landing is twice the width of the stairs
- one landing can be 1 rise above the other, which takes the place of a run or step.
Another option is to go with 13 rises at 7 13/16.
Dave
Hi Steve,
Here is a better suggestion. Check this page out: Lapeyre Stairs.
Let me know what you think.
Dave
Thanks Dave, but I think I've got things figured out. In my diagram I misstated the angle of rise I was looking for....it's 51 degrees (too shallow for a lapeyre which I think is a little beyond my ability). If you refer to the diagram I sent, what I was trying to figure out was where and at what angle to make my cut to have the upper end of the stringer butt up against the upper floor joist (below the loft) for a tight fit. I figure with the floor cut already made to give my 51 degree slope, if I then turn the stringer upside down and mark where it hit's the loft floor, I should be able to make a 39 degree cut at that point, turn it back over, and have it fit snug against the floor and the joist. What do you think?
Steve
PS...I did it with paper cut outs and it seems to work!
PPS...Even doing all the math stuff (SohCahToa) I couldn't find an easy way to calculate it other then by laying it out.
I agree, laying out full size is the best way to get accurate angles. Your angles would be 51 and 39, alright.
Dave
Almost done! Got the stringers up and only have to lag bolt them and then put the (already cut) treads on. Thus far my most complicated woodworking task. First was my work bench, then my miter table, and now my first set of stairs. Can't wait to tackle the next project and thanks for the help!
Best, Steve
Way to go, Steve!!
Dave
I am building a basement bathroom. The sub-floor will be a few inches above the concrete floor as I need to raise the shower drain up so it drains down into the Sanishower pump. I want to use tile for the floor. I will be using 12" to 14" inch simple square tiles. My question is should I use concrete board over the OSB subfloor, or should I use a membrane? Any other hints to putting in a tile floor is appreciated. Thanks Nick
Hi Nick,
First, personally, I would not use OSB sub-floor, but would use 5/8" or 3/4" plywood T & G. The code calls for 1 1/4" of thickness for a sub-floor for tile. If the OSB is already down, go with 1/2" cement board or another layer of 5/8" plywood. This is the bathroom floor, not the shower floor. I assume you would use a shower pan for the shower floor!
Checkout my article: How to Lay Ceramic Tile.
Dave
Hi Nick,
I'll answer under your questions...
Dave
Dave,
Thanks for the quick reply. I have another question. 20 year ago I put tile directly over a plywood floor. Today I am told this is a bad practice and I should use cement board or a membrane between the sub-floor and the tile. The tile I put down 20 years ago is still good. Obviously you can place tile directly over plywood but should I?
It is simpler if I placed the tile directly on, say, 1" plywood. What do you think? If it is OK to tile directly to plywood, what grade (obviously the top side should be A) but should the plywood itself be exterior grade?
All plywood, these days, have exterior glue. Make sure you get the correct thinset, which is for plywood and not concrete. It will say on the bag. I just use the liners or concrete board in the shower, itself.
The area of the basement bathroom is yet to be depressed. A local concrete contractor will dig (12" down) out the area of the basement where the bathroom will go and put in a new depressed concrete floor. (My son is 6' 4" and wants full standing headroom in the shower, hence the dig down.)
I am thinking the plywood sub-floor should be raised off the concrete floor on pressure treated 2x4. My concern is keeping the air space dry and mold free. Any ideas?
Yes, use pressure treated wood. Put a foam sill gasket under the 2x4s. These are common in rolls for 2x4 or 2x6.
Last question ... I need to drill into the tile for screw to hold down the Sanicompact toilet. What is the best way to drill into tile and make clean holes?
If the tile has a glaze on it, it is almost impossible to drill. Try using a masonry bit - carbide. Another option is a diamond blade on a 4" angle grinder. I use these for cutting inside corners, etc. These little blades are not that expensive. You probably could rent the angle grinder with blade if you don't have one, as well. Since the toilet will be on top of the tile you could be a bit messier with the hole for the screws. Then caulk up around the hole and the screws as you tighten it down, with a final caulking around the toilet itself, after the grout sets up.
Thanks ... Nick
Dave,
I have a really dumb question. It is about exterior doors. (I need to buy one for a project I am working on.) I understand the difference between steel, fiberglass, and wood doors. And I certainly do understand that fancy decorative windows in door jack up the price.
However if you go to Home Depot, or Loews, or alike you see very similar doors of the same size and construction and nearly identical windows, and sometime even the same brand, yet one door cost say $375 and the other door cost $775. Is there really functional differences between them or is more that what is in fashion cost more money because they can get it?
A related question is about brands. Say for example: is a Pella door really worth almost twice the cost of a Thruma Tru door? The manufacture's description of the doors I am looking at are virtually identical.
I am willing to pay good money for quality so if a (again just an example) Pella door will work better and look better a decade from now then I will buy the better door, I just do not want to pay for a name.
Thanks ... Nick
Hi Nick,
I don't consider this a dumb question.
When I'm unsure of a product or service, I google it for a review. A lot of the better stores provide this feature at the bottom of their ad or before you go to the checkout.
I googled this: therma tru door review and came up with a bunch of horror stories.
I googled this: Pella door reviews and came up with a different story.
You have to understand that some people will not give anything a good review. You have to look at lots of the reviews and then make a decision based on the majority. Some of the problems may be the install and not the brand.
I built my house in 1992 and have no problem with any doors or windows. I bought them from a local door plant which had a good reputation from the builders. It is good to check these things out before you give them your credit card number!
Dave
I used the zip plywood system with type on the exterior walls. Do I need to put another substrate such as tar paper on before I put on the cedar shingles? Thank you Bruce
No, the house wrap is included in the system, just tape the joints. Make sure you check with your local building inspectors to be sure they are happy with this system.
Dave
Feature Article of the Month
(taken from our website: DaveOsborne.com)
Roof 1: Rafter Tables on the Framing Square
Most trades people and home handypersons have a framing square (also called a steel square, rafter square or carpenter square) in their woodworking tool kits. If you don't already have one here's a handy link to a good framing square. (Buy a framing square on Amazon.)
However, not many people really know how to use the many scales and tables a framing square has. This article covers only the rafter tables. The other tables on the framing square are covered easily and fully in a very good book I highly recommend called Modern Carpentry by Willis H. Wagner. (Get the book from Amazon.)
The framing square is made up of two legs joined at the heel to form a right angle. The longer leg of the framing square, called the body, is 2" x 24" and the shorter one, called the tongue, is 1 1/2" x 16". If you hold the body of the framing square in your left hand with the tongue pointing to your right you are looking at the face of the framing square, which usually has the brand name on the heel. The back of the framing square is the reverse side. Along the edges of the body and tongue on both sides are the graduations of the framing square. These consist of the following fractions of an inch: eighths, tenths, twelfths, sixteenths and thirty-seconds.
For the purpose of this discussion on the framing square we will only be interested in the rafter table and how we determine the length and cut of a common rafter.
The pitch of a roof can be expressed in three ways (each example has the same pitch):
- As a ratio of the rise to a unit run of 12" (e.g. 5 and 12 pitch)
- As a ratio of the total rise to the span (e.g. 5/24 pitch)
- In degrees (e.g. 22.5°)
A carpenter uses the first method, a building code uses the second and a mathematician uses the third.
A carpenter with his framing square in hand will refer to the roof pitch as 4.5 and 12, 5 and 12, 6 and 12, etc. I prefer a pitch of 5 and 12 for an average roof because it is the easiest pitch to calculate.
If you measure...
The above was taken from our webpage: Roof 1: Rafter Tables on the Framing Square
Thanks to all the questions sent in this month. Hope I was able to answer yours, as well.
Get complete access to our website - Subscribe Now!
We BUILD CONFIDENCE. If you need advice on Building or on your projects at work or home you can make a very small investment and subscribe to our website, then send me any questions or uncertainties you might have via email. There is no extra charge. That is all part of your membership to our site!
Please tell your friends and family about our site and this Newsletter.
Your source for building tips, woodworking & furniture plans, house plans and building advice directly from Dave...
Hi, I'm Dave Osborne. With over 50 years experience as a journeyman carpenter, foreman and contractor in heavy construction I enjoyed working with apprentices and sharing the tricks of the trade that others shared with me. Now I get emails from Members all over the world and we include many of my answers in our Free Monthly Newsletters. Some of my answers include drawings and instructions specific to a project, but may also answer your questions. I use correct construction terminology, so you can confidently inform your building supply dealers or contractors exactly what you need.
ASK DAVE!
The Benefits of Membership
Membership gives you full access to our hundreds of how-to articles, woodworking plans, converters, calculators and tables. Our Stair Calculator is one of the most popular on the internet. We have projects you can build for (and with) your kids, furniture for your wife, and sheds and gazebos. If you run into a problem or need advice your Membership includes unlimited email questions to me through our Ask Dave quick response button.
Join us!
Copyright © 1999-2024 DDFM Enterprises. All Rights Reserved. DDFM ENTERPRISES, DAVE'S SHOP TALK and the Dave Osborne logo are trademarks and service marks owned by DDFM Enterprises. All other trademarks on this site are the property of their respective owners. Site design by Design Strategies, Inc.