Basics 3: How to Read a Tape Measure
One of the most useful tools in a tradesman's toolbox is the common tape measure. Let's see how to read a tape measure.
The tape measure can be marked with US or English measurements (feet and inches), metric measurements (meters and parts of meters: centimeters, millimeters, etc) or both shared on the same tape. Most tape measures have common elements to be able to use them easily. Most US tape measures have both inches and foot marks. Notice that the 16", 32", 48", 64", etc. are marked differently than the other inch markers. Some tape measures have small black arrows or pointers with a box around the number, other tape measures have these numbers highlighted in red. These numbers refer to the 16" centers for laying out studs and joists. Most carpenters have the 16" centers memorized up to 8', but a little help on the tape measure is well received when you get to 128". As well as the 16" marks, notice a black diamond mark every 19.2 inches, also called the black truss mark. It was put on the tape measure originally to designate the on-center position of residential roof trusses. Rather than placing 6 trusses in 8', every 16", they saved a truss every sheet of plywood by spreading them out. We don't use this position today with our trusses, which are commonly designed for 24 inch centers.
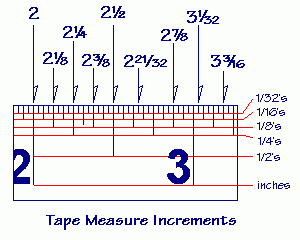
When you read a tape measure a little knowledge of math is needed. We know that 1/2 is the same as 4/8, 8/16, 16/32, etc. We could refer to the 1/2" mark as the 16/32" mark but we usually use the simplest numbers possible. Since we know that 16/32 is 1/2, when looking for 15/32" on the tape measure, for example, it is the first 32nd before the 1/2" mark.
Actually, in the field a carpenter refers to a 32nd as plus or minus a major fraction. For instance, 13/32 is 1/32 less than 14/32 or 7/16, so we say "7/16 minus" and 11/32 is 1/32 more than 10/32 or 5/16, so we say "5/16 plus". This is a fast way of reading the tape measure on the job when taking a measurement of something to cut it to fit. What you should do is memorize the common fractions down to sixteenths.
Here they are:
1/16, 1/8, 3/16, 1/4, 5/16, 3/8, 7/16, 1/2, 9/16, 5/8, 11/16, 3/4, 13/16, 7/8, 15/16 and the inch mark.
How to Read a Tape Measure
 Notice the size of the graduations on the tape measure changes with the fraction; 1/2 is the largest, then 1/4 and 3/4, then the eighths, sixteenths and the smallest are the thirty-seconds. These divisions are the most common, but you can get a tape measure in tenths and hundredths. I have a framing square that divides an inch into one hundredths.
We use thirty-seconds in the stair calculator, and other instances like that, just for accuracy because when you're cutting 16 stair risers, if you are 1/16th inch out on each stair, you are out a whole inch at the end. Even being 1/32" out gives an error of 1/2"!
Here is a video I made with Dan's help (my brother and webmaster).
Dave
(Ask Dave) (About Dave)Your source for building tips, woodworking & furniture plans, house plans and building advice directly from Dave...
Hi, I'm Dave Osborne. With over 50 years experience as a journeyman carpenter, foreman and contractor in heavy construction I enjoyed working with apprentices and sharing the tricks of the trade that others shared with me. Now I get emails from Members all over the world and we include many of my answers in our Free Monthly Newsletters. Some of my answers include drawings and instructions specific to a project, but may also answer your questions. I use correct construction terminology, so you can confidently inform your building supply dealers or contractors exactly what you need.
ASK DAVE!
The Benefits of Membership
Membership gives you full access to our hundreds of how-to articles, woodworking plans, converters, calculators and tables. Our Stair Calculator is one of the most popular on the internet. We have projects you can build for (and with) your kids, furniture for your wife, and sheds and gazebos. If you run into a problem or need advice your Membership includes unlimited email questions to me through our Ask Dave quick response button.
Join us!
Copyright © 1999-2026 DDFM Enterprises. All Rights Reserved. DDFM ENTERPRISES, DAVE'S SHOP TALK and the Dave Osborne logo are trademarks and service marks owned by DDFM Enterprises. All other trademarks on this site are the property of their respective owners. Site design by Design Strategies, Inc.