Remodeling 23: Home Remodeling Finishing
Contents:
Cutting crown molding
Kitchen cabinets
Determining the swing of a door
Supporting a ceiling fan
Repairing a textured ceiling
Standard Door and Hall Widths
Refinishing Kitchen Cabinets
Building an Entertainment Center
Tiling a Floor
Square Decorative Columns
Installing Cabinet Knobs And Pulls
Support For Ceramic Tile Floors
Taping Cement Board Joints
Order Of Hanging Doors, Casing And Base
Inside Window Trim
The Best Drywall Anchor
Finishing A Natural Wood Interior Door
Rough Opening Sizes For Bi-Fold Doors
Installing Base Before Or After Carpet
Installing Drywall To The Ceiling And Floor
Heights Of Door Handles
Staple Size For Underlayments
Joint Between Drywall And Wood
Question about cutting crown molding:
How do I cut 3 1/2" crown molding at the correct angle?
Answer:This is how to cut 3 1/2" crown molding on a compound cut-off saw.
Think of the table on your cut-off saw as the floor or the ceiling where the molding will go. Base (floor) molding is cut upright and crown (ceiling) molding is cut upside down. Crown is tricky this way, because not only is it upside down but its ends are reversed. I usually have four sample pieces with me when I cut crown molding: one for the inside right miter, one for the inside left, one for the outside right and one for the outside left. Mark each piece so you know which one's which. These save me cutting up expensive crown just to get my head right every time. I'm referring, of course, to a maximum of a 3 1/2" crown that will stand up vertically against the saw fence. Anything larger would have to be cut on the flat, a different procedure entirely. If your fence isn't high enough, make a 3 1/2" high fence from 1/2" plywood and screw it to your fence from the back with wood screws.
Question about kitchen cabinets:I'm looking at building kitchen cabinets. Would they be similar to your corner cabinet plans
or is there a difference in the case construction? Answer:The design of kitchen cabinets is dependent on your choice of hinges. With a face frame (the style used in the corner cabinet plans) the doors can be flush with the frame or overlap them. Also, with a face frame you can buy european hinges, which are hidden from the front and overlap the face frame in three different ways: 1/4", 1/2" or a full overlap of 5/8". Without a face frame, you are limited to the euro style of only full- or half-lap hinges. I really like the euro style hinges because they can be adjusted three ways: up or down, in or out, and sideways.
Question about determining the swing of a door:How does one determine the swing of a door?
Answer:Conventionally, a door opens into a room. Stand on the outside of the door facing into the room. If the door swings to the left, it is a left hand door; if it swings to the right, it is a right hand door.
For a door that opens outwards from a room, say for example an outside door or a small bathroom, the bevel on the door is reversed. Also, the lock set hand is reversed. Stand on the outside of the room facing into the room, as before. If the door opens towards you with the hinges on the left, it is a left hand reverse door; if the hinges are on the right, then it is a right hand reverse.
Question about supporting a ceiling fan:How do I attach a heavy ceiling fan so it won't fly or fall off?
Answer:If you have access over the light (an attic, for example) this is what I'd do. Leave the existing electrical box in place that the old light attached to. Watch for wires and drill a 1/2 inch hole or remove the knock out in the center of the box at the top. Get the appropriate length of 1/8" running pipe thread; these come in lengths from 1/2" up to 3'. At the bottom of the rod in the box, attach a spreader bar with a threaded hole already in it to accept the 1/8" pipe thread of the rod. It may be in the fan/light kit or you might have to buy it from a light shop. Attach the spreader bar to the two screws in the box with the rod sticking up through the box into the attic. Go up into the attic and place 2 - 2x4s, on edge, with the rod between them. Screw a plywood scab over the top into the 2x4s to keep them together and put the washer on top of the scab. Fasten these 2x4s across the ceiling joists or truss bottom cord. You will notice that the fan has a steel safety wire to help support it as well. This wire should be fastened to the 2x4s for safety. Now the weight of the fan is supported by the joists or truss. This will hold a very heavy fan.
If you have to make a large hole around the box, you can install a rosette around the box later. They come in a variety of sizes and designs, giving an easy fix to a messy hole.
Question about repairing a textured ceiling:I did some repair work on a ceiling that had a textured stucco-like finish. How would I go about duplicating that finish in the area I was working on.
Answer:There are three ways to texture a ceiling that I know of. Blown on, hand textured with a trowel and a combination of the two where it is blown on then gone over with a trowel. If you've got a large area to do, you can rent the machine to blow it on and adjust the nozzle for different size of texture. Otherwise, buy the textured ceiling mix in a bag, mix in water and trowel it on with a 12" drywall trowel. Either way, practice first on spare pieces of drywall. I watched the guy hand trowel my ceiling and he applied a 10'X10' area then went over it again, flattening it out. Sorry, I can't be more specific, there are just too many variables with a textured ceiling.
Question about standard door and hall widths:Is there a standard width to a hallway? Also I've got a 36" front entrance door, the rest are 32". Is there a reason to put a 36" door anywhere else?
Answer:I prefer 36" doors for entrances. They usually cost the same as 32" and 34" but give you that added extra room to move in furniture and appliances. The standard door size for bedrooms and other interior doors are 30". A hallway should be ideally 38", 36" minimum.
Question about refinishing kitchen cabinets:I would like to refinish my kitchen cabinets that are lacquered with a dark brown lacquer.
I want to strip the lacquer and repaint them in a solid color. I do not want a glossy finish and am worried about paint brush strokes. I was considering an antique looking finish.
Answer:If you are painting the cabinets there is no need to strip them down to bare wood. If the finish is smooth but glossy, just remove the gloss with medium sandpaper, say 100 grit. A palm sander is excellent for this job.
Then paint the surface with 3 coats of a Urethane paint, such as Varathane. You can choose a satin or semi-gloss finish. No primer is needed, even on bare wood. Follow the directions on the can. Varathane goes on easily with a brush and levels out to a smooth surface, showing no brush strokes. Just make sure you apply it in a warm room. Between coats, sand with extra fine sandpaper such as 220. Make sure the last coat is put on in a dust free environment.
Question about building an entertainment center:I'm planning on building an entertainment center/armoire. Most of the plans that I've looked at call for a 1/4" plywood back to be nailed into the sides. However, one plan that I've looked at uses a 3/4" plywood back with dadoes routed into it to hold the shelves. I plan to use the center shelf to hold a 27" TV.
In your opinion, would it be better to use the 3/4" plywood back with dadoes routed into it so that the center shelf will hold the TV without sagging?
Answer:If the length of the shelves is no more than 36" and made of 3/4" material, a 1/4" back should be sufficient if you glue and nail the back into the sides and shelves also and if the unit is supported off the floor by the sides. A 3/4" back would be necessary if the shelves are longer than 3' and if the back is used to hang the shelving unit on a wall.
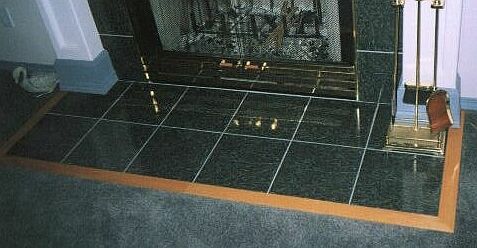
Question about tiling a floor:I am installing tile and carpet in the rec room of my house and the problem is that there's a two foot perimeter of tile around the room and the center of the room is carpet How do I finish the carpet and attach it to the floor? There is underpad for the carpet and the tile is only 1/8".
Answer:First of all, make sure your choice of tile is correct for a floor. Floor tile is thicker than 1/8". It is standard procedure, when installing ceramic tile on the floor, to stiffen the floor up usually with another layer of 5/8" tongue and groove plywood. This would help your situation also. Place a 2' perimeter of plywood around the room where the tile will go. Lay the tile out first to get its exact width. For the transition between the tile and the carpet, there are products on the market for this purpose: vinyl, aluminum.
When installing a ceramic tile hearth in my house, I used a piece of oak hardwood flooring between the tile and the carpet, which matched the hardwood flooring in the rest of the house. This is just an idea for you. (See picture.)
Most of your problem will be solved by putting in the plywood to raise up the tile. Check on the thickness of the tile. It should be 3/8" to 1/2".
Question about square decorative columns:I am making a Home theater downstairs and need to make square decorative columns. Do you have any plans for these? Some thing simple?
Answer:Start off with dimension lumber, 2x4, 2x6, etc. to get the approximate size, 6x6 for example. Then cover the frame with 3/4" MDF. If you have a table saw, miter the edges, so it looks like one piece. Then install MDF panels with molding as in this drawing:
The panels can either be inset below the surface of the column or outset above the surface of the column depending on which way you install the MDF.
Outset: the MDF is cut to the shape of the panel, as shown, then installed with molding around it.
Inset: the MDF is cut into mitered strips, which are attached to the edges of the column with molding on the inside of them. This is where you use your imagination and artist abilities.
Question about installing cabinet knobs and pulls:We had custom cabinets built for our bathroom. We chose to install the drawer knobs and door handles. What is the best way to install knobs and handles and assure uniformity prior to drilling holes. Cabinet facing wood is cherry.
Answer:Pick a measurement you want, depending on the stiles and rails, if any.
The upper cabinet pulls or knobs are attached for easier reach near the bottom of the door. The base cabinets are attached near the top of the door. Start at about 2" by 2" in from the edge and down from the top or up from the bottom, for knobs.
Use a center punch to mark the holes. A center punch for wood is like a sharpened screw driver. In fact that is how I made mine, from an old screw driver that I cut off and sharpened to a point.
Use a small wood block, about 3x4x3/4 thick, for backing on the inside of the door or drawer. This prevents the drill from splitting out the inside face. Just hold it tight on the inside surface when drilling the hole.
I've made jigs to mark and drill the holes, but I prefer just measuring and marking and center punching the holes.
Use a 3/16" drill bit, a bit larger than the machine screw.
Question about support for ceramic tile floors:I want to put down tile on the kitchen floor. The floor currently has vinyl from the 70's and is flush with my hardwood floors in the dining and living room. My question is do I need to take out the subfloor and replace it so once my tile is laid it will be even with the hardwood?
Answer:It is very important when putting in a tile floor that the floor is stable. The building code requires 1-1/4" of solid wood. In new construction, we put down two layers of 5/8" tongue and groove plywood. This usually makes the tile floor higher than the hardwood, so we use a transition strip. In your house check the total height of the sub-floor. You can do this easily by looking at the heating duct cutouts, if you have them. The maximum height difference, according to the code, is 5/8" between floor finishes.
Question about taping cement board joints:I'm confused about whether or not to tape the joints on (1/4" wonderboard,a cement backer board for tile) The manufacturer says not to, but people in the trade say to tape them with fiberglass drywall tape. Any insight on this would be greatly appreciated.
Answer:Actually James Hardie recommends the use of a 2" fiberglass tape embedded in thinset mortar to tape and mud the joints.
Question about order of hanging doors, casing and base:I'm in the process of finishing my new house and have a question.I have to hang doors, put on the base and door trim and lay a pre-finished hardwood floor. What should the order be?The sheetrock is up, spackled and painted.
Answer:Usually, we hang the doors next. When I built my house, I chose to hang the doors after the flooring was on. With hardwood we usually cut the jamb off the bottom over the hardwood area. This allows the hardwood to be installed under the jamb (allow 1/2"clearance to jack stud or cripple). I figured if I install the jambs after the hardwood and lino and carpets it would make a neater finish around the jamb than cutting the lino against the jambs and having the lino curl up, which it eventually does. The only negative aspect of this procedure is that if there is a transition between the hall and the room, the door jamb has to be scribed to fit the different elevations, (which is no big deal).
The different flooring joins under the center of the door. Without the jamb in place, you have to be sure that the joint is under the center of the door. So be aware which way the door will swing. The positive aspect is that the hardwood and carpet and lino goes under the jamb giving a nicer finish. The jamb bottom may have to be cut off to allow fitting the jamb on top of hardwood. Check this out first. After the jambs are installed, the transition strips can be installed, tight to the jambs. The casing goes on next, then the base against the casing (door trim).
Question about inside window trim:Lots of people "trim out" their windows different than others. What's your preferred way of installing inside window trim?
Answer:If installing a window stool instead of the picture frame casing, this is the way I do it. Install the stool first, have it extend beyond the vertical casing at least 1". Install the upper casing as normal. Install the apron, under the sill, with the ends of the apron directly under the outside edge of the casing.
Here is a drawing:
I have drywall return in my own home and did the window stoop and apron like this:
I have round circle head windows in the living room, family room, and foyer and kept that theme with my door casing, as shown here:
Have you any suggestions for the BEST methods for hanging shelves or other heavy objects from drywall where using a stud won't work?
Answer:The best anchor is a screw in the stud. Sometimes I put a small 90 degree angle bracket on the top of the shelf unit or under a shelf screwed into the shelf as well as into the stud.
There are anchors for drywall which hold quite well. My favorite is a plastic E-Z drywall anchor that is screwed into the drywall, then a screw is screwed into it, as shown in the picture. It is designed to drill its own hole. I use these for towel rod holders, etc.
For hanging pictures there are hangers designed to hold 100 lbs. just by fastening to a bracket nailed into the drywall. For heavy weights such as this try to use more than one anchor to spread the weight around.
Question about finishing a natural wood interior door:I would appreciate any feedback from you regarding finishing the interior pine side of an out-swing french door patio door. After applying a conditioner (per Minwax's recommendation) I am considering applying a gel stain. Is any sanding necessary?
Answer:Yes, sanding is needed to remove any mill glaze from the boards used. This should be about 100 grit paper, sanded with the grain or with an orbital sander. I prefer gell stain, myself. I apply it with a rag and rub it in good. I would not sand after the stain. Put the first coat of finish on then sand very lightly with 220 grit between layers to remove any dust and grain raise. I like using the Varathane product called Professional finish. It comes in a black label, it is oil based, but dries fast. I don't like to use a finish and stain in one application. If you want the stain darker or lighter it is sealed and can't be re-stained without removing the clear finish. Minwax is a good product, I've just had experience with the Varathane products.
Question about rough opening sizes for bi-fold doors:How do you frame in a bifold door? What are the rough opening measurements?
Answer:A bi-fold closet has a finished opening of the size of the door, so allow for that when framing it in. That is, the rough opening would include the thickness of the wall finish, say 1/2" drywall, for example, plus the door. For a 3068 bifold, the rough opening would be 37" by 80 1/2" plus 1" for carpet or hardwood. So lay out accordingly.
Question about installing base before or after carpet:I am finishing a basement and we are putting down an OSB subfloor which will eventually have wall to wall carpet over it. Should I install base trim before or after the carpet goes in?
Answer:You can do it either way. In new construction we put the base down first, keeping it up about 1/2" above the sub-floor. Sometimes the new paint gets marked up a bit, so is then touched up after the carpet is laid. If installing the base after the carpet is laid. Pre-paint the base and lay it on top of the carpet, not pushing it down too hard onto the carpet. The nail holes are then filled and touched up.
Question about installing drywall to the ceiling and floor:How close to the floor and ceiling should drywall go?
Answer:There is no hard and fast rule about drywall to the floor. The walls should be kept tight to the ceiling drywall. That is the ceiling drywall is applied first then the walls applied tight to the ceiling, leaving a gap on the bottom.
In a new house with precut studs at 92 1/4", double top plate and single bottom plate. The ceiling height is 96 3/4". This leaves 1/4" clearance. The baseboard is used to cover this gap up as well as hold flooring edges down.
Question about heights of door handles:What is the height to fit internal door handles?
Answer:The old height was 36", but now it could be 40" half a 80" door. I always measure the existing doors in a house to see what range they fall into and match them. For a new house go with 40".
Question about staple size for underlayments:If I use staples for a Luan underlayment(for Linoleum in a bathroom),what size is best? Also, I thought the underlayment should end up half way through the doorway, but someone just told me only 3/4 inch and the carpet will be laid in the hallway and go through the doorway 4 inches.
Answer:If the underlay is 1/4" or 3/8" the staples are 1 1/8" long and should extend at least 85% into the sub-floor, but not into the joists. These are chisel point narrow crown staples used with an 18 gauge air nailer. Otherwise use 1 1/4" ring nails. Keep the staples parallel to the grain so they won't splinter and will set themselves below the surface. I always check the floor after stapling with a 12" drywall knife and sliding it along the floor to see if it catches any staple heads that didn't go below the surface. A hammer blow will smarten it up.
The joint of different flooring is made under the door, in the center, so that from either side, when the door is closed, you only see the flooring in that room.
Question about joint between drywall and wood:Any suggestions on how to make the joint when you butt sheetrock to a timber frame post.
Answer:Yes, when making a butt joint to an exposed timber or to a window jamb,use a plastic J-mold for drywall. The J-mold is cut to length and slipped over the raw edge of the drywall. When installed it leaves a nice finished reveal which can be painted with the drywall. Wide side goes to the back.
Dave
Your source for building tips, woodworking & furniture plans, house plans and building advice directly from Dave...
Hi, I'm Dave Osborne. With over 50 years experience as a journeyman carpenter, foreman and contractor in heavy construction I enjoyed working with apprentices and sharing the tricks of the trade that others shared with me. Now I get emails from Members all over the world and we include many of my answers in our Free Monthly Newsletters. Some of my answers include drawings and instructions specific to a project, but may also answer your questions. I use correct construction terminology, so you can confidently inform your building supply dealers or contractors exactly what you need.
ASK DAVE!
The Benefits of Membership
Membership gives you full access to our hundreds of how-to articles, woodworking plans, converters, calculators and tables. Our Stair Calculator is one of the most popular on the internet. We have projects you can build for (and with) your kids, furniture for your wife, and sheds and gazebos. If you run into a problem or need advice your Membership includes unlimited email questions to me through our Ask Dave quick response button.
Join us!
Copyright © 1999-2024 DDFM Enterprises. All Rights Reserved. DDFM ENTERPRISES, DAVE'S SHOP TALK and the Dave Osborne logo are trademarks and service marks owned by DDFM Enterprises. All other trademarks on this site are the property of their respective owners. Site design by Design Strategies, Inc.