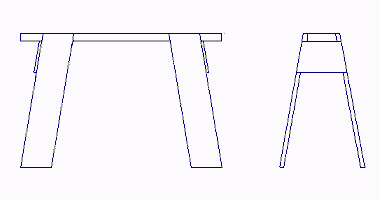
Sawhorse
These are beginner wood working plans, but are for an advanced project because of the tricky angles that need to be cut. The best angle of a sawhorse's legs are 10°. That's 10° in two different directions remember. The 2x6 needs to have each side ripped at a 10° angle so the legs splay out.
The sawhorse legs also need to be cut at a 10° angle so their bottom ends line up with the ends of the 2x6.
Once you set your saw, make all the cuts with the same setting and it should all work out fine. Just be careful to keep the cuts parallel on the legs and non-parallel when ripping the 2x6.
At about 24 inches high, I find these sawhorses ideal for putting material on, cutting with a powersaw, etc. Also, the wide 2x6 top is perfect for standing on to reach an 8 to 10 foot high ceiling.

List of Materials:
- 1 - 3' 2x6
- 1 - 8' 1x8
- 20 - #8x1 1/2" flat head wood screws
- 2 - small pieces of plywood
Tools Needed
- Table saw (preferred)
- Power saw
- Tape, square and pencil
- Drill
Instructions
Set the blade on the tablesaw at 10°. Rip the edge off each side of the 2x6, keeping it as wide as possible. When cutting the sawhorse legs, make 2 rights and 2 lefts. The saw blade is set to 10° and the miter fence is set to 10°. Cut 2 legs the same then turn the board over and cut 2 more legs. This way if you are using smooth one side, all 4 legs will show the same surface outwards.
Layout the 2x6 with square marks 4 1/4" from each end. Drill the top of the sawhorse legs for the screws, 3 screws on each leg is good. Match the outside of the legs to these marks. Make sure that the legs are all uniform, that the tops are sloped the correct way to be flush on the top of the 2x6, that the legs are both splayed backwards, away from the ends of the 2x6 and that the bottom of the legs fit flat on the floor.
Now cut 2 pieces of plywood as end gussets. Start with a piece about 8"x10". Lay it up against the sawhorse legs and under the 2x6, scribe the outside of the legs on the plywood. Go to the table saw, the blade is set back to 0°, the miter fence is still set to 10°. Start at the top marks (under the 2x6) and cut both ways at 10° giving the shape of plywood shown in the drawing. Pre-drill and screw 4 screws on each end into the legs, be carefull to line up the screws with the sawhorse legs.
Enjoy your sawhorse.
Dave
(Ask Dave) (About Dave)Your source for building tips, woodworking & furniture plans, house plans and building advice directly from Dave...
Hi, I'm Dave Osborne. With over 50 years experience as a journeyman carpenter, foreman and contractor in heavy construction I enjoyed working with apprentices and sharing the tricks of the trade that others shared with me. Now I get emails from Members all over the world and we include many of my answers in our Free Monthly Newsletters. Some of my answers include drawings and instructions specific to a project, but may also answer your questions. I use correct construction terminology, so you can confidently inform your building supply dealers or contractors exactly what you need.
ASK DAVE!
The Benefits of Membership
Membership gives you full access to our hundreds of how-to articles, woodworking plans, converters, calculators and tables. Our Stair Calculator is one of the most popular on the internet. We have projects you can build for (and with) your kids, furniture for your wife, and sheds and gazebos. If you run into a problem or need advice your Membership includes unlimited email questions to me through our Ask Dave quick response button.
Join us!
Copyright © 1999-2026 DDFM Enterprises. All Rights Reserved. DDFM ENTERPRISES, DAVE'S SHOP TALK and the Dave Osborne logo are trademarks and service marks owned by DDFM Enterprises. All other trademarks on this site are the property of their respective owners. Site design by Design Strategies, Inc.