| NEWSLETTER from DaveOsborne.com | ||
| “Building Confidence” | May 2005 | |
Welcome
Welcome to our new subscribers to this free newsletter as well as those who have joined our website. Thanks for supporting our work here and for helping Dan and I to Build Confidence out there with regards to home remodeling for do-it-yourselfers and contractors.
What's New
I was away on a quick job for about a week, installing a hardwood floor in an old friends house. The same house I framed for him, years ago, actually. I don't think I inconvenienced too many members with late answers for their questions. The questions have dropped off a bit lately. I guess everyone is heading for the great outdoors instead of in front of their computers. Good on ya!
You know where I am if you need help with anything.
Ask Away!
Here is what I have been answering with regards to questions, this month:
Dave:
My customer wants custom-built, hinged garage doors. I plan on using 3/4" acq
plywood with 1x4 pine around perimeter, across middle,
and diagonally (z-buck style), with black hinges.

#1. Will the 1 1/2" edge of jamb support the "h" half of a hinge?
#2. Any suggestions to prevent warping of door? Each half is (48"x83").

Thanks,
Tim
Hi Tim,
I wouldn't build a door with 3/4 plywood. You are totally depending on the heavy plywood as the frame. If the plywood is warped, the door is warped. In my opinion the hinges would not hold in the edge grain of the plywood.
I would go with a frame of spruce and 1/4" plywood of G1S cottonwood or spruce. You can add the decoration on the face, but keep it light.
Choose the spruce for the frame for straight and true pieces and the plywood off the pile that is not lifted on one side, that is not warped.
I did a similar double door as your sizes which did not warp a bit, following this procedure. I used 2 1/4" casing for the face trim to look like a colonial door.

Checkout my article Remodeling 16: How to Build a Door.
If the door is for a garage that is heated, insulate between the frame members with either Styrofoam or fiberglass.
Dave
Dave I find your articles wonderful. I am going to build stairs to replace
existing stairs that are a mess, in a raised bungalow built in 1962
(it's actually a lovely house) that come up from the basement six steps to
a landing roughly 40x70 1/2 with a walk out. Then 180 from the landing
to the upstairs. ends of top half steps exposed. The opening is 70 1/2 w, 85 d.
From basement floor to upstairs is about 105 ( hard to measure because existing
crap is in the way. I tell you all this in-case you have any additional tips.
I printed your articles out on stringer layout etc. They are great I will study
them before I rip everything out of course. (My partner's having anxiety
attacks over this though.) My main question is that If I buy oak treads and
have the Risers and sides painted finished poplar How do I make the side trim
that would be like a mirror of the stringers underneath? Is this trim also
called a stringer? I saw no mention of trimming out like this. I may
have missed it.

Thank-you very much. Patient in Toronto. Yours -Marcus
Hi Marcus,
Sorry for the delay in getting back with you, I was on a job out of town.
Thanks for the comments.
 In this picture we see the closed stringer against the wall, acting as a trim. The open stringer is what you are referring to, I think. In your case, just copy the stringer onto the poplar board or plywood, allow for the thickness of drywall on the bottom of the stringers, the poplar should cover this, unless the wall comes up to the bottom of the stringer, as shown. A profile on the bottom edge may be nice, either done with a router or install a small molding. This should be allowed for, as well, according to the width of the board.
The treads will overhang the finished open stringer, extending the tread past the riser, as shown. There are two ways of doing the risers. They can be mitered as shown or be flush with the stringer and install a casing or similar molding over the end grain.
It is not too clear in this picture, but another option for the tread trim on an open stringer is to install small molding under the treads at the front as well as the sides.

This is how I finished my stairs. The stringer is hidden, covered with drywall, and trimmed to cover the raw edges of the drywall, another option. Notice the carpet featured in the middle of the stairs with the hardwood just on the exposed ends.
Hope this helps,
Dave
Hi Dave,
Before I become an annual member of your wonderful site, can you please
tell me if my membership includes unlimited number of questions or is there a
limit to the number of questions I can ask in the course of a year.
Thanks Dave and I'm looking forward to joining your site.
Thank you
Sharon
Hi Sharon,
Thanks for the nice comments. Sounds like you have lots of questions!!
I've never had to limit anyone for questions yet and can't see myself starting in the near future. As our site grows and we get more members, you may have to wait a bit longer. I'm heading up North to do a quick job for a friend of mine. I'll be gone for a week. I don't know yet if I can access the internet from his house, but I think so. In the mean time you can research our site, keep in mind that you can search our site for key words and click on Find. For a sample of one person's questions check out the Jan. 2005 newsletter: http://daveosborne.com/newsletters/0501.php
Dave
I have a 1970 Sahara mobile home. It is a single wide 12x48. The serial number
is S3830. I am trying to get a county permit but they want me to submit the
building plans for it. I don't seem to be able to find the plans anywhere and
wondered if you had any ideas.
Thank You

Milton Meyers
Hi Milton,
I had a quick look on the internet, but without success. Are you sure that Sahara is not a model rather than the manufacturer. Try to send me the actual manufacturer's name and I may have more luck. Failing that, we could draw up the floor plans easy enough if you do the research and give me the measurements. A bit more time consuming on both our parts, though.
Why do you need this? Are you moving the unit onto a private lot? Could you be more specific with what the county actually wants and why?
Later,
Dave
Dave,
Thank you for responding to my question. On the only documentation I have is
a registration which lists the mobile home as a Sahara. The county wants
house plans for electrical, plumbing, gas, and of course the house plans.
Since I did not get the permits originally and the mobile home was put there
first and set up without the permits, they say I must have specific plans.
I actually have someone here at my work that has AutoCad that can help me
with making plans if I couldn't find the manufacturer's original plans.
Milt
Okay, Milton,
I tried again, no success. Maybe phone around the mobile home sales yards and see if some of the salespeople recognize the Sahara model and could give you any more details as to manufacturer, etc. Making up your own plans maybe your only option.
Good Luck,
Dave
Does any body out there know anything about this particular brand of mobile home. If so, please inform me and we'll pass it on to Milt. Thanks
Greetings from Vegas, Started on my backyard without alot of money
or forethought! I know, bad idea but so far I have been successful.
I live on the edge of town and construction companies, home owners
carelessly dump leftover materials in the desert. I collected enough
pavers, concrete block, gravel, sand, lumber and even some plants to
get a good start. I layed the pavers 700sq ft, built a sandbox and
cover for the kids, framed out a vegi garden structure to ward off
cats, built raised planters out of concrete block, added colored
cement slurry to create old stucco look. Each corner of the planters
(2'high) I added a square made out of block(2'high) that I would
like to use as a base for a four post hip roofed overhead shade
structure. I've never built a hip roof, I would like to use redwood,
the footprint is 9'x11' I would like to use a lightweight roofing
material Lowes sells(it looks like a red tin panel but it's not tin).
How should I set posts, I could drop them into the squares and fill
with concrete (will the wood rot become compromised)? or fill them
with concrete and set the posts on top? I don't want ugly framing
ties to show as the bases of the posts will be 2' higher than the
ground...the first thing your eyes will see. How do I determine
which roof pitch to use(is there an easiest one to deal with?)
Any special considerations to creating this without walls and only
four posts? I would like the roof to extend 12"-16" beyond the
footprint, an eve? I will be doing this at least twice, hopefully
right the first time! Thanks Ron
Hi Ron and welcome,
I can't believe you just drive out to the desert and get what you need. Vegas is something else!!
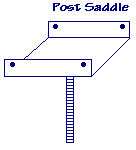 I don't like to see wood buried or in concrete. A treated fence post is the only exception. Better to fill the blocks with concrete, insert a post saddle at the top of the concrete. This looks nice, in my opinion. You could put a re-bar in the center of the post but this doesn't hold down the structure from flying away during those desert wind storms. Just take a drive out to the desert and pick up four post saddles, as shown in the drawing.
The easiest roof pitch is 5/12. Check out this plan: Gazebo Hip Roof 10'x10' and Roof 3: How to Frame a Hip Roof gives instructions for how to frame a hip roof generally.
Later,
Dave
Dave,
I'm planning on laying ceramic or porcelain tile in my kitchen/family
room. What's the difference between the two and which is best?

In your article "Remodeling 9: How to Install Ceramic Tile" and other
writings, you say "Don't use durarock at all in this case (over
solid wood flooring). Durarock is used mainly in a shower."

What about a product popular around here called "Hardibacker"?
Is it too only necessary in "wet" places like bathrooms?

The house is 40+ years old and the area that I want to tile a
roughly 28' x 15' with 2x8 joists on 16" centers running the 15'
dimension. After we removed the carpet, the floor in the family room
now has 1x6 decking (not T&G), a layer of building felt, with
3/4 particle board underlayment and what looks like real linoleum
over that, for a total thickness of almost 1 5/8" .

There are some small, less than 2" diam, "bad spots" in the linoleum
that should easily be filled-in with the thinset. I drove 3" screws
into the floor joists every 4 1/2" to well below the linoleum's
bottom surface. There is joist bridging in the center of the 15' run,
but no solid blocking. The floor joists are now attached to the center
beam with metal hangers in addition to the original toe nailing and
setting on a 2x2 nailed to the lower side of the 3 piece 2x10 beam.

The only difference in the kitchen floor is that some years back it
got a layer of 1/4" Lauan plywood nailed to it and then sheet vinyl
glued down on top.  I re-nailed the original subfloor down to it's
joists (didn't have a nail gun or screw gun back then and had to do
all the nailing by hand. My plan is to use a roofing shovel and tear
up the plywood and vinyl in the kitchen so the floors in both areas
will be at the same level. The bar that currently kinda separates the
kitchen from the family room will be removed to make the area one big
room. Just for extra insurance, should I screw the floor in the kitchen
down with the 3" screws and then use a framing gun to drive a nail
between each of the 4 1/2" OC screws in the family room floor.

At that point, will these floors be ready to accept tile directly, or
do I need to use some sort of underlayment like Durarock or Hardibacker
after all?

Mike in KY
Hi Mike,
Yes, it was quite a letter, but I get the picture much better with your explanation of what's going on.
Ceramic tile has a fired glaze where porcelain does not. Porcelain is therefore porous and should be sealed to keep it clean and for easier cleaning. I'd go with the ceramic for the floor.
Of course, the hardibacker use is up to you. The hardibacker and durarock are roughly the same product, a cement based board for tile. I understand that your floor will be 1 5/8" thick, well screwed at 4" to 6" on center. This is plenty sufficient for ceramic tile, the code calls for two layers of 5/8" plywood which is 1 1/4", so you should be good. Patch up the hole from the bottom plate from the bar with wood, screwed down. If the lino is left on, go over it with a belt sander to remove any gloss so the thin set will adhere better. You can check with your tile supplier what he thinks about the thinset onto old lino. He may recommend a bonding agent to be either mixed with the thin set or applied separately. I would get the better quality bag of thinset. That hardibacker doesn't come cheap and putting it on, in my opinion is not worth it for the thickness of floor that you have as long as it is in good shape, for example not shiplap or boards on the top with spaces between them.
Dave
Dave,

I'm looking forward to reading what you have to say about making kitchen
cabinet doors out of MDF. Besides the new floor in the kitchen and family
room, I'm pretty much remodeling both rooms from top to bottom. It all
started when our 32 year old Sears Avocado green bottom freezer refrigerator
finally decided to take a dump that I couldn't clean up. Damn Kenmore stuff.

Naturally the new (Sears) side by side, that "she" just had to have, would
not fit back into the same hole. Had to remove one stud space of the wall
on the left side so the freezer door would open and cut three inches off
the bottom of the kitchen cabinets above. As you are well aware, one thing just
snow-balled into another. I tore the old paneling and the 3/8 drywall off
the kitchen wall and then decided to do the same thing in the family room.
Replaced all the old metal electrical boxes with new plastic ones with new
switches and outlets. Naturally did some judicious rewiring at the same
time (a hell of a lot easier with the studs showing).

The upper kitchen cabinets above the bar that separated the two rooms are gone and
the walls covered with 1/2" drywall, painted, and the ceiling has been
textured. Finishing the drywall and texturing the ceiling was done by
someone else for $200, but I did the painting and installed a new entrance
door. Thank God I got a big new Lowe's just 15 minutes away.

The kitchen cabinets are original and appear to have been custom built on-site.
They have needed updating for a long time and the wife wants them painted
white. I want to make my own cabinet doors and drawer fronts from MDF and use
European hidden hinges with at least 1 1/4" overlay so they will kinda look
like frameless kitchen cabinet units when done.

And that will get me to my next questions involving making cabinet doors from MDF
with a standard rectangular pattern routed in the face and making new
counter tops.

Looks like we'll be talking lots more.

Mike
Hi Mike,
Sounds like you have lots of work to do. One point, I've never heard of a 1 1/4" offset for euro hinges, max is full overlay which usually means 5/8". There are available, though, Euro face frame hinges to attach kitchen cabinet doors to a face frame. Maybe check that out in your area, Lowes should have them. I'll get drawing up the cabinet doors, I'll be going up North for a week, though, starting this Monday. A friend of mine wants me to put down some hardwood floor for him. I framed three houses for this guy, he is like a second father to me. A chance to get away for a bit, too.
Actually, making cabinet doors from MDF is very simple. Use 3/4" MDF, heavy as hell. Measure very carefully your cabinet frame and try some scrap pieces to make sure you know the exact overlap of the cabinet doors. That is buy your hinges first and try them out. Euro hinges need a 1 3/8" hole drilled about 7/16" deep. I have a table top drill press for this. You could use a drill with stop on it or pay someone to drill them for you. More on Euro hinges is in my article: Cabinets 1: Frameless Kitchen Cabinets
When routing a pattern on the cabinet door, I make up a template with the pattern shape, one for every different size cabinet door. The router has a series of bushings that come below the plate of the router. This bushing guides the router around the template. This is time consuming, but does a nice job, making the patterns the same. If you just want to profile the edge, have your router come through a router table or make your own set up. Then use a straight edge clamped to the table as a fence.
Be careful removing kitchen counter tops in very old cabinets, pre 1970s. They were usually built in place with the counter top holding the cabinet gables together. Not like today where the counter tops are screwed on from underneath.
Later,
Dave
Dave,

The hinges I'm looking at are off eBay for a $1.50 each, Amerock with
either 1 1/4" or 1 3/8" overlay for face frame cabinets, like mine.
So far I've only bought one of each to see if they are what I need
and they look like they'll work just fine The last time I checked,
the guy still had 800 of them and I only need about 70 or so.
I've already bought the 35 mm boring bit (off eBay for about $20)
for my drill press. And I have borrowed a 1 3/4 HP plunge router off
a neighbor (he's had it for years cuz didn't know how to adjust the
stop release, so he never even used it) with a brand new carbide
plunge bit that should work fine for the face pattern and maybe even
the edges too.

I am still curious as to the exact design of the templates you make
for each cabinet door. I've got at least 31 cabinet doors I know of right now
and damn few of them are the same size, let alone any sort of standard size.
Got any pictures you could email me on the design and use of the templates?

As for the old kitchen counter tops, I hadn't planned of taking the old ones off
for that very reason. Hopefully just rough up the surface so contact
cement will stick the new formica down. Just can't afford even thinking
about any of the solid surface or stone tops. I got a formica trimmer
($20 for a Porte-Cable at a flea market and it was only missing the wrench)
and 4x8 sheets of Formica at $45 a sheet is a lot cheaper than Corian at
probably $45 a square foot.

Have a good time up (farther) north with the flooring.

Mike in KY
Hi Mike,
Sounds like you have things well in hand.
Here are some pictures of my templates. 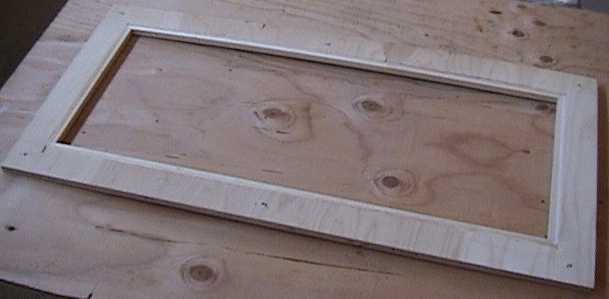
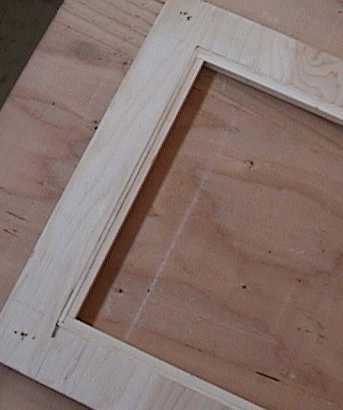

Notice, in this case, I wanted to make a solid cabinet door look like a panel door. I made the template up first from a piece of 1/4" plywood, then routered my first pass. I added 1/4"x 1/4" strips to the template and kept making new passes with the router to get the kurf wider, etc.
In the third picture notice the router upside down with the guide bushing against the template and the bit extending past the template into the cabinet door. (The door isn't shown). I wish I took a picture of the cabinet doors before I installed them. This should give you some ideas. I made the template the same size as the cabinet doors to set it in place faster, rather than measuring every time, since I was removing the template after each pass and putting it on another door. A template like this allows you to go around a corner with the bit and make it perfect. If you didn't have a template and used a fence, instead, you would have to be very careful when coming to an inside corner, not to go too far or not far enough. With a template, just go around the corner keeping the bushing tight to one side, an easy inside corner.
That's exactly how I do counter tops that are part of the kitchen cabinet structure, rough it up with the belt sander and glue formica right on top. You can get creative with the tops, with oak 45 degree reveal, etc on the edges. A 45 degree bit removes the formica edge and cuts the 45 on the oak at the same time. You can have the oak just reveal with the formica below it too. I've got to write an article on this, too, as well as making doors.
Later,
Dave
Well Dave, I too thought I was sorta "well in hand" until I saw your template
system. Man, that looks like almost as much work as making the cabinet doors
themselves.

There's a company in the business of custom spiral staircases about 50 miles
from me that has some CNC equipment to make routed MDF doors for
$15 + $1/sq ft more for each door. They will cut the cabinet door to any size you
want to 1/16th inch tolerance.

Maybe I need to make up a detailed list of sizes and let them quote me a
price for making and delivering the cabinet doors to my door. I have always hated
to pay somebody else to do what I think I can do myself, but...

Doesn't someone make a 1/16" thick counter top material that is the same color all
the way through, instead of the ugly brown base that shows when you route the edge
of formica?
Mike
Hi Mike,
We have 4 popular brands here, including Formica. Yes, they all seem to have the same edge. It is actually laminated paper with resins to hold everything together. Sounds like a good idea for a quote.
Dave
On a gable roof, using manufactured trusses. How do I build out from the first
truss for the 2' overhang?
This is covered in Framing a Gable End Overhang, which includes a drawing to help explain it.
Dave
Well, that's it for another issue of Qs & As. Thanks for your attention and support, both financial and moral.
Feel free to forward this friendly folder to a family fellow or a few friends.
Be careful out there!
Dave
|
home | contact | articles | plans | downloads | dictionary assurance | cancel | newsletters Copyright © 1999-2026 by David E. Osborne. All Rights Reserved.
|