| NEWSLETTER from DaveOsborne.com | ||
| “Building Confidence” | September 2006 | |
Welcome
Welcome to our newsletter. Thanks for subscribing and your interest in our website. We hope the weather is gentle on you for the Fall and you are enjoying the changes of this season.
What's New
With Fall here now life seems to be settling down into familiar routines. Frances, my wife, and I are taking Spanish language lessons and are progressing slowly. We hope this may help in our short term mission trip to Northern Mexico we have planned for the Spring. More on that as we get closer to the date.
Ask Away!
Here are some of the questions from our members during the month and my responses to them:
Hello Dave.

Hopefully you can provide some advice regarding my question on
interior painting with latex paint.

I just painted my newly remodeled bathroom with satin finish latex
paint and a few hours later when I removed the blue painter's tape
where the tiled shower wall meets the drywall, the tape pulled off
some of the paint on the drywall. In some places the paint was
peeled off about 1/2 to 1 inch. Do you think that sanding the
edges of the jagged paint edges and repainting will solve the
problem, or is there a better solution? Also, can you provide some
advice on what I can do to prevent this from happening again?

Thanks,
Dan
Hi Dan,
I don't like to use masking tape for this purpose. I "cut in" leaving a nice clean edge. To remove the jagged edge, I would use drywall compound and fill them in. You need to prime and seal these areas again, then apply two coats of finish. Try to cut in with an angular paint brush made for this purpose. Go slow and try to get a neat line against the tile. After the paint is complete, a latex with silicon, paintable caulking can be applied against the tile edge which leaves a neat edge as well as covers the paint edge a bit.
Dave
Hi Brian,
Sorry for the delay in getting back with you, I was on holidays.
These are some of the rules on built-up beams:
All joints should occur over the center of the posts, except for the following:
    "Where a beam is continuous over more than one span, individual
members are permitted to be butted together to form a joint at or
within 3" of the quarter end points of the clear spans, provided
the quarter points are not those closest to the ends of the beam."

    "Members joined at quarter points shall be continuous over
adjacent supports."

    "Individual members should be nailed together with a double row
of nails not less than 3 1/2" in length, spaced not more than 18"
apart in each row with the end nails located 4" to 6" from the end
of each piece."
A clear span is the distance between the edges of a post, rather than the distance of the center of the posts.
![]()

Dave
Dave, our house was built in 1985 and has a hip roof construction.
We want to remove the wall between our dining room and living room.
This wall is parallel to the floor joist beam in the crawl space but
is offset about 2' from the floor joist beam. I am therefore assuming
that this wall is non-load bearing and can be removed. The ceiling
joists in the attic are 2x6's on 16" centers that apear to be
continuous across the 24' span between outer walls. The ceiling joists
run perpendicular to the wall I want to remove.

My question is whether this wall, although non-load bearing, may still
be carrying some of the load of the ceiling joists? We have no storage
load in the attic above this area, so the ceiling joists should be
carrying only the ceiling dead load. However, there are also some
vertical supports nailed to the roof rafters which are attached to a
wood plate running perpendicular to the ceiling joists. So, a little
of the roof load, especially a heavy snow load, may be transferred to
the ceiling joists. Joist span tables indicate that a 2x6 ceiling joist,
under 25 psf loading, should span only about 15'. Is it advisable to
remove this wall without installing a new ceiling beam? Please advise.
Thanks.
Hi,
I would not recommend removing this wall without replacing it by a beam. In 1985, the powers to be may not have been as keen on "point loading" as they are today. Point loading is carrying the load right down to the foundation, rather than supporting it on joists, etc.
Usually, maximum length for dimension lumber was and is 22', unless custom cut. There may be a beam of some type supporting this 24' span. Some beams are flush with the joists on the top and bottom with joist hangers supporting the joists on each side.
If you don't want a beam to replace the wall section to be removed, you could install a flush beam in the ceiling joists. Just temporarily support the joists on each side of the wall before removing it. In an attic space such as this you could support the ceiling joists by installing a beam above the joists and tying the joists to it with Simpson metal straps.
Dave
Thanks for the reply. We came to the same conclusion that a beam is
necessary if we remove the wall. I took a closer look in the attic
and found the ceiling joists were actually spliced right on top of
the wall. So the span of the 2x6's was actually about 13' and not 24'.
So, we have changed our plans to remove the wall and will stay with
the current floor plan. Thanks again.
Bob
Hi Bob,
That's good you found the splice.
You still have the option of removing the wall and replacing it with a beam. I did this on a reno about a year ago and used an engineered multilam which cost about $300 for an 18' beam. It allowed the dining room to be opened up to the living room, as well. These beams are two slabs of 1 3/4" thick, so when put together fit nicely into a 2x4 (3 1/2") wall. The beam was about 12" high. You get these beams at a truss plant. Engineered beams are required over 9' or so.
Dave
I have a project for a new house with a daylight basement to be built
on a slope and I need to mark the ground for excavation of 3 pads
(from top to bottom: top parking/garage/main house, basement level,
and pool level). These pads are about 9.5 ft differences in elevation.
What kind of marks/stakes will the excavators want me to place for these
initial cut/fill operations? There must be some conventions in the
business, but I haven't yet found them.
Good question!!
I was helping my father on a road job once and learned that conventionally the surveyor drives a stake and uses the top of the stake as the elevation mark. He then marks on the stake the cut as C 2.75' or fill as F 2.75'. This gives him an idea of how much he needs to cut and fill. The surveyor then takes other shots on top of new stakes in the cut or filled area to give the operator a closer idea of the grade. In an excavation for a foundation, be aware of the code that requires any filled area to be engineered. So you want to be very careful to come to the correct cut grade rather than going too deep and having to fill. If too deep the fill must be compacted in no more than 6" stages, otherwise it will settle with the weight of concrete and structure. It may also have to be passed by an engineer, so be careful. Also when excavating for a foundation leave about 3' outside of you concrete line for working room to construct the forms and allow for the angle of the bank. When going down 10' or so the banks will not be straight up and down, so allow for this, depending on the type of material you are digging into.
Dave
Thanks. So it's customary to place stakes across the areas to be cut
and filled (which will obviously get destroyed as the operation
progresses) as opposed to placing them outside the area or just on
the edge of it? It looks like the biggest pad will be for the basement,
and it looks like there will be little or no fill on that cut,
thankfully. I'm thinking of trying my hand at the (future) pool pad
with my small Kubota backhoe attachment. If it turns out well, I may
tackle that big basement cut. It has some large granite mossy boulders
that I'd like to move down to the pool pad, but they may be too big for
my little tractor to handle. I might try digging around them then
pulling them with my truck. I've done that with some big logs that my
tractor couldn't handle.

Bill
Hi Bill,
You start at the perimeter of the excavation to give the operator an idea of how deep to cut or fill. The operator tries to leave the stakes in place.
As the excavation is dug out, new stakes are added to show the remaining depth to be excavated. Usually, when the excavation gets to the final stages, a series of level shots are taken with the operator holding the rod and telling him how close he is at different spots inside the excavation. The final stage is done by hand by driving some stakes and attaching screeds, the same ones for getting concrete grade, screeding off the grade about 3 1/2" below top of concrete.
Dave
Dave, I am wanting to install a metal roof on my home. What is the
best method of doing so. I watched some pro's do a commercial building
in my neighborhood earlier in the year. One tip the carpenter gave me,
was when I stripped my old roof completely off, to be sure to install
some sort of rubberized underlayment instead of Felt Paper as are under
most roofs. He said that you could in actuality, just go with this stuff,
and not be in any hurry to get shingle or metal roofing back on, as this
would shed any type of weather. He also said that when shoot screws, or
nails thru this material, it would seal around the shaft of the fastener,
thus eleminating any costly unwanted leaks. He asked me how many squares
of roofing that I had on my house. I told him, and he figured a moment,
and said to add another 800-900 dollars for this material alone, + what
ever roofing material that I decided to go with. I can't remember the
name of the product. Would you recommend this rubberized material, or
just go with the 30# felt as has been used for years. P.S. I also have
2 valleys in my roof, and 2 hips out on one end. I don't know if this
makes a difference or not.
Also what metal thickness should I be looking for?
What type of material warranty should I look for?
What type of venting should I install. I have 1 power vent and 2
Whirly Birds vents now. I 've been told to go with a top ridge vent,
but they just don't seem like they would move enough heat out of the
attic, without some sort of driven fan/blower ventillation......
Dave as always thank you very much in advance.................Brandy
Hi Brandy,
Not knowing the slope and climate conditions, this is a bit of a tough question to answer.
The roofer was correct in what he said. He was referring to an ice and water shield. When we put on a metal roofing the first 3 feet from the eaves are sheeted with solid sheathing. The rest of the roof deck is strapped with 1x4 or 2x4, usually 1x4 on 12", 16" or 24" centers. The centers are determined by the gauge of the metal. You get these centers from the manufacturers, themselves. Your dealer will have or could get these numbers for you. We don't apply felt or ice shield to a strapped roof deck mostly to a solid deck. It is up to the manufacturer whether he requires felt or not. Valley flashings are required for metal roofing, as well. Valleys and hips are a bit of a trick for metal roofing, especially the valleys. Follow the manufacturers directions for valleys and hips. I would choose a gauge of 26 or 24, leaning towards the 24 gauge. The fasteners for these modern metal roofs are usually special screws which come with a neoprene washer under the head. Hopefully water doesn't get a chance to get below the metal. To get rid of the noise and possible condensation problems of a metal roof, installers now prefer to apply metal on a solid deck with underlayment of roofing felt or the rubber ice and water shields. Obviously, the rubber is the best way to go, but is the extra expense worth it? This question I can't answer, not knowing of your particular circumstances.
The ridge vent is a good way of ventilation, but is dependent on the eaves being vented as well to get the air movement.
Dave
Dave, I've finished framing out my basement and installing 1/2"
Drywall or Gypsum Board. Now, How do you finish it. Tools that I
have for doing this job:
1/2" drill and mud mixer.
I sanding outfit that hooks to my shop vacuum, for working off
excess dried mud, and other high spots.
6" drywall knife
12" drywall knife
mud pan
several rolls of fiberglass tape.
several lengths of corner bead.
several lengths of inside corner bead.
"0" know how for the tools. I would appreciate some help on this,
they make it look easy as hell on "TV". If you know of, some "DVD"
that I can purchase, I'll do that. Some years ago I got a "VHS"
tape at "Lowes" on how to install Ceramic tile. I watched it, and
did several small jobs, as well as an even dozen big jobs for myself,
and my children to date. I think if you, or someone offers one of
these, and it would work like the "Ceramic Tile" video did for me,
it would be fantastic. Once again thanks in advance..... Brandy!
Hi Brandy,
From the roof to the drywall!!
I prefer the pre-mixed mud in the pail, easy to mix it with your tool.
I wrote an article on this check it out at: http://daveosborne.com/dave/articles/how-hang-finish-drywall.php
I'm sure there are videos out on this. Try with the building suppliers and your local library.
Let me know specifics if you are having trouble.
Dave
Ok Dave - new topic!

we may have a problem here but I'm crossing my fingers you might
say we don't....

This is about the hall bathroom we ripped out. Pete put in a new
tub (nice!) and put cement backerboard on the walls so I can tile.
He used the correct tape and mastic to finish it up. I didn't
realize it but he didn't put any vapor barrier between the
backerboard and the studs. There is regular insulation in between
the studs which are 16" on center.

I checked a couple websites - one said no vapor barrier needed,
the other site (DIY) says roofing felt should be used and a 3rd
said it isn't mandatory but suggested. Pete said the instructions
that came attached to the backerboard did not say a vapor barrier
was needed and he thought it was waterproof so using one didn't
cross his mind.

How do you feel about this? Do you suggest removing the backerboard
and installing the felt?

I'd rather take it down and do it right (if need be) than be sorry
later.

thanks again!
Pat
Hi Pat,
Our code requires vapor barrier on the warm side of any outside wall. Since this is wall is insulated, I take it that it is on an outside wall. I would not put poly behind anything, wall, floor or roof unless as a vapor barrier.
According to the code, vapor barrier is also required in the floor of a crawl space, but they don't push this since the floor usually has vinyl or underlay under the carpet which keeps moisture out. In you case, with the backer board, I would not go to the time and expense of removing it for the sake of applying vapor barrier. The backer board will keep any moisture out and act itself as a vapor barrier.
Thank God! I was hoping you would say that, but I have to ask the
next question just to be double sure: (and yes, the shower wall
is an 'outside' wall of the house)
Do you think there's any possibility the water hitting the wall
in the shower may somehow 'creep' through the tile, grout, mastik
and backerboard and create a moisture problem in the space where
the studs are?

thanks Dave
Yes, there is a possibility of that happening, if the grout cracks and the mastic cracks and the grout crack and the mastic crack match up with each other. That is not the purpose of the vapor barrier, anyway. The water would pool up on the inside of the wall probably on the floor. After about 1 month you can spray on a 2% silicone liquid which helps seal the grout. It makes the water bead up. My main concern would be to keep an eye on the grout for cracks. The grout is the week link in this scenario.
Dave
Dear Dave,
I have a 2 family home in CT. Heat and Hotwater comes from two
180,000 BTU Natural Gas Boilers. The boilers are vented by an
electrical power vent. I want to build a chimney up to code as
inexpensive as possible. Possibly woodframe with chimney pipe?
I would like this to go up the outside of the house. What is the
best least expensive suggustion you have? Please give details.
I would suggest the wooden zero clearance chimney, if your unit can use a B vent. This should be the least expensive chimney. The chimney is simply framed with 2x4s or 2x6s, sheathed with 3/8" OSB or plywood to keep it square and rigid and sided with material to match the house. For a high chimney, install the fourth side after the vent is installed. The height of a chimney is 3' above the roof or 2' above the highest part of the roof within 10' of the chimney.
Dave
Dave I have a detached 3 car garage 28x36 with trusses on 24 inch centers.
I would like to finish the ceiling but I was looking for another material
other than drywall. Any suggestions?
Yes, you could use 4'x8'x1/2" plywood or OSB panels and install battens over the joints to form a pattern - either 4x8 or 4x4, etc. You could also use either 1x4 or 1x6 V-joint pine, etc.
Dave
On the shed project... I have leveled the dirt or at least eye balled
it level, but now I want to get the footing square and level so I
can get the blocks on, how's the best way to lay that out?
Hi Craig,
Build the forms for the footings out of 2x6 about 16" wide between the 2x6s. The footings have cleats 19" long and fastened to the top and bottom of the 2x6s. The top cleats are removed after the concrete hardens, the bottom ones are left in the concrete. Cut the forms to the correct length. Lay the one side into position first, level and staked down. The stakes are 1x3 or 1x4 driven into the ground on each side of the footing and nailed to the footing when it is leveled. Position the other side into position and place the one in the middle as well. Tie the two outside forms together with a 1x4 or 2x4 to the correct width. Square these two outside forms by measuring their diagonals which should be equal when square. Stake the other side when square and level. Place the center footing in place and stake when level.
Refer to the instructions in the plans for making the footings.
Here is a drawing to square them:
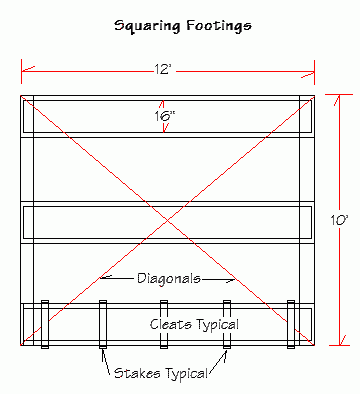
Dave
I was talking to the cement place and he tells me that I should
put some gravel down first before I pour a pad. Is it really necessary?
Hi Craig,
I depends on the type of soil you have. If there is good drainage already with sand or gravel, it is not necessary. If the ground is clay, some gravel is good to help surface water drain away from the shed. Don't pour concrete on grass or any organic material that will rot out and settle.
Dave
HI, I was wondering if you have any info on cement stairs or if you
just deal with wood. Also if you had any articles that I might have
missed on building a closet. Thx
Hi Rae,
Yes, I wrote an article on concrete stairs: http://daveosborne.com/dave/articles/concrete-steps.php
Nothing on closets,but here are a few tips.
- The inside walls of the closet should be about 24" wide.
- The finished opening for a bifold door is the same as the size given. That is for a 5'x6'-8" bifold or sliding bypass door the finished opening is 5'x6'8". The finished opening includes the floor. If the floor is vinyl, no problem. If the floor is hardwood or carpet allow 1" extra. So for the sides of the opening allow for the drywall or wall finish thickness. The manufacturer allows for the track and the door height.
- The floor in a closet usually is the same as the room.
- There are 3 ways to finish the door opening: use corner bead as usual on an outside corner; use a half jamb which is a 1x2 flush on the jamb and casing attached to it, as normal; or use a J-molding to form a 3/4" overlap of the wall drywall over the door opening.
Dave
What is involved in rough plumbing and rough electrical - new construction?
Hi,
Rough plumbing and electrical is so called because these are the first stages of plumbing and electrical work which are hidden inside the walls or under concrete slabs. Nobody will see your rough work except the inspectors. Usually, you need an inspector for the plumbing which may be the same department as the main building inspections. In all the jurisdictions I've worked in, the electrical inspector is a different department and requires a separate permit. Only licensed electricians can take out an electrical permit except in some areas homeowners who are experienced in residential wiring may take out a special permit as the homeowner. Their are concessions to this permit, contractors can not be involved, but family members may. If you have a brother-in-law that is handy or experienced in electrical work, he may help you do the wiring as long as he is not financially compensated for it. The permit will be in your name.
The rough in plumbing includes stub outs for the hot and cold water supply to kitchen sinks to go through the wall at 23 1/2" from finished floor, at 8" centered with the sink and for the 1 1/2" drain at 16 1/2"; for bathroom lavatories at 18" from the finished floor at 4"centers and the 1 1/4 or 1 1/2" drain at 18". The lav drain and tail piece is 1 1/4", I prefer to adapt up from 1 1/4 to 1 1/2 at the slip joint adapter at the bottom of the tail piece.
The rough in for a tub or shower is the installation of the valve itself. The height of the center of the valve is 15 1/2" above the tub rim for a tub/shower combination and at 14" above the rim for a separate tub and the shower valve is set at 54" from the finished floor. The shower head is roughed in at 78" from the finished floor for both the tub and shower. The tub faucet is roughed in 4" above the tub rim. The trim is left off until after the wall board is in place. The rough in includes installation of the tub and shower. Usually these are in place before walls are installed. Depending on the size of the shower, make sure you can get it into the bathroom area before the final exterior wall is in place or at least before the door is installed. If this is a renovation and the doors are installed, a reno shower unit can be purchased which comes in two pieces to get through doors. The drain will match the size of the drain of the shower, usually 2" or 1 1/2" for the tub. Follow the instructions from the manufacturer regarding installation of your particular tub or shower control/valve.
The toilet supply is cold water only and usually 6" offset to the left of center of the toilet and 9" off the finished floor. The drain is attached to a floor flange which is mounted 12" from the finished wall on the centerline of the toilet.
The dishwasher is usually serviced from the kitchen sink and is not included in the rough in stage, unless a separate hot water shut off is desired. The dishwasher drain runs to a spigot on a special tail piece from the sink drain, installed with the finish plumbing.
If you have any specific questions, just send me a line.
Dave
I am building a 12X12 concrete slab with a single step down
on two sides. I am concerned about the concrete flowing over
the step form when I have the concrete poured. I understand
the step is poured first then the slab however what is to keep
the concrete from flowing under the slab form and then overflowing
the step form. I have yet to install the stringers but the rest
of done. Concrete is delivered this Monday.
You pour the concrete at the lowest point first. The concrete slump, the stiffness of the concrete, is important when pouring stairs. It should be stiff enough to hold its position but remain workable. When ordering the concrete make sure you specify the slump or tell the dispatcher that the concrete is for stairs. The slump is in inches measured from a special cone which is 11" tall. The concrete is dumped out onto a smooth surface, a straight edge is laid on top of the cone and the amount of slump, the distance the concrete settled is measured in relation to the cone. So a slump of 6" means very wet concrete and a slump of 1" means very dry concrete. A slump of 2 1/2 to 3" would be good for stairs. But leave this up to the dispatcher since there are additives they add to make the concrete workable that may affect the slump. He should know the ideal slump for stairs for his mix. Remind the driver before he adds water when he gets to your site. He will probably look at it first, hopefully. Don't think of concrete as the consistency of water.
I've poured stairs with many risers and never had any problems with the concrete running out, as long as the slump is not too high. If by some off chance the concrete is too wet, the driver can add a bag of cement to stiffen the mix. Rely on the driver's discretion, he has probably poured more concrete than both of us.
Dave
Who inspects the main drain from the septic tank to the house?
How deep does the electrical service have to be buried from the
pole to the house?
Hi,
You'll have to check with your local municipality to see who inspects the drains. It varies depending on where you live. In my area septic systems have a separate department responsible.
In my area the electrical cable must be buried a minimum of 18" under pedestrian areas, 24" under driveways. The power company usually leaves their cable stub-off duct at 36". Here again check this out with your local electrical inspector.
Dave
Hi Dave!

Just wondered if you have a favorite 'invisible deck board fastener'
that you might recommend.
It seems there are quite a few out there all about the same price.
thanks!
Pat
Hi Pat,
I've never used these, but the eb-ty looks like the best. You need to use a biscuit joiner for the slots. These are not cheap, though, about $1 per biscuit and screw.
Dave
Wow! Lots of questions last month. Hope one or two could help you on your projects. With Winter around the corner, now is the time to prepare your house for the tough weather. Checkout our website for some tips: http://daveosborne.com/dave/articles/winter-proof-home.php
I'm always glad to hear from you,
Dave
|
home | contact | articles | plans | downloads | dictionary assurance | cancel | newsletters Copyright © 1999-2026 by David E. Osborne. All Rights Reserved.
|