| NEWSLETTER from DaveOsborne.com | ||
| “Building Confidence” | October 2006 | |
Welcome
Dan (my brother and webmaster) and I welcome you to another newsletter. We hope you are finding our website helpful with your do-it-yourself projects.
What's New
I just got back from a quick trip to Northern Mexico. I took a plumbing contractor friend of mine, Geoff, to accompany me so we could get an estimate on materials needed to install a water treatment system for a church camp. A pastor in Juarez uses this camp as his base for his monthly trips to minister to the Tarahumara Indians of the canyon area about 6 hours from there. He brings food, clothing and supplies down into the canyon where this tribe lives. Geoff and I loaded up an extra suitcase each bringing 80 new pairs of kids running shoes that our church quickly got together for us. It takes him about 3 hours to walk down with a mule train and about 6 to 7 hours to climb back out. The elevation at the base camp is 6700 feet above sea level so gets below freezing for a couple of months in the Winter. We are looking for about a 2500 to 3000 gallon vertical water tank about 6' in diameter. We'll build a house over it, insulate it and heat it with a propane heater to keep the frost out. Then treat it. The water supply is pumped from a small river near by. My church will be sending a team of volunteers to erect this in the Spring. I'll let you know more about it as we progress.
Ask Away!
Well onto some of the questions from our members during the month and my responses to them:
Hello Dave,

I'm a 1-minute old member and I have an unusual question. I'm preparing a
cottage as my future retirement home and it only has a 1-car garage.
The house is on a hillside with a walkout basement. The yard's earthen
grade beside the east basement wall drops 8 feet over a run of 20 feet.
I would like to excavate the hillside and either build or put a
10' X 12' x 7' high Arrow storage shed on a concrete slab beside the house
for my lawn tractor and tools. I would also like to cover it with earth to
hide everything except the garage doors to make it more pleasing to my neighbor.

What is the cheapest construction method and can an Arrow Concord galvanized
steel shed hold the earth's weight on it's own?

I also thought about a minimal shell to hold the weight of the dirt and then
slide the shed under it.

At the top of this hill is the first floor level with a railroad tie and
crushed stone turnaround covering the entire top of the east-west area of the
proposed shed area. If I wanted to pack dirt in around and over a "shed" to
the top of the grade, make it level, add stone, and park my boat on top of the
shed and dirt, how robust does the construction have to be (estimate 2 feet of
dirt on top of the shed and a 3,000 pound car/boat)? It would end up being a
stone driveway beside the house with an elevation equal to the hill's top, with
a garden shed structure under it, with only the dirt and the "shed's" front
doors being visible from the back yard.

Thanks,
Larry
Hi Larry and welcome,
An unusual question is right!!
I would not trust the steel sheds to hold up this amount of weight. Your idea of a covered shed sounds good to me, but I would recommend a concrete shed, walls, slab and roof, to hold up the fill and car and boat on top. A structure like this would not be hard to build, although will be more expensive than a metal shed. This should really be designed by an engineer who would specify the size and placement of rebar and thickness of roof and walls. Keep in mind the inside ceiling height should be 12" higher than a standard height of a garage door which is 7' high x 9' wide.
I would research this a bit more regarding the services of an engineer and his fees. Once you have a plan, I could help you build it. I've worked on large commercial and industrial projects forming for concrete buildings, structures, including underground parking.
Dave
Hi Dave! I'm a new member to your site, and it's great! Here's the question...
My wife and I have a cabin in the woods of northern New Hampshire.
I just finished an addition which will be the kitchen area. I need to purchase
cabinets, and am wondering how well the cabinets with the wood fronts and
particle board bodies will hold up under temperature extremes. The cabin is
unheated, and it gets below zero up there on occasion. We have propane heat,
but only run it when we are there, as there is no water. We are trying to keep
everything that we can on the inexpensive side, but only want to buy once and
not get burned by a wrong purchase. Any help would be appreciated!!
Thanks!
Roger and Arlene
Hi Roger and Arlene and welcome,
I don't see a problem with either the cabinet wood doors or the particle board boxes with temperature extremes. There could be a problem with humidity extremes, though. It depends on how much moisture is allowed inside when the cabin is heated up. If there is any hardwood flooring present take a close look and see if the changes in temperature and humidity over the years has affected them. Heating with propane introduces moisture into the air. This would be my biggest concern. The propane heaters should be vented to the outside. Bathroom and range hood vents should be run during this warm up stage. Moisture will deteriorate fiberboard fairly quickly if left to accumulate on the surface. If Northern Hampshire has a dry climate you should be okay.
Dave
Hello again, Dave!
I have an electrical question that I hope you can give me guidance on.
We currently have a meter and breaker box on a pole on our property.
I would
like to electrify our cabin, which is about 100 feet from the service.
We have a 100 amp square d setup. Here's the question....
What size wire should I use to run to the cabin? We will be running a
refrigerator and 5 or 6 60/75 watt lights. Can I run a 30 amp breaker
(GFCI) from the main box, or should I put a sub-panel in the cabin?
The power will be turned off at the meter when we are not there. I'm
hearing that I need to use 6/3 wire to a sub panel from one person, and
another says 10/3 outdoor wire will be fine to run from the box to the
cabin outlets. HELP!!

Thanks again!
Roger and Arlene
Hi Roger,
Its nice to have friends willing to offer advice, isn't it?
If you were running a fridge and 5 or 6 lights from a panel in a house you should have 2 circuits. One for the fridge and the other for lights and outlets. The fridge circuit is 2 wire #14 copper with ground hooked to a 15 Amp breaker. The fridge circuit may include a clock but nothing else. A circuit for outlets and lights is 2 wire #14 copper on a 15 Amp breaker. This circuit may have a maximum of 12 outlets or 12 lights or any combination of the two up to 12 per circuit.
If I were doing this, I would go with a sub-panel in the cabin. This would be the largest panel I would think I would need for future use. Then all you have to do is take a circuit from your sub-panel rather than from the pole 100 feet away. A 15 amp 14 gauge circuit is good for a maximum length of 130 feet. You don't want to connect outlets and lights with any wire larger than a 12 gauge. Most of your 15 amp fixtures are intended for #14 wire. #12 wire is a lot stiffer than #14 and should only be used for the outlets or heaters designed for this gauge.
You may want to use a toaster, coffee maker, or hair dryer, iron or circular saw. These appliances take close to 15 amps to operate and it would be nice to have the required amperage to run them. Since you have lots of power on the pole, you may as well use it or be ready to use it at some time down the road. The powers to be have already figured this out for you.
For a small house up to 861 square feet of floor area, not including the basement, the smallest size panel is a 60 amp panel with 16 circuits, 2 hot conductors of #6 R90XLPE copper (black, red or blue); 1 neutral conductor of #6 R90XLPE copper (white or neutral grey); service raceway of 1" or use #6 copper Teck cable; service grounding conductor of #6 bare copper. This may be different in your area if subject to inspection. What is important in all this is that wire gauge is matched with breaker size - 14 with 15 amp; 12 with 20 amp; 10 with 30 amp; 8 with 40 amp and 6 with 60 amp.
A GFCI breaker is not needed from the main panel to the sub. You only need this type of expensive breaker for outdoor and bathroom outlets or a hydro-massage bathtub, etc. For the GFCI required outlets, it is cheaper to go with an actual GFCI outlet connected to the first outlet from the panel. Then all the other outlets are also protected downstream from this one . Dave
Dave,

I am installing new kitchen cabinets. I am planning to install two levels of
molding at the top of the cabinets - a 3 1/4" high crown molding on top of a
small, flat vertical molding (about 3/4" high"). Much is written on how to
cut the molding. My question is how to attach the molding to the cabinet?
With the two levels of molding, do I attach a single backer block that is
high enough for both? Is the crown molding attached by only nailing it in the
small vertical area at the bottom of the molding? (The molding does not reach
all the way to the ceiling, so it cannot be attached there). Do I attach the
backer block to the cabinet first and then the molding to the backer, or do
I attach the molding to the backer and then the backer and molding to the
cabinet? What size nails should I use to attach the molding to the backer?
A short tutorial on how to do this would be great. Thanks!

Bob
Hi Bob,
Usually we just nail the lower part of the crown to the face of the cabinet. The corners are glued to each other so this stiffens it up. On long runs I install a block fastened to the top of the cabinet which projects out at the same angle as the crown. I then nail the crown into this block every 3' or so. In your case I would nail the small molding in first onto the face of the cabinet, then nail the crown into the small molding with the odd nail into the block. Here is a drawing to help:

I use an air nailer for work such as this. I use the 18 gauge nailers for this type of work. In cabinet work such as this always use carpenter's glue, white or yellow (preferred).
Hope this helps,
Dave
What is the proper method for rough in of shower drain in a concrete slab?
Also a floor drain like in a utility area? Thanks for info.
Hi Randy,
For a shower drain you need to know exactly where the drain will be. This means you either need the specs for the shower drain or the shower itself. What I do if I have neither and am roughing out a concrete slab for a client, I install a bulkhead in the slab or a blockout to prevent the concrete from getting to a certain size area. In this instance, I build a square box about 16x16 or 12x12, depending on how accurate I have info for the shower drain. Below this box is the drain that I can tap into at the right time.
In the mean time I fill the box with sand and pour concrete around it. When the time comes to install the shower I dig out the sand, remove the 2x4s forming the blockout and tap into the drain. Shower drains are 2" ABS with a p-trap below grade when the shower drain is plumbed to the correct point you can pour concrete in the hole and replace the shower pan or one piece as the case may be. A fitting is used that doesn't require gluing, but a rubber tapered gasket installed from inside the shower or above the shower pan. It works well.
A floor drain like in a utility room that may be used for the hot water tank should be run into the perimeter drain around the house. If the drain is connected to the sewer line inside a house it needs a p-trap. This creates a problem since the floor drain is not used much it may dry up leaving the p-trap useless, without water in it. To alleviate this, a trap primer is required to keep water in the trap at all times. This trap primer could be hooked to a toilet upstairs so every time the toilet flushes a small amount of water is discharged into the trap. This is why you should try to hook the floor drain to the outside perimeter drain.
Dave
Hi Dave!

I trimmed out my first closet!  (I get excited over the craziest things!)

It's so pretty I just had to show you!

(I've never done base board or any kind of trim before.)

Pat
Looks good, Pat. I should just give all my clients your email address so they can get advice from you and I can go on vacation!! Ha!!
How's the deck coming?
Dave
I don't know if you'd want ME giving advice Dave! haha

My husband says when I'm working I remind him of a person afflicted with
a combination of ADHD and Tourette's !
(which means he definitely keeps me out of the public eye when I'm working
on a project! haha)(he has also been know to claim he doesn't have any idea
WHO the crazy lady is pounding on that deck board screw with a dead drill !)

Here's a couple pix of the porch/deck. It's looking awesome and so much
bigger as it gets closer to completion. I finished putting the Ipe down on
the deck under the sunroom windows yesterday. Eb-ty clips are very good and
worth the price, but don't use the glue. The reason I say this is several
times I got almost to the last clip and either found a sly crack or previously
unseen flaw or the board was so 'bent' I couldn't get it to slide in. Ipe boards
are so hard and they all LOOK pretty much straight and perfect, however some
things don't become apparent until you're actually working the board. Glue added
to the mix would have been a disaster. On the web all instructions say to use
glue but the forums say pretty much use glue only if you are a total perfectionist.

This deck reminds me of an old fashioned country porch, nice and relaxed feel
 and hey! where's my rocking chair?!! Dogs love it too. especially crawling
 under it-maybe we'll need to leave an access panel for them to get under.

Here's a view of a sunrise from the porch (red sky in the morning, sailor take
warning!) (Pete's Coast Guard 26 years).
I think we'll be putting a table just outside the door, we might enjoy eating
breakfast looking at something that pretty instead of staring at the bad news
in the newspaper.

OK - staining base boards today - it's a little cold out and I need a little break!

Hope you have a great day Dave!
Pat
Thanks, Pat, that's good advice on the glue with eb-ty clips.
Dave
Note: Have a look at Pat's pics on the member page http://daveosborne.com/dave/photos/index.php#pat.
Dave,

In response to the posting about installing a metal roof, I put a metal roof
over our deck this summer. My supplier offered a product called "Low-E". It
is a closed cell sheet similar to the packing material used to ship electronic
gear. It is about 1/4" thick and has an aluminized mylar coating on each side.
Supposed to be as effective a a 4" fiberglass batt in keeping heat out. If you
plan ahead, the seams can be placed on top of the lathing the roofing is
screwed into. The stuff is great, there is no radiant heat off the roof during
the hottest days and it gives a clean appearance to the underside of the roof.

Just something for your readers to think about. This product will go a long way
toward controlling those electric bills in the summer. A subject close to the
hearts of everyone living here in south Louisiana where the Air Conditioning
season lasts pretty much all year.

Don
Thanks, Don for the info. I'll put your email in our next newsletter.
Dave
I am considering laying marble tile in a small bathroom. The area being covered
is 5' x 5'. The existing floor is a laminate sheet on top of plywood and the
laminate floor comes up evenly with the hardwood floor of the main room. I'd like
to know if there is anything different i should use to lay marble, is it easy to
cut with a regular tile saw, and should i tear up the laminate to apply the
adhesive underneath. Since the tile will be higher than the main floor i am
assuming a wood transition strip would be appropriate also.

Thanks,
John Fletcher
Hi John,
I would remove the laminate which is usually not fastened to the floor, anyway. The general rule for ceramic tile is to build the floor up to at least 1 1/4" thickness - 2 layers of 5/8" sub-floor, to eliminate any movement. So check this out. A transition strip or reducer would be applied at the doorway, hopefully out of the same hardwood of the existing floor. A brass bevel strip would also be acceptable.
Dave
Being that this is a 3 story house and this bathroom is on the middle floor,
I can only see one sheet of plywood on top of the subfloor. I would need to
put another sheet of plywood down? This would raise the floor by almost an
inch above the main room once you include the thickness of the tile.
So marble is pretty much the same technique as ceramic? No special adhesive
or grout?

John
No, two sheets of plywood is good, including the sub-floor. As with ceramic the tiles rest in thin set mortar, not adhesive. Marble has thinner joints than ceramic which are grouted with a sanded grout to your color preference.
Checkout this article on our site: http://daveosborne.com/dave/articles/how-lay-ceramic-tile.php
Dave
Hi Dave! We're just about ready to put up an entire house of drywall
(about 200 sheets or so) and I've been offered different opinions on attachment:
ie. adhesive and nails; adhesive and screws; only nails; only screws.
I'm curious what the best way of putting up drywall is?

Thanks!
I've seen a lot of pros put on drywall. They nail the sheets in place then use screws. Screws should be placed along every stud or joist, etc. about 12" apart and 6" along the edge. Only screw along the edge when the opposite sheet is installed. For walls use 1 1/4" long screws, for ceilings use 1 5/8" screws. Adhesive is not used in normal drywall installation. Start with the ceilings first, then start with the walls and lift the wall sheet tight against the ceiling sheet. A space is left at the bottom of the wall which is covered by the baseboard.
The idea is to install the sheets so that there is few joints as possible. So if the room is under 10' long use 10' sheets rather than an 8'+ 2' piece, creating an extra joint. All sheets should be placed at 90 degrees across the studs or joists. Don't screw into the drywall to countersink the screw and break the paper. The screw should be screwed in just enough to dimple the surface, but not tear it. If this happens, place another screw beside it. This is where a proper drywall screw gun comes in handy.
Good luck with the job,
Dave
Hi Dave,
I am very glad to hear you are learning spanish. I just happen to be a teacher
of Spanish and ESL so please let me know if you have any questions.
I would love to help you. I have lots of materials that make learning quite simple.
Check out Rosetta Stone as well. Its kind of expensive but well worth the money.
I use RS to learn other languages such as Manderin etc.
Also, if you need to hear how the word sounds give me a call, 214-755-4633.
Don't hesitate to call I am always willing to help people interested in the
Spanish language.
I hope to hear from you soon.
Chris O
Hi Chris,
Thanks for the email.
A lady from our church is teaching the class. She lived in Paraguay for a number of years. She had a language school there. We are learning from the Spanish Now book which comes with 4 CDs of spoken lessons. I've taken French in high school and German in university. Spanish seems a bit easier to learn.
Thanks for your offer of help, I may take you up on it a later on if I have trouble. Including tonight, we have completed 6 lessons.
I'll checkout Rosetta Stone.
Thanks, again,
Dave
You readers are the best!!
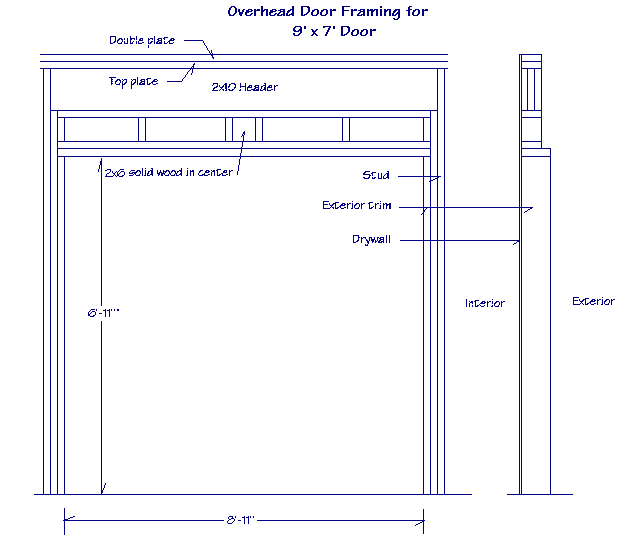
Can I get a garage door to fit and work in this. Rollup type? Do I have enough
clearance?
A drawing is included.
No. A standard overhead door is 9' wide x 7' high, which requires a finished opening of 8'-10 1/2" x 6'-11", as shown in this drawing:
Dave
Dave,
Thanks for the assist on a window bay bump out. Putting the finishing touches
on this weekend. Wish this was the end but a lot more to do in the home.
Couple questions you might be able to help me out with.

1. I am putting in a new foyer (9x8) on a block foundation with vented crawl
space, no access door, about 1.5- 2 ft if that. How might I insulate this to
keep moisture out of insulation.

2. Since the entry door is under the porch I would like to have minimal to
no step into the house into hardwood floor. How to I account for the height
of the wood flooring? Also any recommends on whether no step is good or
bad idea?
Hi Mark,
1. The worst thing you can do is to put poly under the joists. This causes condensation problems. With a floor we don't usually put in a vapor barrier. When installing the floor sheathing we apply construction adhesive from tubes. This not only makes the floor stronger, but acts as a caulking to keep out moisture and air movement. Insulation usually doesn't have moisture problems under the floor if the crawl space is warm and dry. In your crawl space there should be a layer of 6 mil poly with about 2" of concrete over it. This keeps out any moisture from coming up from the ground. The foundation walls are coated with an asphaltic sealer on the outside to keep any moisture coming through them. The only place moisture can be introduced is through the crawl space vent which should be closed during the wet weather. I live on the West coast where it is close to 100% humidity in the winter and we don't experience any problem with our floor insulation.
2. I prefer to keep a minimum of 2" step from the porch or deck to the main floor of the house. This way any weather that is blown in won't come in the house. If you want to consider this as part of the house, as a foyer is, the floors should be flush.
Dave
Dave,

Enjoy your site. I need some help. Ive just completed a side addition with shed
roof and cathedral ceiling 1/2 story below the main part of my bungalow.
I'm attempting to install vent baffles within the ceiling rafters but have two
skylights to block the air flow (see photo). There is also blocking between
rafters to make life difficult. How do i get
around these obstacles?

Thanks
Ralph
Hi Ralph,
If you are going to insulate between the rafters it will diminish the venting. Usually, in my area with a vaulted ceiling such as this we are required to strap above the rafters with 2x4s so that there is a minimum of 1" airspace above the insulation as venting. In your case I would still drill round holes in every other blocking at the eave and insert round 1 1/2" diameter plastic louvers. Don't worry about the rafter space with the skylight since this will be your "skylight tunnel". Make sure you install 6 mil poly for vapor barrier in this space as well as under all the drywall or ceiling finish whatever it may be.
If there are any blocks between the eave and the ridge, drill these as close as you can to the sheathing, two 1" holes spaced out in each blocking to match the spacing of the holes in the eave blocking. It would be a good idea to also install a continuous ridge vent. Roof vents won't help much, here since it is not an attic space. When insulating try to place the batts flush with the ceiling rather than stuffing it tight to the sheathing, hopefully there will be some air movement above the insulation. Depending in the area you live, another option is insulating on top of the sheathing with rigid insulation and use R-17 3 1/2" fiberglass batts in the rafter spaces.
Dave
Dave: I completed my foundation and am ready to install the sill plate.
What is the best way to level the sill plate around the entire foundation?
Thanks
Hi,
Is this a trick question?
The foundation should be perfectly level when poured. Usually we install a 2x6 sill plate onto the top of the foundation wall, drilling holes for the anchor bolts to project through, so we can fasten it down into position. A sill gasket is stapled onto the bottom side of each sill plate to act as a weatherstripping and to keep the wood from making contact with the concrete.
If I was asked to install a sill plate on a foundation that was not level I'd have to do a number of things to correct it depending on how out of level the top of the wall is. For the worst scenario, I'd repour the top of the wall about 6" so the new anchor bolts would fit. I'd tie rebar to the existing anchor bolts. If the wall is within 1" of level, I would knock off the high spots and shim up the low spots with cedar shingles (shims). The anchor bolts would be too low, so I'd chisel the wood away to allow a nut and washer to grab the anchor bolt.
Could you be more specific on how out of level the wall is.
Dave
Dave: It is off 1/8 to 1/4 inch. We poured in windows in two spots and the concrete
bulged upward when it set. I looked on the web and this appears to be a common
problem when pouring a window in place. The product we used is a foam foundation
blocks by a company named Quadlock. You have to cut off the top of the blocks to
get it the correct height and put a metal track on top to be used as a drywall
nailer. I was just wondering if I should use metal or cedar shims and how far apart
on center they should be? Is it easiest to use a string line all the way around or
do you suggest doing something else?

Sorry for not being more specific in my original email.

Thanks, Todd
Hi Todd,
If this is out 1/8 to 1/4 in only 2 places, try to knock this down, rather than build the rest of the foundation up. You can rent a surface grinder for concrete, a large angle grinder with a special cone shaped stone. Maybe start with a chipping hammer, first and grind it off after. If this isn't feasible go with cedar shims. Purchase utility grade shingles, not shakes, and split or saw them into about 3" wide. Always use 2 shingles together, thin edge over thick edge to keep them even.(You should separate wood from concrete by using a roofing felt or sill gasket.) These should be spaced under every joist if the floor joists are attached to the sill plate or 3' centers if a wall is attached to the sill plate. You can fill the void between the concrete and sill plate with a spray foam type insulation later on when there is some weight on the sill plate.
Use a 4' level rather than a string line or better still shoot the sill plate level with a builders level or laser level. You can rent these tools including a 6' level. Always go both ways from an elevation that is known to be the desired elevation with a hand level. If you start at one point and go around the foundation with a hand level you will probably gain height and not have a true level. In the old days, before fancy builders levels with scopes or lasers we used a simple garden hose filled with water. We purchased the cheapest hoses, green almost see through. We filled the length of hose with water except for about 6" from each end and left one of us stationery, with one end of the hose on a level mark. The other guy would walk around the foundation wall forms placing a pencil mark on the wall as shown by the level of the water in the other end of the hose. We had to be very careful not to spill any water while we moved around. Since water forms its own level this system worked very well, although slow.
Try to level off the high spots first, then you can treat the entire foundation as in my first email as a true level foundation.
Dave
Well, that's it for another month. Hope to hear from you if you are having trouble with something I can help with.
Be careful out there,
Dave
|
home | contact | articles | plans | downloads | dictionary assurance | cancel | newsletters Copyright © 1999-2026 by David E. Osborne. All Rights Reserved.
|