| NEWSLETTER from DaveOsborne.com | ||
| “Building Confidence” | June 2007 | |
Welcome
Welcome to another newsletter from DaveOsborne.com, where we build confidence. You do the work with our guidance.
What's New
My wife and I, along with our daughter, her husband and two kids have just returned from a trip to Portugal to visit his family and some of the country. I've got a few pictures, which I'll include at the end of this newsletter, of the construction technigues over there.
I was able to keep up with your questions during our stay, so will include some of them, as well.
Ask Away!
Hi Dave,

I am building a 12' x 20' hobby shop near San Diego. (No snow load.)
I am using normal rafter, ridge pole construction which requires
a 2 x 6
ridge pole over 20 feet long. How do I splice 2 x 6 lumber to
achieve the 20 foot length? My rafters are 16" OC. It appears to me
 that a 14"
splice between two rafters wouldn't be very strong.

Thanks,
Raymond
Hi Raymond,
The ridge board in a rafter system is to provide a nailing surface for the rafters. As a heavy load is introduced to the roof the rafters have a tendency to want to push the walls out. This is overcome by either supporting the ridge at the end walls and in between with posts to the center wall, installing collar ties across the rafters, or a pony wall on each side of the rafters to cut their span. This extra support is only required on rafters with a long span. The ceiling joists are an important member of the rafter system. They prevent the walls from being pushed out if they are properly nailed to the rafter and the wall.
In a 12x20 shop in San Diego, I would suggest that a scab at the joint of the ridge board, between two rafters, would be good. I would make this scab 5 1/2"x14", as you suggest, out of 3/4" plywood and fastened to each side of the ridge with 5 - 2"x#10 wood screws on each side of the joint. If the ceiling joists are nailed to each rafter, you will have a good roof.
If you are not putting in ceiling joists, this is a different story. I would laminate a ridge beam of 2 - 2x6s and alternate the joints. Fasten the beam together with 2 - 3" nails or screws spaced 16" on center. Support the beam on each end of the shop on the end walls. If there is a door or window in the center of the wall treat this wall as a bearing wall and put in a good header to support the ridge beam above it. Make sure you allow the thickness of the ridge in figuring out the length of rafters.
Hope this helps, Dave
Hi Dave,

Would you be willing to give me some help determining if an
interior wall in my home is a load bearing wall. In all honesty,
it's not really a wall, it's more of a double-sided closet in
the middle of my kitchen.

Before I explain what the wall looks like, or draw it out, or
say what the layout is, I would like to know if you would be
willing to help. Will probably take an experienced person like
yourself 30 seconds to know whether or not this is load bearing.

Thanks,
Jan
Hi Jan,
Well, okay, since you asked so nicely!
Dave
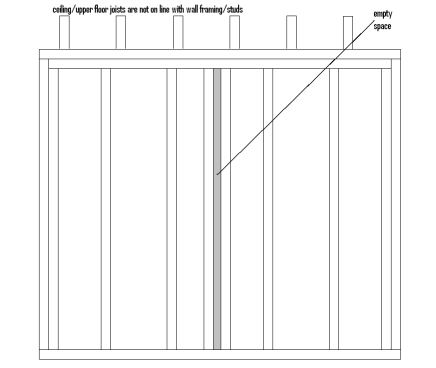
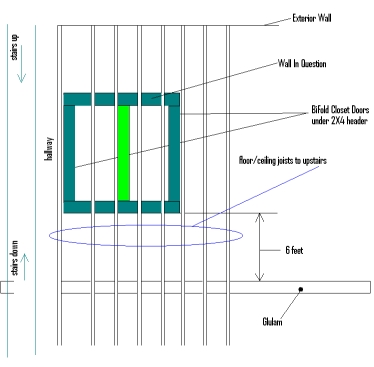
Well, I did my best to draw two pictures that somewhat show
what the structure looks like. Basically, I have a rectangle
in the middle of my kitchen that is framed out to be a closet
on one side and a pantry on the other. There is a wall between
them that is definitely not a load-bearing wall. The rectangle
is about 7 feet long by 5 feet wide. There is also a very
large glulam running the length of the entire condo,
perpendicular to the joists, about 5½ feet away from the
space.

The wall in question has several studs in it, and at the top
has two 2X4s running perpendicular to the floor joists of the
floor above. None of the studs is directly under a joist.
Don't know if that really matters or not, since I would guess
that they could build a strong enough header and double the
studs and it would not matter if they were under the joists
or not.

Anyway, I have tried my best to draw this for you and have
attached two drawings. In one drawing you see an empty space.
There was a 2X4 attached to one of the studs on that wall and
the wall on the other side. Those 2X4s were used as the outer
frame for the wall that separated the closet from the pantry.
It is the light green wall in the other drawing.


Upstairs is a bedroom. There is no wall upstairs that is
directly over the wall in question. Opposite the wall in
question is a wall that is directly under a wall upstairs that
separates the said bedroom from a bathroom. I am not tearing
out that wall.

If you can not tell, it's OK. I know that you are dealing with
limited information. Unfortunately, I don't have access to my
camera right now, or I would have taken pictures to send you.
If you really need pictures, I can take some this weekend.

I appreciate any help, and any advice, you can give me. I really
want to tear this wall out, but I don't want to cause any damage.
Since I am doing this entire remodel myself, on a limited budget,
I have to seek help and advice wherever I can find it.

Thank you so much for your help,

Jan
Hi Jan,
Good drawings!!
I would say that your wall is not a bearing wall. One more thing to checkout - see if the floor joists are not joined above the wall. I wouldn't think so with the outside wall and the glulam close by.
One warning, when removing a wall, remember that you are going to have a groove in the floor and ceiling where the wall plates were fastened.
Your concern about the studs not in line with the joists above is not an issue. With a double plate the joists do not have to line up with the studs. For a single top plate they do. Good observation, though.
Good luck with your reno.
Dave
Hi Dave,

My husband and I are expecting our first child and have to build
a 2 floor addition to our home. We are adding a living space
downstairs and a bedroom and a bathroom upstairs. we are going
through Lowes to buy all our materials...we have a one time
chance at 10% off our entire purchase so we want to buy as much
as possible at once...problem is..a checklist of materials would
be great so we don't forget anything..Do you know of any websites
if not your own out there that may be able to provide us with a
checklist? I'm talking from electrical boxes on down to the
faucets, nuts and bolts.

A loaded question I know, but I Just thought I'd ask, thank you
for any advice you can give...I love your website too!

Jennifer
Hi Jennifer,
Congrats on the baby!!
I have a checklist, actually on our website. It lists everything for building a house in the building phase. Check it out at: http://daveosborne.com/dave/articles/construction-estimating.php
If you have a plan of your renovation, most building supply stores will give you a free estimate right off the plans. If you take your plans to the contractor desk at Lowes, they should be able to give you a 'take off' of the quantities you need for your reno. This should include bathroom appliances and supplies. If you are going to get sub-contractors such as plumbers, electricians and heat, vent and A/C guys, they should give you a quantity take off of materials, as well. If you bought your plans from a professional, they, too, do take off on what you need, for a nominal price. Just some ideas to consider.
Dave
Dave, I've poured a 5" concrete pad, how would you recommend
fastening the walls to the pad? Also I have a 150psi 2 gal
pancake compressor. Would this be big enough to drive nails
for the framing and roof? If so, what type nailer (best
value $/quality) would you recommend?

Thanks/Randy
Hi Randy,
Usually we install anchor bolts in the wet concrete. Afterwards you can drill through the bottom plate into the concrete and install an insert bolt. Use a carbide or masonry bit. It is a bolt, washer and nut with a wedge on the bottom. The insert or mechanical fastener is put into the hole and hammered to tighten up the wedge. Simpson strong tie makes these.
The pressure is enough in your compressor, actually the large framing nailers use about 90 to 100 psi. When you are doing the sheathing, you may run out of air with only 2 gals of reserve. I have a 4 gal and I have to wait for the air to build up when doing alot of nailing like in sheathing. Framing should be no problem. You can buy just air tanks alone or put on a few 50 foot airlines to store the air a bit longer.
I prefer the coil utility nailer over the stick. The coils hold more nails and overall are cheaper. They will drive nails from 2" to 3 1/2" which is plenty.
Dave
Hey Dave.. my wife has decided that she wants 1/2" & 3/4" X 1"
molding on a few walls around the house.. as well as 1" x 6"
T&G wood on the ceiling in 2 of our rooms. I believe that I will
need a nail gun to make these jobs easier.
My question; what do you suggest for a general purpose (electric)
nail gun which will work well for both of these applications ?
Thank you
I can't really recommend an electric nailer. I would suggest you get an import 2" brad air nailer and compressor, if you plan on doing much of this. Otherwise, maybe rent an air nailer and compressor. I don't think you would be happy with an electric nailer. You need to be able to drive 2" nails for 3/4"molding plus 1/2" drywall into studs.
Dave
Ok Dave.. Thanks for setting me straight!
In checking out the sites.. there are many nailers
which I believe would fit your recommendation.

To narrow down my choice, is there something even more
specific that you can suggest?
I would like to keep my investment at below $200.00 for
this particular tool since I wouldn't be doing a whole
lot of this type of thing. I do occasionally build a
bird house, small shelf, etc.,. and it will be something
which will be handy to have on hand since I usually find
myself drilling holes and using finish nails for these
little projects, especially when working with cedar.
On the other hand, having one which will do various
lengths of brads seems to be a good idea ?
I have purchased tools in the past which just would not
perform as I expected they should.
Also, I do own a smaller compressor.

Thank you again.. Dick
BTW.. I truly enjoyed my communications with your Brother Dan
Hi Dick,
I'm surprised you can get a Paslode for this low price. I would recommend this one. I'm familiar with this brand. I have the equivalent one in a Porter Cable brand and paid $149 and am happy with it. I've worn out two import no-name brand, at $99, in the same time I've had my name brand.
When buying nails just get the cheapest 18 gauge nails, you don't have to buy Paslode brand. That's where they make their money. Buy 1 1/4" nails for casing nailed to the jamb; 2" for casing nailed to stud behind drywall. I used galv. 5/8" nails for fastening fence lattice together. This is a very handy size of nailer. If you have a small compressor, forget about the electric nailer and go with this one. Add a few drops of oil every day you use it, into the air line connection.
Yes, Dan is a character, we get along pretty well. He sure knows his computer stuff, I'm happy to have him as my webmaster.
Dave
Here's the data about the Paslode:
 The Paslode T200-F18 air powered 18 gauge brad nailer, item# 500959, drives 5/8" to 2" brad nails. Includes plastic carrying case. Comes with one year warranty. This Paslode brad nailer offers an extremely lightweight and well balanced design to reduce operator fatigue. Features a tool-free adjustable depth of drive and convenient no-mar tip to prevent surface damage. The Paslode T200-F18 pneumatic brad nailer is great for molding, window casing, door casings, decorative trim, panel installation, and more.
Tool Specifications:
Model: Paslode T200-F18
Part Number: 500959
Weight: 2.1 lbs. Height: 9-1/4" Length: 11-5/8"
Nail Range: 5/8" to 2"
Magazine Type: Straight
Nail Capacity: 100 (2 strips)
Operating p.s.i. (bar) 70-100
SKU 500959
Price: $91.00
Dave,

Greetings... I'm building a bar outside on my deck - I have
designed the plans - but I don't know about the wood.
Can you give me some guidance on wood for my bar?
For framing, I'll use treated lumber, but for the exterior
visible surfaces, I wanted to use something a little nicer.
Can I use regular untreated wood (pine board, pieces of
molding, etc.) if I seal/stain/treat it? What should I use
to treat it from weather damage? I would like to put
something on it (some sort of varnish to make it glossy).
Can you give me some help with this?
Thanks in advance.

Anthony
Hi Anthony,
Pressure Treated Wood is treated for bugs with a pesticide and not for rain or weather exposure. You don't really need PTW on top of a deck. If you live in a very wet climate, it may be a good idea to have the bottom plate with PTW. This may prevent rot between a wet deck board and the bottom plate. Common framing material is good for the frame, such as spruce, pine or fir. For the exterior finish, cedar is the best with its natural oils to preserve the wood.
Try to avoid moldings made out of finger joint materials. With the temperature extremes and the moisture, these will fail over time. Moldings come in cedar, too. My second choice for finish wood after cedar is pine. Teak is very good, as well, but expensive, used alot on boat decks.
I recommend 2 coats of Cetol 1 on raw wood then 1 coat of Cetol 23 for the final finish. These come in colors or clear, so color match the number 1 with the 23. Cetol 1 penetrates, seals and stains the wood where 23 provides a sheen as a finish, but not glossy. Follow the directions on the can and see the color samples at your dealer's.
Hope this helps,
Dave
Thanks Dave,

I'm looking into the Cetol now...
Question... can I use plywood outside on my bar (cabinet
grade)? I have attached a screenshot of some choices from
Lowes.com - can you let me know if you think I can use
any of these?
thanks.

Anthony
Yes you can use ext. ply. If you use 3/4" you would eliminate a frame of dimension lumber. Build the cabinets as in my articles. If exposed to the weather, don't leave any end grain exposed which may de-laminate. Cover it with molding or counter tops, goes without saying! Dave
Hi Dave,
I am a new member. I emailed you last week regarding plans
for a house I want to build. I have not yet decided what
to build because there are several issues, ie, lot size
(33ft wide) and me wanting to encompass too many things
like solar orientation, full basement with separate
entrance to mention a couple of things.
you mentioned a house plan outfit called, I think jarett
but I can't find it on the internet so it must be my
spelling.
could you please tell me the correct name?
cheers.
trevor
Hi Trevor,
Here is their website. I didn't realize they were Canadian!! They will ship the plans anywhere. https://www.jenish.com/index.php
Dave
Dave: The house we built over the last 2 years is finally done
(finished it last fall). Having never built a house before,
much less designed and built from scratch, there are some
things I wish I had done differently. Most are minor, but one
of them I need some help figuring out the best fix.

The basement mechanical room has a floor drain that drains out
of from under the slab, underground and down the hill about
75-100 feet where it terminates above ground for a French type
drain. The pipe is 1 1/2 inch PVC pipe. We are in central
Kansas and winters get pretty cold at times. The house has an
electric heat pump with a humidifier. The water from these
items drains into the floor drain. The water softener also
discharges into the floor drain when it regenerates. The actual
plumbing in the house drains into a septic tank.

The problem is that the water flow is so small when the
HVAC/Humidifier is running that the line freezes at the point
where it runs out above ground. No one lives in the house (it
is a weekend getaway) so when it freezes, the water backs up
into the floor and IF the water softener were to regenerate,
it would discharge 40 gallons of water that could go
no where but all over the basement.

Long story, but here is what I want to do to fix it. At the point
of the floor drain, cut a hole in the basement floor and put in a
sump pit with a sump pump. I would like to attach the sump pump
to the existing drain line running under the floor. My assumption
is that the line would not freeze when water pumps out of it
because it would be flowing
too fast. Is that a good or valid assumption? Also, I would in
effect be making the drain dependent upon a sump pump but could
use a battery backup. That said, if the power is off, the water
softener and HVAC would not be working any way so I see little
risk of a flood in that regard. I did not want to run a sump drain
pipe up and out above ground
because we now have a concrete slab all the way along the side of
the house and the discharge onto the slab would be an ice problem.

Another option is to try and do something at the end of the pipe
to prevent freezing but I do not know what. I had a hole dug about
4 feet deep at the end of the line thinking I could bury some
perforated pipe and run the line into it. Now I am concerned that
would not work well because of my concern about the ability to
handle the 40 gallons again
and what to do if groundwater fills up buried drain and no capacity
to handle discharge.

Any thoughts on a good solution?
Hi Jeff,
When I had property in the interior of BC, Canada, I ran the end of my septic fields to a rock pit. Our depth of frost there was 8'. So this was the depth of the pit. The idea is that the pipe goes into the pit at a level below frost, so it won't freeze. The water then percolates through the ground and disburses. The rock pit has a capacity to hold a certain quantity of water dependent on the percolation of the soil. In Wichita, the frost depth is 38", Topeka is 49 and Fort Leavenworth, the highest, is 54". So another option is to dig a hole where the pipe would have adequate frost protection. Dig the hole about a foot deeper to act like a sump. I'm talking about a 4' diameter hole about 4 to 5 feet deep, filled with large rocks to about 18" below finished grade. This should hold 40 gallons, I would think. Lay on the top of the rocks a landscape fabric or layers of newspapers. Backfill with topsoil, for a lawn or flower bed and Bob's your uncle.
I noticed when living in cold climates that if we had an early snow before the extreme low temperatures the frost depth was substantially reduced.
House looks good, by the way. Don't beat yourself up over a few mistakes. We all make them. To every problem there is a solution.
Let me know if the rock pit, also called a dry well, will work for you.
Dave
Forgot... Yes, water won't freeze if it is moving well, depending on the temps, of course. A river we lived by up North froze up, every year. We had temps of -40 for at least 2 weeks and average winter temps of -25. We couldn't snowmobile until warmer than -25 F. When the river broke up, in the Spring, ice flows of 8' deep would be flowing down the river.
On that note, let's look at some of the pictures I took of Portugal. Nice and warm there, but not to extreme. The Algarve, the Southern coast, was 38 C or 100 F, but with an off shore breeze from the cool Atlantic Ocean, was quite pleasant.
The first thing I noticed in Portugal was that everything is done in concrete or tiles. The houses are framed in a terra cotta block and stuccoed on the outside with plaster on the inside.
The roofs are framed with concrete beams with the typical red terra cotta tile roofs. The one think I thought strange was the concrete handrail spindles and ornament as shown in this picture:

Another odd thing I noticed was a concrete dog house:

Wood is very expensive over there. I was told that marble is cheaper than wood. Marble is used for stair risers and treads, window sills, and counter tops. Wood is used only in door jambs and interior doors, casing and some finishing. Exterior doors and windows are made from a heavy gauge of aluminum.

This picture is of a ceiling inside a room of a medieval castle. The members holding the roof sheathing up are actually trusses, notched and bolted at the overlap.
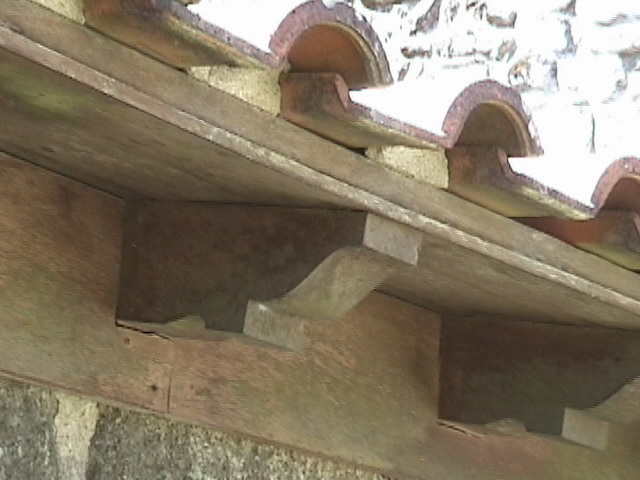
This is the eaves finish under the overhang of a roof in the same castle. Wood was used then, probably there was more of an abundant supply of wood around at that time. Their wood used for structural and finish is olive, oak and pine along with others. I noticed huge eucalyptus trees over there.
Well, that concludes another issue of our newsletter. I hope you can use some of this info in your next project. We encourage those of you who are not members of our site to join us. We have a wealth of information for you in articles, tables, tips and jigs, plans and definitions. Check us out, sign up and if you need help, send me an email. Our memberships start at $7.49, hardly enough to dent the project budget.
Dave
|
home | contact | articles | plans | downloads | dictionary assurance | cancel | newsletters Copyright © 1999-2026 by David E. Osborne. All Rights Reserved.
|