| NEWSLETTER from DaveOsborne.com | ||
| “Building Confidence” | December 2007 | |
Welcome
Welcome to Dave's Shop newsletter. Wow! Another new year is upon us. All the best for 2008!
What's New
Since we were late in getting our November newsletter out, we thought you deserve the December one on schedule. Dan also thinks we should put out a newsletter twice a month from now on. Your comments would be appreciated. I'll see how it goes.
Ask Away!
Here are the questions and my answers for December.
Hi Dave, I need some advice on making a frame to hold up a bathroom
sink. Currently I have a small sink in 3 sided alcove in a small
bathroom. I'd like to take out this sink and replace with an larger
sink, a type from an older era(30's, 40's, 50's). The outer dimensions
of this larger sink are 24" wide and 21" deep. On the front underside
side the sink bowl leaves a minimum of 1 3/4" between the bowl and the
sink edge.

 The alcove is 25 1/2" wide and the frame that's holding up the current
sink is not worth saving. I have a bunch of 2x4 lumber and I'd like to
make something with that that will hold the sink up and that I can slide
into this alcove. The only visible part will be the front and I could
make a front panel with a door out of some nice wood. The top would
also be visible but only a very narrow strip on either side and on the
front. Could you lay out some basic ideas for me?

Thanks, John
Hi John,
Here is a drawing:
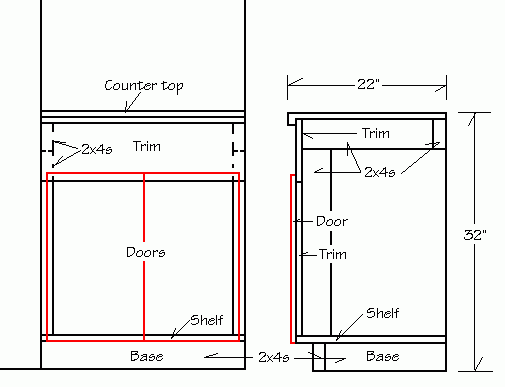
You can use your 2x4s up as shown on the drawing to support the top at the back and the sides and down the front sides for the hinges. The base can also be 2x4. For the doors and trim use a melamine or plywood finish of your choice.
You should make the cabinet in place, rather than a slide in unit. That is install the 2x4s one at a time, according to the drawings.
Dave
Hi Dave,
 I have found your site extremely informative and helpful for several
years now..
 I now have a question that I can't find the answer to on your site,
so here goes. I have old solid wood doors that I want to use as double
doors on a storage shed. They are 31 3/4 inches wide. How wide should
I make the door frame to have sufficient clearance to use these as a
double door? My logic says 64" isn't quite enough clearance.

Thanks,
 Jim
Hi Jim,
Thanks for the nice comments. Yes, you've been with us for awhile - April 15th, 2005!!
I would go with 1/8 between the jambs and in the center, giving 3/8. So make the jamb 63 7/8 or a touch (1/32) larger. If you are going to swing the doors to the outside, have the active door installed with an astragal which will keep the weather out. Our dictionary has an astragal drawing: http://daveosborne.com/construction-dictionary/construction-definitions.php
For any other question, don't hesitate to ask.
Dave
We are renovating an old house that has a septic system.
The pipe to the septic is cast iron. How can we change this pipe
to plastic pipe. It is a different size and we need to replace
from the septic tank to the house. This is an unusual problem
since the septic is above ground where the pipe enters and is
inside the house. I know don't say it. WE will eventually have
a new system put in but not until next spring. Right now we have
to hook up 2 new bathrooms to the old system and don't know what
to use to go from abs to cast iron.
Happy new year!
Actually, this is not a big problem. The cast iron pipe hub should be either cut off with a reciprocating saw with steel blade or by renting a large cutter for cast iron, if you have the room. I have done this a few times using the recip saw. Just a warning - cast iron pipe is very hard, but also very brittle. It can be broken with a hammer. Once the pipe is cut off a "mission" fitting, a rubber fitting that slips over the pipe and fastened to the pipe with stainless steel clamps, is used between the cast and the abs or pvc. Here is a pic of one:
 These fittings are the heavy duty rubber with s/s clamps not to be confused with the mj - mechanical joint couplings, which are much lighter and not approved for burial. They may need rubber bushings to match different sizes of pipe, such as 4" cast to ABS, or 4"cast to PVC.
These fittings are generically called Mission, but Fernco is also a brand in my area. Your retailer will know which one you need and the size of bushing if needed, too.
Hope this helps,
Dave
Dave, thanks for the help getting my son-in-law set up with his new
Membership. Now for my question!

I have a room 13 X 33, and I want to put down hardwood floor to match
the rest in the older part of the house is all refinished red oak,
3/4" X 2 1/2" strips. Can I lay this diagonally, and also install a
boarder using some walnut floor strips and how would I do this.
If I have to lay it, as it is, to match the living room. I'll have to
lay it cross wise, or 13' foot width, enlieu of the 33' lenght.
One other thing, in your answer, could you work up a drawing, and
attach to the email back please. I'm one who likes the movie,
in lieu of reading the book, if ya know what I mean.
Brandy!
Hi Brandy,
Happy new year.
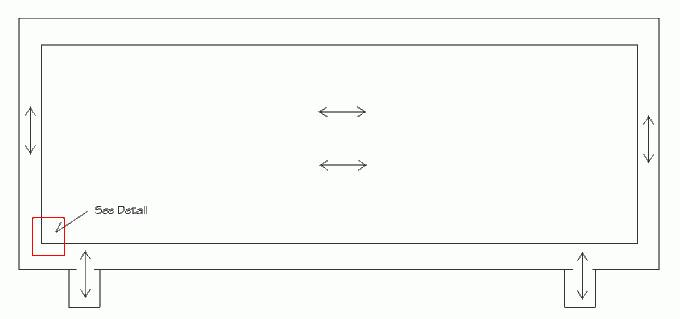
The type of flooring you describe is end matched. This means the ends of the boards, as well as their sides have either tongue or grooves. This enables the floor layer to design his layout in many ways. Here are some drawings for different examples of designs in your particular case:
The arrows show the direction of the boards.
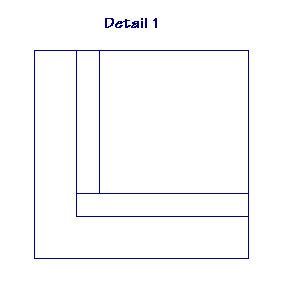 This is the common way of making corners for a hardwood floor. The end matched boards are used to advantage.
 Here the ends are mitered. This is a disadvantage of having end matched boards since you cut the tongue and groove off. If this is done a groove should be cut into the mitered ends and a spline should be inserted between the two grooves to stiffen the corner. This is also the disadvantage of installing hardwood floor on a diagonal. When the angle comes into a straight section of the floor, a groove must be cut into the angled piece creating more work.
 When installing a walnut strip with red oak, try to lay a lighter piece of oak on each side of the walnut, creating a 3 piece border.
This is the floor in our dining room.
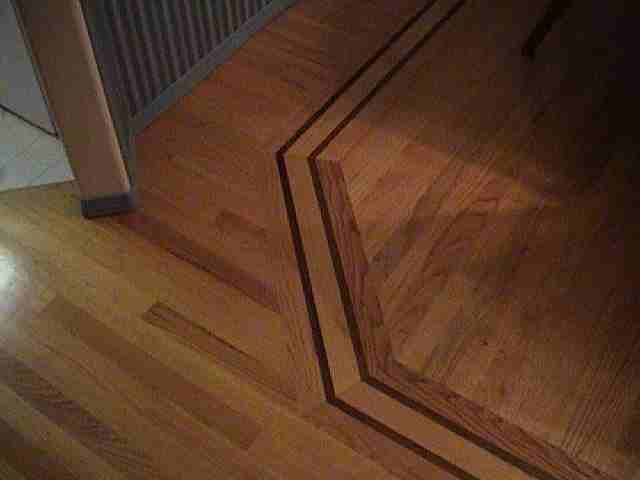
Our nephew did this for us. He used 1" black walnut to make the border with 2 1/4" red oak. The diagonal pieces all have a groove with a spline that he made from hardwood scraps. This is a lot of tedious work.
Well, Brandy, I better get this out to you before you give up on me. Sorry for the delay in my reply. Christmas took priority and visiting with family, which should be number one, right?
This email just touches on all the designs you can do with corners. I've given just the basic ones. So if you want to run any ideas by me, don't hesitate to send them.
All the best for 2008,
Dave
Dave
Love your web site

Looked at available sheds at lumber yards and decided to build our own
ordered a couple of sets of shed plans from you
printed off things like rafter cuts and soffit instructions
came up with our own design ideas
- like windows from Plexiglas
- ridge vents
- wire hardware cloth nailed to outer frame and buried 6" deep to keep out
critters under the foundation.
- painted inside of roof sheathing and texture 111 white - prior to nailing
up- lot easier and adds brightness.
- ramp made from left over pressure treated flooring
- studding started in the middle of the walls and went out 16" with 20"
pockets on each end
- also made pockets in front and back walls to drop in (2) 8' 2x4 so as to
provide a rack for Kayaks for the winter storage.
- lots of pocket wells in the stud bays for tools
- added filler pieces between studs top extend the the depth of the back
shelves.
- Used the same colors as the house to make part of the complex
- window boxes and xmas wreath Finish off the project
- should have added power - maybe next year

The result was an 8 x 14 shed which includes the best of all ideas - my son
really enjoyed it as I did.
we think it is pretty special - already had a couple of folks taking pictures
so they can use for ideas.
Thanks again for your help

Bob Davis
Thanks, Bob, nice job.
When Dan gets back from vacation, I'll get him to put the pics on our site, if you like.
Dave
Dan has Bob's pics on our site now, checkout Our Members' Photos page: http://daveosborne.com/dave/photos/index.php
Share Bob's pride and satisfaction of doing it yourself with the help of our website: http://daveosborne.com
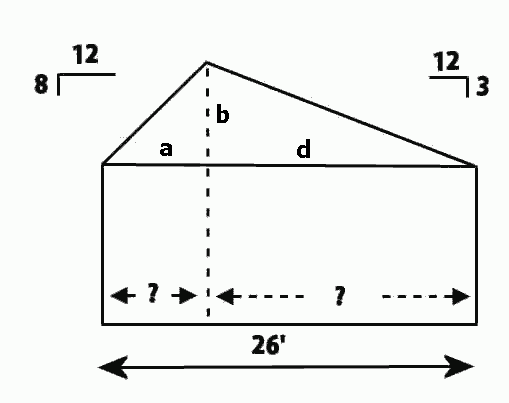
Hi, Dave it's me Ruben.
I had a question for you. I wanted to know if you could explain to
me how to figure out how to layout for an uncentered ridge. I have
included a detailed pic to help explain what im talking about. It's
been awhile since I have done it and I forgot the math formula for it.
The way I remember doing it before was that I would add the ratios together.
8/12 3/12. But I forgot the order to do it in. It was the easiest way to
do it, but it's completely slipped my mind now.
Hi Ruben,
I had to enlist help from Dan for this question. He says:
The common number between the two slopes is the rise in the center, which is the same from both triangles, of course.
So, we just have to solve for the horizontal line of each triangle. Let's say that b is the height of the roof from the horizontal and a is the first horizontal section to the left of the peek and d is the right horizontal section.
We know that a + d = 26 (formula 1), or a = 26 - d (formula 1a).
We also know from the slopes that a/b = 12/8 (formula 2) and d/b = 12/3 (formula 3). This is the ratio you are talking about: a is to b as 12 is to 8.
If we solve for b (in formula 2), b = 8a/12 and (in formula 3) b = 3d/12.
Since both equal b, they both equal each other, so 8a/12 = 3d/12, which simplified is a = 3d/8.
We then solve for a, so a = 3d/8 and then plug that into formula 1 above, so:
3d/8 + d = 26 or
3d + 8d = 26 X 8 or
11d = 208 or
d = 18 10/11
Now solving for a using formula 1a means a = 26 - 18 10/11 or 7 1/11
If you understand how to derive this, you don't need to memorize the general formula, which you should be able to work out from the formulas above.
After all this, you know that length a in the diagram above is 3/8th's the length of b (from the slopes), so you can quickly write down (from formula 1): 3d/8 + d = 26 or d = 8 X 26 / 11 giving us the general formula:
The length of the longer side is the total length of span times the rise of the shorter span divided by the total of both rises. The length of the shorter side is the total length of the span minus the length of the longer side.
Merry Christmas, Ruben,
Dave
Dan and I would like to wish you all a very happy, safe and peaceful new year. We hope that 2008 is your best year ever.
Dave
|
home | contact | articles | plans | downloads | dictionary assurance | cancel | newsletters Copyright © 1999-2026 by David E. Osborne. All Rights Reserved.
|