| NEWSLETTER from DaveOsborne.com | ||
| “Building Confidence” | November 2008 | |
Welcome
Welcome to another Building Confidence Newsletter. November is a busy month for us all. Dan and I appreciate your time to send us you emails on questions, comments and suggestions.
What's New!
Dan has done some changes to the Conversion Calculator, that is adding conversions for board feet to lineal feet and percent slope to degrees.
I've been quite busy doing custom plans on bedroom furniture, gazebo and a Buffet and China Cabinet Plans, 6 plans in all this month.
I'm still working on our basement reno. I'm ashamed to tell you that I'm still in the framing stage. The plumbing and electrical are both in. I need to hook up a cable TV and phone line before drywalling. I've been busy doing other things higher up on the To Do List.
Ask Away!
Here are the questions and my answers for this month:
Hi Dave,
I am in the prosess of building a house and I have a question on
the installation of hardie plank siding. I live in nova scotia and in
this part of the province its not widely used opting for vinyl instead.
My question is I have 2x6 with 1/2 inch osb 1" type 2 foam and 1x4
strapping 16" oc. I was planning on installing the hardie with 1 3/4
roofing nails but the owner says the rep wants me too used 3 1/4 nails
to get into each stud any thoughts would be appreciated.
Barry
Hi Barry,
According to the 2005 National Building Code of Canada, you can nail the siding directly to the 1x4, as long as it is 3/4 thick and nailed well, vertically, to each stud. The nail should penetrate through the strapping, 1 3/4 galv. roofing nails should be good. Checkout your local building codes. Here in BC we have had terrible problems with water penetration from California style designed condos, without overhangs, etc. These caused problems with water penetration and eventually mold. BC has amended the NBC to require breathing space: 2x6 studs, of course, 3/8 OSB or plywood sheathing, 2 layers of tarpaper, 3/8 pressure treated plywood furring strips nailed over the tarpaper, hardie plank nailed to these, into the studs, behind. A special metal furring channel is attached to the bottom of the wall to allow moisture to drain out.
Here is the website for Hardie siding in Canada: http://www.jameshardie.com/pdf/install/install_plank-canada.pdf Before going ahead with you installation, check with the rep and see why he wants direct nailing into the studs. The homeowner may not have explained to him about the 1x4 or the NBC has been amended in your area. This happens alot in different jurisdictions. You need to honour the rep, or the homeowner won't get any warranty, right?
Hardie plank is a good product and is used almost more than cedar here on the West coast. BUT it has to be installed correctly, including back painted before install.
Dave
Hi,
Can you provide photos and detailed information how to install spindles
with round tip on down stair rail - stair model: two spindles attached to
each stair tread.
Hi,
Did you read this article? http://daveosborne.com/dave/articles/stair-handrails.php
If you read it already and you have a specific question, please let me know.
You wrote: install spindles with round tip on down stair rail Do you mean the round top newel post?
Dave
Dear Dave,
Thank you for answer. Yes I read the mentioned article. Sorry for my
not clear question - I mean: How to install 'Dowel Top Spindle'?.
In your article under paragraph 'The Handrail Down the Stairs' you
explain installation of Square Top Spindle at Pony Wall, but I am
going to install 'Dowel Top Spindle' as two spindles attached to
each stair tread. I suppose that I should pre-drill handrail for
top side of spindles, the hole to put in top of spindle, then fix all
spindles to the stair tread (two spindles per tread) by fixing bolts
in middle of spindle bottom. And next step is to install handrail
over the spindles. Maybe the tricky stuff is how to predrill in
handrail holes with correct angle and place, so after installation
everything to look perfect.
Any suggestion for my stair work will be very helpful for me.
Thank you and Best regards
Ilyan
Hi Ilyan,
Sorry for the delay in getting back with you, I was out of town visiting family. With the 2 spindle per tread technique watch for two things: that the spindles are evenly spaced on each tread and that the spindles are evenly spaced on the top rail. This is tricky, but takes careful layout.
Once the newel posts are in position and fastened securely, you can cut the length of the top rail, including any goosenecks, or up easings, etc. Don't fasten it to the newels at this point. You need to turn the rail upside down and drill it for the size of the dowel on top of the spindle. Now this is a bit of a trick, drilling on an angle, but using a jig will make it easier. the jig is very simple as shown in this drawing.
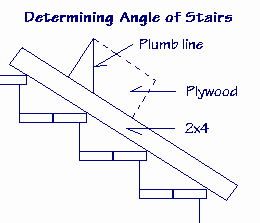
![]()

The jig is 3/4" plywood triangle with a cross piece screwed on the bottom to keep it square. To get the correct angle, just lay a 2x4 down the stairs resting on the nosing, lay a piece of plywood on top of the 2x4 and with a level, mark the plumb (vertical) line on the plywood.
Drill into the rail about a 1/2" deep hole, then cut the spindle 1/8" shorter than the overall length. That is the spindle top will go into the hole 3/8". The hole for the dowel top should be loose enough to be able to slide the dowel in easily with glue around it. After the holes are drilled in the top rail, install it into position on the newel posts. When you install the spindle slide it into the rail hole, bring it into position on the tread. Slide it down tight to the tread and fasten the square base of the spindle into the tread with the small head screws I mentioned in the article. No need to fasten the top of the spindle, the glue is enough. Once the bottom is fastened with 2 screws toe-screwed through the bottom of the spindle with glue, it should be very secure.
Hope this helps,
Dave
Read your Sept newletter and wanted to get clarification on vapor
barrier. Would you recommend installing vapor barrier on the warm side
of bat insulated walls that have House Wrap on the exterior side of the
sheeting?
This is a good point to bring up. We are talking about 2 different things here, moisture and wind barrier for the outside of a house and vapor barrier for the inside.
The house wrap is not vapor barrier, in fact it is designed to allow vapor out of the wall cavity to keep it dry. It is a moisture or rain barrier. It is rated at so many minutes (30, 60, 90 min.) for water penetration, yet it will let the wall breathe. House wrap is a polyethylene or tarpaper with very small holes or pores, a semi-permeable membrane in effect.
Vapor barrier is 6 mil polyethylene with UV protection with zero moisture or vapor penetration.
Yes, the vapor barrier is needed on the inside, warm side of the wall.
Dave
I have been building home in jamacia beach , Texas 77573....due to
hurricane ike i am just getting started back. the house is dryed in and
i have subs finishing elect /plumbing /HVAC. Next will be insulation and
drywall which i have questions about. With insulation of walls / floors
does the vapor barrier go to inside or outside. Looks like i am going to
be pushed into december / january with the drywall...will there be
problems doing this in winter.....the walls are 9 feet what size
sheets....should they install horizontal or vertical...
thanks Gil
Hi Gil,
The vapor barrier always goes on the warm side of the walls and ceilings. We don't worry about vapor barrier on floors. The floors usually are protected by vapor going through them with lino, ceramic tile or the underlay under carpets, etc. The worst thing you can do is install vapor barrier under the floor joists on the cold side of the floor. This creates problems with condensation.
No problems with doing drywall in the winter. Here in Canada we build all year round. Just purchase or rent a construction heater. If you purchase one remove the plug on the end and replace with a dryer plug. Cut the neutral prong off the plug. Now you can plug it into a dryer or range outlet. These are the 220 Volt heaters with fans and cost around $80 - $90. It doesn't take much heat in an insulated house to dry the mud. The important thing is air flow to help the drying process.
Purchase 9' long sheets of drywall and install vertically on the walls. Get the longest sheets for the ceiling and install across the joists or strapping. Try to minimize the number of joints. Common size sheets are 4' x 8, 9, 10, 12 and 14 feet.
Dave
Dave if it does not go below freezing can i get away without a heater.
If not do i leave it running at night with no one there?
This heater has a thermostat and is safe for this use. When the temperature gets below 50 you should have a bit of heat. Remember it is the air flow that dries the mud, as well. If leaving it at night, make sure it is not too close to anything and keep the thermostat low.
Here is a picture:
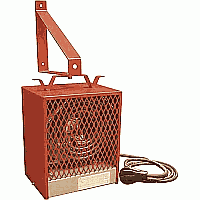
Mine didn't come with the bracket. It is a Chromalox 240 VAC 4800 Watts.
Dave
Hi Dave,
Not even sure if you will remember me Dave, but you helped me with my
leisure building/pool house I built in my back yard. I've finally
finished it ( 1 1/2 years later) but I wanted to get you a picture or
two and also to say thank you! You were an invaluable part of this
project. Not bad for someone who never even so much as considered
building anything before. It took so long because I built it myself
and saved over $20,000 based on the two bids I got from contractors to
build it. Thanks again Dave!
Marc
Wichita, KS
Hi Marc,
Sure I remember you.
Congratulations on the job, it looks really good. Thanks for the picture. I'll get Dan to put it up on our website, if you like. Checkout Marc's photo: http://daveosborne.com/dave/photos/index.php
Dave
Hi Dave,
My field of expertise is theological, and sometimes I feel if I can't
fix it I can bless it.
This past summer my wife and I spent some wonderful time visiting our
daughter and which is our tenth grandchild. We installed doors,
door framings, and window ledgers using poplar which took a beautiful
stain. Our next trip will be to install the base moldings now that
the carpet has been installed.
Problem: the outer parts of the walls are rounded. How do we prepare
the wood to shape around the rounded portion of the walls? We do not
wish to use plastic moldings. Do you have a solution or do I just
say a blessing and move on?
Hi Michael,
Congratulations on ten grand kids. My wife and I are proud of all 8 of ours, too. It's always good to say a blessing before tackling a wood working project, especially since our Lord is a carpenter. Here are two ways for applying base to a round wall:
Cut the back side of the molding with a table saw or circular saw set to cut the depth of the thickness of the base less an 1/8" or so. Be careful not to cut through any part of the profile. The smaller the radius of the curvature the deeper the cuts should go. Start with the cuts about 1" apart and see how it bends around the wall. The problem with this method is the saw cuts are visible from the top. If the molding is painted these cuts can be filled with putty, sanded and painted. With a natural wood and stain it is more difficult. Either use a pre-stained putty to match the chosen stain or use a wood tape and glue it to the top of the molding, covering the saw cuts. Use the yellow carpenter's glue, wiping any glue drips off right away with a damp rag.
Steam the molding and while hot, bend it around the curvature, nailing as you go. Checkout my article on making and using a simple steam box: http://daveosborne.com/dave/articles/steam-box.php
Hope this gives you inspiration.
Dave
Good morning.
I am looking at adding a 24' x 25' addition on a 1960 vintage 2-story
frame-built house in the Ontario near-north. Foundation of this house
is poured concrete. The current house has a north to south orientation
and a 8:12 pitch roof.
This addition will be either a single story or a two story structure,
full basement, same width of 25', probably a poured foundation,
east to west orientation, 8:12 pitch. (Clay soil.)
Construction costs in the area are approx $160/s.f.
Questions:
1. How to attach or connect, the new foundation to the old foundation.
2. Would a block foundation be 'better', i.e., easier, cheaper?
3. What size of footing & foundation thickness would you reccommend?
   Any rebar?
4. What size of steel beam joist support & floor joist size would be
   reccommended for a 1 story, and what size(s) for a 2 story? It will
   be a 2x6 framing for walls etc.
5. Are there any advantages to go with the 2 story structure?

Thanks in advance for your help. As always the recent newsletter was
interesting and informative.
Terry
Hi Terry,
- The existing foundation is drilled and a anchor and bolt inserted to tie rebar onto.
- I prefer concrete because I can do it myself. I've never done a block foundation. I haven't even seen a block foundation for a house in my construction career, seen lots for commercial. They are more popular in the States than in Canada. "Build your house on a firm foundation."
- 8" wall and 16" x 6" deep footing with the wall centred on the footing. 2 rows of 1/2" (#4) rebar in the footing, mid-depth. Checkout this article: http://daveosborne.com/dave/articles/build-house-foundation.php
- I need to see a floor plan for this. Usually 2x10 floor joists with a centre beam is good for 14'.
- The advantage of a 2 story is: one foundation and roof; central heating is more efficient. Disadvantage: room for stairs has to be considered.
The $160 per square is based on a new house with kitchen and bathrooms - the most expensive rooms in the house. If this addition is for bedrooms the cost comes down.
Glad to see you still receive and enjoy our Newsletter. Time to renew your membership??
Dave
Well, another busy month of answering your emails.
We hope you have a special Christmas this year and those of different beliefs who have celebrations this time of year we also give you our best wishes and pray for a world of peace this coming year.
Dave
|
home | contact | articles | plans | downloads | dictionary assurance | cancel | newsletters Copyright © 1999-2026 by David E. Osborne. All Rights Reserved.
|