| NEWSLETTER from DaveOsborne.com | ||
| “Building Confidence” | December 2008 | |
Welcome
Welcome to another newsletter. Since this newsletter comes out in January, we wish you all a very happy start to the new year.
Ask Away!
These are the questions and discussions I've had last month with our readers.
I'm installing a 72" double door in a wall but the floor and ceiling
aren't level. If I level the top of the door frame then there is a 5/8"
difference in height from one end to the other, which will be unsightly.
How do I adjust the framing so that the final result is parallel to the
ceiling and floor?
Are you actually telling me that your floor is out 5/8" in 6'? My first reaction is to tell you to check out your level. I hope you are using at least a 4' level. If your level is accurate, you have a serious problem. I would start with the floor and find out why it is out so much. If the ceiling and floor are out the same amount, you may have a problem with your foundation sinking in one corner. I've seen this happen before, so don't rule it out.
A double 6' door has to be level on the header. You can't throw it out of level to match the floor. The doors won't line up in the center if the top jamb is not level and the sides are not plumb or square with the top. This is not only unsightly, but unacceptable.
You should address your first problem and level the floor.
Dave
I would like to know what the recomendations to install a double french
door, Im elimetating a 36" door and a 36" window and the wall between
the door and window, my outside wall is block with stucco, I want to
close off half of the door to beable to increase my kithcn cabients
space and to be able to sit in my dinning room and look out to my pool
which is on the opposite of the wall.
Is the structure of your house 8x8x16" concrete block, or is the house wood framed with 4x4x8" brick/block attached to the framing?
Dave
(No further response...)
I need to make or buy kitchen cabinets for my new house. In all the
research I have done, the only place I have seen anyone make an on-site,
built in set of "cabinets" is Norm Abrams for a large work bench/tool
storage combo for his shop.
Why can't kitchen cabinets be made "built in"? If they can be,
can you direct me to a site which gives instructions for making cabinets
this way?

Thank you
PM
All the cabinets used to be built in place until the European design became the rage here. With these modular cabinets, you can buy measurements close to your own and have an instant set of cabinets. To have someone come in and build you a set of cabinets in place is very labor intensive and costly. Remember that the counter top forms the top of the cabinet, the laminate is glued in place. Take it from someone who has built cabinets both ways, the modular way is the best. Don't get modular confused with no frames. Usually, the cabinets you see today don't have a face frame. The doors are mounted on the inside of the gables. They still have face frame cabinets with your choice of hinges, but the counter top is added later.
I've got instruction on our site for building both the frameless as well as the face frame cabinets. I also do custom plans probably starting at around $100 for a set of kitchen cabinets, depending on the size of kitchen.
I would be interested to hear why you want the built in cabinets.
Dave
(No further response...)
Hi Dave,

My question is that I have bought a ranch style house that was built in
the 60's and has several small rooms that I would like to open to each
other. I know that the wall I want to remove is a load bearing wall.
So my question is what type of header do I need to carry the ceiling
joist. The first wall I want to open is 9' 4". The second is a larger
area as I want to open an area that is 16' 2". I would prefer not to
have to use a center post to give extra support to this header. I would
also be open to using a laminated style beam for both areas. I am
living in South Carolina so there is not a high chance of snow (1" in
the past several years, and it melted by the next afternoon) The house
is built on a crawl space so under the house is accessable via a space
of about 24" or so. I am not sure of any other info you might need, but
any help you can give would be a big help.
Thanks Robbie
Hi Robbie,
I need to know the span of the joists on each side of the beam so I can calculate the required beam size.
When you get into a long span such as your 16' the building code requires an engineer to calculate the beam. I've put in up to 18' beams and have had very good service from my local truss plant who engineers the multilam beams. They come in layers of 1 3/4" thick, are not too heavy to put together in place and not too expensive. For example for my 18' beam, the size was a double thickness to fit a 2x4 wall and about 12" deep. I made it a feature of the reno I was doing, with fancy columns on each end and panels along the beam. I think the cost for the beam was $300, this was a few years ago.
If you want the ceiling flush under the beam, we install a flush beam in the attic space above the ceiling joists.
Checkout the roof to be sure you don't have trusses. Probably not for a 60's house. Also checkout to see if the existing wall supports the roof as well as the joists. Sometimes the ridge is supported off the center wall or a pony wall off the joists to cut the span of the rafters.
Dave
(No further response...)
Hi, I have a new deck & awning with 3 large picture windows that look
out over the garden. I would love to decorate them with the Chinese
style lattice/fretwork is used in traditional Chinese buildings. The
photos attached show fairly elaborate designs, but there are simpler
ones.
Regards
Gayle
Hi Gayle,
I only received one photo.
Did you have a question?
Dave
Hi Dave,

Sorry, I had a bit of trouble with sending the email. My question is how
difficult
would it be to make some of the simpler versions of the Chinese lattice?
The
only photos I could find to send to you were of fairly complicated
designs. In
short I was hoping that if it's not too difficult I could learn to make
a panel of the
lattice myself. But I don't know where to start, I never tried anything
like this
before. I imagine I would need some sort of template of the design I
want??

Regards

Gayle
Hi Gayle,
This would be more suited to stained glass rather than wood. For wood, maybe start with a narrow panel of light wood paneling. Stay clear of the masonite or fiberboard panels. Layout the design and leave the small squares solid for strength. Leave about 1/4" of wood for the outline of the octagons. This type of repetitive construction is well handled with a router and panel bit and a jig of the shape you decide on.
Dave
This was a question on crown molding that I answered, but deleted the sender's email by mistake, before sending it, Duh! Hopefully, he gets this newsletter along with his answer. Sorry about that!
The question was: How do I get the angle for cutting crown molding coming off a cathedral ceiling to match up with the wall angle.
Answer: You need to install a transition piece to remain on the same plane, as shown in this picture.

Dave
Dave,
I want to close off and reclaim some the space in my stairwell leading
upstairs, area above you as you go up the stairs. I know I can't be the
first to ever do think of this any thoughts.
Hi Mark,
Actually, my son-in-law did this to his stairway. He put up a shelf or two supported by 1x4s. The problem is reaching the storage, so he made a wooden ladder from his upper landing to this storage area. It seems to work well for him and my daughter.
Hope this helps,
Dave
Hi Dave,

I read some of your info on stair installation. It was helpful but
I am looking for some step by step so to speak. I am decent at home
improvement but I haven't done this before.

I am finishing my basement and I have a pony wall on one side and
I want to install square top spindles down a sloped wall, not on the
stair treads. Seems simple enough but I'm really not sure how to
install the spindles so that the screws are hidden and attach the
hand rail to the newel.

Are there some instructions, key things you could send or point me to?
Thanks much.

Steve
Hi Steve,
You can install the spindles on the bottom rail with screws through the rail, but the top of the spindles have to be either toe-nailed or toe-screwed with the small head screws as I mentioned in my article. You need to get the angle of the top and bottom of the spindles. This is simple enough by putting a straight board down the stairs, resting on the nosing, as shown in this drawing, in your case the plywood is laid on the pony wall:
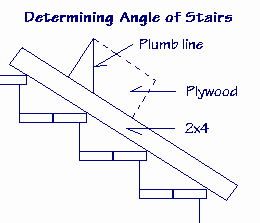 Scribe a plumb line against a level on a piece of plywood. The plumb line to the bottom of the plywood is the correct angle of the spindle tops and bottom, as well as, the angle at the end of the handrails. To get the length of spindle takes a bit of figuring. Allow for the thickness of both handrails and the height of the top rail off the steps.

This picture shows how the sloped top rail is secured to the newel with 2 small head wood screws and glue. The spindle is secured with glue and finish nails. The holes for the screws need to be pre-drilled into hardwood and filled later.
So, cut the angles on your spindles and to the correct length.
Cut the angles and correct length on the top and bottom rails. Keep the bottom cut at the same place on all the spindles. ie. Be consistent.
Layout the spacing of the spindles on the bottom rail. Keep the spindles no more than 4" apart. Start with them on 5" centers with an even margin at the start and finish. ie. at the newels.
Put the top rail next to the bottom so the plumb cuts line up and transfer the marks to the top rail. This gives the same spacing on both rails.
Drill the location of the center of the spindle through the bottom rail for a #8 x 2" flathead wood screw. The spindles won't turn with the angle, so 1 screw and glue is good. With the spindle in place you will have the angle to drill through the rail. Countersink the head flush.
Install the bottom rail and spindles, as a unit, onto the pony wall. Place glue on the tops of all the rails, spread it around to cover the entire top surface. Place glue on the ends and put the top rail into position on top of the spindles, don't fasten the rail to the newels until all the spindles are fastened to it with glue and finishing nails or the small head screws. Wipe any excess glue off right away with a damp rag.
Hope this helps,
Dave
I have a 6 inch step down from my foyer and dining room into the living
room. The living room is approximately 260 sq ft. I was thinking about
filling the living room in to make it even with the rest of the house.
There is a fireplace in the living room but I think it would be ok to
have the fireplace "sunken" a few more inches as there is a 3" brick
hearth on the floor. I was thinking of pulling out the brick hearth,
laying 2 inches of pea gravel then 4 inches of cement. I would frame out
the front of the fireplace to get the sunken affect. My concern is how
would the new 6 inches of material interact with the existing drywall on
the walls? Can you tell me if this is feasible? What other issues should
I be thinking about??? Thank you in advance.
Karen
Hi Karen,
A sunken living room is considered a nice feature in a house rather than a detriment. That said, I don't have a problem with filling it in, if that's what you want.
My concerns are:
- Pouring tight to the drywall. You need a bit of expansion and contraction space there. Some 1/2" donacona board will do well or a couple of pieces of sill gasket built up to keep the concrete away from the wall. A strip of molding over some caulking will hide the space.
- Allow for the thickness of a finish, brick, slate, etc., on the concrete hearth, unless you "stamp" a design into it.
- There is no need to remove the brick, you can pour the concrete on top, no problem. I would prefer doing this rather than having a base of pea gravel. Depending on the age of your house, most hearths are cantilevered off the chimney, rather than poured on the floor. If the hearth is resting on the floor I would prefer to pour the concrete hearth on 2" or 3" styrofoam SM rather than the gravel base.
- When putting on the new floor joists to raise the sunken floor, lay the new joists across the existing ones to spread the weight out, rather than having the new joists sitting on the sub-floor.
- My last concern is the new hearth would cause the floor of the fire pit to be lower than the floor level, which may seem odd.
I'm assuming you have a masonry fireplace and chimney.
Dave
Well, that's it for another month. We hope this newletter has inspired you to finish that project. Checkout our website: DaveOsborne.com for lots of tips and how to do it yourself articles.
Dave
|
home | contact | articles | plans | downloads | dictionary assurance | cancel | newsletters Copyright © 1999-2026 by David E. Osborne. All Rights Reserved.
|