| NEWSLETTER from DaveOsborne.com | ||
| “Building Confidence” | May 2009 | |
Welcome
Welcome to our newsletter from the website that helps build confidence so you can do your projects yourself.
What's New!
Why don't you checkout our website to see what we have added recently: http://daveosborne.com/dave/index.php
Ask Away!
Here are some of the questions I answered last month:
Hi Dave,
I just read you article on installing a window in a frame wall with
siding on the outside.  I have a brick facade home, and would like to
replace several of my old double-hung windows. On the outside, the
windows are recessed the thickness of a brick and are trimmed with brick
molding, which I would like to preserve.  Actually, I would like to
preserve the sashes themselves.  So my first thought is this:  Is it
possible to install thermal/double pane glass in an existing window
sash?  Also, can I replace the sash weights with a spring device?
Thirdly, is it possible to seal the sash to make it air tight?  If this
is possible to do, where does one obtain the necessary materials
(windows and window weight replacements)? And finally, how do I prepare
the old sashes for the thicker double-pane glass?
Thanks in advance....big fan of your newsletter.
Rob
Hi Rob,
One way of doing this, which you may not know of, is to remove the existing sashes right down to the jamb. With the jamb left, you can order a modern renovator window custom made to fit the existing jamb. This window does not have the nailing flange on it. You can get vertical sliders in vinyl or wood which are weather proofed. These are spring operated instead of the old cast iron weights and can be painted to match the original window.
You could probably alter your sash to install a sealed unit (glass only) by widening the area for the glass. I've never done this, but it could be done with a little care and a table mounted router. Does your sash have the putty on the outside?
About changing the weights for a spring - I think this would be pretty tough. It would take a lot of engineering to pull this off. I've repaired vertical slider mechanisms before. There is a small block and tackle setup mounted to a spring between the sash and jamb. The pulleys and string take up most of the movement with the spring the rest. That's why I think it would be better to replace the window with a retro fit. To find replacements for the old weights, you would have to go to secondhand or thrift stores, if they are available at all. Anything for weights would do, long narrow, lead, etc. that would balance the weight of the sash. It is a very simple setup - weight with sash cord over a pulley which attaches to the sash.
Usually, with wood windows the sash has a rabbet open to the inside and closed on the outside. The window is installed with a putty tape against the outside, fixed stop. The sealed unit installed in the frame and a wooden stop nailed in place to hold the glass in place.
Hope this helps,
Dave
Thanks for your prompt reply.  Yes, I have considered a modern renovator
window.  That would certainly be an easy solution.  However, I am
interested in preserving the look of the original sashes as well as the durability
of the old yellow pine from which they were constructed.
My sashes do have the putty on the outside, with a rabbit opened to the
outside.  The top pane has two vertical mullions (spelling?).  I too was
thinking that I could route out the rabbit just enough to accommodate
the new, thinner double pane glass.  If I do this, two questions come to me:
1. would I still be able to use putty on the outside to hold the new panes?
2. How would I handle the mullions on the top panes?  They, too have putty
beads on the outside.
Regarding the weights.  I can certainly reuse the weights I have.  My
bigger concern is how to make a better seal between sashes and jambs.
I look forward to hearing back from you.
Best regards,
Rob
Hi Rob,
Window mullions are part of the jamb that separate sections of the window. You are probably referring to muntin bars that separate or appear to separate the individual panes of glass. In the old days, they didn't have large sheets of glass like we do today, so a large window was separated into smaller pains with muntin, glazing or sash bars. Today, with the seal units, they either insert the muntins between the panes of glass (internal grid) or on the outside of the window (removable external grid, for easy cleaning).
On your top sash, do the muntin bars actually separate the glass into 2 panes, or are they mullions, part of the jamb? Usually, muntin bars form a grid rather than just vertical bars. That's what throwing me off, here. A digital picture would be nice.
You could still use putty to seal the panes, but that is a pain. (grin) I would prefer to use wooden stops, if there is enough room.
I can't see any way to insulate the cavity enclosing the weights, unless the wall around the window is extended out enough to allow insulation to be added in front of, or behind the weight chamber. It is not uncommon to extend the thickness of a wall at a window, in new construction. I've done this before to accommodate a roof line below a window. Would you consider doing something like this?
Dave
Dave,
1.  I really appreciate the time you have given this so far.  Here's a
drawing of the two windows from the inside.  Also you will see cross
sections of the muntin bars in the top pane.  They do separate three
panes.
I also did a x-section of the sash.  In both cases, the outside is open
and takes putty. I could handle the muntins as external grids on the inside
and outside of the windows.  I'm thinking that I could route out an
additional 7/16" from the sashes, giving me close to 1-inch for the double panes.
If the new double panes are 3/4 (figuring 1/2 inch spacer and 2 1/8 inch
panes, that would leave my maybe 1/4 inch for the stops.  That leaves me two
questions before I scrap this idea and take your renovator window
suggestion:  Is 1/4 inch enough?  Do you have a feel for cost/sq. foot
for the double pane units?  I have 11 windows I would like to do.
As for sealing around the weight channels, about the best I could do
would be to remove the trim on the inside and wrap them in plastic.  Hmmm!
2.  Okay.  Assuming I come to my senses, how do I size the renovator
windows.  E.g., let's say the jamb to jamb measurements are 39-1/2 by
62?
If you answer these questions, you have more than earned the three years
of dues I have paid, and I will try to sit quietly in the back row for a
while.
Cheers!
Rob

Hi Rob,
Thanks for the drawings.
You should have about 1/2" for the stops, 3/4 would be better, 1/4" is too small.
I don't know costs. Best thing to do is call a window sales place there, they should send a salesman out to give you a free estimate and suggest ways to go about this. These estimates should be free and without obligation.
Poly like you say will help seal off the weight chamber from air infiltration, but not from loss of heat or a/c, as the case may be. Also insulate between the jamb and the stud, under the casing, all around. Measuring for the renovator windows - measure across and vertically in 3 places to see if there is any variation. Go with the smallest dimension and they will make the sealed unit to fit. Or better still, get the salesman to take the measurements, himself. He will tell you the options for windows, as well, sliders, vertical sliders, awning, casement, etc. They can make the windows almost to match the original.
No problem with the questions, there is no limit. Thanks for the nice comments, though.
Dave
Dave - We am nearing completion of a new home (a DIY project) and are
currently designing the stairs and guard railings. I was referencing
your site - specifically "how to install an inside hand rail" and read
the part about a 42" high guard rail. I have measured several new
installations here on the Sunshine Coast and one each in Coquitlam and
Victoria. As well I tried to read the Canadian Building code - on line
version - and called a local building inspector. They all seem to
indicate a minimum 36" guard rail for inside residential buildings is a
standard. Can you provide clarification for me?
Thanks - Len
Hi Len,
Thanks for the email.
Yes, I've looked over the code carefully and have come to the conclusion you are correct. It is a bit ambiguous, to paraphrase:
- All guards shall be not less than 42"
- Guards for porches, decks, landings and balconies can be 36", except over 6' and the porch... serves not more than one dwelling unit
- Guards for stairs shall be not less than 36" measured vertically from the nosings and 42" high at landings
- All required guards within dwelling units shall be not less than 36" high.
What is important is talking to your local inspector, which you have done. BC is governed by the National Building Code with BC Amendments. Local Municipalities have their own bylaws which can be quite different than neighbouring jurisdictions.
I'll change my article so there is no more confusion, thanks.
Dave
Thanks Dave. We have been working on our house for several years and
reference your site regularly as we progress through the various stages.
It has many interesting articles and I always check on how you have done
things before I tackle the various projects myself. They are very clear and I
have never felt the need to ask questions before. I actually used your stair
articles and calculator to design the ones in the attached picture. I
also was under the impression that I needed a 42" guard rail before I started
and was quite surprised to find out that it seemed a 36" one would be OK. I
like the lower version better as it doesn't impede our views as much so now I
am going to go with it.
I tried to attach this picture of some of the areas that need railings
but it was too big for the site so it rejected the attachment and nuked my
comments. Kind of a surprise.
I know you like the pictures so now that I have your e-mail I thought I
would send it.
Thanks very much for your help - now and in the past.
Len
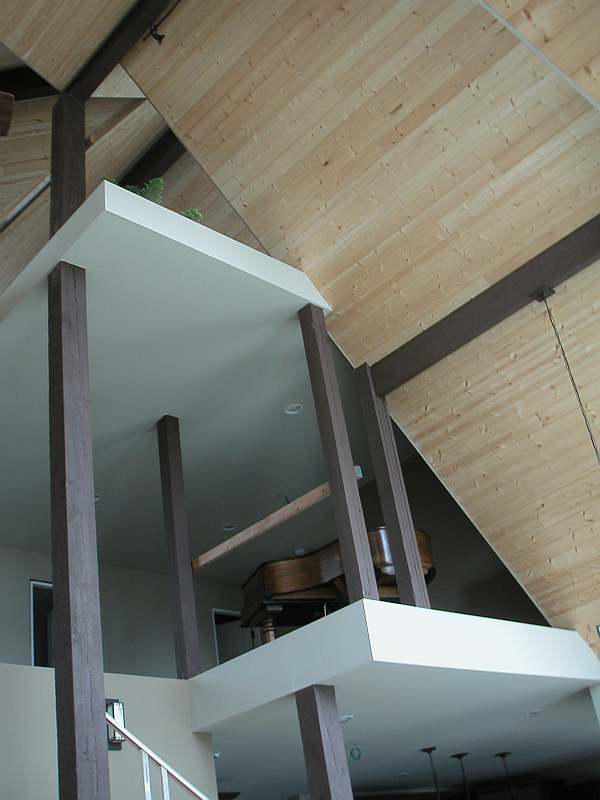

Thanks for the pics, Len. Nice house, quite the framing job.
Glad our site was a help, thanks for the nice comments.
Dave
(Len and Linda did a fantastic job on the framing and stairs. If this doesn't build your confidence, I don't know what will. Just getting the grand piano up there is worth a big WOW!)
I have a dutch hip roof 1275 sq ft house that I want to add a carport
to. This will be added on the 27 ft +(2 ft overhang) end of the house.
The roof is the biggest challenge as I really have to do this right, but
don't quite know how to grade the roof trusses(smallest from top to
bottom)to match the existing slope. I also want to extend the existing
soffit and fascia to match.
Is there a program that can figure out the sloped trusses??
Many thanks.
Dennis
Hi Dennis,
The truss plants have a program for this but is probably beyond the financial reach of most people.
I would suggest working with a truss plant for this size and type of reno. You would need a building permit for this so need to jump through a few hoops. Most trusses need to be engineered and the installation checked by an engineer. Truss plants look after this for you.
I could help you with the installation, through email.
Dave
I need a drop ceiling for a bathroom where there is a 15' cathedral
ceiling.  The ceiling is made up of decking so there are no joists.  Can
I just attach the strongback to the wall studs?  What is the best way to
handle this situation?  The bathroom is about 5' x 7'.  Should I use 2x6
joists?
Hi and welcome to our website,
For a short span of 5', no strongback is necessary. Use 2x4 joists. Nail the 7' 2x4 ribbon on each side, through the wall studs first, then cut your joists to fit between the two ribbons. Toe-nail the joists in place at 16" centers with 3 1/4" common nails, 2 from each side or use joist hangers.
Dave
Hi Dave,
I am replacing my deck surface with 5/8" T&G plywood. The present
surface is rotted in several places and it has a spandex type of coating
on it which has worn off in various places. I have a carport under the
deck. The deck is rather huge [14ft x 42 ft.] I have obtained the
plywood and I went to my local Home Hardware store to purchase vinyl
sheet decking I want to use. The guys at Home Hardware strongly advised
against trying to do this myself. They said, for one thing , it is a 2
man job and should be done by professionals. They then produced a card
with the phone# of a local contractor on it as they said it is going to
take a ton of adhesive to cover it and suggested I phone him. I haven't
done this yet but my understanding is a ball park figure of $3,000 to
apply the sheet vinyl. I am kind of balking at this as I have built my
own deck before from the ground up using 2X6 treated planks. Though I
have never worked with sheet vinyl before I have watched a video on
applying it!
I know I will need a heat gun for the seams that I can pick up at
Rona or Home Depot for just over $100 and also edge flashing and clips.
I also know when applying the sheet vinyl you should fold the sheet in
half, apply the adhesive and then do the other half of the sheet. They
also told me I need to use a thicker sheet vinyl than they normally use
because of the size of the deck?  Is this really such a difficult job
that I shouldn't attempt it on my own? What do you think?
Thanks.......Stan from Greenwood, B.C.
Hi Stan,
Sounds that you have been doing your research on applying vinyl decking. I've never done it before, but have seen it done and the guys didn't have any wings sprouting from them. They seemed like ordinary guys. If you feel you know the procedures, go for it. Checkout this video on Utube: http://www.youtube.com/watch?v=N9tXZ2hWLYc
What I do know is preparation for the vinyl. The t&g should be Select rather than Standard Sheeting. This means the knots are solid and not left with holes in the top veneer. Also I would glue the plywood down using a construction adhesive for this purpose, using nails or screws. There should be a slight slope to the deck of 1/4" per foot. You won't even notice it when walking on it, but this prevents pooling of water. Prepare the plywood surface by sanding and filling any unevenness in the surface, especially at the joints. Use a floor level cement for wood, not the concrete one.
I don't see any problem in you doing the vinyl yourself. I do everything I can myself. Lots of things I have never done before that I research from the web or a book. Being a carpenter, I'm used to working with many other tradesmen. I kept my eyes opened, asked questions and learned as well as gave advice to the other guys.
I'm glad you are using the heavier 60 mil vinyl, it is required for a roof protection for over rooms and garages.
Dave
Well, that's all the questions for last month, which leaves a bit of room for 2 more pictures.
Here is a picture of a castle at a military tattoo that my wife and I attended recently. Peter, who made this castle, was in the Canadian Navy and later worked in the sail loft down at the dockyard, near the Pacific Coast Naval Base in Esquimalt, BC, near Victoria. I bring this picture of the castle to your attention because it is made of canvas. Talk about being innovative - well done Peter. The bands marched through this castle - one at each end of the arena.

The reason we attended this military band concert was to see our grandson, Sheldon play. Sheldon is an air cadet from Calgary, Alberta, whose band was invited to perform at the BC Cadet Band Competition the afternoon of the Tattoo. They were not in the competition being outside the Province. Congratulations to 604 Moose Air Cadet Squadron for their performance at the competition and at the Tattoo. Talk about confidence to play and march in front of a packed sports arena with guests including the Commanding Officer of the Naval Base. Yes, I am a proud grandfather, does it show? Here is a picture, captured from video, of Sheldon on trumpet, with his band.

Enjoy the Summer, I will be. My wife and I are in the middle of renovating our camper - great fun.
Until next month,
Dave
|
home | contact | articles | plans | downloads | dictionary assurance | cancel | newsletters Copyright © 1999-2026 by David E. Osborne. All Rights Reserved.
|