| NEWSLETTER from DaveOsborne.com | ||
| “Building Confidence” | June 2009 | |
Welcome
Welcome to our Newsletter from DaveOsborne.com the Building Confidence website.
What's New!
I just got back from a weeks holiday in the interior of British Columbia, Canada with my daughters, sons-in-laws and 7 out of 8 grandkids. Great fun! Frances and I had noticed a musty smell in the truck slide in camper, so we did a bit of renovation on the poor old thing, a 1975 vintage. We tore out the panelling in the upper bunk area where the dampness did the most damage and covered the rest of the existing panelling with new 1/8" new panelling. Frances sealed the entire camper with a shellac based product which sealed any smells out. Read the rest of the story on our website at http://daveosborne.com/dave/articles/renovate-camper.php.
My brother and webmaster Dan and his wife recently returned from Calgary, Canada where they received very advanced training in drug counselling procedures. There are very few (if any) families today who don't have someone addicted to drugs. Dan wants you all to know that now is the time to help your loved one get off drugs. Getting the addict into a new and distant area is often essential to their recovery. The person who trained Dan is one of the most highly trained and respected drug counsellors in North America. She has an empty bed for another person right now. She achieves an enviable 70% success with crystal meth and crack cocaine addiction, which are much harder to break free from than heroin.
Ask Away!
Here are a few questions and my answers for June that I will share with you:
Dave: I have to vent a dryer that is not near an outside wall but do
have the ability to vent up into the attic...Any suggestions?
Rick
Hi Rick,
Up into the attic is not good enough. The vent should go through the roof. The dryer vent introduces a lot of humidity into the attic which causes condensation, moisture, then rot. It is not that hard to go up through the roof. There are roof jacks made for 3" or 4" ducts. Another thing - the duct has to be insulated to prevent the duct itself causing condensation - hot air passing through a cool moist space. You can buy an insulated flexible duct approved for this from your local building supply store.
I've found dryer vents attached with wire or string to roof vents. This is not acceptable!
Hope this helps,
Dave
Hi Dave: I'm gonna build a 10` X 16` deck next to a Mobile home,
freestanding [not connected to the trailor].
What do you suggest as best way to support the deck...3 posts across
the back and 3 across the front of beams. Could you give me a sketch
of your opinion
Thanks
Rick
Hi Rick,
Here is a drawing for you:

Use 3 double 2x8 beams running the full 16', flush on the sides and one in the center. The joists should be 2x6 at 16" centers with a box joist on each end, as shown. Run the decking across the joists lengthwise for the best look or on a 45. The posts are double 2x4s fastened with a scab across the post and the beam connection of at least 3/4" plywood or solid lumber (1x4). Posts should rest on a pressure treated wood base or concrete (preferred) pad or blocks. Dave
Thanks Dave, It helps. The dryer is used for only about 12 weeks a
year tops, [summer camp] and the attic does have operating skylights which I
keep open a bit to let the heat out. But you're right and I should vent
through the roof. I looked today and did see that if I add an additional 10
feet of straight pipe I could make it to a gable end .... I hate
working on roofs and I hate putting holes through them
Rick
Hi Rick,
Going through the gable end is the best idea, alright.
Dave
Thanks Dave, I would like to set the front beam back maybe a little to
allow for some lattice work
Thank you for your help
Rick
No problem. Actually, depending on the size of joists we can overhang them up to 24". For 2x6 joists, maybe 6" to 12" max. I do this sometimes to shorten the span between beams.
All the best with your projects,
Dave
We are putting an addition on our house approximately 24 X 40. Master
bath; shower, toilet and sink, powder room toilet and sink. Foundation is
slab on grade. The rough in plumbing is needed. I would like to do this
myself. Thoughts and comments. We will tie into the existing sewer out
side the foundation wall. In front of the master bath.
This is too broad a topic, please ask a specific question. This said, I'll comment as follows:
Roughing in plumbing under a slab on grade requires pre-planning and accurate layouts. Rough in for a shower includes leaving the drain below the surface and simply building a blockout of 2x4 about 12" square. Fill this blockout with sand. Later when the shower pan is installed the exact position of the drain can be determined and installed by digging out the loose sand and connecting the vertical pipe, then filling in the void with a bit of concrete mix. The water supply line can be brought up through the slab, or a blockout allowed for it, but should then be connected through the walls after the framing is in place. This is the same procedure for the electrical supply, except unless heating is desired in the slab - wire or piping.
Be aware of the plumbing codes in your area concerning the schedule of pipe inside the building versus outside. Also, don't forget about vents for the plumbing.
Dave
Hi Dave,
I'm in the process of finishing my basement and I have a bathroom layout
question. Although the basement only had four bare concrete block walls
when I bought it, it was pre-plumbed in the floor for a basement bathroom.
There is a round hole through the floor slab, approximately 12 inches in
diameter, with a PVC drainpipe sticking up out of the dirt for the
bathtub's drain. The builder's layout probably assumed that the bathtub's
ends would be oriented East and West, along the proposed bathroom's South
wall. In the North-West corner of this proposed bathroom rectangle, are
the PVC pipes for the commode and sink. The soil line from the upstairs'
two (2) bathrooms runs across the ceiling of the basement and drops 90
degrees vertically into the concrete slab. There is a Y at the bottom of
this main soil line, with a PVC pipe extending upward that's capped.
I assume that this is to be the commode's floor drain. The commode would
face East, with the tank being against the West wall. A small diameter
vertical pipe, which I assume is to be the sink drain, is beside this
soil line.
I said all of the above to give you a general picture of the layout.
There is at least two feet of open floor space around each pipe and/or
drain. My question is, how far away from these pipes should I construct
the inside of the bathroom walls. I would prefer to install the commode,
sink, and tub after the walls are completed for ease of construction and
to prevent damage to them.
Thanks,
Larry
Hi Larry,
I'm a bit confused with the layout, a picture or drawing would have been nice. I have all the dimensions of this in an article so I won't repeat those now. Checkout: http://daveosborne.com/dave/articles/plumbing-rough-in-dimensions.php
The 3" or 4" pipe coming down from upstairs is a stack which is used as a wet vent, for the downstairs, as well as a drain for above. It should have a Wye coming off it at the bottom with a plug screwed in with gasket. This is a cleanout. The pipe should have and expansion fitting inline then continues under the slab to the outside to the sewer or septic connection. The commode drain should be a 3" or 4" pipe sticking up vertically out of the slab. It should have a glued cap on it to keep sewer gases in. This pipe should be within 10' of the stack to be used as a vent and 12" of the finished wall.
The 12" hole is typical of how to rough in a tub or shower. Sometimes the vertical pipe isn't connected yet. This is the most critical part of roughing in a tub or shower in a slab. There is no room for error. You must decide on what tub or shower you are going to install before you plumb it. The tubs with built in surround have to be installed before any walls go up or you won't get them in after, unless you go with a renovator model which comes apart. With a fiberglass tub you can put it in later, but the drain roughin must be accurate. The toilet, and sink go in after the walls and floor are finished. Don't forget the p-traps and vents for the tub/shower and the sink. For the tub/shower the vent is 5' or less from the drain and the p-trap is glued without a cleanout in/under the slab. The sink has the vent within 5' of the drain, as well. I put a union p-trap in after the finishing is done which takes care of the cleanout requirement under the sink.
The toilet should have a space width of at least 30", 36" is standard. If I missed something just fire back a specific question to me.
Dave
Thanks Dave,
Sorry that I didn't have drawing capability.
I really appreciate all of your detailed instruction. It's a great help to
me and it has convinced me that I'm going to possibly be in over my head
without some professional help, at least initially. Thanks for the guidance
and also for showing me that there is no room for error with a tub.
That was the convincing statement to indicate that I should seek a pro for
the first phase at least.
Larry
I think you've made the right decision. Once the roughin is done the rest is easy.
When I built my house in 1992 I got a plumber to help me put in the roughin. I paid him by the hour which was a great learning opportunity for me. The inspector made him remove and replace 2 drains which used a wet vent. He told me after the inspector left that they were allowed to do it that way in Ontario, where he just moved from. So even the pros get confused.
Dave
My cellar walls are laid up stone, appox 1880. The mortar
has dried out to some extent and there are air leaks.
I would like to redo the walls to seal them. Will a standard sand mix
mortar work?
Thanks Dave
Hi Dave,
Yes, you can also purchase ready mixed bags of topping mix or masonry cement mix. Just add water.
Try to remove any loose parts and wash off with clean water just before adding the new mix.
Dave
I am a do it your selfer, I am replacing my deck this time with a gable
roof and it will be screened in. Questions I have are with the roof. The
deck is 14ft deep by 18ft wide. I would like to go no higher then 4ft
high with the roof. I figure 4ft X 12 divided by 9ft - 5.333 rise to 12" (or)
5 to 1 pitch.
The rafters will be 2x8s. Using my speed square to mark the rafter ridge
plum line put the pivot of the square along the 2x8 then adjust the
square so the side of the board lines up with 5 on the common, then place
my mark.
And if I am still correct the rafters should be at least 9ft 9inch long
plus overhang.
Each of the rafters will be doubled up with 2x6 spacer at the top and
for a cross piece. The crosspiece will rest on the walls top plate.
Does this sound correct to you. I never did a roof before.
Your math is correct if you want the rafters going the long way across the roof. The rafters could be made from 2x6s rather than 2x8s, if you like.
I suggest you read my Roof articles on making rafters from our website. It will explain how to hold the rafters together at the ridge and the cut required at the wall.
Checkout our articles and plans at http://daveosborne.com/dave/index.php
Dave
I do not understand what you mean by "if you want the rafters going the
long way across the roof".
Usually we go with the rafters across the shortest dimension, the 14'. You chose to go with them across the longer dimension the 18'. Is this because the deck is attached to the house along the 18'?
Dave
This is correct.
Okay, have you thought of a way to run the rafters up the existing roof to keep the deck water proof?
Such as in this drawing:

Dave
the rafters at this end of the roof will be attached with carriage bolts
to the wall studs, this house is a two story colonial.
the carriage bolts I am thinking of will be 1/2" X 7" with washers and
only one per stud.
Okay, you've got it figured out pretty well. Carriage bolts are used if you have access to both sides to install the nuts. Lag bolts can be used on a finished wall if access is denied to put nuts on bolts. Actually, with the rafters going up against the house existing wall, like this, all that is required is to keep the rafters tight to the wall. The rafters will support themselves, as the rest of them do, so a heavy bolt is not really needed. I would suggest using 3 1/2 to 4" x #10 flat head wood screws. The length depending on the sheeting and exterior finish used. Try to get the screw into the stud at least 1 1/2". A smaller diameter screw helps keep the stud from splitting.
Dave
Dave. I have a back wooden deck that has what appears to be a 7 step drop
down to the ground including the landing and the bottom step down.
It seems too steep. I have a bad knee and my wife has a bad ankle not to
mention my 12 year old yellow lab is having difficulty going up and down
these steps. I would like to change it to a seven step drop down and
change the step height reducing the difficulty. The current rise is 9"
and run is 9" The steps are 36 wide and 51 inches long out to the ground.
I believe that I can not use the standard method. Is there an alternative
method to alter it to fit the reduced rise as well as decrease the steep
angle of the steps. If you need more info let me know. Any help you can
give me please let me know. I do not desire a ramp just a better way in
and out.
Bob
Hi Bob,
Is this correct, the total rise is 7 x 9" = 63?
If so, you should have 10 rises of 6 3/8" with 9 runs of 12" giving a total run of 108". Do you have the extra room for this?
You're right that a 9" rise is too steep. A 6" rise is closer to the rise in a public building.
If you want to go a bit less steep you could choose 11 rises at 5 3/4" with 12" run.
Hope this helps,
Dave
I am unsure if you count the top step and the bottom step in the
rise/run? If so that would only be 6X9 = 54. I think I measured
51 not 54. But the math is what it is. Yes I do have room for that
but I also have another thought is to change the location of the
steps on to the side of the deck where it is closer to the ground.
It is 36 inches to the ground verses 54 from the top of the deck to
the ground now. If I was to us use the formula rise/run 6" rise 9"
run I would have 63. Could I get away with that and still be less
steep and smoother transition up and down. Hope this is as clearer
than mud.
I can send a photo if that would help.
Thanks
Bob
Hi Bob,
If you are going with a 6" rise then the run should be about 12" to give the correct slope. This is all covered in my articles on stairs:
http://daveosborne.com/dave/articles/how-build-stairs.php
Dave
A custom plan client, Ken, mentioned that his wife wants him to re-stain other pieces he has made in the past to match his new completed china hutch I designed for him (see his finished photo at http://daveosborne.com/dave/photos/index.php). His major work would be masking off the glass to stain the trim around the glass doors, etc.
This is my response to him:
Hi Ken,
Good to hear from you and glad that the hutch is finished.
A painters trick is to forget about masking off glass. When the paint or stain is dry, scrape it off nice and clean with a single edged razor blade scraper.
Dave
I built a set of stairs going from one landing to another. The problem
is the top landing is only 6 inches thick. For the angle I cut to work
the top of the stringer is what rest against the skirt board.
The bottom of the stringer is unsupported and hanging in space.
That puts all the weight of the stairs themselves and the people on the
top/compromised part of the stringer. Is there a way to adjust the angle
I need to cut to take into account a 6" platform to connect to? Or if I
put a 1' skirt board on will that help the bottom of the stringer take
the weight? I also thought of running a 2x6 down the side of the top of
the stringer to help strengthen it. Will any of these help or is there a
way to fix it?
Here are a couple of drawings. Hope they help.

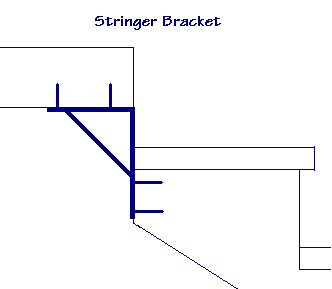
Dave
Well, that's it for another month. Thanks for the questions.
Enjoy your Summer, hope you take the time to get out and explore what God created for us. We have so much to be thankful for.
Until next month,
Dave
|
home | contact | articles | plans | downloads | dictionary assurance | cancel | newsletters Copyright © 1999-2026 by David E. Osborne. All Rights Reserved.
|