| NEWSLETTER from DaveOsborne.com | ||
| “Building Confidence” | February 2010 | |
Welcome
Welcome to our newsletter about home renovation. You ask the question, I give the answer. In this way we build confidence in your ability to do it yourself with some guidance from us.
What's New
A new video! Dan, my brother and webmaster, helped me make a video explaining how to use a tape measure, one of our handiest tools and one we definitely need to know how to use.
Ask Away!
Here are some of the questions I have received from our readers this month:
Dave,
Do you have any step-by-step guide in building a shower from scratch.
We are gutting the master bath and I'm noodling putting in a walk in
shower. The idea is to take a corner of the bathroom and integrate
the pan right into the new floor, use some glass walls, and wallah.
Oh for it to be that easy. Can you gauge the difficulty of taking
on a job as this as well.
Mark
Hi Mark,
In my view, getting the drain piping to match up with the position of the shower pan's drain is the most challenging part. This has to be exact. There are products out there that help in this regard. Purchasing a preformed shower pan is where to start. Get the matching drain and cover for the pan which is a tapered fit. A tapered collar is slid on the drain pipe from above, making the job a lot easier. There are even shower pans available to glue ceramic tile directly on it, so the shower looks like a concrete shower. Checkout local showrooms of tile or bath stores.
Install the pan level in both directions. Once the pan is installed, the rest is fairly straight forward. Install the valve and head. If on outside walls be sure to install insulation and vapor barrier.
Install 1/2" concrete backer board such as Hardie board, this matches up with the drywall coming up to the shower walls. For a ceramic tile job, mud the backer board with thinset mortar, using the fiberglass tape over the joints. Mud the screws, as well. Let dry overnight. Now you are ready for the tile installation. Purchase the thinset mortar with the bonding agent included. Layout the position of your first row of tile, at the pan. Start from the center with the cut pieces in the corners. On the end walls, have the full tile on the outside and the cut piece in the corner. Mix up enough mortar for the bottom row and apply the mortar with a 3/16" notched trowel. Clean up any spillage of mortar on the pan, as you go.
Your valve/control has very good instructions enclosed, so don't worry about that. Even the shower drain usually has a diagram with instructions, as well.
It is hard to rate the difficulty of a job without knowing your ability and experience. Another part to research is the glass walls and door. This can be a very expensive stage if not going with a kit or stock sizes.
If you have any specific questions it is better to ask me directly.
Dave
Dave,
If I want to use a HVLP [high volume low pressure] sprayer to stain &
varnish doors and trim, do you think I should spray the doors laying
flat or upright? I am also wondering how much overspray there may be.
I just finished drywalling the basement and painted the ceiling but
the walls and floor are still un-finished. I was thinking of setting up
a "spray booth" with plastic ceiling and walls to contain the over
spray and I made a filter box to help pull the mist out of the air.
Do you think I need to do this or don't you think the HVLP would get
overspray on the ceiling?
(Note: I have 8' 8" high ceilings)
Yes, I would protect the ceiling. These sprayers have lots of over spray.
When I built my house, I spray painted the doors myself. I arranged all the doors in an upright line, spaced about 2' apart, so I could get between them to spray. I stood the first door up near the wall and attached a couple of small strips of wood to the top so it would not move. I then attached strips from this door to the remaining ones in the row. I tacked the strips with finishing nails and tapped the strips up above the door about 1/8" so the paint would not pool under the strip. Lift the doors above the floor on small strips as well. The time you save by spraying the doors is amazing. Just spray to the point of run-off - not too heavy. Don't enclose the area entirely. Paint needs air movement to help it dry. A fan sucking the air out, which also means new clean air is coming in, is a good thing. Just a steady, low air flow is all that is required with a temperature of over 50° F (10° C).
Dave
Have you ever thinned the stain down so you don't have to wipe it off
after spraying? I use to have a ratio for this that the painters at my old
house used. I think it was around 3 parts stain to 2 parts thinner. This
would put a nice even coat of stain on that didn't need to be wiped off. Do
you know what the ratio should be?
Below, you said that you had the doors about 2' apart. That seems a
little close if you need to keep the sprayer about 12" away from the door for
spraying or wasn't that the case?
Dale
I have never sprayed stain on. Liquid oil stain usually is fairly thin already so experiment. I wouldn't go with more than 10% thinner to start. It should say on the label. I hold the sprayer about 6" to 8" away, low pressure, remember. Experiment on a scrap piece. You want all the doors consistent once you have the formula figured out.
I had a whole house full of doors so needed to place them as close as possible. The more space the better, 2' apart was tight, alright. Dave
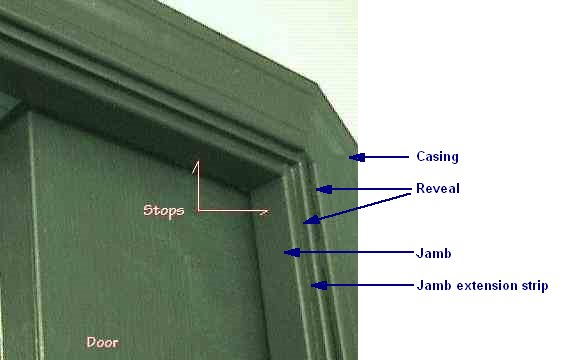
Dave,
I have a couple prehung doors I got awhile ago but I forgot the
interior support walls were 2x6. Do you know any tricks on adding 2"
to the door frame and still have it look good. Have you ever tried
taking the frame apart, cutting a little off the side opposite the hinge
mortise to make it square and then gluing on a 2" extension?

btw: I tried spraying the stain and varnish and it worked great. I did
end up covering all 4 walls and the ceiling and floor with plastic. I
was glad I did, otherwise I am sure everything would have been coated
with stain and varnish. I also made a box with 2 furnace filters and a
fan on the end to pull the spray mist out of the air that also helped.
I've done this lots of times. Install the door as usual, door side flush with wall. Rip 1 strip at 1" wide x 1" thick and nail it to the thick side of the jamb leaving about 3/16" reveal. Then rip another strip 3/4" wide x 1" thick and nail it to the first strip with the same reveal. Now nail on the casing with the same reveal. The finished molding will look like it was made for it.
Here is a picture:
Hope this helps,
Good job with the spray booth. Dave
What type of fastners are needed to fasten gyproc to metal studs?
I sometimes wish that teachers took note of your quote: "There is no
such thing as a stupid question"
Thank you.
You use the standard drywall screws with the fine thread rather than the coarser thread. Set the clutch on your drill so that the screw just leaves a slight dimple but doesn't tear the paper of the drywall. It takes a bit of a push to get the screw through the thin sheet metal.
That quote was my father's who ran multi-million dollar construction jobs. He never was too proud to ask anyone a question. He had a grade 8 formal education, but was always learning. In his late 50's his company sent him to university to take a course in computer scheduling.
Dave
Hi Dave,
I'm building an addition to a house in Surrey, BC, Canada. Code
requires an 8" x 1'-6" footing and an 18" high foundation wall. I want to
use 2x10 to form since I can use it all afterward for building. I'd
like to pour the footings first. Could I use 2x10 and snap the pour
level on the forms inside then use nails to finish too? Then do the
footing forms have to be stripped before forming the foundation walls?
My cleats would get in the way otherwise wouldn't they since they would
be higher than top of the concrete?
The addition is 39'-2" long and 27' wide, 2 story. Three car garage,
below loft with vaulted ceiling above. So the footings require four
14" deep x 4'x4' point load pads. Can the 6" deeper part of the
point load pad be poured just in the ground dug below the rest of the
footing? Could I frame the upper 8" of the pads with 2x10's like the
rest of the footings then just deepen those 6" more using the dirt as
the form?

Thanks Dave
I'm sure I'll have lot's more questions
John
Hi John and welcome,
The standard footing is 16" wide not 1'-6" with an 8" wall, just to make that clear.
What you are proposing can be done, but the extra work involved is not worth the extra expense of using 2x8 instead. You can always rip the 2x8 down later into 2x4s or use 2x6s with a 2x3 nailed on, with stakes driven in along the sides. It is far easier to screed the concrete off the top rather than bring it to a level inside a form. Sometimes you can get away with a 2x6 high footing, check with your building inspector.
I prefer to pour my footings and walls in the same pour. Use 2x8s or boards as above. Nail the cleats on at about 3' centers, top and bottom. The wall forming goes on top of the 1x3 cleats. If the bottom of the slab is above the top of the footing, you don't have to worry about the cleats being left in the concrete, since any leakage would be under the slab anyway.
For the 14" pad use 2x10 with 2x4 and stakes and dig out the form bottom, in the center, to increase the depth.
Checkout my article: http://daveosborne.com/dave/articles/build-house-foundation.php
Dave
Hi Dave,
Thanks for the quick reply that's awesome.
Actually the Structural Engineer has called for 18" wide and 8" high footings.
Ya, 2x6's with 2x3's works as all the framing is 2x6 and that gives me 8".
The bottom of the slab is above the footing.
Now if I build the form for one pour do I shoot levels and stake my footing
first then build my foundation form wall on that?
Then snap a chalk line for the level in the wall and nail 1x2 on that line to
give me something to finish the cement too?.
Is it ok to use 2x10 to form the foundation wall? Nail the bottom of the first
layer onto the footing cleats, then use form straps nailed on either side of
top of the first layer, bottom of second layer nailed on first layer then cleats
on the top to keep the 8" width?
Thanks again, Dave
Respectfully,
John
Hi John,
If you have an engineer, that's great. Does he have rebar in the footings and walls. You mention 18" height of walls. Does this include the 8" above the grade?
If you want to pour the footings with the wall, you should shoot your elevations for excavation. Try to get the area pretty close to the elevation you want, that is bottom of footing. The footing should be close to level for a garage slab, but not necessarily right on. We usually have 3" slope in 20'.
If the excavation is done correctly, the footings are placed in their proper position without worrying about their level. Stake the footings into position, straight and level across. Put the rebar in and hang them about midway from the cleats with tie wire. Layout the bottom 2x4 plate for the wall forms on each side. Use 3/4" plywood rented forms for easy form ties. These ties are made for 3/4". I chose to use 1x8 resawn boards for my forms. These are very inexpensive compared to plywood or renting forms, since you can use these boards on the framed walls for sheathing, later. You need to use vertical 2' tie bars with these or 8' horizontal with plywood.
There is a tremendous amount of weight to concrete which novices don't understand. You need to form the walls up properly without worrying about blowouts and the like. This is the foundation for your walls and need to be in the proper place, straight and true. Don't skimp on this step.
After the plates are nailed down to the cleats at 9 1/2" apart, start the outside wall forms, bring them up to height, brace the top of the wall to 2x4 stakes on the bank. I would buy 2x4 shorts for formwork, like this, which is 6' long. Then shoot your top of wall elevation on the form. Try not to have too high a board above the top of concrete. Use 1x2 for the level strip, top of strip along top of wall. This leaves a 3/4 x 1 1/2 pocket for your sheathing to cover, perfect for resawn sheathing. Just check on whether the design dimensions are figured for outside of framing or outside of sheathing and adjust the wall, accordingly.
Dave
Hi Dave,
Thanks again for the info.
Tie bars, metal or 2x4? For the vertical every 2', the horizontal bars with
plywood option every 1"?
The engineer has rebar in the footing but he says BCBC [BC Building Code] 2006
doesn't require rebar in foundation walls up to 4'. I think I'll put some in
though. I can tie them to the snap ties, yes?
Is a 1x2 level strip still ok for pocket if 1/2" plywood is being used for
sheathing?
That slope you're referring to is in the garage slab, yes? Or should the
footings slope that much to give uniform clearance between bottom of slab and
top of footing? Then level the foundation wall on top of that so foundation
wall at front will be lets say 3" higher than that at the back? Keeping 8"
above grade at the back?
I got to get my head around this before we get started.
John
Hi John,
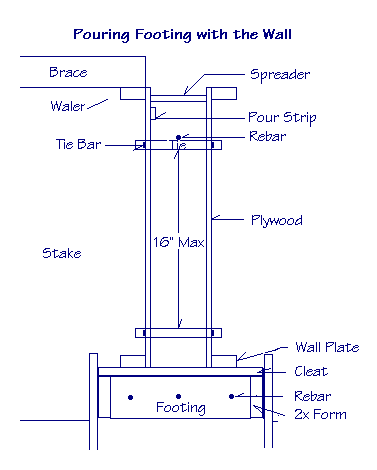
The ties are specially made with an oval hole in their ends to place metal tie bars to hold all the ties together. The tie's length is designed to go against the 3/4" plywood, so they should be 16" apart both ways, max, vertical and horizontal. If you rent the plywood they will already be drilled. Nail a 2x4 whaler along the top to keep the top from being wavy and to attach the braces to.
Here's a drawing:
Let me know if you don't understand anything else.
Dave
Well, that's it for another month. Thank you for your participation in our newsletter and your interest in our website.
Dave
|
home | contact | articles | plans | downloads | dictionary assurance | cancel | newsletters Copyright © 1999-2026 by David E. Osborne. All Rights Reserved.
|