Building Confidence
| Volume 9 Issue 4 ISSN 1923-7162 |

Welcome to Dave's Shop Talk's Home Improvement Newsletter of questions from our members on their construction projects, a Tip of the Month and a home remodeling article, both from our website at http://daveosborne.com.
What's Happening
The trip to my Aunts' to install a new laminate floor last month was successful. My two grandsons: Enoch (14) and Noah (15) helped me and my wife, Frances, with the purchasing, transport and delivery of materials. More on this below. Thanks for the help Noah and Enoch. Noah took the pics.
My brother Dan's new site Free Choice Coupons had a problem with the security cert so you might have gotten a warning from your browser. He's got that fixed now.
Tip of the Month
Put a paint roller in a plastic bag and seal tightly for next day's use, to avoid having to clean it: http://daveosborne.com/newsletters/0412.php
Ask Dave!
Got my stringer measurements from Dave's Easy Stair Calculator. Run = 6 13/32", Run= 12". Pulled out my Johnson framing square to set rise & run, only to find that there are no 1/32 measurements on the square only 1/8's. How do I adjust the frame for a 13/32 setting?
13/32" is 1/32 more than 3/8". On your square it's a quarter of the space between the eighth marks after the 6 3/8" mark.
Dave
Sir,
I'm looking to install a Laminate wood floor in my 500 sq. ft basement. I'll need to do a little leveling first. The basement is now dry after installing a waterproofing system with a sump. The floor is concrete with just the usual dampness. So, I'd like to know your recommendations for a floor leveler and a laminate that will be durable.
Thank You,
Greg
Hi Greg,
I'm concerned about the floor's usual dampness. How damp is the floor?
Dave
Hi Dave.
The floor isn't that damp. After removing the old carpet and old linoleum tile the floor is dry, just a little musty smell. After running the dehumidifier the smell goes away. I think with a moisture barrier it will be fine.
Okay, that's good.
You can use a floor leveler for concrete. It is a cement based product, put on with a cement trowel. Follow the instructions on the bag.
Get the thickest laminate within your budget from 7mm to 14mm. I just installed a laminate floor for my elderly aunts. I used a 12mm thick flooring. Since the floor was over a crawlspace I used a Styrofoam pad with vapor barrier attached. I like the way it stuck to the next sheet beside it. I used a red Tuck tape over the joint, although this was not required. I would suggest using this type of vapor barrier pad on your concrete. The laminate becomes a floating floor. Remember to leave 1/4" all around the walls for expansion.
Hope this helps,
Dave
Thanks Dave,
Do you have a specific leveler or flooring that you've found works best?
Looking for durability as well.
Thanks,
Greg
Hi Greg,
The floor leveling compound comes in a bag to be mixed with water. My local brands probably won't be the same as yours. Just be sure to get the floor leveler for concrete rather than for wood sub-floor. I just buy whatever the local building supply store carries, no problem.
With the laminate floor, I prefer the Klick brand, but there are many others. Definitely get the type that clicks together, rather than needing glue between each joint. I didn't even see the glue type, the last time I bought laminate, so that is probably not an issue. Don't even think about buying a thin laminate, like 7mm. The joint itself is not strong. I have found, through experience, that the thicker laminates go together easier. This stuff is made of HDF (High Density Fiberboard) with a plastic laminate finish on top, similar to the plastic laminate of counter tops - Arborite, etc. It should be handled with care. Read the instructions and start laying the boards the right way. I use small pieces of 1/4" plywood as spacers between the laminate and the side wall and between the end and the wall. Some brands let you insert one board at a time, as they lock in place, others require you to attach all the boards in a row together, then tilt them up, as a unit, and click them in place to the existing row. You get what you pay for!
Be aware that laminate is a disposable floor. In other words, you cannot sand it down and re-finish it like hardwood. Once it is all scratched up, it needs to be replaced. That been said, it is a very durable floor and will last for years if treated with care. Water and laminate does not mix, so don't wash it with a mop and bucket. Use only a dry mop and wipe up spills right away.
Some installation tips: cut off the bottom of door jambs and casing, so that the laminate will go under the jamb, remember the 1/4" space rule. The baseboard covers the joint and keeps the laminate down. The rest of the floor floats on the Styrofoam pad, it is not attached, anywhere. Transition strips of wood, metal or vinyl are used at doors, if the flooring changes to lino or ceramic tile, etc.
This is the ideal flooring for the home handy person to install. Just do a bit of preparation: read the instructions that come with each package; leave the packages wrapped up, in the room for 48 hours to acclimatize; remove existing baseboards and nails; scribe the first row, if the wall is bowed or not straight; prepare spacer blocks out of scrap 1/4" ply; get a short 2x4 about 18" long for a tapping block and go for it. The tapping block is used to tap against the last row of laminate to get the joint absolutely tight together. If done correctly, it only needs a very slight tap. The joint on the ends and on the side should be tight together, if done correctly. Don't tap the block too hard and mushroom the tongue. Make sure there is nothing in the groove to prevent it from going together tightly. Some times a piece of HDF breaks off from the tongue and prevents the joint from tightening.
I think I have covered everything. If not just send me a note.
Dave
Hi Dave,
My son has recently bought a house in New Mexico circa 1977. It has metal cased windows that wrap around the jambs with stucco on the exterior and Sheetrock on the interior. They need to be replaced.
I am a builder from Vermont and have never seen this type before and am unfamiliar with how to remove these and measure for new vinyl replacements.
Any suggestions?
Eric
Hi Eric,
I have not seen these myself, either. I would guess the metal wrap incorporates the nailing flange, though. When I replaced older aluminum windows, I would, with my angle grinder with masonry wheel, cut the stucco about 1 1/2" away from the edge of the outside jamb. I would cut all away around the jamb, to the expose the outside of the nailing flange. I would carefully chip out the stucco from the jamb to my saw cut, remove the nails in the flange with a nail claw, remove the inside trim and casing and pop out the window. I would then replace the new window, nailing the flange back to its original position, against the sheathing. I can't think of any time I did this that I did not replace with a stock size of window. I found that we have 2 sizes of rough opening for windows, depending if they were made on the West coast or the East. One required 1" less than stock size, eg. for 2' x 3' the rough opening was 23 x 35. The other rough opening was the size of the stock size, 24 x 36. The actual size of the window for the first example is 1 1/2" less on the dimensions, that is 22 1/2 x 34 1/2. You want about 1/4" clearance all around. Getting into custom windows, as you know, is expensive.
After installing the window, there is a space between the window jamb and the stucco. I install a wooden trim of 1x4 around the window, over the stucco, tight to the jamb. A bead of exterior latex caulking finishes the job. With the heat in New Mexico you could clad the 1x4 with flex flashing or use the plastic decking material.
Isn't it fun going from one jurisdiction to another and put up with the different building codes in each one.
Dave
Hi Dave,
I hope everything went well.
With your help and advice, my stair case project turns out very satisfactory.
But I have some troubles with the drywall. As shown in the attached photos, with my finger, I can press down some spots of the outer corner beads, and leave dents there. My contractors have already painted the drywall.
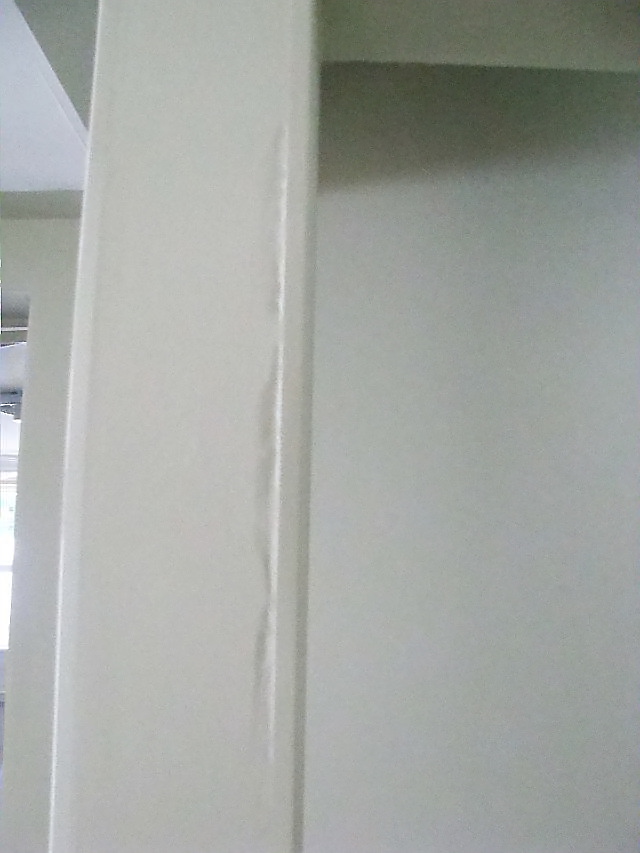
Hi Sean,
This looks to me that the corner bead was taped on, but not enough mud was used under it. First of all, is the corner bead taped on or is it metal corner bead nailed or screwed on?
Dave
Hi Dave,
Thank you for your quick response.
Yes, my contractor taped the bead on. I agree he didn't use enough joint compound under the tape.
In your opinion, can it be fixed by cutting the tape wherever necessary, filling in and smoothing it out with mud?
I appreciate your help all along.
Best,
Sean
Hi Sean,
Yes, this is exactly what has to be done. Any bubble of tape that is loose should be cut out. Hopefully, enough tape is left to hold the corner bead secure, which looks the case.
Dave
Dave,
Thank you very much.
Myself did a lot of work including plumbing and electrical until the last finishing part. I was too busy to keep track of every details in the work, and didn't expect such mistake to happen. Now, the lesson is contracting out any work requires a lot of research and caution.
Best Regards,
Sean
Yes, good references are important for contractors.
This is unfortunate, but able to be corrected. Oh, make sure you prime the mud first before the finish coat. Drywall primer/sealer is an amazing product. It makes the soft finish of drywall mud into a hard protected surface. It also keeps the repaired surface from telegraphing through the finish paint.
Dave
Hi Dave,
Here is another question about my staircase.
The first two pages of the attachment were taken of my current staircase. The treads are pine, and paint spilled over them. Note that my contractor didn't put skirt boards. I suppose most staircases need skirt boards to protect the walls, don't they? But at this point, I don't see how he can add the skirt boards.

Hi Sean,
Stairways don't require skirts for protection, but are installed mainly for a trim feature. In my own stairway, I have hardwood on the outsides and carpet between. Against the wall, I have carpet going to the wall without a skirt.
Attached are two photos of my stairs in comparison to the molding in place of a skirt. Notice the clean edge of the carpet and drywall joint.

A skirt can be installed after the stringers and treads are in place, but it amounts to a lot of scribing and patience. Personally, I don't think it needs it.
A good carpet installer can make the carpet cut against the wall, look good - no need for base.
Dave
Hey Dave---great stuff here. Couple questions about cutting stringers.
See attached picture. Replacing rotted set of stairs, and 2 stringers will be placed in the pocket seen in the picture.
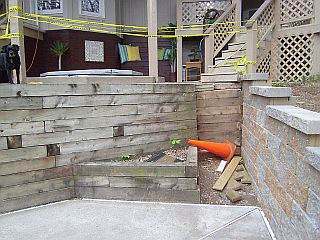
Rather than attach the stringers to angled joist hangers, I would make a tapered wood landing, flush with the top of the concrete, supported by vertical 2x4s or 2x6s. Then build the stairs square off that landing, start with the first step down a riser. The stringer can be toe-nailed to the 2x4 or 2x6, depending on how wide you need to have the landing to square it off. After toe-nailing, you can put a scab over the joint of the vertical 2x4 and the stringer. For extra strength, place a 2x4 post under the stringers at the high end and in the center. You should use pressure treated wood for the stringers and galvanized nails.
Here is a drawing:

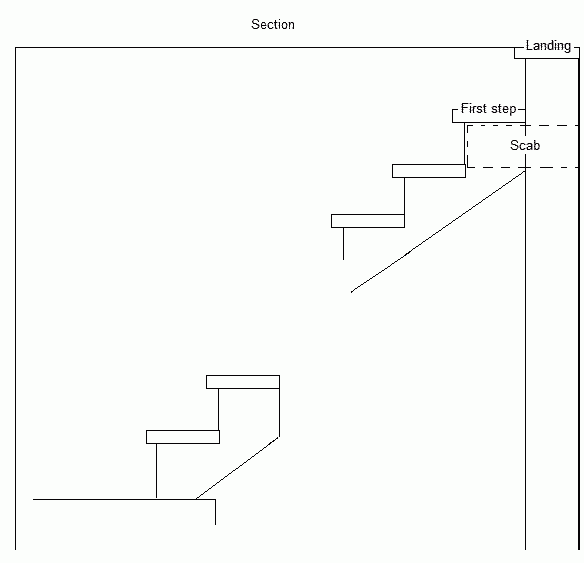
Hope this helps,
Dave
Feature Article of the Month
(taken from our website: DaveOsborne.com
These days a laminate floor is a popular item. It is inexpensive, easily installed and does not need to be sanded or finished. My nephew, a hardwood floor installer, calls it a disposable floor. That is exactly what it is. When the floor is worn out and all scratched up, it is easily ripped up, discarded and replaced. Laminate refers to the material it is made from - plastic laminate. Yes, the same stuff, the plastic laminate of cabinet counter top fame, known as Arborite, Formica, etc.
The difference in the laminate floor and the laminate counter top is the HDF base. HDF is high density fiberboard. Most of us have heard or worked with MDF, medium density fiberboard, so are familiar with the terminology. With the HDF base, the flooring is less subjected to dents from falling objects. The finish is protected by many layers of polyurethane coatings. If you respect the flooring, wear socks instead of leather shoes, it will stand up a long time. You can even use this flooring in bathrooms, after applying additional coats of polyurethane, as advised by the manufacturer.
When laminate flooring first came out, the boards were glued together in their tongue and groove joints. Now, they are manufactured with click together tongue and groove joints. They are just as easily dismantled, no glue is needed, no fasteners are used to attach the flooring to the sub-floor. It remains a floating floor, usually laid on top of a thin Styrofoam blanket to add cushioning, fill in small hollows and prevent passage of moisture to the fiberboard and upper layer of laminate. Moisture and laminate do not get along well together. Whether the moisture is from below or above, so use only a slightly damp cloth for cleanup. Most times use a dry mop for best results. Okay, now we know the basics of the product, let's install it. Like any typical flooring job, a good layout is essential. Remove any baseboard and nails from the walls. Measure the width and length of the room, so you can see if the length of the room will give short ends or the width of the room will have a narrow strip on the far side. You can prevent this with a little planning by cutting the first board in half to allow a bigger piece to be left at the other end. Likewise, by ripping a piece off the starter board a larger piece is left at the other wall, when we are finished.
 Notice if the first strip of laminate needs to be trimmed for a crooked wall or slight bow. By scribing the first starter strip, we avoid having air under the baseboard instead of a consistent piece of laminate against the starter wall. You need an even margin of 1/4" between the wall and the laminate all around. This stuff needs to expand and contract, so allow for that. The laminate should go under any door jambs, so cut these off, before getting too close to them. I usually, lay a scrap piece of laminate, upside down on the floor, against the jamb, rest my reciprocating saw blade on it and proceed to cut the bottom of the jamb and casing off. Allow 1/4" expansion, to the wall, under the jamb, as well.
 Once the first strip is laid against the wall, things will go a bit faster. Prepare some 1/4" shims to use against the laminate and the wall, at the sides and the ends. Stagger the joints by at least 9" by using the cutoff piece from the end, at the start of the next row.
 Some manufacturers suggest doing a complete row, from one wall to the other. Assemble the strips end to end, cutoff what you need to have 1/4" space from the wall on the last strip, tilt the entire row up enough to get the whole length started in the groove of the existing row and carefully bring the row down, with a slight pressure into the groove. Extra hands are helpful to do this. A block of 2x4 x 12" to 18" is handy to tap the strip into the existing one, by keeping the block flat on the floor and pivoting one end out and quickly slap the strip to tighten the joint completely. A small slap is all that is required to tighten the joint. Don't beat the tongue up by mushrooming the HDF material by hitting the strip, too much. Continue in this fashion across the room, ripping the remainder of the strip to allow a 1/4" space for expansion on the ends and the sides.


When finished the entire floor, replace the baseboard and enjoy what you have completed with your own hands.

Almost the End
We hope you investigate our resources on our website: http://daveosborne.com/dave/index.php
Our site is a paid subscription site which has not only articles and plans, but a dictionary of common construction terms, tables on joist and rafter spans, converters and calculators, tips and jigs to make building projects easier and of course, this free monthly Newsletters.
Thanks for your continued questions, comments and good wishes.
Your source for building tips, woodworking & furniture plans, house plans and building advice directly from Dave...
Hi, I'm Dave Osborne. With over 50 years experience as a journeyman carpenter, foreman and contractor in heavy construction I enjoyed working with apprentices and sharing the tricks of the trade that others shared with me. Now I get emails from Members all over the world and we include many of my answers in our Free Monthly Newsletters. Some of my answers include drawings and instructions specific to a project, but may also answer your questions. I use correct construction terminology, so you can confidently inform your building supply dealers or contractors exactly what you need.
ASK DAVE!
The Benefits of Membership
Membership gives you full access to our hundreds of how-to articles, woodworking plans, converters, calculators and tables. Our Stair Calculator is one of the most popular on the internet. We have projects you can build for (and with) your kids, furniture for your wife, and sheds and gazebos. If you run into a problem or need advice your Membership includes unlimited email questions to me through our Ask Dave quick response button.
Join us!
Copyright © 1999-2026 DDFM Enterprises. All Rights Reserved. DDFM ENTERPRISES, DAVE'S SHOP TALK and the Dave Osborne logo are trademarks and service marks owned by DDFM Enterprises. All other trademarks on this site are the property of their respective owners. Site design by Design Strategies, Inc.