Building Confidence
| Volume 9 Issue 7 ISSN 1923-7162 |

Welcome to Dave's Shop Talk's Home Improvement Newsletter of questions from our members on their construction projects, a Tip of the Month and a home remodeling article, both from our website at http://daveosborne.com.
What's Happening
We were able to complete the pouring of our driveway, this month. My wife, Frances and I formed it and prepared the surface for a professional crew of 5 guys who poured the concrete with an exposed aggregate finish. We waited about 19 years for this stage of our process to be finished. The neighbors were impressed, actually saying so.
Tip of the Month
When constructing a project outdoors, use treated lumber for pieces near the ground or on concrete. Ref: Our Newsletter August 2006.
Ask Dave!
I need to know the best way to install a cedar shake roof on an octagon gazebo.
If you have suggestions on starter strip and ridge cap and center cap.
Thanks.
Starter strip is just two layers in the same course, alternating with their joints.
Ridge and Hip caps are shingles ripped to 6" wide and nailed to each other, lapping alternately on each course.
The center cap is a solid piece of cedar with octagon angles.
Dave
I need to install an attic stair across the ceiling joists. What's the best way to frame that and support the joists?
Here is a drawing of a stair opening:

Each joist is doubled up on the sides of the opening and the headers are doubled up, if the tail joists are over 6'.
Dave
Dave,
My stair must go across the joists. not parallel to them. That's my quandary.
Thanks,
Martin
Hi Martin,
Do the same scenario. The point is you are cutting out your joists, so you need to support the joists you have just cut. You are just changing the width with the joists and your length across them. In this case the end joists are still doubled up and your headers across the joist probably are doubled up, as well. The only time you need not to double up the header for the joists that you cut out, is if they are sitting on a beam or girder, etc. less that 6 feet away. Then you just need a single header. Your joists need to be doubled up between your opening, regardless of the way it goes, because all the load of the cut joists are being support on the doubled up joists on each side. You need double joist hangers onto the doubled up joists and single joist hangers to support each joist running into a double header.
Dave
I am remodeling a garage apartment and need to put in a hidden wall panel that opens for access to the back of a stackable washer/dryer. My plan is to use a 3/4" plywood panel that will be hinged to a stud and will be flush with the rest of the wall. I want to use a trim piece to hide the seams in the wall but need to know what kind of hinge will swing the panel away from the wall so that the trim piece on the hinge side doesn't hit the wall.
You need the hinge pin on the outside of the panel, like a piano hinge or butt hinge. I made a panel access, similar to this under a tub. I made three panels with casing around them, only the center one was solid. I used magnet catches to stick the removable panel to the framing. Maybe you could do it this way, rather than hinged. Dave
Thanks Dave. I hadn't thought of using magnets but that may work well.
Martin
Dave,
I am replacing the handrail on my staircase. It is a short run, only 5 steps. ( I will need 6 balusters per side to meet code of 4" centers.) But I'm not sure about the angles to drill the underside of the new handrail to insert wrought iron rods. I could use a level and mark the old handrail then transfer the marks to the new one, but is that the right way?
Thanks for your help.
Larry
Hi Larry,
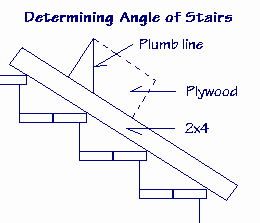
I like to take the angles off the stairs, themselves. Lay a straight edge, a 1x4 or 2x4 down the stairs. Place a small piece of plywood, 12" x 12", approximately, on top of the straight edge. Get your level and scribe a vertical line on the piece pf plywood. This is your jig for drilling the angle of the holes. Just line up your drill with the line on the plywood.
Here is a drawing:
Dave
I have used the stair calculator to plan my stringers for my front porch. That is great! However, the code book the county gave me says I need to use stringer hangers, and I have a 10 inch rim joist, and if I follow the plan, I only have 3 inches to work with the stringer hanger. I'm not sure that's code. Is there another way to hang the stringers that would be code? The code booklet shows the first set of steps on the same level as the porch, but that would require an awfully steep staircase. There will be posts set into footings at the bottom of the steps that will support the stringers as well. Thanks!
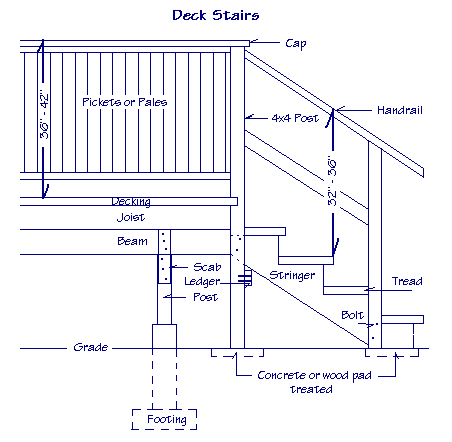
Can you install posts to support the stringer, as well as the same posts for the handrail? A 2x4 ledger is fastened across the posts under the stringer.
Here is a drawing of what I mean:
Dave
Our plan is to have the upper posts inside the rim joist because they will also support the guard railing around the porch. I've decided to use solid stringers on the outside and one cut stringer on the inside. Since our steps will be about 4 feet wide, this keeps me from having to put in a fourth stringer and footing. (By the time we dig FOUR footings, we might as well lay down a slab!). The Simpson website says that we need 3.5 minimum inches of the hanger on the rim joist, but we'll have to try to get by with 2.5 inches on that center stringer. Most of the weight will be carried by the outer solid stringers anyway, and they will have 9.5 inches hanging on the rim joist. Does that sound reasonable? We're pretty experienced do-it-yourselfers, and we're certainly building this better than the original builder did it, but I don't know how picky the inspector is likely to be.
Andrea
Hi Andrea,
You are better off to put posts under the stringers than relying on hangers and screws to support them. Simpson's business is selling brackets and hangers, go easy on these things. I don't like a closed stringer on outside steps because it tends to trap water on the treads, in the corners, which causes rot.
For 4' wide stairs you only need 1 center stringer with 1 1/2" treads. I prefer to make 1 footing 12" by 4' under the 3 stringers.
Dave
Dave, Need some suggestions. I am building a dedicated workshop 24' X 24'] with 9' ceiling. I plan on insulating and putting up sheetrock on walls/ceiling. I'm going with H.D. insulation. Approx: 600 Sq Ft. I have considered several possibilities on heat and narrowed it down to L.P. Radiant Tube heater monted on ceiling [45,000 btu]; What do you think?? I live in the Seattle area. It's cheaper than a heat pump and forced air and cleaner than a wood stove. Also how do I figure how much sheetrock to buy???
Thanks, I really like your website.
Kelly in Port Orchard
Hi Kelly,
Sounds like a nice workshop! The propane heater should be good.
The best way to take off quantities of drywall is to measure the length of the walls and ceiling for the lengths of sheets. You always want to go with the longest sheets, within reason, to save butt joints. The sheets should be laid horizontally to the wall and across the ceiling joists. Usually ceiling drywall is 5/8" thick, but residences use the I/2" special ceiling drywall, which is a bit denser, so you can hang it on 2' centers, to match the trusses. If there is no intersecting walls, you could go with 12' sheets. Have the 1' extra for the 9' ceiling between the 2 sheets of 4' drywall. That way it is easy to mud the joint. Stagger the butt joints.
If there were no doors or windows or intersecting walls you would need 4 - 12' sheets for 4 walls = 16 + 2 for the 1' strip = 18 - 4x12x 1/2" sheets. For the ceiling you would need 2 per row times 6 rows = 12 - 4x12x1/2" ceiling drywall.
Stagger the sheets on the walls: top row 12' and 12', next row is the 1' row: start with a 4' sheet then a 12', leaving 8'. Bottom row would be 4' wide again, starting with 8', then 12' then 4' left over. Very little waste this way.
Do the same with the ceiling: start the first of 6 rows with 2 - 12' sheets. 2nd row would be 4' + 12' + 8'. 3rd row would be 8' + 12' + 4'. 4th row would be 12' + 12' again. then repeat for the other two rows. With doors and windows, especially an overhead door, just measure for each row on the walls. You will save some sheets, this way.
Hope this helps,
Dave
Feature Article of the Month
(taken from our website: DaveOsborne.com
Remodeling 11: How to Cope and Install Crown Molding
COPE: To cut or shape the end of base molding or crown molding so it will cover and fit the contour of an adjoining piece of molding.
We generally cope the inside corners of baseboards and crown moldings. This started in "the old days" when air nailers were not invented yet. A carpenter would nail everything by hand. He noticed that in an inside corner of molding, if the base molding was mitered, the opposing corner of molding would have a tendency to open up with the hammering process, making it tough to get a nice tight joint. Mr. Cope came along and thought that if he could easily cut the profile square on the opposing crown molding, as he nailed it in place, it would remain a tight joint because it would slide along the crown molding instead of opening up. This was explained to me, at a very young age, by my father and I never forgot it. The part about "Mr. Cope" is writer's privilege, sorry about that.
Now, to actually cut the cope joint. On one side of the inside corner of molding measure the length of the...read more at https://daveosborne.com/dave/articles/how-install-crown-molding.php
Almost the End
Well, that does it for another month. We hope some of these questions and answers will help you with your own projects. If you need more advice, join our website, then send me an email.
Thanks for your emails and support.
Your source for building tips, woodworking & furniture plans, house plans and building advice directly from Dave...
Hi, I'm Dave Osborne. With over 50 years experience as a journeyman carpenter, foreman and contractor in heavy construction I enjoyed working with apprentices and sharing the tricks of the trade that others shared with me. Now I get emails from Members all over the world and we include many of my answers in our Free Monthly Newsletters. Some of my answers include drawings and instructions specific to a project, but may also answer your questions. I use correct construction terminology, so you can confidently inform your building supply dealers or contractors exactly what you need.
ASK DAVE!
The Benefits of Membership
Membership gives you full access to our hundreds of how-to articles, woodworking plans, converters, calculators and tables. Our Stair Calculator is one of the most popular on the internet. We have projects you can build for (and with) your kids, furniture for your wife, and sheds and gazebos. If you run into a problem or need advice your Membership includes unlimited email questions to me through our Ask Dave quick response button.
Join us!
Copyright © 1999-2026 DDFM Enterprises. All Rights Reserved. DDFM ENTERPRISES, DAVE'S SHOP TALK and the Dave Osborne logo are trademarks and service marks owned by DDFM Enterprises. All other trademarks on this site are the property of their respective owners. Site design by Design Strategies, Inc.