Building Confidence
| Volume 9 Issue 9 ISSN 1923-7162 |

Welcome to Dave's Shop Talk's Home Improvement Newsletter of questions from our members on their construction projects, a Tip of the Month and a home remodeling article, both from our website at http://daveosborne.com.
What's Happening
We added a new article and category, Concrete Work 1: Exposed Aggregate Driveway. Check it out. On request of a member, Dan added the calculation for the volume of concrete columns in our Concrete Calculator. Thanks, Mike. Dan wants me to write a newsletter twice a month. Imagine that! Are you readers up to that? My problem is to remember to write them on the 15th and the end of the month. Good Luck, Dave! Wish I was a webmaster!
Tip of the Month
To nail brads or very small finish nails use a brad pusher. Ref: Basics 3: How to Read a Tape Measure.
Ask Dave!
Dave, I am putting up a wall in a building that has a metal skin. The wall will be 2 X 6 with insulation and sheetrock on the inside. Should I use plastic sheeting during this process??? I'm thinking that it might not hurt if I use a vapor barrier between the outside wall and the insulation; What do ya think?? Would it be better to use a VB between the insulation and the sheetrock??? Thanks in advance for your help. Have a great holiday weekend.
Kelly in Port Orchard, WA
Hi Kelly,
No, I would not put poly on the cold side of the wall, always on the warm side - between the insulation and the drywall. No problem with a breathable tar paper, though, which keeps moisture in but lets vapor out.
Looking forward to the weekend, although every day is a long weekend when you are retired. We are having a mini family reunion at a park not too far from here so that is always good!
Later, Kelly, enjoy the family on the long weekend!
Dave
I want to replace a 16 ft bearing wall with a beam made from 2" material put together. 2 story house - main floor is on cement slab. 2nd floor has bedrooms. I was thinking of using 2x12. what wood should I use and how many side by side do I need. Should they be glued, nailed or screwed together.
Hi Vic,
I need to have more info to figure out the beam. Any beam over 10' should be engineered. I am not an engineer, but can look up tables for you, to give you an idea.
What I need is:
- the number of floors supported by this beam
- does it support a roof?
- what are the sizes and lengths of floor joists on each side of the beam
Dave
Hi Dave
The beam will support one floor with one bedroom and loft above and above that the roof. The floor joists are 2x8, 10' on either side and 16" centers. The house was built in 1946.
Thanks Vic
Hi Vic,
You need a 5 ply 2x12 beam for a 16' span with 10' joists on each side of it. The beam could be built out of Douglas fir or hem/fir or spf (Spruce, Pine, Fir).
Dave
Hello Dave
My name is Ron and I just joined your Shop Talk website. I am looking for help/advise on my current home project. I am replacing the seven step concrete banking steps to my backyard. I live in Minneapolis MN. I have done the demolition of the old steps. Pictures are attached to show you the present state. I am sorry but the pic of the old steps taken before the demo began got deleted on my camera. I am looking for some old pics of it. The steps I have in mind are shown in the attached drawing. I have added the approximate dimensions required for my steps. My total rise is approx 54" and the run as measured from the start of the bottom step to the top of the top step is approx 76".

Hi Ron,
I used our calculator to get a drawing of your rises and runs. I think it may be better to go with a 6 3/4 rise with a 10 7/8 run. This gives a nice slope and comfortable step. This will also match you total rise and total run of 76" requirement.
Here is the drawing:
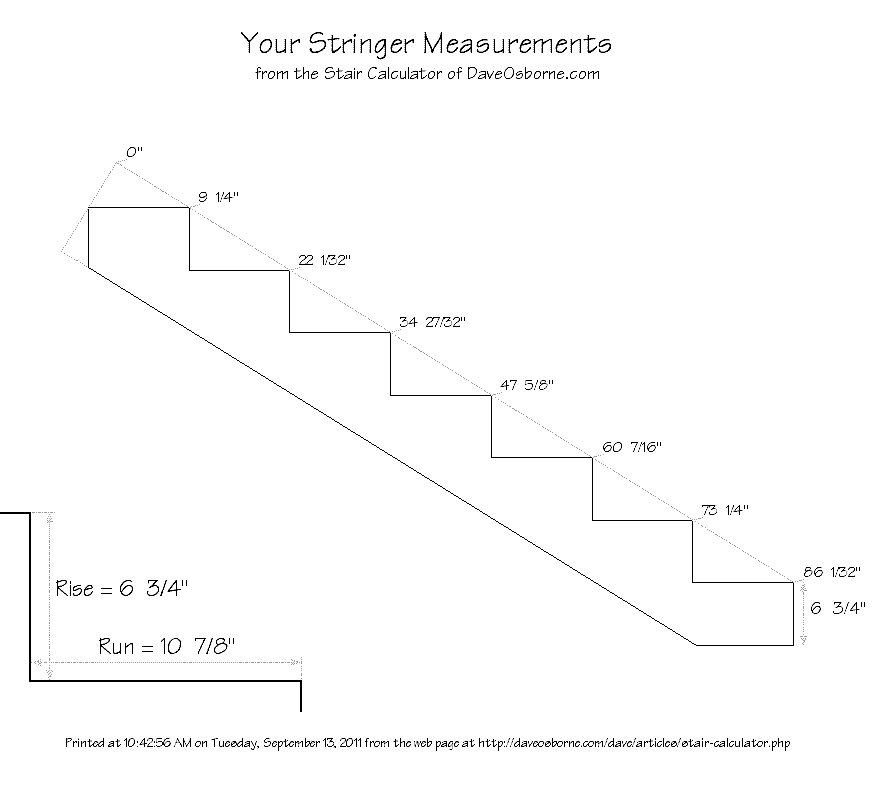
Usually, with concrete steps, we angle the riser back on the bottom to give a wider step, since there is no nosing like on wood stairs. Another thing we do is angle the bottom of the wooden riser for the form, so we can finish the tread right to the riser with a trowel. These two tips are shown in the article.
I'll show you a bit later how to form the inside wall so you can easily remove the risers, very important, especially for exposed aggregate. I wanted to show you the risers and runs that I came up with, to get your opinion on them.
Later,
Dave
Hello Dave
Thank you for your quick response! Sorry that it took me so long to reply. Other home and property work has occupied my time. The stringer drawing seems fine. I will need to make the proper construction of the point of attachment of the top of the two stringers. I am beginning the construction of the footings for the walls and steps. This may take awhile so please bear with me. I have some other irons in the fire.
I have a question or two concerning angling and beveling the bottom of the riser form. I could not find these tips in the article @ articles/stair-calculator. Help please. Last winter when I was considering redoing these stairs I found a web site that had these tips but I did not bookmark it or save the info. As I remember it also recommended leaving a 1/4" gap at the bottom of the riser where it meets the previous landing strip.Presumably to make a smooth blending of the riser concrete and the tread of the step below it. Do you recommend that too?
Thanks again.
Ron
Hi Ron,
The tips are in another article on concrete stairs, here is the link: http://daveosborne.com/dave/articles/concrete-steps.php
To make it easier to attach and remove the risers, make up your stringer out of 3/4" plywood. Cut the angle back on the stringer, as shown in the above article, and in the drawing below. Then form up the inside walls on each side, allow room enough to attach the stringer to the back of the inside wall form, facing the steps. Mark out the stringer on this wall; measure 1 1/2" over for the risers to come against the plywood, since you will be using 2x ... material for the risers. this way the end of the riser comes against the face of the plywood form. The stringer would attach to the wall form and hold the riser in position, like as in this drawing:

I think what the other website was saying about the 1/4"gap at the bottom is for expansion and contraction. So the new concrete stairs would allow them to expand without buckling the existing sidewalk. This I would also recommend.
Hope this helps,
Dave
Hello Dave
I have a question concerning footings. I noted that in Stairs 7 you did not speak of footings. I planned to use footings in my project because when I tore out the old steps the upper step was broken off the other steps and that step and the upper landing was sinking. Also it seemed that the lower step and their pad had sunk some. There were no footings going down to the frost line. The lower parts of the wall had a lot of trashy fill at the bottom. The pads supporting the lower step and wall were only 8'' deep. I am tearing these out and replacing then with 8' diameter piers going 4 feet down. I planned to put 12' wide footings for the entire length of the walls with piers going up to near the bottom of the top step.
The question is am I over designing the steps? Do I need these footings?
Thanks.
Ron
Hi Ron,
Those concrete steps, In #7, are made differently than your steps. They are designed like a slab on grade, where there is no walls on each side of the steps. The entire stairs is like a footing. I designed the bottom step stronger than the rest to act as a footing, as well.
In your design with the walls on each side of the stairs, these walls should have footings, like a standard house footing - 8" deep x 4" wider on each side of the wall with 3 rows of rebar across the middle of the depth, running the length of the footing. The wall should be tied into this footing. The stairs should have at least one rebar near the nosing and tied into the wall. The stairs should be poured onto a compacted gravel/fill bottom. You could make the bottom step a bit bigger on the bottom to act as a beam/footing between the two walls, poured against compacted fill or gravel. This would prevent the stairs from sliding down the hill. I wouldn't put in any piers. If you live in an area of extreme temperatures, where the frost line is 8' or so, the bottom of the wall footings should extend down to this level. You may want to consider pouring the footings and walls in one pour and the stairs, between them, in another, leaving rebar stubs out to tie onto, later.
Dave
I want my first stair to be even with the current floor. My rise is 19". I don't know how to adjust the calculator to get to floor height. (3 step stringer)
Our stair calculator is set up for the first step coming 1 rise below the upper floor. If you want a drawing of your stringer, you can fool the calculator, a bit. I already entered the 19" total rise, so I know the riser is 6 11/32. Add 6 11/32 to the total rise of 19 = 25 11/32. Enter this amount. You will get a drawing of your stringer. The drawing of the stringer attached to the floor is wrong so disregard that one.
Here is a drawing of your stringer:

I hope this helps,
Dave
Hi Dave!
How's retirement life? Or are you working full time on the website?
I have a question for you.
Hi Ron,
Retirement is good. The last few months, we have spent lots of time on fixing up our house - painting the trim, power washing and pouring our driveway. It really looks good, even the neighbours are saying so! The website is doing well.
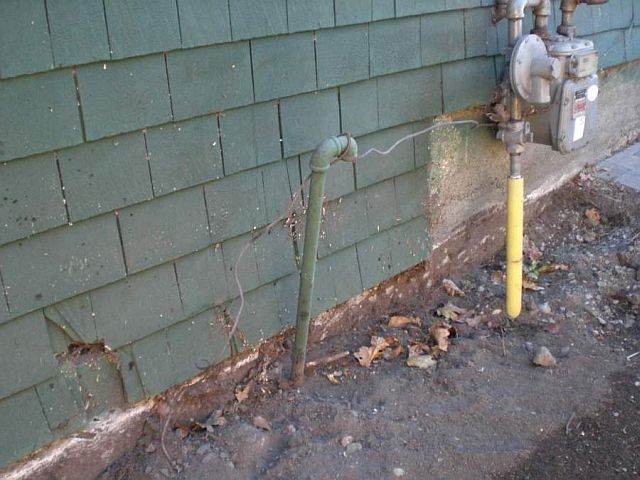
I think that pipe is a vent for a buried oil tank. See how the two elbows are attached to face down to prevent water coming in, this is a good clue.
Those zinc strips are supposed to work, alright.
Well, Ron, good hearing from you. Take care.
Dave
Feature Article of the Month
(taken from our website: DaveOsborne.com
Remodeling 13: Cutting Wide Crown Molding and Cove Molding
When cutting crown molding wider than 3 1/2", we find that when cutting the wide crown molding to length, we have to lay the crown molding face down rather than upright on the turn base of a slide compound saw.
There are two common angles in the wide crown molding and cove molding of today...
I hope you are familiar with inside and outside miter joints. Refer to the previous article Remodeling 12: How to Cut Crown Molding for a picture of these. Also, remember that for every miter joint there are two pieces. We will refer to them as the left and right hand pieces as viewed in relation to the miter joint. Note: This is different than the previous article Remodeling 12: How to Cut Crown Molding where I referred to the left and right hand piece in relation to the wall.
The bevel angle of the saw is the...read more at http://daveosborne.com/dave/articles/how-cut-wide-crown-molding.php
Almost the End
Well, that does it for another month. We hope some of these questions and answers will help you with your own projects. If you need more advice, join our website, then send me an email.
Thanks, Rick for your plan idea of a firewood rack from our previous newsletter. I'll work on it.
Thanks for your emails and support.
Your source for building tips, woodworking & furniture plans, house plans and building advice directly from Dave...
Hi, I'm Dave Osborne. With over 50 years experience as a journeyman carpenter, foreman and contractor in heavy construction I enjoyed working with apprentices and sharing the tricks of the trade that others shared with me. Now I get emails from Members all over the world and we include many of my answers in our Free Monthly Newsletters. Some of my answers include drawings and instructions specific to a project, but may also answer your questions. I use correct construction terminology, so you can confidently inform your building supply dealers or contractors exactly what you need.
ASK DAVE!
The Benefits of Membership
Membership gives you full access to our hundreds of how-to articles, woodworking plans, converters, calculators and tables. Our Stair Calculator is one of the most popular on the internet. We have projects you can build for (and with) your kids, furniture for your wife, and sheds and gazebos. If you run into a problem or need advice your Membership includes unlimited email questions to me through our Ask Dave quick response button.
Join us!
Copyright © 1999-2026 DDFM Enterprises. All Rights Reserved. DDFM ENTERPRISES, DAVE'S SHOP TALK and the Dave Osborne logo are trademarks and service marks owned by DDFM Enterprises. All other trademarks on this site are the property of their respective owners. Site design by Design Strategies, Inc.