Building Confidence
| Volume 10 Issue 12 ISSN 1923-7162 |

Welcome to Dave's Shop Talk's Home Improvement Newsletter of questions from our members on their construction projects, a Tip of the Month and a home remodeling article, both from our website at http://daveosborne.com.
Tip of the Month
To convert millimeters to inches, multiply by .03937. To convert meters to feet, multiply by 3.281. To convert square meters to square feet, multiply by 10.76. Ref: Tables 4: Common Conversions.
And a Bonus Tip:
The height of a 1 1/4" or 1 1/2" bathroom vanity sink drain is centered at 18 1/2" from the finished floor. The supply shutoffs are centered with the sink, 8" apart and 21" from the finished floor with the hot on the left and the cold on the right. Ref: Useful Stuff 1: Simple Steam Box.
Ask Dave!
Hi Dave, I was told by my school mate about putting up the plastic barrier between the crawl space ceiling joists with the black goop and how messy that job is when you're working on your stomach in cramped crawl space. I asked Ross if there was anything newer than this method I used in the 1990's, he said to contact you guys, but I didn't see anything on your web site that addressed this problem?
Jim
Hi Jim,
In crawl spaces we usually put the rigid styrofoam against the concrete. This acts as the vapour barrier, as well.
Between the studs in a crawl space including the cavity of the floor box joist, after insulating with fibreglass insulation, we still apply the black goop, called Acoustical caulking. It is applied with a caulking gun and the 300 ml tubes.
The trick isn't to touch it. Just apply a bead to the perimeter of each joist space and along each stud and plate. This is only done if the wall isn't covered with drywall or paneling. Don't apply too heavy a bead - just enough to seal the poly to the wood as you staple it in place.
Remember that vapour barrier is never installed on the cold side of the floor joists, always on the warm side of the room.
If you choose to insulate the floor, rather than the walls, of a crawl space, don't install any vapour barrier - the floor covering inside is considered the vapour barrier.
Hope this helps,
Dave
I am currently remodeling my bathroom and in the tail end of it. I am attempting to install trim around my bathtub area. before I make my cuts I want to be sure of what I am doing. I think in each corner a 45 degree cut would be what I need to make to match the ends up, is this correct? Also how do I measure my lengths when measuring with these angles (if that makes any sense).
Hi George,
Checkout my article on this: Remodeling 11: How to Cope and Install Crown Molding
Try coping the inside corners, following the instructions in this article. The first piece of molding is cut square into the corner - a snug fit. The second piece, coming into the corner is coped. the outside corners have to be mitered. This means that each side of the molding has the same angle. If the corner comes to a 90 degree angle then each molding is mitered at a 45 degree angle. If the corner is a 45 degree angle then each miter would be 22 1/2. Check with a framing square and see how close the corner comes to a 90. If it is a bit larger, make the miter a bit larger, same thing if it is tighter than a true 90. Remember that the extra angle over or under a 90 is halved, so adjust only slightly over or under a 45.
To measure the outside corner, measure to the outside of the 45 degree angle of the molding. We call it the long angle. When I measure a door casing I measure the short angle and add 3/16", off the floor or 2 times 3/16 = 3/8 for the header.
Hope this helps, or did I confuse you more?
Dave
Hi Dave!
I hope you remember me. I think we last corresponded back in Oct. I was the one with the badly built and narrow staircase.
You helped me get started on a path towards new stairs, and you also gave me an initial plan, with some new winders, and some guide measurements on how to proceed.
Well, I thought it was appropriate at this time to give you an update of my project, along with pics.
Here a series of photos on that. The first one is of the old staircase, which didn't even have proper stringers to support them:

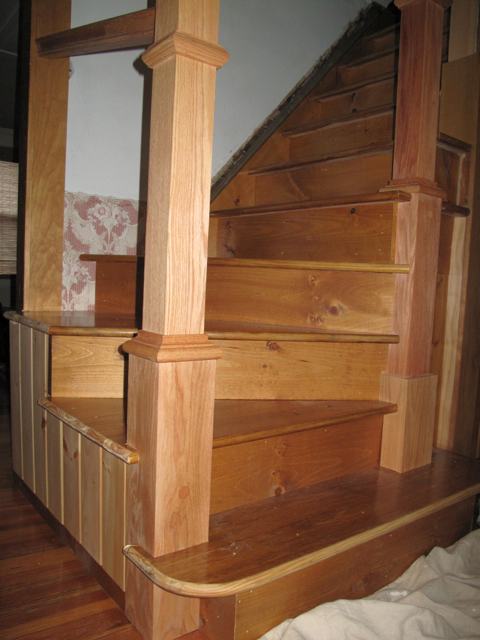
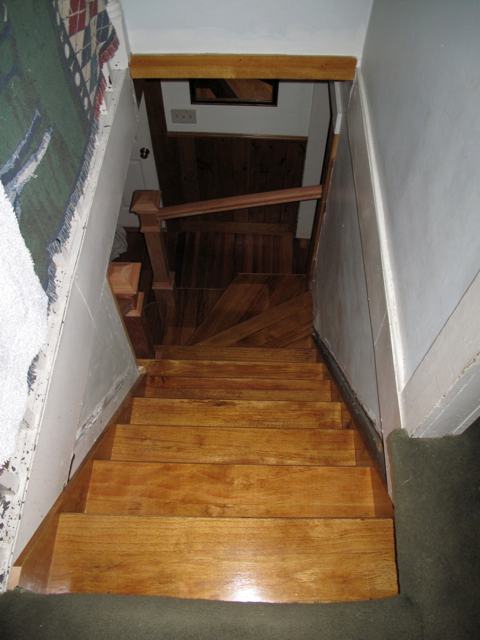

Wow! I am impressed, Andre. Looks like you can run a Sherman tank up those stairs and they won't fall down. Good job. Nice to a have a friend who is a tradesman to help with the layout. As soon as I saw those pics, before reading your comment, I thought, wow, Andre is good!
With the balusters always use glue. Either toenail them in place or use handrail screws, which have small heads, screwed in like toenails from opposite sides. The top of the baluster is cut on the angle and the bottom is cut square to fit on the tread. The trick is to layout the spindles evenly, and to space them out no more than 4" between. I go into this in detail at: Stairs 5: How to Install an Inside Handrail
Thanks for the photos, Andre, appreciate them. I'm glad everything worked out well.
Dave
Thanks Dave!
Yes, getting some solid help was definitely crucial for me, but I did learn a lot along the way, starting with finding your website!
Thanks for that article and additional hints. That's what I was looking for.
Back to work to finish things up. Some staining and sealing with polyurethane, and then mounting the balusters and handrail.
If all goes well I'll be done by Christmas, or at least New Years.
And, speaking of which, my very best to you and family for the Christmas and New Year Holiday season!
Thanks again,
Andre
Thanks, Andre. All the best for you and yours.
Have a good Christmas and great new year.
Dave
Dave:
I have been asked to build a ramp for a car. The car is being built in a large shed. The rise of the door opening is 6 1/2" the car road clearance is 4 1/2" the wheel base of the car 9 1/2 ft. What should the length of the ramp so the car doesn't bottom out when entering and leaving the shed.
Thank You
Ron
Hi Ron,
I laid out your ramp and slab full size and came up with this drawing:

So the ramp length is 7'. Since I don't know how level the bottom of the ramp is on the site, the critical height is the 2" up from level or 4 1/2" below the surface of the slab, 4'-8 1/2" away from the edge of the nose of the garage floor, as shown. This ramp should give the car a clearance of 2"+ over and above the 4 1/2" above the tires of the car. This gives a bit of a margin when the car is loaded more heavily or less air in the tires. If this is a concrete ramp, I would recommend a pea gravel mix of 3/8" aggregate, instead of the usual 3/4 minus. This would facilitate a finer finish at the bottom of the ramp. I would also go with the glass fiber reinforced concrete made up of chopped strands of alkali resistant fiberglass. More at this link: http://www.grca.org.uk/product/default.asp
I used this type of concrete for my new exposed concrete driveway, last year and am very happy with it. They say this fiber reinforcing is as strong as rebar. I'm thinking of particularly for the tapered area at the start of the ramp.
Hope your Christmas was Merry and your new year will be a good one.
Hope this helps,
Dave
Dave:
I hope you don't mind me asking, how did you come up with the numbers? My guess it Geometry formula.
Thanks
Happy 2013
Ron
Hi Ron,
Yes, I tried geometry, at first to get an idea of what I needed. I then drew up a scaled sketch. Then to be accurate I laid out the sketch full size and came up with the drawing I sent you. Here is a better drawing showing the tires and the clearance.

The position of the car with the least clearance to the hump, is shown. As the back tires move up the ramp, the clearance gets greater. I found that you need 2" down the ramp at the halfway point of the wheelbase. I then just extended the ramp line to come up with the 7'. That's why I said to make sure the 2" or 4 1/2" from the slab level is accurate, depending if the area in front of the garage is level or sloped.
Dave
Hi Ron,
Thinking of your ramp - I solicited help from my daughter and her husband. My daughter, Jacqui, is a Math wiz, - tutors Math, etc., but loves practical math challenges. So her and Mario, her husband, got right into this problem. I wanted to know how realistic the numbers were that you gave me. They have a 1965 Mustang with very similar measurements as yours. The Mustang clearance is 5" with a 9' wheelbase. What surprised me is that its bumpers are extended 3' in front of the center of the wheels. Now this may be a problem with your ramp. I went to my full scale layout on my garage floor and found that with a 4 1/2" clearance at 3' in front of the wheelbase your front bumper had only 1 1/2" clearance above the ramp. The rear bumper had no problem clearing the ground as it started up the ramp. Jacqui figured out that if the front bumper was extended out 3' with a 4 1/2" clearance at that point the best length of ramp to give a full 2" of clearance is closer to 8'. So you may want to consider this. There are things we don't know: if the driveway is sloped or level; how far are the bumpers in front of the wheelbase measurement and what is the clearance under them? If you want to verify these measurements, I can ask Jacqui to verify the ramp length for the new data. Also, you may want to consider them buying a new or another car in the future, so they need a longer ramp to accommodate more average vehicles.
Something to consider talking over with your client.
All the best in the new year.
Dave
Dave:
Thank you for taking a second look and also thank your daughter and husband for their help. I will look into the distance of both the rear and front bumper from the front and rear wheels and there clearances.
Wishing you all a Happy, Healthy and Prosperous 2013.
Ron
Okay, thanks Ron.
All the best,
Dave
Note: Thanks to Jacqui (my daughter) and Mario (my son-in-law) for their help with Ron's ramp.
Here was a question on our weekly tip:
"When cutting a machine screw to length, thread on a proper size nut first, cut the screw and back off the nut which cleans the threads in the process."
Dave:
Never thought I could cut a machine screw to length. This tip would have saved me a lot of time and aggravation earlier this week on a light fixture installation.
So what is the best way to cut a machine screw? How do you secure it and what kind of saw or cutting tool?
Thanks,
Trace
Hi Trace,
We had a special tool when we owned a hardware store in which we would screw the machine screw into the appropriate sized hole then close the plier jaws and screw out the shortened machine screw. Now I screw on a nut, put the end I want to cut off in a vise, cut the machine screw off with a hacksaw and screw the nut back off, which cleans it. You also can screw the nut on and cut a small machine screw with a good set of cutting pliers. The pliers really crimp the threads up though. The best way is with a fine blade hack saw. If you don't have a vise, just hold it with pliers on the end that is coming off or get a helper to hold it while you cut it off with the hacksaw.
The trick is putting the nut on first. On a large bolt it is handy to have a bench grinder setup to grind the end of the bolt off smooth.
Dave: Had visualized doing as you suggested - only backwards - with head in vice and screw sticking out - which seemed like trouble. Your way makes much more sense.
Yes, I put the head in the vise, as well, but it moves around too much.
Dave
Feature Article of the Month
(taken from our website: DaveOsborne.com
Cabinets 3: How to Make Cabinet Doors
In this article I will discuss some ways a person having the basic shop tools can build his own kitchen cabinet doors or China cabinet doors or even curio cabinet doors.
To start with, the easiest cabinet doors to make is a slab door made from plywood or MDF with the edges rounded over or profiled and a square pattern routered out in the center. When purchasing the plywood or MDF always buy a sheet that lies flat on the pile. This should give fewer problems with warping.
Similar to this style would be the same plain plywood or MDF with a small molding nailed and glued in the form of a pattern on the face of the door, such as shown on the left. Going a bit further, instead of routering a profile on the edge of the cabinet door, you could apply a small molding on the edge similar to applying square edging or tape. This is particularly useful to hide the grain of plywood. Keep the molding flush with the back of the cabinet door. I used this design with melamine, trimming it with oak molding. MDF, if painted, is an ideal material for cabinet doors since no grain appears on the edges. Be careful to include the thickness of molding in your measurements when cutting the cabinet door to size. The cabinet door should overlap the face frame or gable by about 1/2" to 5/8", depending on the hinges you have chosen.
Tall cabinet doors, as shown in the drawing, should have... Read more at http://daveosborne.com/dave/articles/cabinet-doors.php
Almost the End
Thank you all for your emails and questions, This is a good way for you all to participate in the Newsletter. Hope you had a good Christmas this year and know that Jesus Christ came to this earth not to live, but to die, so that we can live for an eternity with Him, our Heavenly Father and the hosts of Heaven. (We can talk about this, too, if you like.)
If you need advice on your projects at work or home, please become a member of our website, then send me an email. Check out our website! http://daveosborne.com
Your source for building tips, woodworking & furniture plans, house plans and building advice directly from Dave...
Hi, I'm Dave Osborne. With over 50 years experience as a journeyman carpenter, foreman and contractor in heavy construction I enjoyed working with apprentices and sharing the tricks of the trade that others shared with me. Now I get emails from Members all over the world and we include many of my answers in our Free Monthly Newsletters. Some of my answers include drawings and instructions specific to a project, but may also answer your questions. I use correct construction terminology, so you can confidently inform your building supply dealers or contractors exactly what you need.
ASK DAVE!
The Benefits of Membership
Membership gives you full access to our hundreds of how-to articles, woodworking plans, converters, calculators and tables. Our Stair Calculator is one of the most popular on the internet. We have projects you can build for (and with) your kids, furniture for your wife, and sheds and gazebos. If you run into a problem or need advice your Membership includes unlimited email questions to me through our Ask Dave quick response button.
Join us!
Copyright © 1999-2026 DDFM Enterprises. All Rights Reserved. DDFM ENTERPRISES, DAVE'S SHOP TALK and the Dave Osborne logo are trademarks and service marks owned by DDFM Enterprises. All other trademarks on this site are the property of their respective owners. Site design by Design Strategies, Inc.