Building Confidence
| Volume 11 Issue 6 ISSN 1923-7162 |

Welcome to Dave's Shop Talk's Home Improvement Newsletter of questions from our members on their construction projects, a Tip of the Month and a home remodeling article, both from our website at http://daveosborne.com.
Tip of the Month
When cutting Pressure Treated Wood, use the appropriate saw blade listed for use with PTW. When handling PTW wear gloves and wash up before eating. Ref: Deck 4: Deck Stairs.
And a Bonus Tip:
When cutting or ripping wet lumber you need a blade with a wide set or the blade will bind. Ref: Remodeling 17: How to Install a Pocket Door.
Ask Dave!
On an upcoming work and witness trip to Indianapolis, IN, we are to install Fibre cement lap siding over an existing siding (house built in 1922). There is old wood lap siding on the house and covered with a type of flat old shingle looking siding (have seen this on lots of old houses). Time does not permit taking this old stuff off. Any idea how I can easily find the studs for nailing? What do you think the spacing might have been back then? 12" or 16"?
Back then they used shiplap boards for sheeting, so were not that particular with their centers, whatever they were. When I started framing in the 60's, we used 20" centers for walls. With the existing siding, you should have enough thickness for nailing into it, without hitting the studs, especially if there is 3/4" shiplap under that, as well.
Dave
how much of the nosing should hang over the stringer
About 1" maximum.
Dave
hi dave just a suggestion; how about adding to straddle with a handle attached to the jig over the table saw fence
so that the jig rides along the fence & the hands are away from the blade.
Yes, the hands must always be away from the blade. I would suggest maybe not to straddle the fence, since you want pressure on the jig against the fence and down on the table. A handle would work on the fence side and on top of the jig.
How's this?

Dave
Dave.
As long as we're talking decks, I have removed the railings that were troubling me. The had been screwed in and I could not back the screws out. You proposed a common-sense solution: just cut the &^%$(@ screws! Why hadn't I thought of that...too practical I guess. The railings fit tightly against the supporting posts and my mastery of the Saws-All had me worried I would be taking a support along with the screw so I cautiously opted for a hack saw (broke blade) then a hand held band saw - bingo!
No need to reply - I know you've got guys who need your help - and I'll be back in line for assistance soon enough.
Regards,
Trace
Thanks, Trace,
I should add: when cutting between two pieces of wood to cut the screws, place a feather wedge between the pieces to give a bit of clearance so that the blade won't damage the wood. If you are keeping the posts and throwing the cross members away, cut into the cross member rather than cut the post.
Dave
Dave,
I did not know what a feather was in this context. I assumed it was some sort of shim but Googled it out of curiosity. I found an interesting article on stone splitting; nothing on carpentry...but I got the idea.
I have some standard, hardware store grade wooden shims. Are you referring to these as feathers or is there a tool in carpentry known as a feather?
Trace
Hi Trace,
Feather wedges are thin wooden wedges. I have a jig on the website to make them. These are very useful for shimming things up, down or apart:
http://daveosborne.com/dave/articles/thin-feather-wedge-table-saw-jig.php
By the way, we have a search engine on our site, as well, on every page, upper left corner. It searches the newsletters, too.
I saw my father splitting a rock with feathers and wedges, when I was just a little guy. He drilled a series of holes along a line that he wanted the rock to split, using a star drill, hit by a hammer and then put the feathers in the hole then the wedge between them and tapped each wedge, a bit, until the rock cracked. We have come a long way since then with our pneumatic tools, etc.
Dave
Dave:
Always enjoy your weekly hints. On the humidity switch is there one small enough to fit the space of a standard light switch??
Question:
I am installing a PVC bead board ceiling on a shed roof. How do I go about measuring the corner angles for the ceiling molding. They are 90 degree angles but I believe there is a 6/12 roof pitch. I am planning on using inside corner molding.
Thank You
Ron
Hi Ron,
Glad you enjoy the hints. Yes, there is a humidity switch that will fit in the standard size electrical box. This is for turning a fan off and on based on the humidity in the room. These are quite common with the new code requiring humidity control either with a bathroom fan or a heat recovery ventilation system, in new homes.
Checkout my articles on crown molding:
http://daveosborne.com/dave/articles/how-cut-crown-molding.php
When installing a crown molding on a sloped ceiling which comes into a horizontal ceiling line, you need to cut a short transition piece to bridge the two planes. That is, you can't miter these two pieces together, directly, since the slope and the horizontal are two different planes. Here is a picture which helps explains what I'm trying to say:
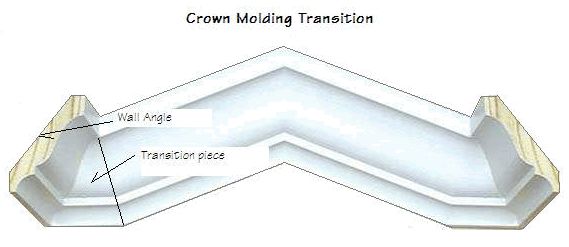
The transition piece changes the plane of the slope to the plane of the horizontal. Once you realize that the transition piece is needed, in this situation, making it is not that difficult. You can spend hours trying to miter these two pieces together without this transition, because it just doesn't work.
Dave
Hi Dave. I am installing eavestrough. I know the slope needs to be 1/4 inch per 10 feet. How do I slope the eavestrough over the front deck, where there are no downspouts? Do I start in the center of the deck and slope down each way? Or do I start at one end and slope down all the way across Distance is 27 feet.
How do I plan the rest of the eavestrough for slope too?
Thanks
Andy
Hi Andy,
We don't usually worry about sloping the large 4" and 5" gutters of today. We keep them roughly level and they drain okay. On that 27 foot front, it wouldn't hurt to keep the center up and drop the ends about 3/8". Anymore will be noticeable. We used to slope the old wooden gutters, but not the aluminum gutters.
Dave
Feature Article of the Month
(taken from our website: DaveOsborne.com
Deck 4: Deck Stairs
 Here is an example of the basic deck stairs off a raised backyard wood deck. Notice that the one piece 4x4 posts holding the deck stairs railing also carry the weight of the stair stringers. When attaching stair stringers to a backyard wood deck with only a 2x6 box joist, there usually is nothing to attach the stair stringers to. Here the stair stringer is bolted to the posts and a ledger board is installed under the stair stringer for those with a longer run. Either pressure treated wood or concrete pads are shown under the posts and bottom stair of the stair stringer, rather than having the stair... Read more at Deck 4: Deck Stairs
Almost the End
Thanks for the questions, this month. I hope my answers help the readers of this Newsletter, as well.
If you need advice on your projects at work or home, please become a member of our website, then send me an email. Check out our website! http://daveosborne.com
Your source for building tips, woodworking & furniture plans, house plans and building advice directly from Dave...
Hi, I'm Dave Osborne. With over 50 years experience as a journeyman carpenter, foreman and contractor in heavy construction I enjoyed working with apprentices and sharing the tricks of the trade that others shared with me. Now I get emails from Members all over the world and we include many of my answers in our Free Monthly Newsletters. Some of my answers include drawings and instructions specific to a project, but may also answer your questions. I use correct construction terminology, so you can confidently inform your building supply dealers or contractors exactly what you need.
ASK DAVE!
The Benefits of Membership
Membership gives you full access to our hundreds of how-to articles, woodworking plans, converters, calculators and tables. Our Stair Calculator is one of the most popular on the internet. We have projects you can build for (and with) your kids, furniture for your wife, and sheds and gazebos. If you run into a problem or need advice your Membership includes unlimited email questions to me through our Ask Dave quick response button.
Join us!
Copyright © 1999-2026 DDFM Enterprises. All Rights Reserved. DDFM ENTERPRISES, DAVE'S SHOP TALK and the Dave Osborne logo are trademarks and service marks owned by DDFM Enterprises. All other trademarks on this site are the property of their respective owners. Site design by Design Strategies, Inc.