Building Confidence
| Volume 11 Issue 7 ISSN 1923-7162 |

Welcome to Dave's Shop Talk's Home Improvement Newsletter of questions from our members on their construction projects, a Tip of the Month and a home remodeling article, both from our website at http://daveosborne.com.
Tip of the Month
For a straight cut, look at the edge of the circular saw blade to see where it is cutting on the line, rather than the guide marking on the front of the base plate. Ref: Deck 5: Deck Stairs with Returns.
And a Bonus Tip:
Before staining or finishing woodwork projects, sand lightly all over. Plywood and solid lumber will come with what is called a mill glaze on it. This should be sanded off or roughed up, with the grain, so that the stain will cover evenly - use a 120 grit sandpaper before you stain. Ref: Remodeling 7: How to Install a Skylight in an Existing Roof.
Ask Dave!
Dave,
I love your site and newsletters and read every word repeatedly to learn new info and techniques. You also answered several of my questions when I replaced the staircase in my home. My current problem is at my daughter's home.
She and her hubby bought a foreclosure and got a really great deal. The windows are all custom sizes (expensive to replace) and several are rotted at the bottom because of a poorly designed landscape irrigation system. Most have some good wood left at the bottom and only one can be probed all the way through. Can I repair the window bottoms in place with an epoxy product, wood filler, or some product you recommend or do we "bite the bullet" and special order ($$$) new windows?
Thanks for all your help. You are a great resource for "jack-legged" woodworkers like me!
Larry
Hi Larry,
I see from our records that you were with us for 2 years, thanks.
I would try to repair the window bottoms, if they are not too bad. Try to get all the rotted wood out, which is like a cancer and especially any bugs in there. I would try to repair the damage with a new piece of wood, if the damage is large, Otherwise, use a good epoxy body filler for cars for smaller repairs. I like the epoxy putty or filler that they have out now. I've used these quite a bit for repairing fiberglass, steel and wood. Just mix equal amounts and apply it to the surface, let it dry and sand it like wood. I would not replace those expensive windows, if you can make a decent repair on the sill or stoop. Don't use the plastic wood products, though, go with the two part epoxy.
Dave
Hi Dave:
I have two metal doors that need to be painted. What type of paint do you recommend for these doors and do I use the same paint on the interior?
Thank You
Ron
Hi Ron,
I would use a good oil base (alkyd) exterior paint. Exterior paint has properties in it different than interior paint, slower drying and UV protection, for a couple. If you notice dings on the doors, now is a good time to fix them. Use an auto body 2 part epoxy filler; sand before application and then after. Use a fine, wet and dry sandpaper and remove any loose paint and any gloss.
On the interior, try to use the latex (water based) or acrylic latex paints. Do your preparation work first, sanding to remove any gloss, filling, sanding again (maybe 3 times, if the repair is thick) before applying paint.
Dave
Dave, I have seen articles on the do's and don'ts of having lights above a bath, i.e. a chandelier hanging over a garden tub. some of the articles say don't do it unless it's waterproof, and using GFCI. we just bought a house and are looking to makes some updates to the bath. It has a garden tub and we'd love a light or chandelier above it, but want to be safe and smart in the process. your thoughts?
You had me going on this one, as well. I know that a light switch must be 1 meter away from the inside of the tub.
I did a bit of checking and the National Electrical Code (NEC) states that no hanging fixtures should be in the "wet zone", which is 3' horizontally and 8' vertically from the rim of the tub. So I would say no hanging fans or light fixtures above the tub, unless you have a 10' ceiling. Now there are approved fixtures for above a shower - a waterproof, glass enclosed, properly grounded fixture. This would be okay above a bathtub.
You may want to ask your electrical inspector to be sure. Apparently, not all the States have accepted the NEC, so be sure to check out your options, locally.
Dave
Hi Dave,
While I'm vaguely familiar with the concept of venting toilets and other DWV piping, the term mechanical vents is unfamiliar to me. I checked Dave's Dictionary...no luck. I Googled it and came up with several medical (breathing) applications. So, what exactly is a mechanical vent in this context?
Thanks,
Trace
(Trace is referring to our weekly tip: "When retro fitting a plumbing fixture that requires its own vent, use a mechanical vent.")
Hi Trace,
This refers to a small check valve type of vent that opens only one way, when it senses pressure from a drain. It won't over flow, just provide venting so that the p-trap will not siphon out.
Here is a picture of one:
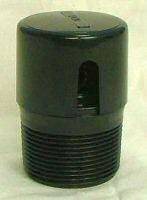
It screws into a 1 1/2" ABS female adapter, has a small spring in it. It is allowed by the code under certain conditions:
Section 2.5.9 of the National Plumbing Code of Canada covers this.
2.5.9. Air Admittance Valves
(See A-2.2.10.16.(1) in Appendix A.)
2.5.9.1. Air Admittance Valve as a Vent Terminal
1) Individual vents may terminate with a connection to an air admittance valve as provided in Articles 2.5.9.2. and 2.5.9.3. (See also Sentence 2.2.10.16.(1).)
2.5.9.2. Air Admittance Valves
1) Air admittance valves shall only be used to vent
a)fixtures located in island counters,
b)fixtures that may be affected by frost closure of the vent due to local climatic conditions,
c)fixtures in one- and two-family dwellings undergoing renovation, or
d)installations where connection to a vent may not be practical.
2) Air admittance valves shall be located
a)not less than 100 mm (4") above the horizontal branch drain or fixture drain being vented,
b)within the maximum developed length permitted for the vent, and
c)not less than 150 mm (6") above insulation materials.
2.5.9.3. Installation Conditions
1) Air admittance valves shall not be installed in supply or return air plenums, or in locations where they may be exposed to freezing temperatures.
2) Air admittance valves shall be installed in accordance with the manufacturer`s installation instructions.
3) Air admittance valves shall be rated for the size of vent pipe to which they are connected.
4) Installed air admittance valves shall be
a)accessible, and
b)located in a space that allows air to enter the valve.
5) Every drainage system shall have one vent that terminates to the outdoors in conformance with Sentence 2.5.6.2.(1).
Since the Canadian Code has this provision, it doesn't mean that Codes elsewhere are the same. Your local jurisdiction is what counts when codes are involved.
Notice that the code refers to these as air admittance valves, other names are auto vents, mechanical plumbing vents, etc.
Dave
Thanks, Dave.- now I've got the picture. I'm in the plumbing business but on the commercial / mechanical side and had not run into this - though I'm familiar with various bronze and iron check valves for water, glycol, steam. etc.
Trace
I can understand that, since it is only for residential use, not in commercial installations.
Dave
A question on our website stair calculator:
It wont let me use the NY codes to build a steeper staircase. This is for a garage attic space and I need it to be steeper than a stair case but not like a ladder. Is there any way to use more than an 8.25 rise?
Yes, make sure you uncheck the box - "Enforce Building Code Standards". Also, checkout our article on an alternate tread stair - half ladder, half stairs: http://daveosborne.com/dave/articles/lapeyre-stairs.php
Hope this helps. If not please send me the total rise and available run and stair thickness and I'll give it a try for you.
Dave
Feature Article of the Month
(taken from our website: DaveOsborne.com
Deck 5: Deck Stairs with Returns
The construction of the deck stairs as shown in the above Floor Plan is a very complicated build, which incorporates the fundamentals of stair building combined with that of roof construction. If this is your first time in making stairs, refer to the How to Build Stairs articles on the web site. Also, details are given in How to Build a House 2: The Foundation.
I will compare the support of the miter of the steps with a hip rafter in a roof and the supports for the steps between the handrails with common rafters. Notice that the steps are 7' in both directions to produce a 45 degree angle with the deck line.
The height of the deck off the ground is 67", in our example; you can vary yours accordingly. The main thing I would like to accomplish here is to clarify... Read more at Deck 5: Deck Stairs with Returns
Almost the End
Thanks for the questions, this month. I hope my answers help the readers of this Newsletter, as well.
If you need advice on your projects at work or home, please become a member of our website, then send me an email. Check out our website! http://daveosborne.com
Your source for building tips, woodworking & furniture plans, house plans and building advice directly from Dave...
Hi, I'm Dave Osborne. With over 50 years experience as a journeyman carpenter, foreman and contractor in heavy construction I enjoyed working with apprentices and sharing the tricks of the trade that others shared with me. Now I get emails from Members all over the world and we include many of my answers in our Free Monthly Newsletters. Some of my answers include drawings and instructions specific to a project, but may also answer your questions. I use correct construction terminology, so you can confidently inform your building supply dealers or contractors exactly what you need.
ASK DAVE!
The Benefits of Membership
Membership gives you full access to our hundreds of how-to articles, woodworking plans, converters, calculators and tables. Our Stair Calculator is one of the most popular on the internet. We have projects you can build for (and with) your kids, furniture for your wife, and sheds and gazebos. If you run into a problem or need advice your Membership includes unlimited email questions to me through our Ask Dave quick response button.
Join us!
Copyright © 1999-2026 DDFM Enterprises. All Rights Reserved. DDFM ENTERPRISES, DAVE'S SHOP TALK and the Dave Osborne logo are trademarks and service marks owned by DDFM Enterprises. All other trademarks on this site are the property of their respective owners. Site design by Design Strategies, Inc.