Building Confidence
| Volume 12 Issue 5 ISSN 1923-7162 |

Welcome to Dave's Shop Talk's Home Improvement Newsletter of questions from our members on their construction projects, a Tip of the Month and a home remodeling article, both from our website at http://daveosborne.com.
What's New
Our Contest Winner this Month is Ross Ferguson, who received a free subscription to DaveOsborne.com. Congratulations, Ross!
For details of how to participate in our contest and help us to increase interest in our site, please visit our contest page at: http://daveosborne.com/dave/articles/contest.php.
Thanks for your participation!
Tip of the Month
Keep soil at least 6" below the bottom of wood siding or any wood on a house. Ref: Tables 12: Construction Estimating Checklist.
And a Bonus Tip:
To save time in cutting all the studs for a home renovation, you can purchase pre-cut studs for an 8' or 9' ceiling. Ref: How to Build a House 4: Install Aluminum or Vinyl Soffits.
Ask Dave!
Stair riser Calculator does not seem to figure in the thickness of the riser material.
I'm using 1 1/2" material for the tread with carpet and 3/4" material for the riser.
Only put in the thickness of the tread, not the riser. If the carpet is going on the floor as well as the treads, don't include that thickness either. The purpose for putting in the tread thickness is to know how much to cut off the bottom of the stringer and then to drop the stringer down that amount, as well, from the top floor. So if the finish on the stairs is the same as the top and bottom floors, this will make each riser work out to be the same height, which is what you want.
If you have any more questions or don't understand this, please continue to ask questions, until you are satisfied. A drawing or photo may also help me to understand better what you are having difficulty with.
Dave
Hi Dave
Hope all is going well and it's getting warm in Canada. It was is the low 80's in Plymouth MA today.
I want to secure a Grab Bar in a fiberglass tub enclosure. My plan was to open up other side of the wall, removing the sheet rock and install wood blocking between the 2 x 4 wall studs. Is there a secure way to attach the bar to the fiberglass only? I believe I have see fasteners but I am not sure what they are called and where to source them.
Thanks
Ron
Hi Ron,
It is getting warmer, here on the coast, 23 C (73 F) which is not bad for this time of year, way above normal which is 16 C (61 F).
Your plan is a good one. I would not trust anchors in the fibreglass. I was lucky when I installed a grab bar to my elderly Aunt's shower - I found a stud right there.
Usually a tub is away from the stud wall, so you may need backing on the face of the studs. I would go through the wall on the opposite side, as well and have a look. I would start with a 2x4 on the flat between the studs, horizontally. Just put it in place, but don't fasten it in yet.Place one at each end of the bar whether it is horizontal, vertical or on the angle. If the fibreglass is away from the wall, put in a piece of wood as a filler between the fibreglass and the 2x4. Remove the filler and the 2x4 and screw the filler onto the face of the 2x4. Fasten the 2x4 in position, between the studs, backed up to the fibreglass of the tub. Then screw the 2x4 to the studs either from the opposite side of the studs or toe-screw into the stud from the 2x4, just be careful not to go into the tub. The bars are then screwed through the tub into the filler and the 2x4 with heavy wood screws which need to be pre-drilled.
Hope this helps,
Dave
As you can see from the photo, a number of years ago I bumped out part of my house.
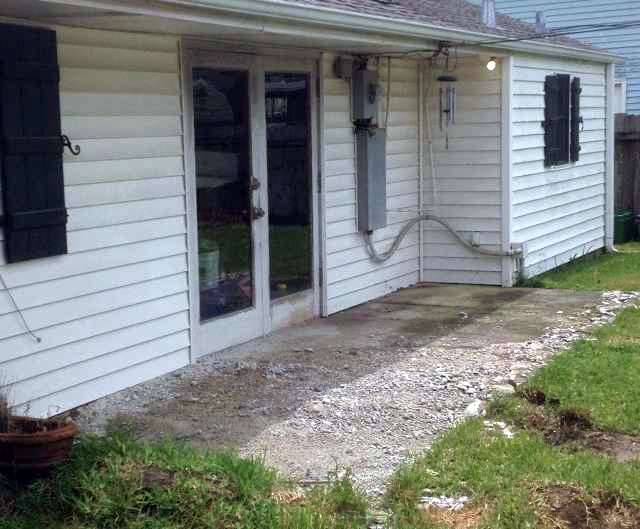 The problem is I don't have 8' ceilings in that room. I'm getting ready to bump out the rest of the house. The addition will extend out to the edge of the new slab after I get the old one out. So wanting 8' ceilings this time I know I am going to have to change/add to the roof. I will be moving the electrical service. Any suggestions when it comes to the roof? Love your web site!!!
Thanks
Tristan
The problem is I don't have 8' ceilings in that room. I'm getting ready to bump out the rest of the house. The addition will extend out to the edge of the new slab after I get the old one out. So wanting 8' ceilings this time I know I am going to have to change/add to the roof. I will be moving the electrical service. Any suggestions when it comes to the roof? Love your web site!!!
Thanks
Tristan
Hi Tristan,
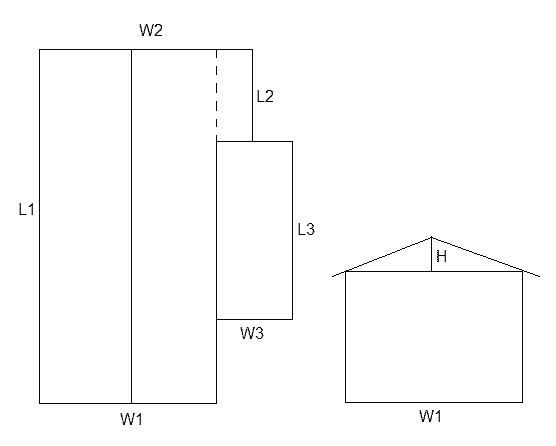
Yes, I have a couple of suggestions for the roof, depending on the length of the addition. If you could give me the measurements of the existing house and the addition, the outside widths (W) and lengths, (L) I can draw up a roof plan for you. I need the height (H) of the roof. I also need to know where you live so I can make sure the roof will support your local wind/snow load, if any.
Here is a drawing to help you get the correct measurements:
Glad you like our website!
Dave
 I'm going to pour a slab from A to B.(B is the edge of house) Slabs will measure 7' x 36'. If for some reason it has to be a little more, thats fine.
Thanks
Tristan
I'm going to pour a slab from A to B.(B is the edge of house) Slabs will measure 7' x 36'. If for some reason it has to be a little more, thats fine.
Thanks
Tristan
Here is a drawing showing what the new roof will look like:

Dave
From Sabrina, my eldest daughter:
Is the white stair skirting installed *before* the floor covering (laminate flooring, in our case)?

Yes, it usually is installed before the stringers are installed. If installed later each tread/riser has to be cut out/scribed, a bit of a trick!
Hope this helps,
Dad
Thanks, Dad. I'll tell Curtis. (He sent this from my account.) We like the look of the skirting and it seems that all the pictures I look at of wood (laminate) stairs, have the skirting. I want to paint the risers white & have the treads be laminate--I like that look, but wonder if it would look weird without the skirting. What do you think?
Thanks!
Love,
Sabrina
The skirt definitely dresses it up, alright. We don't have a skirt on our stairs here and I think it looks okay.
Love,
Dad
Didn't realize that you don't have a skirt. Your stairs are gorgeous! Yours are different from ours--in more than one way, obviously--in that yours are mostly open on both sides where ours have a wall on one side. Do you think that wall would look funny with the newly laminated & painted stairs abutting it directly? I have a hard time picturing things like this in my mind. I should try to find some pictures of stairs without the skirting to compare.
Sabrina
Just found this! It does look ok without the skirting, but the skirting is nice. At least if we want to do it later we can, and if we like how it looks without it, then we'll just leave it. Is this how you would do it too, Dad? Seems to make sense to me, but anything involving accurate measuring is scary to me!
Love,
Sabrina
Yes, this will work. I would scribe the skirt before you put on the treads. This way any gaps will be covered with the treads. The skirt has a function, other than aesthetics, here. The laminate flooring is never cut to fit tightly between walls, there needs to be a gap for expansion and contraction, not so critical when one side is open. Similar to the baseboard the skirt will cover this expansion gap.
Love,
Dad
This is so goooooood!!! [a really nice tribute to mothers]
http://m.youtube.com/watch?v=HB3xM93rXbY
Love,
Sabrina
Made me cry!!
Thanks,
Love,
Dad
Thanks, Sabrina, for your question and the Mom appreciation video. Just to make it clear, Sabrina does phone me and talk once in a while. We don't just send each other emails. Actually, if a father can boast, a bit, Sabrina home schools her 3 kids. Her eldest boy has already graduated from High School and number two son is graduating on the Father's Day weekend, this June. We will be taking the ferry ride from our Vancouver Island home to the BC mainland to share in the celebration, along with our other 2 daughters and grandkids. I hope they remember it is Father's Day! Oh, can't forget I need to take a few tools to replace a broken window in number 3 daughter's home. I think somebody should do a YouTube video on Father's Jobs, right guys? No, we love our Mothers dearly.
Hi Dave!
Hope all is well with you and yours! We have been working our fannies off around here, trying to get to the point where we can take off in the camper for a week or two. Looks like we on the road soon, hopefully :)
Have a quick question about the pad outside the side garage door. Currently there is no pad. If you will remember, we were going to put a cover over the side garage door and you helped me with a drawing of the cover. Here's a question about the pad. I wanted to put a pad approx 4' X 12'. We will have powder coated steel "wrought iron look" corners made as roof supports.
Here's the question:
I have read that sand mix can be used instead of using concrete. It's much easier to mix than concrete!
The pad will be 4" - 6" thick and I will be putting down black slate tiles to match the front porch. What do you think of sand mix? I could reinforce it with hardware cloth or ?? If sand mix is OK, do I need to reinforce it? Frost heave is 4".
This door has very little traffic. I have had zero problems with the front porch because I seal it twice a year, once in the spring and again in the fall. It repels water like crazy, which is awesome. So I would expect no problems from the side door pad in that regard.
Comments, suggestions?
Thanks Dave :)
Hi Pat,
Usually, a sand mix is for a topping over existing concrete and is about 2" thick. You need more cement, as well, about 11 bags per cubic yard compared to about 6 for concrete with aggregate. For your size of pad, you need about a yard of aggregate. You should be able to buy navvy jack, a pre-mixed aggregate for concrete, so you just add water and cement. For that big a pour, I would rent a concrete mixer, rather than hand mix it in a wheelbarrow. For a 4" to 6" slab you could use 6"x6" steel mesh as reinforcement, hardware cloth isn't heavy enough and it is galvanized, bare steel is better. The mesh goes in the center of the slab.
Enjoy your camping,
Dave
Dave
What adhesive would you recommend to adhere galvanized aluminum to a wooden exterior door? I was thinking of a two part epoxy. If you have a brand name in mind please send it along.
Thank You
Ron
Hi Ron,
I would recommend the PC products - PC 7 is a good all purpose 2 part epoxy. PC 11 is more for boats and marine environments.
Here is their website: http://www.pcepoxy.com/our-products/paste-epoxies/pc-7.php
Dave
Remodeling with Limited Staircase Run
Hello Dave, The total rise of our staircase is 106" and total run is 113 1/2". The staircase is open on the left and closed on the right with a total width of 36" (from stringer to stringer). According to the online stair calculator, I would need a total run of 140" but cannot go past 113". Can you please help me figure out the calculations for the risers and treads?
Hi,
Here are some new numbers for you. The minimum run where I live is 8 1/4", the International code is 9". So checkout the minimum run for your area.
Stair Measurements from Dave's Easy Stair Calculator at DaveOsborne.com
Total Rise entered: 106 inches
Floor Thickness: not entered
Number of rises: 14 rises Number of runs: 13 runs
Height of each rise: 7 9/16 inches Length of each run: 8 3/4 inches
Total Run: 113 3/4 inches (9'-5 3/4")
Length of board needed for the stringer: 14 feet
Length of opening in upper floor: needs Floor Thickness
Tape measurements (in inches) for the stringer: 6 5/8; 18 3/16; 29 3/4; 41 11/32; 52 29/32; 64 15/32; 76 1/32; 87 5/8; 99 3/16; 110 3/4; 122 5/16; 133 29/32; 145 15/32.
If you plug in the total rise of 106 and force the rise to be 7.6 and the run to be 8.75. You will get the same print out as I did, including a drawing of the stringer.
I allowed 1" thickness of treads so yours actually may be different.
Let me know how you make out. To give the treads a wider depth, add a 3/4" nosing to them.
Dave
Feature Article of the Month
(taken from our website: DaveOsborne.com
How to Build a House 1: House Lot and House Plans
How to Build a House, First Step: Find Your Lot
The house lot and house plan is like a horse and carriage, you need both parts for it to work properly and one comes before the other. It would be silly to have the carriage pulling the horse. Just as it would be to buy a set of house plans for your new dream home before buying a lot. As some houses are suited for a level lot others are suited for a steep lot. Which way is the view, toward the front or back of the lot? Is the house layout compatible with the lot layout? Are the windows looking out in the direction of the view?
You and your spouse have finally come to the conclusion you want to build your own house. This may include physically driving every nail or acting as the General Contractor and hiring sub-trades to do the work. First thing to do is go and look around for a nice house lot. Consider the area in which you want to purchase, the price of a lot or acreage and the amount of view or privacy provided.
Finally the day has come to walk the lot you have chosen. Now you can research the type of... Read more at How to Build a House 1: House Lot and House Plans
Almost the End
Our Feature Article of the Month, starts with this issue on a Five Part Series on How to Build a House. Hope you checkout our site for this and other How to Do It articles.
Thanks for your emails this month.
If you need advice on your projects at work or home, please become a member of our website, then send me an email. Check out our website! http://daveosborne.com
Help us BUILD CONFIDENCE. Tell your friends and family about our site!
Your source for building tips, woodworking & furniture plans, house plans and building advice directly from Dave...
Hi, I'm Dave Osborne. With over 50 years experience as a journeyman carpenter, foreman and contractor in heavy construction I enjoyed working with apprentices and sharing the tricks of the trade that others shared with me. Now I get emails from Members all over the world and we include many of my answers in our Free Monthly Newsletters. Some of my answers include drawings and instructions specific to a project, but may also answer your questions. I use correct construction terminology, so you can confidently inform your building supply dealers or contractors exactly what you need.
ASK DAVE!
The Benefits of Membership
Membership gives you full access to our hundreds of how-to articles, woodworking plans, converters, calculators and tables. Our Stair Calculator is one of the most popular on the internet. We have projects you can build for (and with) your kids, furniture for your wife, and sheds and gazebos. If you run into a problem or need advice your Membership includes unlimited email questions to me through our Ask Dave quick response button.
Join us!
Copyright © 1999-2026 DDFM Enterprises. All Rights Reserved. DDFM ENTERPRISES, DAVE'S SHOP TALK and the Dave Osborne logo are trademarks and service marks owned by DDFM Enterprises. All other trademarks on this site are the property of their respective owners. Site design by Design Strategies, Inc.