Building Confidence
| Volume 14 Issue 1 ISSN 1923-7162 |

Welcome to Dave's Shop Talk's Home Improvement Newsletter of questions from our members on their construction projects, a Tip of the Month and a home remodeling article, both from our website at http://daveosborne.com.
Tip of the Month
When installing a tall, narrow book shelf, make sure you secure the top to the wall to prevent the whole thing from falling over.
And a Bonus Tip:
Always put the crown of a board up when installing rafters, joists and beams.
Ask Dave!
Dave enjoy your shop talk, learn new things from it. Question: cracks in old drywall best way to repair it?
Thank you Roger
Depending where the crack is use either drywall mud or latex paintable caulking. In an inside corner, the caulking works well.
Dave
As i progress in completing my porch i've got some safety concerns about my roof framing.
As a starting point, was planning on anchoring posts with 8" carriage bolts to rim joist. The posts rest on ' rat sill' that's anchored to top of cinder blocks.
Porch dimensions: 8'x16' with steps projecting approx. 4' additional.
Figured on using a beam (doubled 2x8, 10's or 12's [whatever you suggest]) anchored inside of exterior wall. Was planning on notching posts so at least one of the doubled 2 by material of beam will rest on posts. Will also use carriage bolts @ this location. I want my roof to cover & protect stairs from elements I was wondering about best way to go about the next steps? Should beam be cantilevered past the porch for roof framing to rest on or can the framing be structured to float out there approx. 4'? Also should this beam be 'tied' together across the front of porch? Did not want any sag over that 16' span. Planned roofing materials: asphalt shingles. Planned roof framing: 2x6's with 5/8 th's plywood decking.
Perhaps you may suggest a better & possibly lighter, stronger, better approach to what i'm undertaking?
Thanks in advance for your help.
Hi Walter,
Thanks for the pic. Are you planning a gable roof under the existing roof or tied into it to extend it or lean to against the gable end of the house?
Rather than notching the post for the beam, you can place both laminations of the beam on the post and fasten a scab over the post and beam which ties it together. This is shown in the gazebo plans on our site, as well in article on decks.
I'm still away from home, so I don't have access to my beam span tables. You may need a triple beam for your snow load.
I would need the area you live in for the span of beams for the wind and snow loads. I have a table for those, as well, for the US, if you don't know your specific loads.
Dave
From Walter. Thanks for your response. I am building a gable roof with 5:12 pitch, same as house.
We live in the state of Mississippi, regarding beam size.
Hi Walter,
Sorry for the delay in getting back to you. I'm back home now.
Since you are going with a gable roof, under the existing house roof, the span you are worried about is the 8' span from each side of the porch. For this beam or lintel you need a minimum of a double 2x8, #2 or better spruce, pine or fir. This beam should be attached well to the house with a double joist hanger and supported by a cripple or jack stud of 2x4 fastened to the wall, providing 1 1/2" of bearing surface for the beam to sit on. This info that I'm giving you is based on 21 lbs/sq. ft. snow load and an overhang of up to 2'. Mississippi has a max of 10 lbs/sq. ft. and minimum of 0, depending where in the state you live.
The rafters should be 2x6 on 24" centers nailed to a 2x8 ridge board; ceiling joists should be 2x8 at 24" centers. The ceiling joists are nailed to each rafter and to the beam according to this nailing table: http://daveosborne.com/dave/articles/nail-table.php
You can cantilever the 2x8 beam out over the 6x6 post up to 4'. Fasten a 2x6 scab over the post and beam. I would add additional support with a brace off the post to the underside of the beam. This could be made of a double 2x6. See drawing, below.
Sheeting for the roof can be 1/2" OSB with the rafters at up to 24" on center.

Hope this helps,
Dave
Excellent, well worth the wait.
Across the front of porch, don't beams have to be 'tied' to each other with 16' beam? If so, at what location please or is the ceiling joists enough?
Thank you.
Yes, the ceiling joist ties the front. Also the gable end sheeting and wall helps. You don't need a beam at the front since there is no load there, the rafters span over the front.
Dave
Good.
I think this might be last question concerning roof framing.
Is a 'stiff back' required for ceiling joists to avoid a sag over that 16' & if it is required should it be 'tied' up to ridge board as there is no front beam?
Hi Walter,
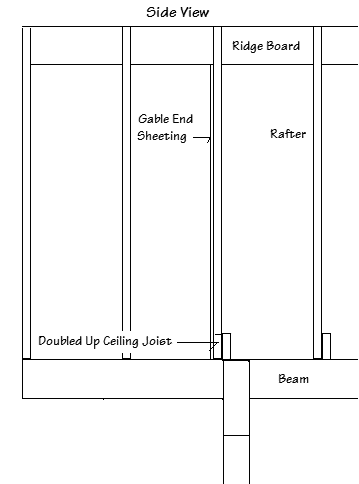
Yes, the ridge is supported by a post down to the top of the ceiling joist which is doubled up, under the rafter. The whole gable end is like a truss with the sheeting coming down, over the rafter and over the joist. Vertical studs at 24" centers are installed for the sheeting support. Use 1/2" OSB or plywood for this sheeting, same as the roof sheeting. Nail the doubled up joist and sheeting well on the rafter and the joist.
Here are 2 drawings, not to scale:

Dave
Dave, hello. Was having difficulty making the stringer calculator work for me...totally my fault. I am building stringers for my basement. Both are finished floors I am using a 1" plywood covering for both riser and run. Total rise is 102 1/4" Total run is 117" Can you assist please, and thank You
Neil
Hi Neil,
Yes.
Plug into the calculator:
Total rise = 102.25
Customize Rise = 7.75
Run = 9.75
Tread Thickness = 1 inch ply...
Click Calculate
This should give you a rise of 7 7/8, run of 9 3/4 with 13 rises and 12 runs.
Click Print Results and get the results and 2 drawings.
To find the run, I entered the total rise and clicked on the 7 5/8" rise and 10 1/2" run (for house). This calculated the rise and run with 12 runs at 10 1/2, which was too much for your space. I then divided the total run of 117 needed by 12 = 9.75 which I entered under the custom run.
Hope this helps,
Dave
Hi,
Regarding the inside measurement question from Trace ... I've invested in a laser distance measurer for our housebuilding project, and it's made life much easier. You just put the back of it against one wall, press a button to shine a laser point on the opposite wall, and hit the button again to see the distance on the display. Loads of manufacturers out there. I went for the top-of-the range Bosch: https://www.boschtools.com/us/en/boschtools-ocs/laser-measuring-glm-80-0601072310--34662-p/ which is quite pricey, but they start at about $30.
Regards,
Steve
Thanks, Steve,
I'll mention your feedback in our next newsletter. They want $300 for that GML 100 model, here! It measures up to 335' with an accuracy of 1/16" which is pretty good.
Thanks,
Dave
Hi Dave,
There are loads of much cheaper models. Bosch do one at $50:
http://www.amazon.ca/Bosch-GLM-15-Compact-Measure/dp/B00LGANH8K/ref=pd_cp_60_1?ie=UTF8&refRID=1VBQAPSFR5W8JH8WGRT9
Might be worth mentioning both of these two, as being the opposite ends of the Bosch range. Stanley and various other manufacturers also produce them -- a quick Google for "laser measure" pulls up loads of information.
All the best,
Steve
Thanks, Steve.
Dave
Steve is one of our members in France!
Hi Dave! With your help several years ago I built a pool house in my backyard that still gets rave reviews to this day (I noticed you still have a picture of it on your site - thank you!). I have been commissioned by a neighbor to replace their rotting cedar deck and they would like to use redwood for everything but the supports underneath (pressure treated of course). I was wanting to know if there are any specific concerns with using redwood for a backyard deck? There will be the usual lawn furniture, BBQ and a few potted plants sitting on the deck so I informed them that they would need to pressure wash it on occasion as these items will leave dark marks around these things from the rain over time. Also, I noticed underneath they have cement piers sitting on the ground to hold up the support legs. I told them that a better idea would be to dig 3' down and put in proper footings, but they are fairly adamant that the cement piers can sit right on the ground (even when I showed them that one had sunk and another was at a 45 degree angle!). My thinking here is that maybe if I showed them a word from you about proper footings they would acquiesce. I live in Southern Kansas where we have fairly mild winters and very little snow. Oh, the only other concern I can think of is that the porch is in the shade pretty much all day long. That's about it. Just a basic square porch with railings and two steps. Redwood and cement piers are the two concerns. Thanks Dave!
I don't have any problem with the redwood. It should be treated with stain or clear finish. People also let it go gray over time. With power washing, it comes back up quite nicely. I looked at some stats for Kansas - Frost penetration in Kansas is 32" and Wichita is 38". Yes, the bottom of the concrete footings should, at least, be at these depths. When placed on the soil, above the frost depth, when the frost comes out of the ground, in the Spring, it raises and softens the the soil.
Dave
Thank you Dave. This should be a straight forward project, but I won't hesitate to ask more questions if need be.
Marc
Okay, Marc, I'll be here!
Dave
Hi Dave, In researching the materials needed for the redwood deck I will be building, I have come across the term 'bugle head screw'. I'm not familiar with it and the only information I can find on the Internet says it is in reference to the head of the screw. Does this take the place of the old familiar term phillips head? And is this a type of screw I should use on my deck project? I'm planning on using stainless steel screws.
Hi Marc,
This is referred to as a drywall screw with a thin, flat Phillips head shaped like a bugle. I like drywall screws for inside purposes only. Use deck screws which are plated or coated for pressure treated wood, or the ultimate best is stainless steel - all flat heads to be countersunk.
Dave
Hi, Dave.
While installing some tongue-and-groove paneling, I figured out something that I'm sure you know, and would make a handy "tip" for others: When installing electrical work boxes, use "old work" boxes, even in new construction. With "old work" boxes, you don't have to worry about fitting the tongue-and-groove panel around a box that's already attached to a stud. Also, you can cut the hole for the work box in the middle of the panel, so you never have a work box hole that spans the tongue-and-groove joint. In addition to making the construction easier, this ensures that your cover plate will sit on a flat surface (without a groove running through it).
Brian
Thanks, Brian. This is a good tip.
Are the "old work" boxes that you are referring to, the retro boxes that clamp onto the drywall or paneling?
Here is a pic taken from: https://www.lowes.ca/electrical-box/iberville-rework-device-box-with-nmd90-cable-clamps_g1440508.html

Product Description
Rework Device Box with NMD90 Cable Clamps
To install a device into an existing wall:
Cut drywall according to shape of box
With brackets tightening the box against the wall
Tighten adjustable screws to fix the box into position
Pivoting ends for rework installation
Application: Old work
Box Type: Wall
Construction Type: Welded
Cover Included: No
Knockout Options: Bottom knockout (1) and ends pryouts (4)
Low Voltage: No
Number of Gangs: 1
Materials: Metal
Listing: CSA America
Dimensions & Weights
Box Depth: 2 1/2 inches
Box Height: 4.6 inches
Box Width: 2.18 inches
Box Dimensions: 2 1/2 inches x 2.18 inches x 4.6 inches
Ship Weight: 0.6lbs
Yes, I have used these many times myself. A bit more expensive than the regular, nail-on boxes, put great when you need a switch or duplex receptacle in a finished wall, or exactly in the middle of a t & g panel.
Thanks, Dave
Dave --
The workbox in your email would work fine. The ones I used are these: http://www.homedepot.com/p/Carlon-1-Gang-14-cu-in-Old-Work-Box-B114RB/100404027 -- you turn the screws on the front, and the 2 "wings" on the backside swing out; as you tighten the screws, the "wings" clamp against the board (or drywall) from the back.
I wish I'd figured this out before I was 2/3 done with my project. It would have saved me a good deal of effort.
Brian
Thanks for this Brian. I was not aware of this plastic box - way better price, too! Thanks again,
Dave
Feature Article of the Month
(taken from our website: DaveOsborne.com
Remodeling 4: How to Frame a Wall
How to frame a house wall is not that complicated, if one learns a few basic home improvement principles of house framing.
The two main components making up a house wall consist of the vertical pieces called the studs and the horizontal pieces called the plates. For a standard ceiling height of 8', the studs are cut 92 1/4", with a bottom, top and double plate that totals 4 1/2", giving a total height of 96 3/4". The extra 3/4" allows for the ceiling finish, with a bit of room. Studs are usually placed on 16" centers for a bearing wall supporting a floor, ceiling and roof and 24" centers for a ceiling and roof only. To save time in cutting all the studs a home improvement person can purchase pre-cut studs for an 8' or 9' ceiling. Studs come in solid wood or are made up of short stock, which is finger jointed together using a mechanical process of glue and pressure. These, however, cannot be used for plates since they lose their strength when not vertical. For exterior walls, most are made of 2x6s to enable the extra insulation to be placed in the cavity between studs. Most inside walls are 2x4 construction except walls specifically made larger for plumbing stacks, etc. Some walls separating closets or such, may be framed on the flat, giving only 1 1/2" between finishes, to help in tight designs.
Home Improvement: Standard Doors and WindowsTo frame in doors and windows, things get a bit more complicated. Standard sizes for doors and windows are usually... Read more at Remodeling 4: How to Frame a Wall.
Almost the End
Hope you enjoy the Newsletter this month.
We BUILD CONFIDENCE. If you need advice on your projects at work or home, become a member of our website, then send me a question via email.
Check out our website! http://daveosborne.com
Please tell your friends and family about our site!
Your source for building tips, woodworking & furniture plans, house plans and building advice directly from Dave...
Hi, I'm Dave Osborne. With over 50 years experience as a journeyman carpenter, foreman and contractor in heavy construction I enjoyed working with apprentices and sharing the tricks of the trade that others shared with me. Now I get emails from Members all over the world and we include many of my answers in our Free Monthly Newsletters. Some of my answers include drawings and instructions specific to a project, but may also answer your questions. I use correct construction terminology, so you can confidently inform your building supply dealers or contractors exactly what you need.
ASK DAVE!
The Benefits of Membership
Membership gives you full access to our hundreds of how-to articles, woodworking plans, converters, calculators and tables. Our Stair Calculator is one of the most popular on the internet. We have projects you can build for (and with) your kids, furniture for your wife, and sheds and gazebos. If you run into a problem or need advice your Membership includes unlimited email questions to me through our Ask Dave quick response button.
Join us!
Copyright © 1999-2026 DDFM Enterprises. All Rights Reserved. DDFM ENTERPRISES, DAVE'S SHOP TALK and the Dave Osborne logo are trademarks and service marks owned by DDFM Enterprises. All other trademarks on this site are the property of their respective owners. Site design by Design Strategies, Inc.