Building Confidence
| Volume 14 Issue 6 ISSN 1923-7162 |

Welcome to Dave's Shop Talk's Home Improvement Newsletter of questions from our members on their construction projects, a Tip of the Month and a home remodeling article, both from our website at http://daveosborne.com.
Tip of the Month
To remove an oil spill from concrete garage floors, use cat litter and work it in well. Use a small piece of wood and rub it into the surface of the concrete. Amazingly, the concrete becomes white again.
And a Bonus Tip:
Put a paint roller in a plastic bag and seal tightly for next day's use, to avoid having to clean it.
Ask Dave!
Dave, Can I add the thickness of my outside floor joist and decking to the total rise in your stringer calculator (this would mean that dimension is in the total rise twice) to make my last run even with the top of the deck? I want the top of the tread on my top run to be even with top of the deck.
No, just add an extra run to the total rise. In this case the number of rises and runs are the same. The drawings won't show the top rise even with the deck, but the stringer will be the right length.
Give me your measurements so I can confirm for you.
Dave
Total rise is 45".
5" rises
13" runs
Thanks,
Chuck
Total Rise entered: 45 inches
Number of rises: 9 rises
Number of runs: 9 runs
Height of each rise: 5 inches
Length of each run: 13 inches
Total Run: 117 inches (9'-9")
Length of board needed for the stringer: 12 feet
Tape measurements (in inches) for the stringer (see diagram): 12 1/8 26 1/16 40 53 29/32 67 27/32 81 25/32 95 23/32 109 5/8 123 9/16
Hi Dave,
The only part that I have really vacillating over is the actual mounting of the beam to the posts. I've considered notching down 3" and then securing beam to posts with through bolts, but resting on top of the posts and toe nailing seems easiest.
- Travis
Hi Travis,
Rather than notching, I prefer to put the beam right on top of the post, then fasten a scab over the joint of the beam and post with a 2x6, as shown in the drawing:

Dave
Hi Dave
The log home company installed the supporting structure that you can see on the photo, but it's up to me to install the decking and railings. How would you suggest I go about that? In particular, I'm wondering about how to attach the posts of the railings in such a way that they are secure and the whole railing assembly isn't susceptible to being pushed over when someone leans against it.
Regards,
Steve
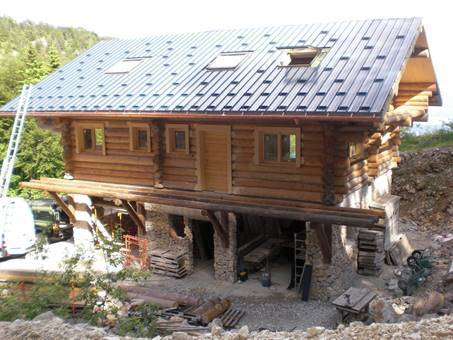
Steve is a member from France
Hi Steve,
My experience with logs is almost non-existent. I would ask your log house builders what they had in mind for the decking. I can't see how even the logs are or how much clearance you have for the floor. If the logs are not too bad and you have the clearance, you could put 1x6 boards across the top of the logs. You would need to plane the odd spot in the logs down.
You may be able to fill in between the logs, lengthways, then get a large floor sander and even it out, like they sand down a hardwood floor.
These are two ideas.
The handrail could be fastened on with drilled lag bolts. Use 4x4 posts, dado the log vertically to fit the 4x4. Try to get them all in a straight line, as well as a vertical surface of 8" to have as much surface area as you can to bolt the 4x4 to the face of the log. Usually, for a handrail or guard rail, in this instance, since it is so high off the ground, the posts are no more than 6' apart. Use a 2x4 on top of the post, with a 2x6 cap on top of that. Checkout: http://daveosborne.com/dave/articles/deck-railing.php
I've also seen some very nice small log handrails, which require a lot of fitting and work, but maintains the theme of the log house. If using a log handrail, be sure to flatten the two surfaces of the logs where they meet, to give more surface area for the lag bolts.

The above pic is quite extreme, but it shows the typical way they attach the balusters to the rails, in log construction. Notice the larger vertical log posts.
Let me know what the log builders have in mind for the decking and handrails and I can give you further help.
Dave
Hi Dave,
Thanks for this.
The tops of the logs are sawn flat, and there's about 6" clearance above them. I haven't yet checked whether a board laid across them would lie level, but if it would then I could screw the decking planks directly to them. This would put the planks perpendicular to the way you walk. Are there any particular advantages to having the decking planks like this, or the other way, i.e. running along the direction of travel? Obviously, to lay them longitudinally, I'd have to install joists across the logs first, plus rim joists either side to keep them upright. Given the 6" clearance available, that would also be possible.
For the posts, it looks like I'll have to cut a notch in the front face of the front log, so that I can fit the post as shown in your drawing entitled "Securing Handrail Post." Of course, if I installed joists across the logs, plus a rim joist, i'd be fitting the posts to that.
The log approach to the rails would of course be the most attractive, but also the most difficult :-)
It would be useful to have your thoughts on planks crossways versus planks longitudinal!
Regards,
Steve
Hi Steve,
If the logs are flat on the top, I would place the planks across them rather than lengthways. A slight slope to the outside would actually be a good thing to drain away water, rather than perfectly level. A slope of 1/4" per foot is enough and will be hardly detected.
Dave
Hi guys I am building a deck which is 2x8 on 16 in centres. Is this strong enough? My deck is 20x12, my beam is 10ft from house
Thanks Mike
Hi Mike,
The 2x8 joists on 16" c-c are good for a span of 11', so that works.
Dave
Stair Calculator Unable to enter the total Run (or Length of Stair Opening in Upper Floor) in the calculator. Total Rise 98 7/8" Upper Floor Opening 95" Total Run an lower floor 96" (to final nosing of existing stair, intent is to tear out that stair and rebuild, this is an old American Folk Farm House, uneven cement floor has been poured a while back) Ceiling Height is 90 3/8" Floor Thickness 8 1/4" Tried unchecking "enforce building code" Please let me know if I am missing something.
Thank You, Jeff
Hi Jeff,
I think this is your best option, even though it is not according to code. I suggest you add a 1" nosing which will make the tread a bit wider.
Stair Measurements
from Dave's Easy Stair Calculator at DaveOsborne.com
Total Rise entered: 98 7/8 inches
Floor Thickness entered: 8 1/4 inches
Head Room entered: 80 inches
Number of rises: 12 rises Number of runs: 11 runs
Height of each rise: 8 1/4 inches Length of each run: 8 23/32 inches
Total Run: 96 1/32 inches (8'-0 1/32")
Length of board needed for the stringer: 12 feet
Length of opening in upper floor: 96 1/32 inches (8'-0 1/32")
Tape measurements (in inches) for the stringer (see diagram):
6 11/32 18 11/32 30 11/32 42 3/8 54 3/8 66 3/8 78 3/8 90 3/8 102 3/8 114 3/8 126 13/32

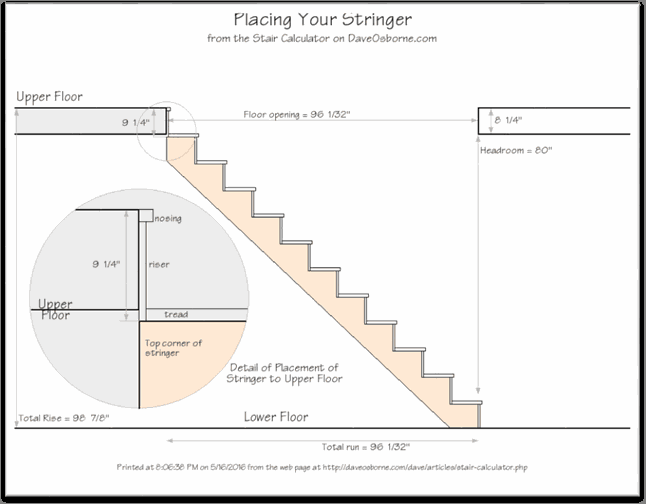
Dave
Hi Dave,
Additional thought ...
This is the page from which I accessed the Calculator:
http://daveosborne.com/dave/articles/stair-calculator.php
Can you test this yourself and tell me how to enter my data below in order to recreate the results you sent to me?
Total Rise 98 7/8"
Upper Floor Opening 95"
Total Run an lower floor 96" (to final nosing of existing stair, intent is to tear out that stair and rebuild, this is an old American Folk Farm House, uneven cement floor has been poured a while back)
Ceiling Height is 90 3/8"
Floor Thickness 8 1/4"
Tried unchecking "enforce building code" Please let me know if I am missing something.
Thanks again,
Jeff
Hi Jeff,
Yes, I used our Calculator, but since your run space and opening was so small, I had to play with it a bit, as follows:
Start with a regular set of stairs to get some initial figures, I used the custom rise/run for a house:
Result is:
Exact Measurements of Stairs: (in inches)
Rise 7 19/32
Run 10 1/2
Rises 13
Runs 12
Total Run 126
Length of Stringer Board to Purchase 14 feet
This section is optional (see note 3 above)
Length of Stair Opening in Upper Floor 126
Okay, we can see that the run is too long, lets see if we can get 1 less rise and 1 less run.
Choose custom rise of 9
With your hand calculator divide your run space of 96 by 11 runs = 8.73
Enter 8.73 into the Custom run choice
Click Calculate
Result is:
Exact Measurements of Stairs: (in inches)
Rise 8 1/4
Run 8 23/32
Rises 12
Runs 11
Total Run 96 1/32
Length of Stringer Board to Purchase 12 feet
This section is optional (see note 3 above)
Length of Stair Opening in Upper Floor 96 1/32
Okay, with these results you can print your drawings...
The only reason we go through all this is so that you can print your drawings. We need to force the calculator to do what we want it to rather than what it is intended to do.
When we first introduced our stair calculator, guys wanted to be able to manipulate the calculator to produce results that were not up to code. I didn't want that, at first, but was convinced by the guys building the stairs, as in a situation such as yours, that it is their choice to build stairs not to code. My job is to encourage them to try all the possibilities to build according to code.
Some of these possibilities include:
Extending the opening in the floor, either at the top or the bottom; putting in a landing and reverse direction, if you have the room, add a nosing to increase the width of the tread.
Anything else I can help with, please don't hesitate to ask,
Dave
Feature Article of the Month
(taken from our website: DaveOsborne.com
Remodeling 8: How to Install a Laminate Floor
These days a laminate floor is a popular item. It is inexpensive, easily installed and does not need to be sanded or finished. My nephew, a hardwood floor installer, calls it a disposable floor. That is exactly what it is. When the floor is worn out and all scratched up, it is easily ripped up, discarded and replaced. Laminate refers to the material it is made from - plastic laminate. Yes, the same stuff, the plastic laminate of cabinet counter top fame, known as Arborite, Formica, etc.
The difference in the laminate floor and the laminate counter top is the HDF base. HDF is high density fiberboard. Most of us have heard or worked with MDF, medium density fiberboard, so are familiar with the terminology. With the HDF base, the flooring is less subjected to dents from falling objects. The finish is protected by many layers of polyurethane coatings. If you respect the flooring, wear socks instead of leather shoes, it will stand up a long time. You can even use this flooring in bathrooms, after applying additional coats of polyurethane, as advised by the manufacturer.
When laminate flooring first came out, the boards were glued together in their tongue and groove joints. Now, they are manufactured with click together tongue and groove joints. They are just as easily dismantled, no glue is needed, no fasteners are used to attach the flooring to the sub-floor. It remains a floating floor, usually laid on top of a thin Styrofoam blanket to add cushioning, fill in small hollows and prevent passage of moisture to the fiberboard and upper layer of laminate. Moisture and laminate do not get along well together. Whether the moisture is from below or above, so use only a slightly damp cloth for cleanup. Most times use a dry mop for best results. Okay, now we know the basics of the product, let's install it. Like any typical flooring job, a good layout is essential. Remove any baseboard and nails from the walls. Measure the width and length of the room, so you can see if the length of the room will give short ends or the width of the room will have a narrow strip on the far side. You can prevent this with a little planning by cutting the first board... Read more at Remodeling 8: How to Install a Laminate Floor.
Almost the End
Hope you enjoy the Newsletter this month.
Our motto is Building Confidence. If you need advice on Building or on your projects at work or home you can make a very small investment and subscribe to our website, then send me any questions or uncertainties you might have via email. There is no extra charge. That is all part of your membership to our site!
Check out our website! http://daveosborne.com
Please tell your friends and family about our site!
Your source for building tips, woodworking & furniture plans, house plans and building advice directly from Dave...
Hi, I'm Dave Osborne. With over 50 years experience as a journeyman carpenter, foreman and contractor in heavy construction I enjoyed working with apprentices and sharing the tricks of the trade that others shared with me. Now I get emails from Members all over the world and we include many of my answers in our Free Monthly Newsletters. Some of my answers include drawings and instructions specific to a project, but may also answer your questions. I use correct construction terminology, so you can confidently inform your building supply dealers or contractors exactly what you need.
ASK DAVE!
The Benefits of Membership
Membership gives you full access to our hundreds of how-to articles, woodworking plans, converters, calculators and tables. Our Stair Calculator is one of the most popular on the internet. We have projects you can build for (and with) your kids, furniture for your wife, and sheds and gazebos. If you run into a problem or need advice your Membership includes unlimited email questions to me through our Ask Dave quick response button.
Join us!
Copyright © 1999-2026 DDFM Enterprises. All Rights Reserved. DDFM ENTERPRISES, DAVE'S SHOP TALK and the Dave Osborne logo are trademarks and service marks owned by DDFM Enterprises. All other trademarks on this site are the property of their respective owners. Site design by Design Strategies, Inc.