Building Confidence
| Volume 14 Issue 12 ISSN 1923-7162 |

Welcome to Dave's Shop Talk's Home Improvement Newsletter of questions from our members on their construction projects, a Tip of the Month and a home remodeling article, both from our website at http://daveosborne.com.
What's New
All 10 of our ebooks are now available for purchase. You can find them at http://daveosborne.com/books.php.
Got a nice email from a Member that I thought I'd share with you. He replied to our email that Dan sends out two weeks before each Yearly membership is about to expire.
Hi Dave! Yes I will renew and I should have a credit card on account that will be billed.
I am actually in Sedona, AZ training to be a Catastrophe Adjuster. I couldn't do this without an extensive background in construction and you were the first person who helped me out with my first construction project (pool house). Because you were so patient, helpful and, as you say, human??, it gave me the confidence to move forward with more and more projects. I cannot thank you enough for that.
This is not easy work and the travel is extensive, but the pay is commensurate and I have finally put myself in a position to earn enough so my wife can retire after 26 years of work.
So hats off to you and your team because without your help I don't think I would be here at this point in my life.
Thanks again Dave!
Marc
Hi Marc,
Thanks for your email. Yes, I remember you well and your pool house. We still have a pic of it on our website. I'm so glad you are doing well and Dan and I had a small part in it. We hope your training goes well, sounds like a very interesting job.
As always, keep us in mind if we can help you in your new field - congratulations.
All the best,
Dave
Tip of the Month
When building a project from wood, draw a simple sketch to make it easier to allow for thickness of materials.
And a Bonus Tip:
When installing a new tub, insulate the cavity below and around the tub with fibreglass insulation to keep the water warmer longer for those long soaks.
Ask Dave!
I hope everyone had a good Christmas time with family and friends. Dan and I wish you all a Very Happy, Prosperous and Peaceful New Year.
Hi Dave,
I'm stuck on how to install hardware on a pocket door I'm working on. I got past staining, varnishing and hanging with no major mishaps. My trim is stained and I'm pretty confident about cutting and installing. However, I'm worried about the pictured hardware.
I got both a pull and the side discs because I wasn't sure which way I wanted to go. What do you think? Whether I go with either, how do you make the special cuts required? Seems I could mess up what so far has been a fairly successful project. I'd hate to ding that door up making these cuts.
Thanks,
Trace
Hi Trace,
I'm not sure of the hardware that you have. This is what I use:
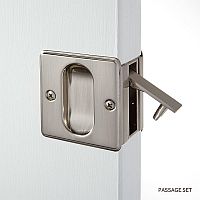
Could you verify the package you have is for a pocket door rather than a sliding door. Your door slides into a pocket, right?
Dave
Yes. it slides into a pocket. I like your hardware. Is there a brand name?
Hi Trace,
Weiser Lock is a popular brand around my area.
Here are the instructions for your type of hardware. It seems easier than the conventional latch picture that I sent you.
With the round latch, a hole is drilled through the door for the pulls and in the edge for the latch. With the one I sent you, the edge of the door is notched out. With either of these hardware choices, you should get a template, in the package, for the drilling or the notching, to fit the particular hardware.
Dave
I have a loft 12 ft off the floor and want to build a ladder with rail that I can walk up or down. Have every had plans for such a thing?
Jeff Martha's Vineyard MA
Hi Jeff,
Have a look at our alternating tread stairs: http://daveosborne.com/dave/articles/lapeyre-stairs.php
Let me know if this is the idea you are looking for.
Dave
This is exactly what I need. I am not sure if I need the alternating tread
but maybe just straight treads
Thanks
jeff
Okay, good.
Are you okay with the math?
Dave
I think so
Thanks a lot
Jeff
Good.
Just email me with any question if need be.
Dave
Hi Jeff,
An after thought - the alternating step is a good idea especially for coming down the stairs frontwards. If the steps go right across, you may find that you need to go down backwards, like a ladder.
Dave
Hi Dave,
I sent 4 pictures. You may ignore the out-of-focus one. I took these after semi-installing a pocket door. The problem is that the door does not close (meet the jam) top to bottom.
Here's the background:
1. Needed to remove the framing around an existing pocket door to install flooring.
2. Once the framing was off decided to upgrade both the door and the framing.
3. Purchased new door and installed old rollers on it. This door is 20 lbs heavier than the original but rolls smoothly.
4, Installed jam.
5. Closed door. The bottom of the door touches the jam but that's it. By the time you get to the top there is a almost a half inch gap (pictured).
I was careful to use a level on the jam to ensure it was straight up and down and parallel to the spot it was going into but I did not check the slope until after I had nailed it in. Turns out it's pretty level if I'm reading the level correctly (pictured). Same with the door (pictured.
What has me confused is the upside down bubble below the right side bubble. It's not in the center. Seems to me they both ought to be in the center if the trim is level.
So, two questions: Am I reading the level correctly? What might be the source of the off-kilter closure? Could the rollers be placed incorrectly? Is there a fix?
Fortunately, this is the door to a bathroom off the laundry room so it's in a less than critical location and based on a trial with a taped temporary set-up I think the lock will work. But I am a little disappointed with the situation. I don't want to proceed with putting up the trim until I either resign myself to things as they are or come up with a correction.
Thank You Sir . I could not agree with your customer from Texas more. I feel the same way and brag about you and the club to all my friends who notice my work.
Regards,
Trace
Hi Trace,
The level you are using is a double vial level. Notice the curvature in the vials. The bottom vial is the one to read. Flip the level end over end and the bottom vial is now the one to read. To check if a level is accurate. Check it one way then the other and the two readings should be the same.
Luckily, there is a simple correction for adjusting your sliding door. Most sliding door hardware has an adjustment for this problem. The wall may be plumb, but the header may be a bit our of level. This is normally the case. The sliding hardware, on top of the door, is where there is adjustment. In a pocket door, usually, the door is held up by two bolts, attached to the rollers, which have threads and nuts. When the gap is at the top, adjust the nuts lower on the front bolt and higher on the back bolt. The stops need to be removed on one side to do this.
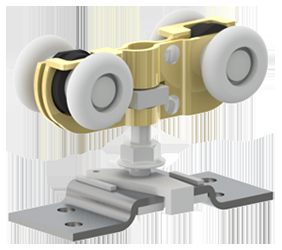
This is a typical pocket door roller with the adjustment nut.
By the way, every sliding door that I have installed has adjustment so that the door meets the jamb evenly. This includes aluminum patio doors, bath/shower sliding doors, closet sliders. This adjustment effects raising the whole door or raising/lowering one side or the other to make the door meet the jamb evenly.
Dave
WOW! What a great shot of the roller and yes my hardware has the nut. Do I take the door off the track to adjust or do so in situ?
You should be able to do it in place, if you have a small enough wrench or pliers.
Dave
Did it in place - easy as pie. What would I do without Shop Talk? Who else would know that or think to tell you when buying pocket door hardware?
Thank You Sir,
Trace
You are welcome, Sir, glad it worked for you.
Dave
Hi Dave,
This weekend I'll be trimming out the pocket door you helped me with recently. I'd appreciate some help on how to proceed. I took a few pictures of the puzzle pieces which include standard door trim plus 2 pieces to be installed at the entrance to the pocket.
I've held the slimmer trim up to the entrance of the pocket and like the finished look it provides but I'm stumped as to how it works with standard trim.
1) Do I leave the 1/4" reveal to the piece beneath as I would with the wider moulding or take the end flush with the already installed trim at the opening. That's the trim that went on either side of the track and continued down the opening to the door.
2) If I butt the wider moulding against there 2 pieces how do I handle the 45 degree miter cuts at the corner?
Thanks, Dave...
Appreciate any guidance you might be able to give.
Trace
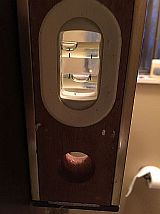
Hi Trace,
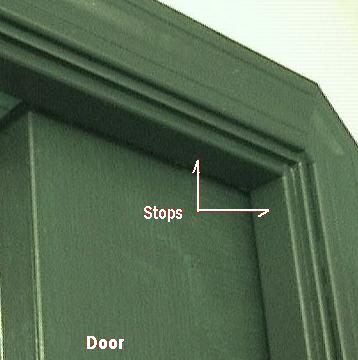
In your pics, the narrow vertical pieces look like the door stops which should have come with the jamb package. You should have 5 pieces about 7' long. They need to be cut to fit against the door - 2 on the right hand side of the jamb and 2 on the left and 2 short pieces on the top. These stops frame the door jamb on each side and the top of the door. The flat side goes against the door, with a slight clearance to it won't rub and the rounded edge away from the door.
The wider piece is the door casing to match the piece on top of the jamb already installed in pic 3. The casing covers the edge of the jamb and the end of the drywall. Yes leave a 3/16" to 1/4" reveal showing the edge of the jamb.
Here is a photo of my pocket door, my stops are plain Jane compared to yours, Ha!
Hope this helps.
Dave
Trace is a real success story for our website. He has been with us since May 18, 2012. He has built up his confidence over the time he has been with us, with the projects he has tackled himself with my advice and guidance. My father, being a carpenter by trade, taught me a lot of things about the trade and how to do things myself. He answered every question that I would ask him, from a 6 year old kid to an adult in the carpentry trade. No question was a stupid question, to him! In my mind a wise man is a man that learns everyday. The best way to learn is observe and ask questions. Thanks, Trace for being an active member of our website. Good for you! Or as the Aussie's say "Good on ya!"
Do you have a favorite or recommended exterior varnish that you use on exterior wood projects, such as hand rails?
Yes, I use a good Marine Spar Varnish for a clear finish or Cetol SRD Wood Finish for Siding, Railings, decks, made by Sikkens. Some of these come with stain to prevent the wood from turning gray and for UV protection. Your building supply store clerk could be more specific to your needs in your area.
Dave
Feature Article of the Month
(taken from our website: DaveOsborne.com
Remodeling 13: Cutting Wide Crown Molding and Cove Molding
When cutting crown molding wider than 3 1/2", we find that when cutting the wide crown molding to length, we have to lay the crown molding face down rather than upright on the turn base of a slide compound saw.
There are two common angles in the wide crown molding and cove molding of today. As shown in the drawing, notice the angle of 38° and 52° and two angles of 45° each.
I hope you are familiar with inside and outside miter joints. Refer to the previous article Remodeling 12: How to Cut Crown Molding for a picture of these. Also, remember that for every miter joint there are two pieces. We will refer to them as the left and right hand pieces as viewed in relation to the miter joint. Note: This is different than the previous article Remodeling 12: How to Cut Crown Molding where I referred to the left and right hand piece in relation to the wall.
The bevel angle of the saw is the vertical angle of the blade in relation to the base. The miter angle is the angle of the base turned in relation to the blade. This is where we get the term compound angle, where the blade is tilted and the base is turned from its zero position both at the same time. Some saws only bevel one way, so I will give you left and right bevels.
The instructions below are for a true 90° inside or outside wall corner. Sometimes we are not that lucky to have an accurate 90° wall corner to work with. Sometimes, for example, in a kitchen cabinet construction we end up having to miter a wide crown molding around a 60° angle or even an off angle like 87°. To help ease the burden of these inconsistencies in our construction lives I've made Tables 8: Cutting Crown Molding that gives miter and bevel angle settings for wall corners of any angle from 60° through to 180°.
Okay, let's cut a wide crown molding for a wall with a corner of 90°.
For Cutting 38°-52° Crown Molding Using A Left Bevel
Inside Corner—Left Hand Piece
Set the bevel angle of the saw to 33.9° left and the miter angle to 31.6° right. Lay the wide crown molding down on the saw base, face up, with its ceiling edge against the saw fence. The finished piece to be installed is on the left side of the blade after the cut has been made.
Inside Corner—Right hand piece
Set the bevel angle of the saw to 33.9° left and the miter angle to 31.6° left. Lay the wide crown molding down on the saw base, face up, with its wall edge against the saw fence. The finished piece to be installed is on the left side of the blade after the cut has been made.
Outside Corner—Left hand piece
Set the bevel angle of the saw to 33.9° left and the miter angle to 31.6° left. Lay the wide crown molding down on the saw base, face up, with its wall edge against the saw fence. The finished piece to be installed is on the right side of the blade after the cut has been made.
Outside Corner—Right hand piece
Set the bevel angle of the saw to 33.9° left and the miter angle to 31.6° right. Lay the wide crown molding down on the saw base, face up, with its ceiling edge against the saw fence. The finished piece to be installed is on the right side of the blade after the cut has been made.
For Cutting 38°-52° Crown Molding Using A Right Bevel
Inside Corner—Left hand piece
Set the bevel angle of the saw to 33.9° right and the miter angle to 31.6° right. Lay the wide crown molding down on the saw base, face up, with its wall edge against the saw fence. The finished piece to be installed is on the right side of the blade after the cut has been made.
Inside Corner—Right hand piece
Set the bevel angle of the saw to 33.9° right and the miter angle to 31.6° left. Lay the wide crown molding down on the saw base, face up, with its ceiling edge against the saw fence. The finished piece to be installed is on the right side of the blade after the cut has been made.
Outside Corner—Left hand piece
Set the bevel angle of the saw to 33.9° right and the miter angle to 31.6° left. Lay the wide crown molding down on the saw base, face up, with its ceiling edge against the saw fence. The finished piece to be installed is on the left side of the blade after the cut has been made.
Outside Corner—Right hand piece
Set the bevel angle of the saw to 33.9° right and the miter angle to 31.6° right Lay the wide crown molding down on the saw base, face up, with its wall edge against the saw fence. The finished piece to be installed is on the left side of the blade after the cut has been made.
For Cutting 45°-45° Crown Molding Or Cove Molding Using A Left Bevel
Inside Corner—Left hand piece
Set the bevel angle of the saw to... Read more at Remodeling 13: Cutting Wide Crown Molding and Cove Molding.
Get complete access to our website - Subscribe Now!
I hope you enjoyed the Newsletter this month and that your summer was a good one.
We BUILD CONFIDENCE. If you need advice on Building or on your projects at work or home you can make a very small investment and subscribe to our website, then send me any questions or uncertainties you might have via email. There is no extra charge. That is all part of your membership to our site!
Please tell your friends and family about our site and this Newsletter.
Your source for building tips, woodworking & furniture plans, house plans and building advice directly from Dave...
Hi, I'm Dave Osborne. With over 50 years experience as a journeyman carpenter, foreman and contractor in heavy construction I enjoyed working with apprentices and sharing the tricks of the trade that others shared with me. Now I get emails from Members all over the world and we include many of my answers in our Free Monthly Newsletters. Some of my answers include drawings and instructions specific to a project, but may also answer your questions. I use correct construction terminology, so you can confidently inform your building supply dealers or contractors exactly what you need.
ASK DAVE!
The Benefits of Membership
Membership gives you full access to our hundreds of how-to articles, woodworking plans, converters, calculators and tables. Our Stair Calculator is one of the most popular on the internet. We have projects you can build for (and with) your kids, furniture for your wife, and sheds and gazebos. If you run into a problem or need advice your Membership includes unlimited email questions to me through our Ask Dave quick response button.
Join us!
Copyright © 1999-2026 DDFM Enterprises. All Rights Reserved. DDFM ENTERPRISES, DAVE'S SHOP TALK and the Dave Osborne logo are trademarks and service marks owned by DDFM Enterprises. All other trademarks on this site are the property of their respective owners. Site design by Design Strategies, Inc.