Building Confidence
| Volume 15 Issue 6 ISSN 1923-7162 |

Welcome to Dave's Shop Talk's Home Improvement Newsletter of questions from our members on their construction projects, a Tip of the Month and a home remodeling article, both from our website at http://daveosborne.com.
Tip of the Month
When cutting identical pieces of boards for opposite ends of a project, place the pattern on the piece to be copied good face against good face. This way both opposite ends will have the best side of the pieces facing out. With the wood we get nowadays, each piece seems to have a good side and a bad side.
And a Bonus Tip:
When buying an older house, pay that inspector his dues. He'll give you a report of what needs attention and your offer on the house can be based on this report.
Ask Dave!
Hallway lighting:
Hi Dave.
I asked this question yesterday but you needed more info so here it is. I want to mount some flush mount ceiling fixture in a hallway that is 225" long and 36" wide. The fixtures are 12" in diameter dome and can accommodate up to 2 X 60 watt lamps. I will be using led lamps for these.
Thanks Ian
Hi Ian,
Based on an 8' ceiling height the recommended spacing is 8' to 10'. So if you space your fixtures from the end walls at 56 1/4" then 112 1/2" to the next one and 56 1/4" to the end wall. This is just a guide. Other factors influencing light would include whether the hall starts at an open foyer, how many rooms come off the hallway - closed with doors or open, same along the entire hall, etc.
Dave
Wall tile adhesive:
What type of wall tile adhesive do you prefer for backsplash applications?
thank you.
Use Ceramic Tile Adhesive for wall tiles in a premixed tub, as opposed to Thinset Mortar for ceramic tiles on the floor which comes in a bag that needs to be mixed with water and/or bonding agent.
Follow the directions on the container for size of notched trowel to use and which tiles the adhesive is not to be used with.
Here is an article on our website about this: http://daveosborne.com/dave/articles/how-lay-ceramic-tile.php
Dave
Bark side up or down?
Hi Dave, I'm rebuilding my deck in Minneapolis, MN, using 5/4 cedar deck boards. Does it matter whether the bark side is up or down? I read quite a few conflicting opinions on this. Some said, in the end, just put up whatever side looks better. Thoughts?
Thanks, Chris
Hi Chris,
I have never seen bark on 5/4 decking! I hope you are not playing with me! Bark is not to be seen on decking, if it is milled by a private outfit. Bark is very soft compared to grain and will come loose and fall off over time. Always, without a doubt, install the bark side down or cut it out if more that on the edge. When I purchase my material from a Lumberyard, I always hand pick it for being straight and tight knots and no bark! We call it Wane a 4 letter word!
Dave
Sorry, Dave, I wasn't clear. I meant should the end of the board be smiling or frowning, regarding the grain of the wood, or just have the best side showing.
Thanks, Dave. Fyi, I had read that the side of the plank in which the bark HAD been on (vs the center), should be faced down (smiling), and others said "bark side" up (frowning), and others said just put the best looking side up. I'm now about 2/3rds done, and generally using the best side up.
Can I ask another question? Do I have to wait a whole year before putting a clear (or light stain) sealant, or could I put it on after about 3 months? Again, this is 5/4 cedar in Minnesota and it gets plenty of sun.
As soon as the wood dries out you can stain it, 3 months should be good. After a year cedar will go gray, so people just leave it and think it looks nice. I prefer to stain cedar. Dave
Thank you, Dave. Yes, I prefer the "new cedar" look too. I bought it kiln dried and wondering how one knows once it is dry enough and ready for stain? Once water no longer beads up? If so, it does not bead up now.
Maybe leave it for a couple of weeks. In this hot weather, it should dry out quickly.
Dave
Feature Article of the Month
(taken from our website: DaveOsborne.com)
Remodeling 20: How to Hang and Finish Drywall
Drywall, also known as gyproc, Sheetrock®, plaster board, gypsum board, to name a few, is a very popular method of applying a wall or ceiling finish. Drywall is quite inexpensive and is easy to install and paint. Its only draw back, for the novice, is the requirement to apply drywall joint compound, we call drywall mud, and sand it down smoothly. The following article will help you understand the principles of finishing drywall.
The term drywall comes from the early days when tradesmen used to apply the wall and ceiling finish onto wooden laths with a mixture of sand, cement, lime and water. They referred to it as plastering a wall or ceiling. They still have these specialized plasterers today, but we can have the advantage of a plaster wall or ceiling put on dry in ready made sheets. Thus the name drywall evolved. The drywall sheets are placed across the studs or joists rather than with their length running with the studs or joists. The drywall sheet is cut to length by scoring the drywall paper layer with a utility knife, snapping the drywall board in a 90 degree angle towards the back and cutting the back paper layer using the inside angle of the break as a guide. To cut round holes for plumbing or square holes for electrical boxes or such, a drywall saw is used. Measure the location on the face of the drywall and just push the stiff, short blade through the drywall and commence cutting.
Drywall comes in many applications: regular drywall for walls, moisture resistant drywall for walls called green board, ceiling board, which is still 1/2" thick rather than the required 5/8" thickness for the ceiling when the joists, rafters or trusses are on 24" centers, is sag resistant. I like the ceiling board because it is lighter than the 5/8". It also comes in a 5/8" fireguard thickness, used mainly in commercial applications.
Before starting to apply drywall tape and drywall mud, make sure all the drywall screws or drywall nails are set below the surface of the drywall a bit. Don't go through the paper of the drywall sheet, just depress the screws or nails below the surface. The screws are best installed with a drywall screw gun meant for this purpose. It has an adjustable chuck on it with a clutch that slips when the screw is just below the surface. Do-it-yourselfers can purchase a less expensive dimpler that can be used in a regular variable speed, reversing drill. Most of the new rechargeable drills have built in clutches, designed for this purpose, as well. Drywall screws are the best option over drywall nails. Ask for proper drywall screws by name, use # 6 x 1 1/4" long screws for 1/2" drywall on walls and 1 5/8" drywall screws for 5/8" drywall on walls and ceilings as well as 1/2" ceiling board on the ceiling. If using nails use 1 3/8" drywall nails for 1/2" drywall. Nail them in pairs every 12" in the middle of the drywall board and 6", along the ends of the drywall board. Along the edges, nail two nails in at every stud or ceiling joist. Nails are set with the hammer forming a dimple below the surface. There are drywall hammers available that have a textured square head ideal for this purpose. It looks more like a shingler's roofing hatchet than a hammer. Drywall screws are placed in the same configuration as the drywall nails, but in singles only. Keep the drywall screws and drywall nails about 3/8" to 1/2" away from the edges. Outside corners should be covered with a drywall corner bead either nailed or screwed on or applied later with the mud application using a mud-on drywall corner bead. I prefer the metal corner bead, unless the corner is rounded where special beads are made for this purpose. Make sure the metal part of the bead is below the bead itself. You can bring the bead above the surface of the drywall by adjusting the metal in or out on that side. Check with a tri-square to make sure the blade of the square will not touch the metal or any of the drywall nails. You want the bead to be slightly higher than the surface of the metal band. In other words don't nail the corner bead too tight on the corner.
There are two choices of drywall tape to use to cover the drywall joints in a wall or ceiling. The professionals use the paper tape and wet it thoroughly with a drywall mud paste before installing it in the joint. To get the drywall paper tape wet, without purchasing the expensive tube applicator that the pros use, I actually cut the desired length off and put it into an ice cream pail to absorb some water for a few minutes. While the drywall tape is soaking, apply a thin coat of drywall mud to the bottom of the joint. As the drywall tape is brought out of the pail and onto the wall most of the surface water is wiped off with the fingers. The drywall tape is applied damp over the drywall mud, centered in the joint. The drywall mud is then squeezed through the pin holes in the drywall tape, leaving a skim coat of drywall mud covering the surface of the drywall tape. Use a 6" drywall knife for the application of the drywall mud and drywall tape. You will notice that the drywall edges are compressed to form a groove when placed together. This is designed to accept the drywall mud and drywall tape for the first application. The 6" blade spans the depressed joint easily, scraping excess drywall mud off the high point of the drywall. Notice that the ends of the drywall are full thickness, not forming a depressed joint, like the edges. Usually when installing drywall sheets on a wall or ceiling the installer tries to fasten the longest sheet he can to fit into the room without joints. The drywall sheets come in 8, 9, 10, 12 and 14 feet lengths. For a long wall or ceiling, obviously we need to butt one drywall sheet to the other to extend its length. In this case the drywall tape is applied over the joint as before and the drywall mud built up slightly for the first application.
Inside corner joints are the most difficult to apply drywall tape and drywall mud to. For using the paper drywall tape, wet it as for the joints, but as you are extracting it from the pail, bend it forming a 90 degree corner. Notice that the drywall tape actually has a depression in it in the center of the drywall tape for this purpose. There is a special corner trowel that may by helpful to spread the drywall mud in the corner and apply the damp drywall tape bent into the corner. Without the drywall corner trowel, use a 3" drywall knife and apply the drywall mud to both sides of the corner. Don't apply too much pressure here and rip the drywall tape, just enough to lay it nicely into the corner to form a straight line. Try to squeeze the drywall mud out through the pin holes of the drywall tape, as done with the joints, leaving a skim coat over the drywall tape. This is as far as you go with the inside corners for the first application.
Outside corners are quite easy to apply the drywall mud to in comparison to the inside corner. With the metal corner bead already fastened in place, take your 6" knife and apply the drywall mud to cover the metal part of the bead, scraping any excess drywall mud from the bead and the other side of the knife. This concludes the first application of the outside corner.
The only part of the drywall sheets remaining to be mudded is the drywall nail and/or drywall screw holes. Using the 3" or 6" knife, again, apply a bit of drywall mud to completely fill the hole, leaving a skim coat covering the surface. I usually carry a phillips screwdriver in my back pocket, in case a drywall screw is projecting slightly above the surface of the drywall. This is the time to give it a slight turn to embed it below the surface. Re-do the drywall mud over it and leave it to dry.
Drying time varies with temperature and humidity in the room. The thickness of the drywall mud is the greatest in the inside and outside corners for the first pass, so these places take longer to dry rather than the drywall screw holes and joints. Overnight is the minimum amount of time to let the drywall mud dry. If drying is taking forever, open a window and get some air movement, a slow moving electric fan helps out, too. Before the next application of drywall mud the walls and ceiling are sanded lightly. Sanding can't take place until the drywall mud is completely dried. The pros usually leave their sanding stage till the end. They usually knock off the high points with a large drywall knife and carry on with more drywall mud. I recommend, until you gain the experience, to sand slightly between coats of drywall mud. This will end up in a better, smoother job overall. Try to control the need for sanding the drywall mud down to the drywall. This is not the result we want. Sand the high spots off and taper or feather the drywall mud off toward the surface of the drywall. Remember to wear safety glasses and a dust mask while sanding. Clean up the dust right after sanding to keep it contained in the room you are working in. Poly (6 mil vapour barrier, polyethylene sheeting) over openings and air ducts and close doors to help in the dust confinement. For large openings a great little zipper device is available to be taped onto the poly in an opening. With this zipper you have easy access in and out of the room.
I mentioned two choices of drywall tape, I like to use a fiberglass drywall tape for drywall repair and new construction. It is self-stick, about 2" wide. For repair work, remove any loose paint, paper or tape. Sand the area about 6", at least, on each side of the crack or defect. Lay on the drywall tape, dry, centered on the crack, no drywall mud. Now with a 3" or 6" putty knife lay the first coat of drywall mud on. Press it through the drywall tape and leave a built up layer over the drywall tape, just enough to cover it. Don't be too fussy with getting it smooth here, try more to build up the thickness of drywall mud over the drywall tape evenly. Leave it for 8 hours, at least, until dry. Sand down high spots only. Don't sand down to expose drywall tape. No worries if you do, just build up the drywall mud again.
 After the drywall mud has been left overnight and is thoroughly dry and the sanding stage has been completed, the second application of the drywall mud can begin. The next application of drywall mud should be with a 6" drywall knife over each side of the inside and outside corners and the drywall screw holes. For the joints, use a 12" drywall knife, extending over the previously done joint by about 2" and feathering it out over the edge of the existing drywall mud. Get into the habit of applying pressure on the feather edge and no pressure over the drywall tape. You do this with a twisting of the drywall knife. Do this to both sides of the drywall tape. I like to use a ready mixed drywall joint compound
that comes in a plastic pail. If the drywall mud in the pail is too dry add some water and stir it up using a drywall mixer
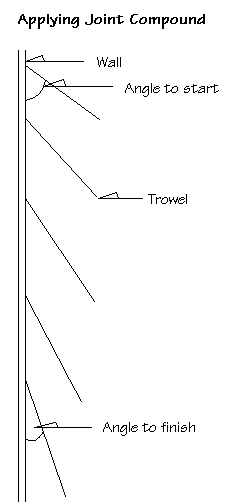
in the chuck of a 1/2" drill. The main problem with novices is not putting on enough drywall mud. Have the trowel
edge covered with drywall mud, apply it with a drywall knife almost square with the wall or ceiling, then slowly reduce the angle as you draw the drywall mud off the knife. After a few practice strokes, you'll get the hang of it. See the drawing.
After the drywall mud has been left overnight and is thoroughly dry and the sanding stage has been completed, the second application of the drywall mud can begin. The next application of drywall mud should be with a 6" drywall knife over each side of the inside and outside corners and the drywall screw holes. For the joints, use a 12" drywall knife, extending over the previously done joint by about 2" and feathering it out over the edge of the existing drywall mud. Get into the habit of applying pressure on the feather edge and no pressure over the drywall tape. You do this with a twisting of the drywall knife. Do this to both sides of the drywall tape. I like to use a ready mixed drywall joint compound
that comes in a plastic pail. If the drywall mud in the pail is too dry add some water and stir it up using a drywall mixer
in the chuck of a 1/2" drill. The main problem with novices is not putting on enough drywall mud. Have the trowel
edge covered with drywall mud, apply it with a drywall knife almost square with the wall or ceiling, then slowly reduce the angle as you draw the drywall mud off the knife. After a few practice strokes, you'll get the hang of it. See the drawing.
Wait 8 hours again to dry. Sand very lightly, just to remove any ridges. Sometimes a third coat is required, just to fill in any air holes or slight depressions that may have been left. Sand when dry. Vacuum any dust on the wall. Prime with a Latex Drywall Primer-Sealer.
You may notice slight imperfections after applying the primer/sealer. This is normal. Just go over the imperfections with a skim coat of drywall mud, let dry and re-coat with more primer sealer. At this stage the drywall mud and sealer dry quite quickly, so much time is not lost. Make sure you prime the fresh drywall mud, though, or the finish coat will look blotchy. When the primer/sealer is dry apply two more coats of your choice of colour and paint, latex or enamel, on the walls and ceilings. You will find that the flatter the finish on the surface the less likely any imperfections will show. Too flat a surface doesn't wash very easily, so the best choice for paint sheen is an eggshell finish.
Stand back and admire your work, checkout your pocketbook, too, for all the money you saved.
Get complete access to our website - Subscribe Now!
I hope you enjoyed the Newsletter this month and that your summer was a good one.
We BUILD CONFIDENCE. If you need advice on Building or on your projects at work or home you can make a very small investment and subscribe to our website, then send me any questions or uncertainties you might have via email. There is no extra charge. That is all part of your membership to our site!
Please tell your friends and family about our site and this Newsletter.
Your source for building tips, woodworking & furniture plans, house plans and building advice directly from Dave...
Hi, I'm Dave Osborne. With over 50 years experience as a journeyman carpenter, foreman and contractor in heavy construction I enjoyed working with apprentices and sharing the tricks of the trade that others shared with me. Now I get emails from Members all over the world and we include many of my answers in our Free Monthly Newsletters. Some of my answers include drawings and instructions specific to a project, but may also answer your questions. I use correct construction terminology, so you can confidently inform your building supply dealers or contractors exactly what you need.
ASK DAVE!
The Benefits of Membership
Membership gives you full access to our hundreds of how-to articles, woodworking plans, converters, calculators and tables. Our Stair Calculator is one of the most popular on the internet. We have projects you can build for (and with) your kids, furniture for your wife, and sheds and gazebos. If you run into a problem or need advice your Membership includes unlimited email questions to me through our Ask Dave quick response button.
Join us!
Copyright © 1999-2026 DDFM Enterprises. All Rights Reserved. DDFM ENTERPRISES, DAVE'S SHOP TALK and the Dave Osborne logo are trademarks and service marks owned by DDFM Enterprises. All other trademarks on this site are the property of their respective owners. Site design by Design Strategies, Inc.