Building Confidence
| Volume 15 Issue 12 ISSN 1923-7162 |

Welcome to Dave's Shop Talk's Home Improvement Newsletter of questions from our members on their construction projects, a Tip of the Month and a home remodeling article, both from our website at http://daveosborne.com.
Tip of the Month
Use clear plastic peanut butter or mayonnaise jars for storage of screws. Mark the size on the lid with a felt pen.
And a Bonus Tip:
To convert millimeters to inches, multiply by .03937. To convert meters to feet, multiply by 3.281. To convert square meters to square feet, multiply by 10.76.
Ask Dave!
No question Dave just want to say your site is awesome and I love how easy it is to get your rises and runs in the Calculator. And I'm sure I will be asking questions in the very near future. Please keep up the site it is great.
It's nice to open this section with such a nice comment from a new member!
Dave
I am installing a new wall in an existing bedroom to make a walk-in closet.
Should I remove the Sheetrock were the top plate will be attached to the ceiling rafters. I believe the ceiling rafters are horizontal from top plate with strapping. Closet will be in a full shed dormer.
Thank You
Ron
Hi Ron,
It is not necessary to remove the Sheetrock under the top plate, as long as you can get 1" minimum penetration into the joists or rafters. The drywall acts as sheeting, so is better left intact.
Dave
We have poured concrete walls. Need to know how to install vapor barrier when framing bedroom walls. We are in Iowa.
Leave a 1" airspace between the concrete wall and the framing. Insulate in the stud space, as usual, careful to maintain the airspace. Apply acoustical sealant (caulking) to the bottom, top and ends of walls. Apply the 6 mil poly, rated as a vapor barrier, over the studs and insulation and caulking using staples. The rule is to apply the vapor barrier to the warm side of the wall. Insulation, caulking and vapor barrier should be installed over the rim joist, as well.
Dave
Just a simple question. I am starting to give an existing bathroom a face-lift. The tile floor is not new. It is not the original 1920 floor but my guess is it is 20 to 30 years old. The existing tiles are 1 ft square and at least one is cracked. I am told that getting old tile removed, particularly if it is applied directly onto a plywood sub-floor can be daunting. Given what I have seen of work done on the house by the previous two owners, lets just say the least expensive contractor got the bid and quality was not always great. Thus I expect the old tile was applied directly to a plywood subfloor put over the original wood plank subfloor. To remove such old tile, it is my understanding you rent or buy a small to mid sized demotion hammer and remove the old tiles by brute force leaving the sub-floor a mess that has to be replaced or resurfaced. Is it a really bad idea to put a new tile floor directly over the old tile floor? This would require a kit to raise the toilet flange but I think that is the old consequence of the new raised floor.
Thanks, Nick
Hi Nick,
Yes, you can put thinset and tile over the existing tile. Make sure the existing tiles are glued down well - especially the cracked one. Purchase the modified thinset with a bonding agent included or mix it in separately. Be sure to scratch up the existing tile with 80 grit, or coarser, on a belt or rotary sander so the thinset will adhere well.
Yes, the toilet flange will need to be raised. You probably have a cast iron drain pipe so take that into consideration for the floor flange and bolts.
Dave
Do you have any advice about which material to use to resurface an old cast iron bathtub ...
epoxy
acrylic / urethane
polyester
Of course each installer tells you the material they use is best.
Thanks
Nick
I have not done this myself, so I searched the internet. I found this video from the This Old House guys, who I trust! They use an acid wash, epoxy primer and an epoxy finish - sprayed on. Where there is a bad deep spot, they grind it smooth and fill with an auto body filler - which is usually a 2 part epoxy, as well.
Have a look at this Google search.
Hope this helps,
Dave
Feature Article of the Month
(taken from our website: DaveOsborne.com)
Roof 4: How to Install Roof Trusses
You are going to build a house or add an addition to a house. The house plans are drawn up, the house foundation is about to be started. It's time to order the roof trusses. Most roof truss factories take at least two or three weeks before they even start to make up your roof trusses, depending on their back log. Don't leave it until the walls are framed and then decide to order the roof trusses. You want that roof on and the roofing applied before rain or the elements do harm to the sub-floor and framing.
The house plans usually give the outside measurements of the walls on the Floor Plan. Some framers have these measurements coordinate with the outside of the sheathing, others prefer to go with the outside of the framing, that is the outside of the 2x4 or 2x6 walls. Personally, I go with the outside of the framing.
Determine how the house will be laid out and order the roof trusses accordingly. The main thing is that when the roof trusses are pre-ordered, make sure the framing is accurate and according to the measurements that will coincide with the size of the roof trusses when they come on site.
With delivery of the roof trusses, you should receive a package from the roof truss plant specifying the bracing required for the roof trusses as well as their safe handling and other pertinent information for each roof truss or set of roof trusses. For example, large roof trusses require 1x4 continuous bridging every 10 feet across their span including at the center of the webs. If the webs don't line up with each other, notice the explanation of using "L" or "T" braces nailed to each individual web. Hip girders that are doubled up will show the number and spacing of nails. Hip trusses will show 2x4 strapping required on top of them. Valley sets resting on open roof trusses will be shown. Usually each individual roof truss has a number marked on it and a matching drawing to show their engineering specs and bracing requirements.
Initially, you and a partner will either unload the roof trusses off the truck using the truck crane to place them across the top of the exterior and interior walls of the house, or set them on dunnage on the ground. The walls at this point have been properly secured, braced and laid out for the truss centers. If on top of the walls or laying on dunnage on the ground, place the roof trusses upside down at the opposite end of the building you intend to start erecting them from, if there are no interior walls. If there are interior walls, pile them up on the end of the building across the tops of the walls. Slide or carry the first roof truss, still upside down, to its position that is marked on the top of the double plate. It is handy to get a third person to help swing the roof truss into the upright position. Set the end of the bottom chord flush with the outside wall. When ordering the roof trusses you specified the particular span, whether the span included the framing or the sheathing. This point is where the roof truss bottom chord flushes up. The roof truss is toenailed into position using 3 - 3 1/4" common bright nails through the bottom chord into the double plate. See: Tables 6: Nail Table One nail on one side and two nails on the opposite side on each end. Space the nails out and not too close to the end of the chord.
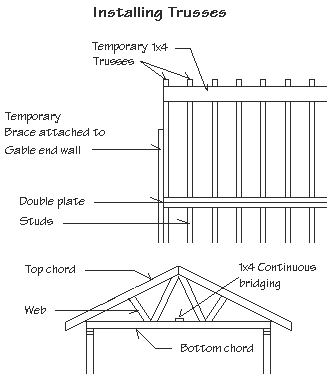 The first roof truss is braced temporarily, usually to a convenient inside wall, or with the use of supports nailed to the gable end wall and attached to the roof truss top and bottom chords, as shown in the drawing.
The second roof truss is then carried over to its designated position as marked on the plate and swung upright and toenailed securely to the double wall plate. A temporary 1x4 is nailed to each roof truss near the ridge to prevent them from falling over. Set the roof truss to the correct spacing when nailing to the 1x4. Continue this procedure. Before coming too close to the end of the building it is best to stand the remaining 2 or 3 roof trusses up, while you still have the room to swing them into their upright position, if hanging upside down. Just lean them against the upright, nailed in roof trusses and start from the opposite end sliding them into position carefully. Use another length of 1x4 to secure the end roof truss to the others at the ridge, tying the entire roof together.
Hurricane clips are installed after all the roof trusses are in place, by nailing them to the face of the double plate and into the sides of the roof truss bottom chord. The continuous bridging of 1x4 is nailed to the bottom chords and webs if specified. Brace the roof trusses accurately before the sheathing is applied. After the sheathing is nailed remove any temporary bracing of the walls and roof trusses.
In most jurisdictions the inspector will require an engineer to inspect the roof trusses for correct assembly. Your roof truss plant should have a name or two of engineers that will come to your site and do this inspection. Have the spec sheets ready to present to him. He will use these to verify that they are installed correctly, with adequate bracing and nailing.
The above was taken from our article: Roof 4: How to Install Roof Trusses
Thanks for your questions this month and for your support of our website.
Get complete access to our website - Subscribe Now!
We BUILD CONFIDENCE. If you need advice on Building or on your projects at work or home you can make a very small investment and subscribe to our website, then send me any questions or uncertainties you might have via email. There is no extra charge. That is all part of your membership to our site!
Please tell your friends and family about our site and this Newsletter.
Your source for building tips, woodworking & furniture plans, house plans and building advice directly from Dave...
Hi, I'm Dave Osborne. With over 50 years experience as a journeyman carpenter, foreman and contractor in heavy construction I enjoyed working with apprentices and sharing the tricks of the trade that others shared with me. Now I get emails from Members all over the world and we include many of my answers in our Free Monthly Newsletters. Some of my answers include drawings and instructions specific to a project, but may also answer your questions. I use correct construction terminology, so you can confidently inform your building supply dealers or contractors exactly what you need.
ASK DAVE!
The Benefits of Membership
Membership gives you full access to our hundreds of how-to articles, woodworking plans, converters, calculators and tables. Our Stair Calculator is one of the most popular on the internet. We have projects you can build for (and with) your kids, furniture for your wife, and sheds and gazebos. If you run into a problem or need advice your Membership includes unlimited email questions to me through our Ask Dave quick response button.
Join us!
Copyright © 1999-2026 DDFM Enterprises. All Rights Reserved. DDFM ENTERPRISES, DAVE'S SHOP TALK and the Dave Osborne logo are trademarks and service marks owned by DDFM Enterprises. All other trademarks on this site are the property of their respective owners. Site design by Design Strategies, Inc.