Building Confidence
| Volume 16 Issue 7 ISSN 1923-7162 |

Welcome to Dave's Shop Talk's Home Improvement Newsletter of questions from our members on their construction projects, a Tip of the Month and a home remodeling article, both from our website at http://daveosborne.com.
Tip of the Month
Always miter the cap in the corner of the deck railing for a nice looking fit. Galvanized nails or screws should be used in any outdoor finishing work, such as backyard decks and deck railing.
And a Bonus Tip:
When plumbing or framing a house always make the grade stamps on the pipe or lumber you're using, visible to the building inspector.
Ask Dave!
Since the questions this month from our members were limited to none, I included some questions and answers from a previous newsletter.
I have a deck we replaced the top lumber on 3 years ago, used 2" X 6" pressure treated wood. (Should have used Trex) Need to pressure wash and repaint each year because sap keeps seeping up through the paint. Using Loews Superior deck solid stain. My shoes are sticking to it again. Would think after three years it would be done with that. BTW also waited over 6 months before the first coat of stain. Is there a product like Killz for interior that works to block sap? Larry
Hi Larry,
Living on the Southwest coast of British Columbia, Canada, we don't have the extreme hot temperatures as those in the Southern States. I have experienced pitch pockets oozing from 6x6 fir/hemlock wood columns, but that's about all. Our pressure treated wood here is usually hemlock rather than pine. I searched the web on this subject and you definitely are not alone with your pitch/sap problem.
Here is the best of what I read from the web, from: https://blog.mlive.com/home_improvement/2007/09/deck_maintenance_for_pressure_2.html
The "sap" oozing from your deck boards is a natural product of the wood, and it's really pitch, not sap. Sap runs in the spring. Running pitch has nothing to do with stains, sealers, or waterproofing the deck. It resides in "pitch pockets" in wood, and when the wood gets hot enough, it melts and runs out. This is especially true of lumber made from conifers, which have large pitch pockets. Your deck wood is probably made of a member of this species, perhaps southern pine.
You're most likely to notice pitch problems on the sunny areas of the deck than in shaded sections, as those are the areas on the deck that absorb the most heat. Kiln dried lumber that has been heated to more than 160 degrees usually does not suffer from this problem. The high kiln temperature solidifies the pitch and prevents it from turning to liquid again. Evidently, the pressure treated lumber used on your deck was either not kiln dried, or wasn't dried at a high enough temperature to cause this solidification.
There's not a lot you can do about the problem at this point except live with it. As the deck heats up in the summer, pitch will continue to run from the boards. There is no sealer made that can contain it under these conditions. But the news is not all bad. There's really no need to let the sticky pitch ruin your enjoyment of the deck. A bit of turpentine on a rag will remove it quickly, and you shouldn't have to wipe it up more than a couple of times a summer. Eventually, the pitch pockets will run dry, and you won't even have to do this minor maintenance chore.
I'll add that pressure treated wood (PTW) is not a weatherproof treatment. PTW is a pesticide treatment to stop decay from bugs. It can be sealed and stained after the wood has thoroughly dried out and the color of the pressure treatment has faded. Turpentine is a natural product and a good solvent for this purpose. I don't believe there is any sealer that will do any good until all the pitch has either dried up and solidified or ran out of the boards. Some people have waited 9 years before their boards stop oozing, this is probably the extreme, though.
My advice, then is to deal with the pitch as it is seen, with the turpentine. Other options are to replace the boards or turn them over if the pockets are on one side only. Eventually, the pitch will harden or run out.
Dave
Hi Dave, I am about to install a hardwood floor in my home. I will be installing 3/8-inch underlayment and 3/4-inch tongue and groove floor boards. I am installing this over one layer of hardwood flooring that was installed without underlayment or any kind of subfloor when the house was built in 1923. I have three hot water radiators (not steam) to deal with. While I can and will drain the system, the radiators are still too heavy to move easily. Also there is not enough play in the plumbing to allow raising two of them to accommodate the new floor. I would really like to avoid moving the radiators. I guess that leaves me with these questions: Is there a good way to lift them a little and lay floor under them? Any compelling reason to do that and bite the bullet on redoing the plumbing? Or can I focus rather on laying floor around the radiator feet (there is enough clearance) and what is the best method to do that? Any advice will be greatly appreciated. Rob P.S. I'm an old (in more ways than one) member who just rejoined.
Hi Rob and welcome back.
Lifting the radiators is the easiest way to lay the floor. If this can't be done, you can fit around the feet and pipes. Depending which way the boards are laying makes one way easier than the other. The easiest way to go around a pipe or a foot is to cut the board at the center line of the pipe or foot - this works best if the boards lie 90 degrees to the radiator. If the boards lay along side of the radiator, try to have the notch on the underside.
Usually, with the pipes you mark the center of the hole from both directions, drill the hole a bit larger for expansion and contraction due to heat in the pipe, then cut across the board along the center line.
With the legs, especially claw foot ones, try to scribe them the best you can or make a cardboard template. Again, cut across the board behind the foot.
After the floor is laid, make or purchase escutcheon plates to go over the pipes and legs, to cover up the hole in the flooring. Cut them in half with a thin blade and glue the two pieces together when in place.
Another option is using a latex caulking the same color as the hardwood and caulk around the pipes and feet.
Hope this helps,
Dave
Thank you, Dave. I think you're right. I'll lift the radiator, even if I have to remove a nipple for clearance.
Rob
Yes, it certainly makes for a better finished job.
Dave
Curious as to why someone shouldn't fasten the top flange when installing a window?
Matt
Hi Matt,
We don't nail the top flange to allow the window to settle with the framing. When applying siding it is nailed at the top, which holds the window in.
Dave
Hi Dave
I've got a screened-in porch. The screen is nailed around the exterior of the porch and cannot be removed. I wanted to be able to remove one panel so I could power wash the house and access bird feeders.The opening measures 49 !/2 x 31 1/2. Not really a standard screen size. Wasn't sure where to find or how to build such a screen. And, how would I affix it?
I was about to write to you but then thought " I'm going to check around to see what I can learn before contacting Dave", I found a screen maker who will build the screen and provide hardware to mount it.
So, what's this got to do with you?
1. 7 years ago I never would have considered (seen?) the possibility of converting a permanent screen to a removable one.
2. A couple of years ago I would have considered the possibility but would have written you for advice first.
3. The experience of doing several projects, most with your help, has taught me almost anything is possible and if there is a will there is a way. I have gained the confidence to trust myself to do a little research and give something a try before running to your shop and knocking on the door.
So while it may appear this little project will have nothing to do with you, in my mind it has Dave written all over it.
And by the way, see those rocks on the ground? I'm pulling them out of a creek downhill from me. Next year I'll be asking how to prepare a bed to lay concrete and put them down for a patio. But that's next year.
Best Regards,
Trace
Hi Trace and thanks for the nice comments.
You can buy a fiberglass or aluminum screening material at your local hardware store, by the foot or meter in various widths. You can make a wooden frame out of 1x3, etc with hinges on one side and magnetic clips on the other, etc. Or purchase a ready made custom job out of aluminum frames.
You can knock on my shop door anytime!
Dave
Recently I used a latex acrylic interior paint, Sherwin Williams, and found that roller application was complicated by the paint in the roller tray reservoir getting thick and or tacky, and making pick up onto the roller, and application onto the wall surface, difficult. I stirred frequently and added a little water, but it didn't seem to help. Is there some other solution, such as latex specific conditioner or thinner that could be used to make the paint spread more smoothly and uniformly?
Hi Henry,
Watch the temperature when painting with latex since it dries too quickly when hot. Also, when this happens, maybe clean the roller out or switch with a clean one. There is a product that you describe called Floetrol, latex paint conditioner, by the Flood Company. My wife used to sell this product to pro painters using older paint, etc. We have used it ourselves, as well.
Dave
This is the problem, and the steps don't land in the proper place on the concrete slab.
Could you elaborate a bit - what is the total run and rise?
Total run is 70" total rise is 33 1/4" from the top of the deck....she wants the top tread to be flush with the existing deck....I made more calculations in the stair calculator and we decided the best way to solve is to get longer boards she purchased 7' x 12" but we need 8' x 12" that would solve the problem.... And a change in the rise to run in the steps.
Hi David,
This is what I came up with:
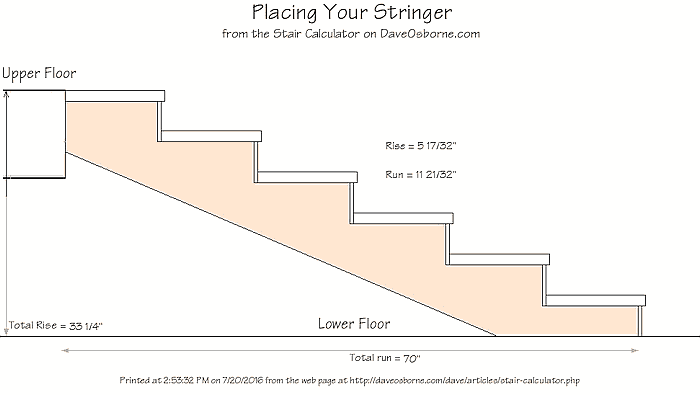
Yes, the stringer needs to be 8'.
Dave
Yup that's what I told her thank you, your site is a freakin treasure thank you for your simple explanations and your knowledge, one place I would love to be a member of and will do
Thanks, David
You're welcome and thanks,
Dave
Hello... read your response on building stairs on un-even ground but am confused on what I need to do. I have to build stairs gov stamped concrete up to a porch. The opening is 4 feet wide. The concrete slopes. On the left it has a rise of 20"....at the center the rise is 19.5" and at the right end the rise is 19". I want to put in 3 stringers. I'll be using 3/4 for the riser boards and 2 - 2x6 for each step. I can't figure out the stringer cuts to maintain a consistent rise of approximately 6 5/8". Any help would be appreciated.... Chet
Hi Chet,
For only 2 steps, you may want to go with 1 platform on top of another, rather than a two step stringer. For the platform, build the bottom level, scribe the bottom to fit. It should be out the full 22" of run, less nosing and finished height including treads of 6.5, based on the 19 1/2" high center. So the height to top of finished tread on the bottom platform would be 13" down from the finished porch deck. The top platform would be 11" wide, allow for overhang (Nosing) on treads, and 6.5 including treads - 3 X 6.5 = 19 1/2. The high side (20") would have the bottom rise at 7" and the low side at 6".
If doing 3 stringers. Make the 2 stringers the size of the center - 19 1/2" and 1 stringer 1/2" longer on the bottom, for the highest end. Then scribe and cut off each stringer bottom - middle one, as is and the short end about 1/2" less. Remember to cut the bottom of the stringers off, first, the thickness of the treads - 1 1/2", before scribing the bottoms. The slope of the ground is taken up with the bottom step - level on top; tapered on bottom. Use your center stringer as the reference for the other two being level on top of the tread.
Dave
Dave... Thank you for your response.... it confirmed what I thought I would have to do and also that there would be no way I could keep the bottom rise consistent given the concrete slope. I needed an expert to confirm that in case I was missing something and I really appreciate how quickly you got back to me.
Chet
You're welcome, Chet, glad I was able to clear that up for you.
Dave
Feature Article of the Month
(taken from our website: DaveOsborne.com)
Tables 6: Nail Table
| Construction Detail | Minimum Nail Length | Minimum Nail Number |
|---|---|---|
| Floor joist to plate - toe nail | 3 1/4 - 12d | 2 |
| Double header | 3 1/4 - 12d | 12" o.c. (on center) |
| Stud to wall plate (each end) - toe nail | 2 1/4 - 7d | 4 |
| Stud to wall plate (each end) - end nail | 3 1/4 - 12d | 2 |
| Double studs at openings | 3 1/4 - 12d | 30" o.c. |
| Doubled top wall plates | 3 1/4 - 12d | 24" o.c. |
| Bottom wall plates to box and floor joists | 3 1/4 - 12d | 16" o.c. |
| Roof rafter or joist to plate | 3 1/4 - 12d | 3 |
| Rafter to ridge board - toe nail | 2 1/4 - 7d | 4 |
| Rafter to ridge board - end nail | 3 1/4 - 12d | 3 |
| Collar tie to rafter - each end | 3 1/4 - 12d | 3 |
| Plywood or OSB to supports | 2 - 6d | 6" o.c. along edges and 12" o.c. along intermediate supports |
Dan and I thank you for your interest and support of our Website.
Get complete access to our website - Subscribe Now!
We BUILD CONFIDENCE. If you need advice on Building or on your projects at work or home you can make a very small investment and subscribe to our website, then send me any questions or uncertainties you might have via email. There is no extra charge. That is all part of your membership to our site!
Please tell your friends and family about our site and this Newsletter.
Your source for building tips, woodworking & furniture plans, house plans and building advice directly from Dave...
Hi, I'm Dave Osborne. With over 50 years experience as a journeyman carpenter, foreman and contractor in heavy construction I enjoyed working with apprentices and sharing the tricks of the trade that others shared with me. Now I get emails from Members all over the world and we include many of my answers in our Free Monthly Newsletters. Some of my answers include drawings and instructions specific to a project, but may also answer your questions. I use correct construction terminology, so you can confidently inform your building supply dealers or contractors exactly what you need.
ASK DAVE!
The Benefits of Membership
Membership gives you full access to our hundreds of how-to articles, woodworking plans, converters, calculators and tables. Our Stair Calculator is one of the most popular on the internet. We have projects you can build for (and with) your kids, furniture for your wife, and sheds and gazebos. If you run into a problem or need advice your Membership includes unlimited email questions to me through our Ask Dave quick response button.
Join us!
Copyright © 1999-2026 DDFM Enterprises. All Rights Reserved. DDFM ENTERPRISES, DAVE'S SHOP TALK and the Dave Osborne logo are trademarks and service marks owned by DDFM Enterprises. All other trademarks on this site are the property of their respective owners. Site design by Design Strategies, Inc.