Building Confidence
| Volume 16 Issue 11 ISSN 1923-7162 |

Welcome to Dave's Shop Talk's Home Improvement Newsletter of questions from our members on their construction projects, a Tip of the Month and a home remodeling article, both from our website at http://daveosborne.com.
Tip of the Month
Replacing the bathroom fan switch with a dehumidifier switch is a good idea to make sure the fan is exhausting moisture outdoors. The switch is turned off or on due to the humidity in the room.
And a Bonus Tip:
To save time in cutting all the studs for a home renovation, you can purchase pre-cut studs for an 8' or 9' ceiling.
Ask Dave!
Hi Dave, Many thanks for this -- once the inside of our house is finished (yes, we're still building it, many years after I first contacted you!) we'll be adding a deck, so I've saved that article and look forward to the remainder. Regards, Steve
Thanks, Steve.
You know where I am if you need some advice. You could probably tell me a thing or two!
For the past year I have been helping with the building of a Baptist Church building. I've learned a lot about Institutional building! The volunteers working along side me have contributed to the project, big time, helping us to complete under budget. I've enjoyed this project, as well. Now, I'm building acoustical panels, to remove the echo and reverberation in the sanctuary. We obtained our Occupancy Permit for the first Sunday in September.
Stay safe out there,
Dave
The church sounds like a fun project, though have to say I'm glad that we (an English church in Switzerland) just pay a small fee to use the church building belonging to another congregation, so all that kind of thing isn't our problem!
All the best,
Steve
Living in France and attending church in Switzerland. That reminds me of the time I visited my daughter and son-in-law in the Black Forest area of Germany. They were volunteering at the Black Forest Academy in Kandern. We visited France and Basel, Switzerland while there. All 3 countries came together near there.
Dave
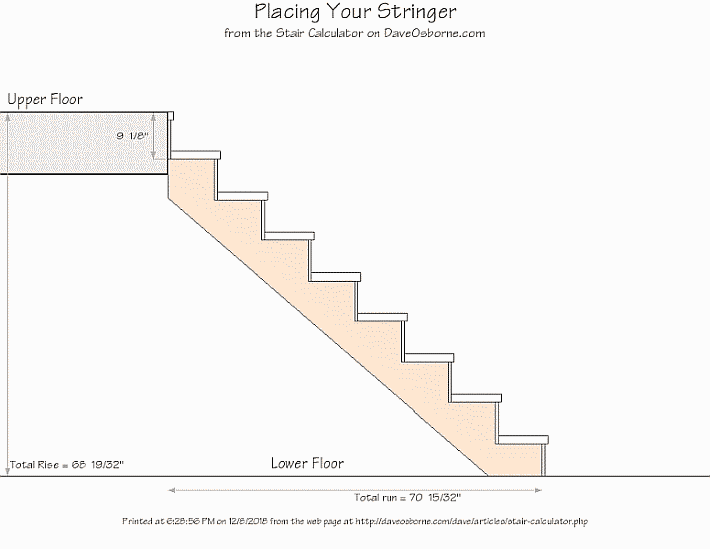
Hey Dave, Please forgive me, but I was educated in the US in the public school system...) I am building stairs in my shop. The Rise is 68.6" and the run is only 70.5". When I use the calculator the run shows 120". What am I doing wrong? Thanks, Harold
Hi Harold,
Your run is not enough for a standard set of stairs, but we can trick it to comply with what you want.
Step 1: plot the total rise of 68.6
Step 2: Choose the Usual rise and run for a house = 7 5/8 and 10 1/2
Step 3: Click Calculate
This gives the number of rises as 9 at 7 5/8 and 8 runs at 10.5. The rises are correct; the run needs some fixing...
Step 4: Go back to the Customize Run and change it to 8.81. We get that number by dividing your total run by the number of runs that we need to go with our choice of rise, which is 8 runs. 70.5 / 8 = 8.81
Step 5: Click Calculate
Your Exact Measurements of Stairs should be: Rise 7 5/8; Run 8 13/16; Rises 9; Runs 8
Total Run 70 15/32 Length Stringer 10 feet
Step 6: Click on Print Results to get 3 drawings.
If this doesn't work for you, let me know and I'll forward to you the drawings.
Dave
These are the drawings that Harold will get from using our Stair Calculator:
Stair Measurements
from Dave's Easy Stair Calculator
at DaveOsborne.com
Total Rise entered: 68.6 inches
Floor Thickness: not entered
Number of rises: 9 rises Number of runs: 8 runs
Height of each rise: 7 5/8 inches Length of each run: 8 13/16 inches
Total Run: 70 15/32 inches (5'-10 15/32")
Length of board needed for the stringer: 10 feet
Length of opening in upper floor: needs Floor Thickness
Tape measurements (in inches) for the stringer (see diagram): 6 21/32 18 5/16
29 31/32 41 5/8 53 1/4 64 29/32 76 9/16 88 7/32

Dave
Feature Article of the Month
(taken from our website: DaveOsborne.com)
Deck 2: Deck Railing
In the previous article I discussed building a raised backyard wood deck. For safety reasons and to abide by the building codes in our local areas, we must install a deck railing around these decks to contain those people enjoying the deck.
For heights over 2 feet above the ground, we must install a deck railing or guard as the building codes call them. A deck railing should be at least 36" high, although 42" is more of the acceptable standard. The deck railing should be vertical barriers, rather than horizontal, where a child cannot climb up on them. They should also be less than 4" apart so that a toddler's head could not fit through and get stuck.
A deck railing is comprised of posts about 6' apart with a 2x4 top and bottom rail, a 2x6 cap and vertical pales. Building supply dealers usually have a choice of pales for a deck railing in different shapes and styles. You can also make up your own design of deck railing from 1x4 or 1x6 stock. Some choose for their deck railing a 2x2 plain balusters or fancier turned spindles, similar to the indoor newel post and spindles.
In this picture of the deck railing around my second story backyard wood deck, notice the following features:
The pales of the deck railing were designed and cut out of 1x6 stock using a jigsaw for the arcs and a hole saw for the circles. The top and bottom rails were dadoed out to form a groove in which the pales of the deck railing could be slid into to hold them in place. Between the pales in the dado, I cut and installed spacers.
Notice the vertical 2x4 on the right completing the deck railing. The bottom 2x4 is within 4" off the deck. This is the only horizontal member allowed on the deck railing as well as the top rail and cap. I like to have the bottom rail raised, like this, so any rain can run off and it is easier to keep clean. These units will be tied into the supporting posts by screwing into the posts through the 2x4s of the deck railing. The posts are 4x4 lag bolted into the box joist or rim joist of the deck. I usually notch out 1 1/2" from the post leaving 2" of wood to bolt onto the joist.
Another choice of deck railing is the 2x2 baluster:
The 2x2 baluster deck railing is supported only by the 2x2s screwed to the box joist of the deck. The 2x2s on 5" centers make this deck railing strong enough.
The alternate choice of deck railing is using the 2x2s, but with the support of 4x4 posts about 6' apart, as shown.
The corner 4x4 post of the deck railing is a bit of a trick since we have to cut the 1 1/2" notch out from the corner. Just set the circular saw blade to 1 1/2", cut out the top and sides. I use a chisel to pry out the piece, which usually splits away. I then clean up the cut with the chisel.
Always miter the cap in the corner of the deck railing for a nice looking fit. Galvanized nails and screws should be used in any outdoor finishing work, such as backyard decks and deck railing.
Get complete access to our website - Subscribe Now!
We BUILD CONFIDENCE. If you need advice on Building or on your projects at work or home you can make a very small investment and subscribe to our website, then send me any questions or uncertainties you might have via email. There is no extra charge. That is all part of your membership to our site!
Please tell your friends and family about our site and this Newsletter.
Dan and I thank you for your interest and support of our Website!
Your source for building tips, woodworking & furniture plans, house plans and building advice directly from Dave...
Hi, I'm Dave Osborne. With over 50 years experience as a journeyman carpenter, foreman and contractor in heavy construction I enjoyed working with apprentices and sharing the tricks of the trade that others shared with me. Now I get emails from Members all over the world and we include many of my answers in our Free Monthly Newsletters. Some of my answers include drawings and instructions specific to a project, but may also answer your questions. I use correct construction terminology, so you can confidently inform your building supply dealers or contractors exactly what you need.
ASK DAVE!
The Benefits of Membership
Membership gives you full access to our hundreds of how-to articles, woodworking plans, converters, calculators and tables. Our Stair Calculator is one of the most popular on the internet. We have projects you can build for (and with) your kids, furniture for your wife, and sheds and gazebos. If you run into a problem or need advice your Membership includes unlimited email questions to me through our Ask Dave quick response button.
Join us!
Copyright © 1999-2026 DDFM Enterprises. All Rights Reserved. DDFM ENTERPRISES, DAVE'S SHOP TALK and the Dave Osborne logo are trademarks and service marks owned by DDFM Enterprises. All other trademarks on this site are the property of their respective owners. Site design by Design Strategies, Inc.