Building Confidence
| Volume 18 Issue 6 ISSN 1923-7162 |

Welcome to Dave's Shop Talk's Home Improvement Newsletter of questions from our members on their construction projects, a Tip of the Month and a home remodeling article, both from our website at https://daveosborne.com.
Tip of the Month
When laying out the height of cripples or jack studs in a renovation, be sure to allow for the thickness of the finished floor material and allow for 1" clearance space under the door for air circulation - a building code requirement.
When installing OSB for sheathing on a house framed wall, be sure to allow 1/8" for expansion and contraction between the sheets, all around.
KEEP BUSY! Now's a good time to catch up on your projects!
Ask Dave!
With no good questions this month, I am including some golden oldies taken from our June, 2012 Newsletter.
Hi Dave,
First, thanks for a great site. I am building stairs leading up to our front porch and used your videos and stair calculator with great results so far, despite having only basic or even below-basic skills!
My question: I have cut the stringers and treads, and just learned that most outdoor stair projects use pressure-treated wood, whereas I used plain old doug fir. I have not yet assembled the stairs.
Now aware of my mistake, I have bought some copper naphthenate to treat my wood, but am told that painting over it might be a problem, especially with a light color (I have a gallon of light grey porch paint), as the c.n. might bleed through.
I see my options as these:
1. Forget about the c.n. and just paint, hoping that the paint will preserve the wood well enough.
2. Use the c.n., but get a dark paint color (losing the $30 I paid for the grey paint).
3. Start the project over, with pressure treated wood. This is not ideal, but not out of the question, as I want to get this right.
What would you recommend, or are there other options I have not considered?
I live in Grass Valley, CA, in the Sierras. We get about 55 inches of rain per year, and in the summer the sun is fierce (the stairs will be directly exposed to the sun).
Thanks for any advice you can offer.
Gary
Hi Gary,
Yes, these days we use pressure treated wood (PTW), within 12" of the ground.
To clear some things up: PTW is for insects eating the wood, not for preserving wood from the sun or rain. It may be an option to preserve your underside of the stringer and treads where they are 12" from the ground with the copper naphthenate. It is true that the copper naphthenate will bleed through, but if you seal it with Shellac, then paint it with the grey paint you should be alright.
Now your problem is to protect the surface from the elements. Is the grey paint an oil or alkyd based, rather than latex based? Check the label to see if you need a primer on bare wood. Also check the label on the copper naphthenate to be sure to wait the required time to dry, before covering it. You live in the same humid climate that I do. We have moderate temps, but about 30" of rain, most in the winter, spring and fall. We had trouble with our own deck. The surface would last two years or so then start to look bad. My wife who is a paint expert, finally made a deck stain out of linseed oil and tint. It seems that every couple of years she re-does the surface. Our deck is cedar.
Dave
Thanks so much, Dave. Very helpful!
Two other questions occur to me.
1. You refer to Shellac as a way to seal the c.n. Would polyurethane work? I have some left over.
2. Are risers merely an aesthetic consideration or do they have important structural or protective advantages as well? I read somewhere that risers help to protect the stringers (from the elements?) and should be used for longer stair life. The Home Depot guy says they're not necessary. What do you think?
Thanks again for a great site and helpful advice,
Gary
Hi Gary, you're welcome.
Shellac is a sealer where polyurethane is a finish. Some would argue that shellac may be used as a finish also, with multiple layers and this is true to a certain point. If shellac is left without a finish over it, alcohol will affect it. The solvent for shellac is methyl hydrate which is methyl alcohol. Shellac is a great sealer, it dries quickly, sticks well and seals stains of all types that want to bleed through. Have you ever seen a t-bar ceiling tile, donnacona, that has blackish water stain? Use shellac then paint over it.
When I build inside stairs, I like to use the risers as support for the back of the treads:
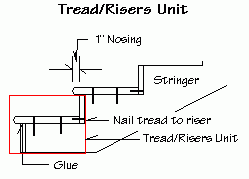
In this sense the risers are both aesthetic and structural to a point. Usually, we use 1 1/2" treads, outside - two 2x6s work well, so don't need the riser for support. The double treads work well, with a 3/16" space between the boards to let water drain through.
I guess the risers may help protect the stringers from the elements, but then the risers need to be protected, themselves, causing more work than just maintaining the edge of the stringers. There is no way, in our climates that we can get away without doing regular maintenance on our homes - caulking, painting/staining. I was told by a professional painter that he likes to stain his wood trim, etc with a good quality oil base stain. Then in a couple of years when the stain starts to fade, paint over the stain with a good latex, acrylic paint. I did that with my cedar trim around the house and it has worked well. The tough parts to keep looking good is the horizontal surfaces of decks and stairs. You just need to keep them maintained, it seems like every 2 or 3 years, they need to be re-painted with a good semi-transparent stain. Paint just seems to peel off. Solid stain is just like paint on a horizontal surface.
Dave
would triangle blocks in the 4 corners be the best way to square up this gate? sags about 1 inch.
Not really. You need a diagonal brace from the right top, open side to the left bottom, hinge side.
Here is a drawing:

Dave
Hi Dave,
We are going to lay slate tile on our front porch. The porch is under a small roof. Do I need to seal the concrete porch before I put down the tile? I didn't think it would be necessary, but someone at HD told me I had to seal it. What do you think? I also need to put some leveling compound in a couple "dippy" spots. The leveler I bought is concrete based. If I have to seal the porch, I would put down the leveler and seal the whole thing afterward, correct? We also thought about having a 12' X 16' slab poured out back in front of one side of the screened porch (where we would also add another door). I was going to put down a buff colored natural stone that would look really pretty contrasting with the grass/yard. Do I need to seal that slab? If I need to seal the porch, do you have any recommendation on which sealer is better? I hope I don't need to seal either one.
Pat
Hi Pat,
I think you know more about tiling than the guy at HD. He may be referring to preventing moisture from coming up through the concrete. Usually, we pour the concrete on 6 mil poly to prevent this.
The concrete should be cured, as should the floor leveler. It should say on the bag how long to wait before tiling on top. As far as I am concerned the sealer goes on the finished surface, not under it.
All the best,
Dave
Dave,
I am building an addition to our cottage which is located 22 km east of Burk's Falls, On. The addition is 20' wide x 10'3" deep. The addition is for a bedroom, centre hall and a bathroom. I am using 11-7/8" engineered floor joists on 16" centres (got them for free). I plan on fastening the matching rim board to the end cottage floor joist with hangers attached to the rim board. At the outside end I have four 8" dia. concrete posts (the whole cottage is on piers since it sits on bedrock) with triple 2" x 10" PT boards for the support beam. My questions: I planned on using 1/4" - 5/16" lag bolts to attach the rim board to the existing floor joist - is this ok and what spacing do you suggest; do I need to install rim boards to the outside ends of the engineered floor joists since the OSB wall sheathing will extend to the bottom; and finally the support beam which will sit on the concrete posts I propose to laminate as follows - two 10' boards end to end, one 10' centred over those boards, one 5' board at each end of the centred board and again two 10' boards on top then glued and screwed together ending up with a 4-1/2" x 10" x 20' beam. Does this all sound right?
Arnold
Hi Arnold,
These engineered joists are a unit consisting of the joist and the rim board. The purpose of the rim board is to keep the joists vertical, not for supporting the load on them. I would prefer to see you install a ledger board under these joists, rather than have them supported by the rim and hangers. The 2x8 or 2x10 ledger would be lagged into the existing box joist of the house, if it is 1 1/2" thick or the studs, depending on the height, with 2 - 3/8" lags, vertically, top and bottom, at 16" centers. These joists would be taller than the ones in the cottage, right. Along with the ledger for load support, I would install blocking between the upper and lower chords of the I-joist to prevent the joist from falling over. This blocking is usually 2x4 nailed on the flat to the framing of the house. By rights, when installing engineered beams, trusses or joists, the engineer specifies the fastening schedule, spacing, etc. Here is a website for Georgia-Pacific a big manufacturer of these joists: http://www.gp.com/build/product.aspx?pid=1390
On your question of beam support. You have 4 posts spaced over a 20' span. The 5' board, from the end, will line up with an area called the quarter span between posts. This is good. The 10' board, from the end, lines up in the centre of the span between posts, which is not good. Any chance of using 3 - 20' pieces? Instead of the arrangement you suggested, I would go with starting with the 5' then 10' then 5' boards on the outside laminations and the 10' and 10' on the inside. This would be according to the code. You need only 2 plys for the joist span and the span on the posts, but 3" isn't enough bearing for the I-joists. You need 3 1/2" so a beam of 4 1/2 is good.
I would use your engineered rim board on the outside of the addition and run your sheeting down it, as well. For the inside, follow my suggestion, above.
Hope this helps,
Dave
Dave,
Thanks for the info, one more question.
Is it necessary to put vapour barrier under the floor?
As mentioned the floor is elevated, insulated with Roxul R22 insulation with
Typar stapled and taped underneath
A
Hi Arnold,
No, we don't put VB under the floor. It has to be on the warm side of the room. Floors usually have lino, carpet with pad, tile, etc. which acts like a vapour barrier to some extent, anyway. It is better to glue and screw/nail the subfloor to the joists, which is another v. barrier. To put VB in means to fold it in between the joists then insulation against it which would slip out. So the code leaves it out for those reasons.
Dave
As promised, here is the plan for the jig I mentioned at the top of this newsletter: We have a bunch of different handy jigs on our site for you.
Jigs 8: Circular Saw Cutting Jig
(From Jigs 8: Circular Saw Cutting Jig
When you find it necessary to cut or rip large pieces with a circular saw, a handy cutting jig helps keep the circular saw cuts straight. I use my circular saw cutting jig mostly for cutting gable ends for cabinets to length, as well as, trimming doors, etc.
This circular saw cutting jig is simply a 4' or 8' strip of 1/4" plywood with a 2" ripping on one side. The circular saw is placed on top of this circular saw cutting jig and slides along the 2" ripping to cut the correct width of the base of the jig. The circular saw cutting jig is clamped on top of the door, which is laying on a couple of saw horses. Here are pictures of mine:
Notice that the circular saw blade guard is held up with a wedge and that the plywood on the bottom of the guide, underneath the circular saw, comes out flush to the inside of the circular saw blade. This way you can mark your door or whatever piece to be cut and the edge of the circular saw cutting jig will be your cut line, no measuring required from the circular saw base edge to the cut.
Dave
Read hundreds of diy articles, answered questions and dozens of plans and projects all written by Dave.
Become a Member and Dave will personally eliminate any doubts you might have about your projects by email.
Dan and I thank you for your interest and support of our Website. We hope we can help you with your present and future projects.
Get complete access to our website - Subscribe Now!
We BUILD CONFIDENCE. If you need advice on Building or on your projects at work or home you can make a very small investment and subscribe to our website, then send me any questions or uncertainties you might have via email. There is no extra charge. That is all part of your membership to our site!
Help us with the cost of putting this info out by becoming a member. Subscribe now!
Please tell your friends and family about our site and this Newsletter.
Your source for building tips, woodworking & furniture plans, house plans and building advice directly from Dave...
Hi, I'm Dave Osborne. With over 50 years experience as a journeyman carpenter, foreman and contractor in heavy construction I enjoyed working with apprentices and sharing the tricks of the trade that others shared with me. Now I get emails from Members all over the world and we include many of my answers in our Free Monthly Newsletters. Some of my answers include drawings and instructions specific to a project, but may also answer your questions. I use correct construction terminology, so you can confidently inform your building supply dealers or contractors exactly what you need.
ASK DAVE!
The Benefits of Membership
Membership gives you full access to our hundreds of how-to articles, woodworking plans, converters, calculators and tables. Our Stair Calculator is one of the most popular on the internet. We have projects you can build for (and with) your kids, furniture for your wife, and sheds and gazebos. If you run into a problem or need advice your Membership includes unlimited email questions to me through our Ask Dave quick response button.
Join us!
Copyright © 1999-2026 DDFM Enterprises. All Rights Reserved. DDFM ENTERPRISES, DAVE'S SHOP TALK and the Dave Osborne logo are trademarks and service marks owned by DDFM Enterprises. All other trademarks on this site are the property of their respective owners. Site design by Design Strategies, Inc.