Building Confidence
| Volume 18 Issue 10 ISSN 1923-7162 |

Welcome to Dave's Shop Talk's Home Improvement Newsletter of questions from our members on their construction projects, a Tip of the Month and a home remodeling article, both from our website at https://daveosborne.com.
Tip of the Month
A 4 1/2" angle grinder with diamond blade works great for a homeowner cutting notches in ceramic tile.
For exterior doors with sills allow an extra 2" for width and 4" in height over the nominal size. For example, the rough opening of a 36"x80" door should be 38"x84" with sill.
KEEP BUSY! Now's a good time to catch up on your projects!
Ask Dave!
With Winter approaching, here are a few tips to help you in your preparation:
- Remove all hoses from their hose bibbs. Even the frost free hose bibbs need to have the garden hose removed so that any water remaining in the valve stem can drain out. Drain the garden hose, itself and store away. On older style hose bibbs, shut off the tap inside the house. Make sure you know where the main shut-off to the house is, before anything happens. It is a good idea to shut off the main valve when going on vacation. The in ground irrigation system should be turned off and the lines blown out before freezing weather sets in.
- Close all vents to the crawl space. The crawl space should be insulated to prevent pipes from freezing. A small baseboard heater or inline heater along the pipes, is recommended during this time of year, if temperatures in your area drop below freezing. Secure the heater well to prevent problems. Make sure your sump pumps are operational, if so equipped.
- Basements should be insulated. I recommend constructing a 2x4 wall in front of the concrete foundation wall, floor to ceiling, installing insulation and vapor barrier. Strap and insulate short concrete walls. Leave a 1" airspace between the wood wall and the concrete. Only put vapor barrier on the warm side of the wall.
- Your furnace filters should be changed by now. Cleaning the air ducts is also recommended. Have a service person tune-up your furnace. Make sure furnace, fireplace and stove chimneys are free from bird's nests or debris and the wood burning liners are swept clean regularly. Close fireplace dampers when not in use. Use Soot & Creosote Remover when actively burning wood.
- Your hot water tank should have an insulation blanket around it, also, exposed hot water pipes should be covered with proper pipe wrap insulation.
- Time to check the batteries in your smoke and carbon monoxide detectors. Check your portable fire extinguishers to be sure they are charged and the powder is not settled and hardened over time.
- In older homes, check out ways to insulate. Little foam pads are available under face plates for plugs and switches. Clear film is made for covering single pane windows. Use caulking to fill gaps around windows, doors and siding. Check out the weatherstrip on doors and windows that open. Are your thermal pain windows still sealed or do you notice condensation between the glass panes?
- Check to see if you have fresh air coming into your home in a regulated fashion. Check out the dehumidifier switches for bathroom fans. Forced air furnaces should have fresh air introduced to them through their cold air return. Talk to local experts who can advise you on this subject. Usually local government departments have free brochures and advice.
- Clean exhaust vent pipes and hoods from the bathrooms and clothes dryer for dust and blockages. Check out the condition of the hoses and pipes, as well, particularly, the corrugated light plastic hoses, which in my opinion, should be replaced with solid pipes made for this purpose.
- Roofs and gutters should be cleaned of moss and debris. I've heard that Tide powder laundry detergent works great on keeping moss off roofs. This is the time to sprinkle some Tide on the roof and let the rains take care of it. Checkout the condition of the roof - shingles needing repair or missing entirely, as well as, overhanging tree branches that could come down in a heavy snowfall and do damage. Check the downspouts, as well, to be sure they are attached to the gutter and not plugged with debris. If the downspouts run onto the lawn, rather than connected to a storm drain, make sure they run the water away from the building foundation, but not over walkways where they could freeze and cause a safety hazard. Also, checkout drain guards at the bottom of steps leading into the basement from the outside, as well as driveway trench grates.
- Check the insulation on the floor of the attic and the ventilation in the attic space. Inadequate insulation here is the result of ice dams in the gutters and at the eaves.
- Reverse the rotation on your ceiling fans to bring any warm air trapped up at the ceiling down to where it is needed.
- Keep a few bags of coarse salt for walks and drives when everyone is wanting it at the same time. Also, prepare for eventual power failures, having a stock of candles, batteries, rechargeable flashlights left in the receptacles until needed, fully charged power bank for your cell phone, food and water, fireplace and air tight stove cord wood, etc for serious loss of electricity and services for an extended period of time. Be sure to top up supplies in your first-aid kit, as well as, a good backup of your vital prescription medications.
- Finally, don't forget about your garden equipment - lawnmowers, weed whackers and blowers that have a gas motor. These gas tanks should either be emptied and run dry or have a stabilizer added to them, to prevent the gas from varnishing. Boaters are familiar with this process every winter season, dealing with their outboards and engines, if not being used for a few months.
Dave
Here is a free article from our site DaveOsborne.com for you.
Plumbing and Ventilation 3: Questions on Plumbing and Ventilation
(From https://daveosborne.com/dave/articles/plumbing-ventilation-answers.php
Here's a list of Dave's answers about plumbing and ventilation you might find of help. Click on a title to see its answer.
Heating Ducts
I am refinishing the basement and need two additional air ducts in the bedroom and bathroom from the existing central air conditioning plenum. I need suggestions and/or diagrams on the proper assembly. I want to use rigid ducting and am looking at possibly 4" or 6" diameter with the total length of both locations of 8 linear feet.Answer
Use a 5" or 6" diameter duct. You need to buy an adapter from the 5" duct (for instance) that will fit a standard 4x10 or 3x12 floor register. The adapter or boot is secured to framing in the wall or a square hole cut in the floor. The other end which goes into the plenum is fitted through a proper sized hole in the plenum, notched about 1" x 1" to form tabs. Each alternate tab is bent into the inside of the plenum and its alternate is bent onto the outside. Space out 3 screws around the duct on the outside and screw these tabs into the plenum. Wrap proper foil adhesive tape (not duct tape) around the outside of the 5" duct and the plenum to seal off any air leaks. Also tape the joints with this tape as well.Installing A Shower Valve
Can you tell me how to install a shower valve in my new bathroom. The two 1/2" water pipes are stubbed out between two 2X4's in the wall. I just don't know how to mount the valve between them. Is there some type of special bracket that is made to do this?Answer
Sometimes the valve has brackets to screw to backing between the studs, Most times the valve doesn't have anything for this at all. Regardless, backing, a 2x4 or 2x6, is fastened on the flat in between studs and centered with the shower drain. Usually the instructions will give the distance the valve should be back from the finished shower wall, depending on the finished trim you have selected. The valve is then fastened to the backing with plumbers metal strapping. The hot and cold water supply should connect directly to the valve inside the wall, they should not be stubbed out. The plumber probably stubbed them out as a temporary service so he could turn the water on. So before removing the supply pipes from these stub outs turn the water off. Depending on the type of valve you got it will take either 1/2" female iron pipe adapters or 1/2" copper pipe sweated fittings. If you sweat the copper pipe fittings to the valves remove any rubber washers, etc before heating the valves up, so you don't damage them. The shower head should be on the same center line vertically. For a shower only, the valve is centered horizontally at 54" above the finished floor with the head at 78" above the finished floor. For a tub/shower combination, the valve is centered with the drain and 15 1/2" above the tub rim, the spout is centered 4" above the tub rim and the head is 78" from the finished floor. If you have the original instructions with the unit follow their specs.Pex Pipe
I see a lot of people using pex for domestic water in new houses. In your opinion what are the advantages and disadvantages of using it.Answer
Pex is an excellent product for hot and cold water. Use the fittings that insert and are crimped on instead of the bulky outside fittings. You can rent the tool to crimp each fitting. The only restriction that I know of is Pex buried under concrete, check out your supplier if going this way.Plastic Sewer Pipe To Cast Iron Bell
We are renovating an old house that has a septic system. The pipe to the septic is cast iron. How can we change this pipe to plastic pipe?Answer
Actually, this is not a big problem. The cast iron pipe hub should be either cut off with a reciprocating saw with steel blade or by renting a large cutter for cast iron, if you have the room. I have done this a few times using the recip saw. Just a warning - cast iron pipe is very hard, but also very brittle. It can be broken with a hammer. Once the pipe is cut off a "mission" fitting, a rubber fitting that slips over the pipe and fastened to the pipe with stainless steel clamps, is used between the cast and the ABS or PVC. Here is a pic of one:![]()

Pouring A Shower Pan
Do you know about the type of cement to be used for the shower pan?Answer
There are actually 5 types of portland cement that we use in mixing concrete with variations of the first 3 with air entrainment. The two most common are Type I (Type 10 in Canada) called Normal Portland Cement. This is an all purpose blend which is the most popular. Type III ( Type 30 in Canada) is a high early strength mix. For a shower pan a Type I should be used. For small amounts of concrete pre-mixed bags are handy. The cement and aggregate are pre-mixed, all that is needed is water. For a bit larger job, one can buy an aggregate mix of sand and gravel called navvy jack which is mixed with cement in the proportion of 6 shovels of aggregate to 1 of cement to give about a 3000 psi mix.Range Hood Vent
Where can I find info on installing a rectangular range hood vent?Answer
The standard size vent duct for a range hood is 3 1/4" x 10" or 7" diameter. You can purchase the duct and transition pieces, angles, etc. at most building supply stores. You'll find that the 3 1/4x10 duct has a wall and roof cap that are compatible to it. The duct should be insulated in the attic to prevent condensation. Try to keep the duct as short as possible with as least number of 90 degree turns as possible. Each fan has a rating which allows so many feet of duct to the outside, 90 degree turns use up a certain amount of this allowable footage. The duct comes in a flat piece which is cut to length before assembling. Screw the joints to prevent separation with 1/2" x #6 pan head sheet metal screws and tape the joints with silver duct tape not the regular duct tape. The wall cap is used on an exterior wall where the duct discharges. The roof cap is used on the roof. You use one or the other. Run the duct through the wall and down the cabinet. The duct should extend down through the cabinet by about 1/2", then cut the corners and fold the sides and ends back against the bottom of the cabinet. The range hood should have a lip which is screwed in place which extends up about 5/8 to 3/4 into the duct under the cabinet. The hood is then screwed in place to hold it secure. The 14/2 wire with ground comes through the wall, no electrical box, into the hood knock out hole. Use a box connector to protect the wire. Make a hole in the drywall large enough to make room for the connector. Connect the wires from inside the unit accessible from under the hood.![]()

Toilet Space
How much space for a toilet is normal (the smallest) to have between a vanity and a bath tub?Answer
Our code requires at least 30", usually it's 36".Washing Machine Vent
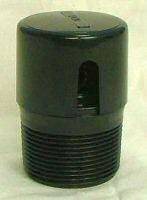
How do I vent a washing machine without hooking up to a vent stack or through the roof?Answer
You must be asking about a mechanical vent. You can buy these in most hardware stores. They are not acceptable by the plumbing code, but in a pinch they are good. Don't hide them in a wall, in case you need to replace it, keep it accessible. Install it above the highest water level of the washer. Here is a picture of the mechanical vent you need. Install it after the p-trap coming off a tee. Use a 1 1/2" female pipe adapter to screw it into. Use Teflon tape or dope on the threads. They cost under $5. Here is more info about the vent at Amazon.![]()
Wet Vent
What is a wet vent? How do you vent tubs and showers?Answer
A wet vent is a vent that is also used as a drain. Maximum trap arm length is 10' for a toilet to the vent and a sink and tub or shower is 5' from the vent.
Read hundreds of diy articles, answered questions and dozens of plans and projects all written by Dave.
Become a Member and Dave will personally eliminate any doubts you might have about your projects by email.
Dan and I thank you for your interest and support of our Website. We hope we can help you with your present and future projects.
Get complete access to our website - Subscribe Now!
We BUILD CONFIDENCE. If you need advice on Building or on your projects at work or home you can make a very small investment and subscribe to our website, then send me any questions or uncertainties you might have via email. There is no extra charge. That is all part of your membership to our site!
Help us with the cost of putting this info out by becoming a member. Subscribe now!
Please tell your friends and family about our site and this Newsletter.
Your source for building tips, woodworking & furniture plans, house plans and building advice directly from Dave...
Hi, I'm Dave Osborne. With over 50 years experience as a journeyman carpenter, foreman and contractor in heavy construction I enjoyed working with apprentices and sharing the tricks of the trade that others shared with me. Now I get emails from Members all over the world and we include many of my answers in our Free Monthly Newsletters. Some of my answers include drawings and instructions specific to a project, but may also answer your questions. I use correct construction terminology, so you can confidently inform your building supply dealers or contractors exactly what you need.
ASK DAVE!
The Benefits of Membership
Membership gives you full access to our hundreds of how-to articles, woodworking plans, converters, calculators and tables. Our Stair Calculator is one of the most popular on the internet. We have projects you can build for (and with) your kids, furniture for your wife, and sheds and gazebos. If you run into a problem or need advice your Membership includes unlimited email questions to me through our Ask Dave quick response button.
Join us!
Copyright © 1999-2026 DDFM Enterprises. All Rights Reserved. DDFM ENTERPRISES, DAVE'S SHOP TALK and the Dave Osborne logo are trademarks and service marks owned by DDFM Enterprises. All other trademarks on this site are the property of their respective owners. Site design by Design Strategies, Inc.