Building Confidence
| Volume 18 Issue 12 ISSN 1923-7162 |

Welcome to Dave's Shop Talk's Home Improvement Newsletter of questions from our members on their construction projects, a Tip of the Month and a home remodeling article, both from our website at https://daveosborne.com.
Tip of the Month
To clean a stainless steel thermos bottle, pour boiling water within 1 inch of the top. Pour in 1 heaping teaspoon of powder dishwasher detergent (Cascade or Electrosol). Replace cap, let stand for 1 hour while gently agitating, periodically. Remove cap and pour out most of the liquid except for about 3" from the bottom. Gently, insert a bottle brush cleaning the sides well. When removing the brush, be careful not to splash any liquid in the eyes. Rinse thoroughly with clean water.
For definitions of construction terms, checkout our dictionary: Construction Terms
KEEP BUSY! Now's a good time to catch up on your projects!
Ask Dave!
Hi Dave,
I need to remove a couple of small screws that hold magnets for what I call half-doors. The problem is the screws are in tight and the phillips heads are very soft. Seems I'll ream the screw tops with any more force. Meanwhile, I'm not turning the screws.
Are sheet metal screws made from softer material than wood screws? I'm asking because I took the magnets down to paint the frame. When I went to re install I could only find 1 screw. The closest match to the size at the HW store were sheet metal screws.
Thanks,
Trace
Hi Trace, it's been a while.
I've run into this problem many times. Sometimes I actually drill the head of the screw out, just the head. Then remove the piece that is fastened. This reveals a short amount of the screw sticking out of the wood. With a good pair of pliers, I grab the remaining part of the screw and unscrew it out. If it doesn't screw out, file it off flush and move the magnet over a little bit. Sheet metal screws, I would think, are as strong or stronger than wood screws, it depends on the Brand. I think Dollar Store screws are softer than Hardware Store screws.
Hope this helps.
Stay safe, Trace,
Dave
Dave,
I was afraid it would come to that. More surgery than carpentry!
Been following your weekly emails but haven't been up to anything lately. Think that will change this year.
You're legendary for steps. What about concrete with limestone topping... or am I at the wrong union apprentice training center for that one? Details to follow if this is an appropriate project.
Thanks,
Trace
Hi Trace,
Yes, it's been a crazy year, 2020, I'll be glad to see the end of it. Glad to see the US, Canada and the world, getting the vaccinations, a huge undertaking!
I can help with concrete steps, alright. We can learn together with limestone toppings. I have a grandson in the Landscaping business that we can probe for info!
Dave
Dave,
Here's what we're dealing with. Sorry the detail shots turned sideways [fixed in this newsletter] but you can see the rot regardless.
Won't do this till it warms up enough to pour concrete but I'd like to start planning for spring.
Where do we start? The RR ties are approximately 4 feet wide.
Thanks,
Trace


First, Trace, read this article and the others on stairs: Stairs 7: How to Build Concrete Steps
Before you rip all these rotten stairs apart, we need to get the total rise and total run. I count 12 rises, so there should be 12 runs, in this case.
Determine whether you want a limestone step on the bottom landing, or the steps to land on a concrete sidewalk or whatever. Also, if you want the top landing to be a limestone step then onto concrete or gravel or grass, which I recommend.
You can find the total run and rise by taking a tally of each existing run and rise, adding them all up. Or, build a level straight edge out the entire total run and measuring down for the total rise and horizontally for the total run, by supporting the level board to the existing rises, or both to see how accurately your calculations are. Then when this is done, you can remove the rotten steps.
Also, you need to decide on if the side steps have an apron or not. This means if the side walls of concrete extend up above the steps so you can see the top of the wall or if the wall is under the steps. Also, the thickness of the limestone steps.
Let's start with the total rise and run, as with all stairs.
Dave
Feature Article of the Month
(taken from our website: DaveOsborne.com)
Stairs 7: How to Build Concrete Steps
He told me, "If you can build stairs out of wood you can build concrete stairs".
When I was a young carpenter, working on a school project, I was told to build a set of concrete stairs to connect two levels of a sidewalk, not yet in place. I talked to my father who taught me the trade while working on industrial projects in northern Canada, constructing mine buildings and bridges. Somehow I missed the concrete stair session. He told me, "If you can build a wooden set of stairs you can build them out of concrete." He told me two things: the stringers for a concrete stair are on top of the treads and instead of a nosing, the riser is angled to give a wider tread. Armed with my new information, I attempted to build the set of concrete stairs.
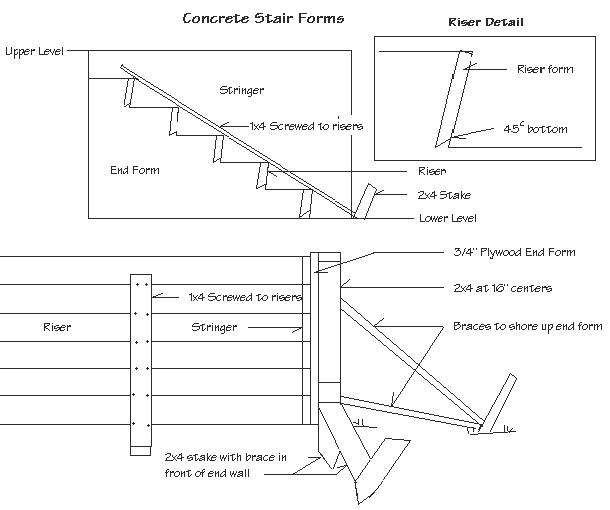
To support the stringers, I built the forms on each side of the stairs, braced them properly in order for them to hold the concrete. I built them tall enough to be able to nail the stringers to them. I measured the total rise between the two levels of proposed sidewalk and calculated the individual rise. I used a low rise of 6" for the kids and chose a run of 12" to complement the rise. I learned that in stair building the pairs 6 and 12, 7 and 11 and 8 and 10 went together. I laid out the stringers. I found it tough at first to get my head around the fact that the stringers are above the treads, acting as a support for the risers that are like bulkheads in a form. I canted the riser back 1" on the bottom to allow more room for the foot on the tread. I used 3/4" form ply on the side forms and for the stringers.
Once the side forms were in place and the stringers fastened in position, I could see that the slope of the earth needed a bit of correction. I wanted at least 4" of concrete under my risers. The dirt was removed to form the correct slope and clearance. It was then compacted well using a plate compactor.
Since this was a commercial project and a union job I just stood by and watched the laborer repair the slope. Actually I stood there just long enough to be sure he understood what I wanted. While I was waiting for the preparation of the slope, I continued on my stairs. I ripped my risers to the right heights and the bottoms on a 45 degree. This was another piece of info my father included: "When the cement finisher comes along to finish the treads, if the risers are not ripped to a 45 on the bottom, since they are are on an angle, the bottom will dig into the tread below it". By ripping the riser material on a 45 degree angle, the bottom of the riser comes to a point, allowing the finisher to trowel right up to the inside bottom corner of the tread and riser. Otherwise there will be a depression left of the 2x8 riser along the tread next to the riser.
I returned to the stair site and noticed the foreman had asked the rebar guys to install a mat of rebar to lay on the slope, after the laborer had finished his compacting. I nailed the risers into position. Since the stairs were about 5' wide I tied all the risers together at the center of their span with a 1x4 nailed down the slope attached to the top of the risers. At the bottom of the 1x4, I drove a stake into the ground to prevent them from moving. I also drove stakes at the edge of the side forms to prevent any movement in the same direction. The risers were all attached to the side walls and I could see the force created by the weight of concrete wanting to deflect the 2x8 riser forms. As I was finishing up, I noticed the rebar guy was back and held the mat off the slope by attaching tie wire to it and hanging it off the risers. He formed a loop around the mat and the riser so the cement finisher could cut the wire and pull it out to get it out of his way. He also added a couple of bars running with the risers in each tread.
Concrete was scheduled late in the day so I stood and watched as the laborers poured the concrete. I loved those union jobs. The forms held well. The finisher started to finish my masterpiece. The concrete was setting up quickly in the heat. The finisher wanted to remove the 1x4 tying the risers together. He got me to remove the 1x4. I had to pry it from the risers0 with extreme care to avoid any movement. I learned a valuable lesson: now I always attach this 1x4 into the riser tops with screws to make it easier to remove during the finishing process.
I've formed many concrete stairs since then. The first one was a good learning experience.
Almost the End
Read hundreds of diy articles, answered questions and dozens of plans and projects all written by Dave.
Become a Member and Dave will personally eliminate any doubts you might have about your projects by email.
Dan and I thank you for your interest and support of our Website. We hope we can help you with your present and future projects.
Get complete access to our website - Subscribe Now!
We BUILD CONFIDENCE. If you need advice on Building or on your projects at work or home you can make a very small investment and subscribe to our website, then send me any questions or uncertainties you might have via email. There is no extra charge. That is all part of your membership to our site!
Help us with the cost of putting this info out by becoming a member. Subscribe now!
Please tell your friends and family about our site and this Newsletter.
Your source for building tips, woodworking & furniture plans, house plans and building advice directly from Dave...
Hi, I'm Dave Osborne. With over 50 years experience as a journeyman carpenter, foreman and contractor in heavy construction I enjoyed working with apprentices and sharing the tricks of the trade that others shared with me. Now I get emails from Members all over the world and we include many of my answers in our Free Monthly Newsletters. Some of my answers include drawings and instructions specific to a project, but may also answer your questions. I use correct construction terminology, so you can confidently inform your building supply dealers or contractors exactly what you need.
ASK DAVE!
The Benefits of Membership
Membership gives you full access to our hundreds of how-to articles, woodworking plans, converters, calculators and tables. Our Stair Calculator is one of the most popular on the internet. We have projects you can build for (and with) your kids, furniture for your wife, and sheds and gazebos. If you run into a problem or need advice your Membership includes unlimited email questions to me through our Ask Dave quick response button.
Join us!
Copyright © 1999-2026 DDFM Enterprises. All Rights Reserved. DDFM ENTERPRISES, DAVE'S SHOP TALK and the Dave Osborne logo are trademarks and service marks owned by DDFM Enterprises. All other trademarks on this site are the property of their respective owners. Site design by Design Strategies, Inc.