Building Confidence
| Volume 19 Issue 6 ISSN 1923-7162 |

Welcome to Dave's Shop Talk's Home Improvement Newsletter of questions from our members on their construction projects, a Tip of the Month and a home remodeling article, both from our website at https://daveosborne.com.
Tip of the Month
When trimming off an asphalt shingle roof, use a utility knife with a hooked blade. You'll find it cuts easier than a straight blade and stays sharper longer.
A real handy tool for reno work is the reciprocating saw with a 12" blade. You can sharpen these blades, as well with a little three cornered file, to fit the teeth. Also, you can get metal blades for them which are good for cutting through the nails holding in a door jamb, etc. I also use it for cutting the bottom of casing and door jambs off, to lay flooring under them.
KEEP BUSY! Now's a good time to catch up on your projects!
Ask Dave!
I have a deck on the corner of a second floor condo. The deck is "L" shaped 14' X 8' and 6' wide. It is fastened to the building on the inside of the "L" shape and supported by 3 pillars at ground level. I'm trying to find out if the deck has dropped. Have measured the slope at the end of the 14' length and there is a 1" drop. Is that too much for a 14' span? The slope from the building to the 6' width is 1/2".
No, a 1" drop in 14' is not much of a slope at all - which is a bit more than 1/16" per foot. Usually, for a deck to shed water we use 1/4" per foot - which is 1" in 4'.
The posts probably did not sink at all.
Dave
Dave, I am wanting to make a tree ring out of rounded 4X4's and without costing any more money. I am wanting to know what the exact cutting degree would be for a 4 ft diameter hexagon around this tree.
Hi
A hexagon can look complicated but once you know the tricks it is quite simple to cut materials for it. For an inside radius of 2', each side is cut 2' long on the inside. Each miter angle is 30 degrees, cut on the miter saw.
Refer to the drawing:

Hi Dave. Can you tell me what the BCBC states about the dimensions for exterior stair handrails? Is 2x3 good? Is 2x4 have too great of a cross section or perimeter? regards, Doug
Hi Doug,
Here is a link to an excerpt from the BCBC 2006 on handrail codes: http://www.rdosmaps.bc.ca/min_bylaws/building_inspect/forms/Guard_excerpt.pdf
Here is a scan of the sections of recommended handrails.

Handrails are not limited to these sections only. Inspectors are not too strict in their interpretation of the code for exterior handrails, unlike interior ones.
In my experience, inspectors accept a 2x4 on flat for exterior handrails. 2x3 also would be acceptable.
Dave
Thank you, Dave. This is excellent info. Maybe a sentence or two to on your stair construction page would help other folks too. regards, Doug
Thanks, Doug. About 95% of our website members are from the US, so I need to be aware of the International Building Code, as well. The IBC is quite similar to the BCBC, but not quite as stringent in certain areas. I embed measurements in this article: Stairs 5: How to Install an Inside Handrail
Dave
Dave, On page 18 of the 10 x 12 garden shed plans, you state, "Tar paper is stapled to the studs, first. Use the proper type for walls." You don't have tar paper for the walls in the list of materials. For a shed, is it necessary? I've got 15 pound for the roof. Same stuff or 30 pound for the walls? Thanks! Rick
Hi Rick,
The difference between tarpaper and roofing felt is that tarpaper allows air to pass through, but not water. Roofing felt is non-perforated so no moisture will pass through either way. Notice that roofing felt goes by weight by the square and tarpaper goes by minutes without permeation of water.
For siding like vinyl and bevel, tarpaper is a good idea. For vertical plywood siding, tarpaper is not needed if you caulk the joints with latex paintable caulk. In a house with siding directly on studs, without any sheathing, 2 layers of tarpaper are required.
I agree, tarpaper is optional on a shed. That's why I don't include it in the List of Materials.
Dave
Feature Article of the Month
(taken from our website: DaveOsborne.com)
Cabinets 3: How to Make Cabinet Doors
In this article I will discuss some ways a person having the basic shop tools can build his own kitchen cabinet doors or China cabinet doors or even curio cabinet doors.
 To start with, the easiest cabinet doors to make is a slab door made from plywood or MDF with the edges rounded over or profiled and a square pattern routered out in the center. When purchasing the plywood or MDF always buy a sheet that lies flat on the pile. This should give fewer problems with warping.
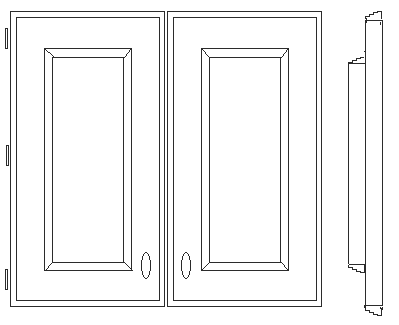
Similar to this style would be the same plain plywood or MDF with a small molding nailed and glued in the form of a pattern on the face of the door, such as shown on the left. Going a bit further, instead of routering a profile on the edge of the cabinet door, you could apply a small molding on the edge similar to applying square edging or tape. This is particularly useful to hide the grain of plywood. Keep the molding flush with the back of the cabinet door. I used this design with melamine, trimming it with oak molding. MDF, if painted, is an ideal material for cabinet doors since no grain appears on the edges. Be careful to include the thickness of molding in your measurements when cutting the cabinet door to size. The cabinet door should overlap the face frame or gable by about 1/2" to 5/8", depending on the hinges you have chosen.
Tall cabinet doors, as shown in the drawing, should have three sets of hinges along the side, shorter cabinet doors need only two. Come down from the top and up from the bottom of the cabinet door about 3" when installing the hinges.
For a face frame cabinet, if the Amerock style overlap hinges are chosen for design, they should be self closing and should come with screws for the front and back as well as little bumpers. Notice the screws are different for the front and back. The cabinet door should have a magnetic closer installed under a shelf and the plate on the door. Install door pulls or knobs on the cabinet doors as desired.
 Raised panel cabinet doors are usually bought or made by those with expensive tools or router bits. I've designed a panel type of cabinet door which is quite easy for the handyman. Basically it is designed like a Shaker door with a 1/4" plywood panel surrounded by four sides that have been dadoed out to receive the panel. You can reveal the stiles to the rails, as shown, or sand smooth.

The stiles and rails of the cabinet door are cut to length and then dadoed to fit the 1/4" plywood panel. A spline is inserted with glue into each corner to fill the dado and provide stability. The cabinet door unit is glued up and clamped together to dry overnight. Make sure the units are assembled on a flat bench and weighted down to keep them true and flat.

To make a cabinet door with a glass panel instead of a plywood panel, which is ideal to show off your fine china in a kitchen cabinet or in a separate china cabinet or curio cabinet, dado the stiles and rails to fit the same splines as in the panel cabinet doors. Rip off the back side of the dado just around the perimeter of the glass panel. Leave the dado intact at the corners for the spline. Finish the rip in the corners with a sharp chisel. Rip a stop for the glass to fit in this rabbet, allow for the thickness of glass. If the glass breaks, the stop can be removed without having to throw the cabinet door frame away. Add a lattice of 1/4" thick bars about 5/8" wide. Glue the butt joints to the stiles and rails of the cabinet door, make them fit tight. An optional method would be to half-lap the lattice at their intersecting joints. Notice how the cabinet door stiles overlap the ends of the rails. Trim the splines off flush with the top and bottom and stain or paint the cabinet doors. The spline makes an added feature as seen from the top or bottom.
Before staining or finishing the cabinet doors and china cabinet, sand lightly all over. Plywood will come with what is called a mill glaze over it. This should be sanded off or roughed up, with the grain, so the stain will cover evenly - use a 120 grit sandpaper before you stain. One of the problems I have encountered with homeowners is that they sand a project too smooth before applying the stain. The pores of the wood are all closed from the fine sanding and won't let the stain penetrate. When the stain dries apply a Varathane clear finish in satin or semi-gloss, rather than gloss. Don't use a latex type of stain or Varathane, go with the oil based. I like the professional Varathane which dries quickly and leaves a nice finish with a brush, as long as the temperature is above 50 degrees F. I also prefer the gelled stain for furniture - rub it in with a rag. Let the stain dry, before coating with the clear finish.
My next article will discuss making formica counter tops for your kitchen cabinets. Also, have a look at my Buffet and China Cabinet plan for more ideas on making glass cabinet doors.
Almost the End
Read hundreds of diy articles, answered questions and dozens of plans and projects all written by Dave.
Become a Member and Dave will personally eliminate any doubts you might have about your projects by email.
Dan and I thank you for your interest and support of our Website. We hope we can help you with your present and future projects.
Get complete access to our website - Subscribe Now!
We BUILD CONFIDENCE. If you need advice on Building or on your projects at work or home you can make a very small investment and subscribe to our website, then send me any questions or uncertainties you might have via email. There is no extra charge. That is all part of your membership to our site!
Help us with the cost of putting this info out by becoming a member. Subscribe now!
Please tell your friends and family about our site and this Newsletter.
Dan and I wish all our readers and members of our website, all the best in 2021 and stay safe out there and thanks to our Front Line Workers.
Your source for building tips, woodworking & furniture plans, house plans and building advice directly from Dave...
Hi, I'm Dave Osborne. With over 50 years experience as a journeyman carpenter, foreman and contractor in heavy construction I enjoyed working with apprentices and sharing the tricks of the trade that others shared with me. Now I get emails from Members all over the world and we include many of my answers in our Free Monthly Newsletters. Some of my answers include drawings and instructions specific to a project, but may also answer your questions. I use correct construction terminology, so you can confidently inform your building supply dealers or contractors exactly what you need.
ASK DAVE!
The Benefits of Membership
Membership gives you full access to our hundreds of how-to articles, woodworking plans, converters, calculators and tables. Our Stair Calculator is one of the most popular on the internet. We have projects you can build for (and with) your kids, furniture for your wife, and sheds and gazebos. If you run into a problem or need advice your Membership includes unlimited email questions to me through our Ask Dave quick response button.
Join us!
Copyright © 1999-2026 DDFM Enterprises. All Rights Reserved. DDFM ENTERPRISES, DAVE'S SHOP TALK and the Dave Osborne logo are trademarks and service marks owned by DDFM Enterprises. All other trademarks on this site are the property of their respective owners. Site design by Design Strategies, Inc.