Building Confidence
| Volume 19 Issue 7 ISSN 1923-7162 |

Welcome to Dave's Shop Talk's Home Improvement Newsletter of questions from our members on their construction projects, a Tip of the Month and a home remodeling article, both from our website at https://daveosborne.com.
Tip of the Month
To get rid of moss or algae off your sidewalks or driveway, use TSP and bleach in warm water. Keep clear of grassy areas.
To remove an oil spill from concrete garage floors, use cat litter and work it in well. Use a small piece of wood and rub it into the surface of the concrete. Amazingly, the concrete becomes white again.
KEEP BUSY! Now's a good time to catch up on your projects!
Ask Dave!
I recently had HVAC installed and my old wall furnace removed. Rather than repair the wall, I'd like to take out the doorway. My Dad has asked your help in projects and thought you could tell me if it was safe to take out the doorway or if the wall is load bearing? Let me know what you think or if you need any other pictures when you get a chance! The wall is the same direction as the beams in the attic. There is an open hole into the attic where the furnace used to be and the gas is capped under the house.
Thank you!
Jennifer
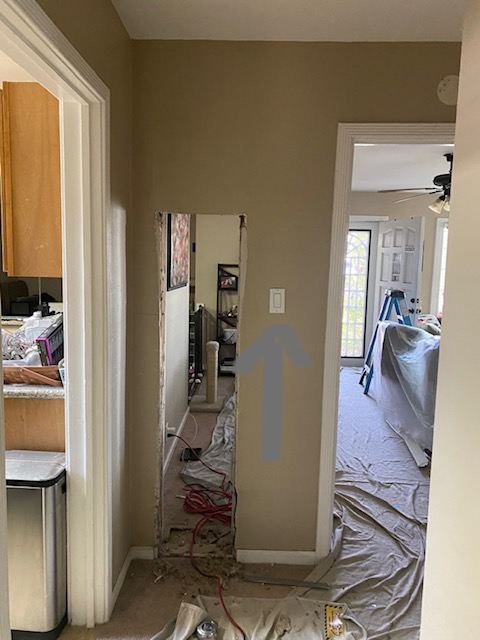

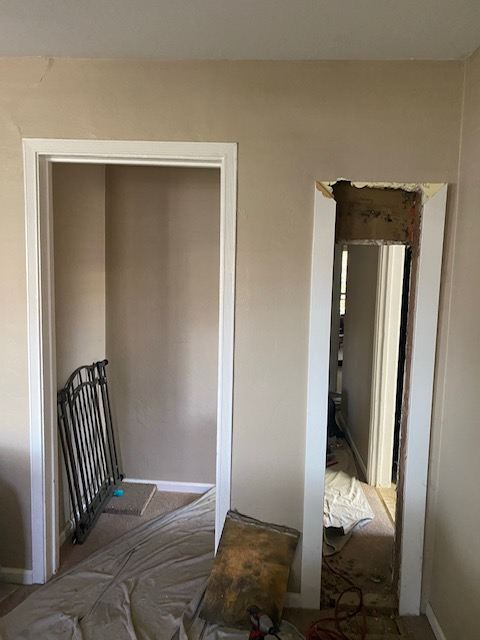

Hi Jennifer, thanks for the pics, which are always helpful.
It looks like you have rafters instead of trusses. Make sure the wall does not support the ceiling joists or the roof and rafters. If the wall goes the same way as the ceiling joist, it probably is not a bearing wall. Just check to be sure that a post from the wall up to the rafter does not exist.
Even if that wall is a bearing wall, there are ways to still support the ceiling joists and/or roof by installing a beam above the ceiling, in the attic space, instead of below the ceiling. Not too much room there, with the HVAC ducts. This is a bit technical, but can be done. It looks to me that the doorway has a header over it, like a double 2x4 on edge. This makes me wonder if it is bearing or not. Usually, in a non-bearing wall, we just put in a 2x4 on the flat, rather than double it up. So check it out thoroughly!
Usually, in a rafter roof there is a center bearing wall going 90 degrees under the rafters and the ceiling joists that are nailed to the rafters are supported by this wall.
Dave
Dave,
I am replacing the handrail on my staircase. It is a short run, only 5 steps. ( I will need 6 balusters per side to meet code of 4" centers.) But I'm not sure about the angles to drill the underside of the new handrail to insert wrought iron rods. I could use a level and mark the old handrail then transfer the marks to the new one, but is that the right way?
Thanks for your help.
Larry
Hi Larry,
I like to take the angles off the stairs, themselves. Lay a straight edge, a 1x4 or 2x4 down the stairs. Place a small piece of plywood, 12" x 12", approximately, on top of the straight edge. Get your level and scribe a vertical line on the piece pf plywood. This is your jig for drilling the angle of the holes. Just line up your drill with the line on the plywood.
Here is a drawing:
Good morning,
I have a 1975 era house where the original builder used 1" white
styrofoam on the basement walls. Some of the material is covered. The
remaining I want to cover because of problems with the material if it
comes in contact with flame. Is the density of the white styrofoam
comparable to the pink in that I can get away without a vapour barrier?
Secondly, what would the "R" value of the white be assuming 1" thick?
Thanks for your time.
Dennis in Ottawa
Hi Dennis,
The National Building Code for Canada requires R-12 insulation in a basement for 24" below grade. Usually, the house builder glues 24" styrofoam SM 2" thick to the concrete which gives a R-value of 5 per inch equaling R-10. Today this is not enough to satisfy the code. In 1975 a basement was designed for storage space rather than living space. Now, with the high cost of land, basement homes are used to their full potential as living and playing space.
Your existing 1" white styrofoam is probably less than R-5 since it is not as dense as the SM type.
I recommend removing the old 1" styrofoam and installing a 2x4 wall about 1" clear of the concrete foundation wall. Install R-12 3 1/2" fibreglass insulation between the studs.
Construct the 2x4 wall with a single top and bottom plate with the studs on 24" centres. Since this is not a bearing wall, 24" centres are okay. You can also use #3 - utility or #4 economy studs for this to save money. Sometimes a building supply has a sale on econo studs that are finger jointed. During the process the pieces didn't get flush on both sides. Since you only need a good surface on one side for the drywall, you can use these cheaper studs, as long as they are straight. You can use the old styrofoam in the stud spaces by cutting them to fit, if you want or around a plumbing stack, etc. for noise insulation. The fibreglass is much cheaper than the styrofoam so that's another reason to go this way.
Install vapour barrier on the warm side of the room, as usual, then drywall or apply your choice of wall finish. Drywall is a good fire barrier which keeps the fire back for a certain time period depending on the thickness.
Dave
Hi Dave,
I have a small hip roof house that I have added another roof to
from over my patio deck. The shingling I won't have a problem with
however, the 2 valleys have me concerned. Many people have offered
suggestions on the right way to complete the roof tie in at the valley.
My existing roof was done last year with 30 yr shingles, felt paper and
ice/water shield. I have installed the roof trusses over the existing
roof and have the sheathing installed.
Would you kindly explain the correct way for me to finish my roof.
Kindest regards.
Dennis
Hi Dennis,
There are two ways to shingle a valley, both are acceptable by the National Building Code.
Method 1 This is what the roofers refer to as "the old school way" (my way). It is the closed valley procedure:
I start by laying out the starter protection, whether it is 30 lb non-perforated roofing felt, or rainguard, by going to the rake of the roof and extending my tape over the eaves by 1 1/2", then going to the other rake or valley and doing the same. I then mark the roof deck at the width of the roll of eave protection, then snap a line at these two marks. Apply the 30 lb felt along the eaves, overlapping the fascia board by about 1 1/2" with the upper edge of the felt on the snap line. This allows the shingles to bend into the gutter which stiffens them up in the wind. Nail, with 1 1/4" galvanized roofing nails, along the top edge of this first sheet at every other truss intersection, so it won't tear off when you walk on it. Also nail up from the bottom edge where there is good nailing at about 12" centers Then run the roll of 30 lb felt down the valley, from the ridge to the eaves. Cut off a single length. Now take this length and fold it in half lengthwise and cut it in half. The width should be 36" or 39" from the roll depending if it was metric or not. After cutting it in half you should have two pieces 18" or 19 1/2" (500mm). Place one strip down the center of each valley, nail the edge on both sides only. At no time should you nail closer than 6" from the center of the valley. What I do when I'm nailing this strip in place is kneel down, with my knee protection on, in the middle of the valley to keep the strip tight into the valley. This is important. Okay you have an 18" strip nailed down in the center of the valley. Now roll out another strip from the roll, full length from the ridge to the eaves. Nail this strip on full width, this time, centered in the valley, nailing at the edges again and with your knee forcing the strip into the valley. So you have two strips of 30 lb felt centered in the valley. The manufacturers, today, require the installer to cover the entire roof deck with 15 lb non-perf roofing felt. Otherwise they won't warranty their shingles. So cover the roof deck that is not already covered with the 30 lb felt. Apply the 15 lb felt parallel to the eaves, overlapping the previous strip by at least 4". If you do this carefully and accurately, you can use the lines marked on this felt to keep your shingles in line, although as you approach the ridge, measure from the ridge to the shingle line to see if you are parallel to the ridge. Run this 15 lb felt into the valley, overlapping the 30 lb felt by about 6". Don't cut the 30 lb felt when you do this.
Okay, let's lay some shingles. Start at the eaves, you need to lay a starter row of shingles. You can't rely on the felt for protection between the shingles on the first row. Follow the manufactures instruction, printed on the outside of the bundle. Usually, you can use part of the shingle as the starter, just be sure to start the starter row with a half shingle so the row on top will be staggered with the joint over a solid shingle. The starter row and the row on top of it should both be flush with the 30 lb felt overlapping the fascia board by about 1 1/2". Continue up the roof running the shingles into the valley and up the other side at least 12". We call this running them wild. Continue up the roof, stay on the one side of the valley right up to the ridge, or until over the valley. Now start on the other side of the valley, at the eaves, as before, except when you come to the center of the valley, run the shingles up the other side, for at least 4" from the center of the valley. Run the shingles up the roof to the ridge as before. At this point I continue with shingling the roof. When the roof is done, measure about 2" up from the center of the valley, at the ridge and at the eaves and snap a line. I get a piece of sheathing, 3/8" OSB or plywood about 12" wide by 8' and slip it under the shingles overlapping the first side and trim the top shingles off along the snap line. When done, you should have a neat cut edge of shingles about 4" up the valley. You don't see any metal flashing, just shingles. In the valley is the greatest chance of having a leak on a roof, since the valley is not as steep as the rest of the roof and a lot of water is directed into the valley from the rest of the roof.
Method 2 The open valley procedure:
Start with the roofing felt along the eaves, then apply a valley flashing centered in the valley, continuous from the ridge to the eaves. This flashing is about 24" wide and has a ridge in the center, not flat, as in the old days. This is a good improvement over the old flat valley flashing. Now start the shingles as above, but when you come to the valley, cut off the shingle about 2" parallel to the center of the flashing. The shingles are cut off neatly on each side of the flashing center, leaving a 4" trough which exposes the flashing with its center ridge. When the water runs down the valley, it hits the center ridge, supposedly preventing the water from going under the shingle on the opposite side of the valley. When cutting the shingles use a piece of plywood or OSB or flashing under them for protection.
Another tip I should mention is to use a hook blade on your utility knife for cutting the shingles off at the rake and the valley.
Hope this helps,
Dave
Feature Article of the Month
(taken from our website: DaveOsborne.com)
Cabinets 4: How to Make a Formica Counter Top
I know you can go into the large building supply stores and purchase a bathroom or kitchen cabinet formica counter top with a rolled top with little shaped end caps supplied as well. But, I would rather build my own kitchen cabinet formica counter top and include a bit of personality to it. I'll show you how.
 On the left I've drawn six different profiles for the edges of your formica counter top, using a combination of formica and oak trim, for example.
Most formica counter top manufacturers today use K-3 particle board which, when exposed to water, from a kitchen sink area, will swell up and crumble away. I can't count the number of times I've seen this happen. Particularly around a kitchen or bathroom sink, I use plywood. Don't buy a sheet of G1S at $40 a piece, but 5/8" D-grade sanded or factory grade or even a select standard sheathing. Anything is better than particle board for around a kitchen sink.
In the corner of a manufactured rolled formica counter top is a miter joint right across the counter, just itching to get all wet and start swelling up or collecting dirt. Formica sheets come readily available in 4x8 and 5x12 sheets. In most cases, for the normal kitchen cabinet formica countertop, no joints are required at all, if you do it yourself.
The easiest way to make a formica counter top is to make it in your workshop with formica splash attached to cover the shape of the bathroom or kitchen cabinets. This helps in trimming off the formica with a router, being able to get around the counter top without a wall in the way.
Take careful measurements including how square or out of square the wall is, especially if the cabinet counter top is an L-shaped one. Make a template of two intersecting 1x4s with a brace between them if you have to. There will be a bit of adjustment for a wonky wall, but that's about all. If the wall is out quite a bit, this should be allowed for.
The basic formica counter top is made the same way for all the profiles shown in the drawings above. The edges will be different depending on the hardwood and the profile chosen. There are two options for the top, overhang the front of the kitchen cabinets or build up the top to have it come out flush with the top of the bathroom or kitchen cabinets. Flush is the standard today, unless making a top for a '60s set of cabinets. In the '60s, we used to make the counter top an integral part of the cabinets. That is, the top would help hold the kitchen cabinets together. We used to nail the plywood to the top of the cabinets and then apply the formica in place. We could never trim right to the wall with a router because the base plate would hit the wall, leaving about 3" of the edge not trimmed. We finished it by hand using a coarse file, block plane, or any other tool we could make use of.
 For the formica top on the left, a piece of oak is attached to the plywood front to form an edge. Formica covers the plywood top and edge. The formica splash is made separately and attached by drilling holes through the plywood backing through the formica. The splash is then screwed into the plywood back, using silicone caulking to fill the voids. The formica is trimmed off by using a 45 degree bit with a ball bearing guide in a router, trimming the formica at the same time as it profiles the oak with a 45 degree bevel. Notice the oak cap on the formica splash. This adds a nice touch and eliminates the need to trim off the formica to the wall. This cap is installed after the splash top is in place and matches the oak on the edge. I keep the cap about 3/8" thick and overlap the formica splash about 1/8".
 In the drawing to the right (plan view), I've shown an L-shaped kitchen cabinet formica counter top with its backing attached to the bottom, usually 3" wide. The 5'x12' size indicates the maximum size of a sheet of formica without having to go with a joint. Remember when ordering your formica, to include material for the splash and edging as well.
The formica is applied to the plywood top with contact cement. Use a solvent based (not latex) contact cement in an area with lots of fresh air. The adhesive is spread with the use of a short pile roller that you discard when finished. The cement on the edging and splash can be applied with a disposable natural bristle paint brush. Apply the contact cement as instructed on the can by applying to both surfaces and leave until dry. When the two surfaces touch they will stick together and you won't be able to pull them apart. To compensate for this we either use a kraft paper or thin strips of wood or extra formica to place the glued formica in the exact position we want above the glued plywood. Since the glue is dry it won't stick to the paper or sticks, just to itself or other glued surfaces. When the formica is in position, pull the paper or sticks out carefully and the formica will stick to the glued plywood and can't be moved. When all the sticks are removed the formica can be rolled onto the plywood eliminating any air bubbles. If the formica covers the edge, instead of an oak trim, the formica on the edge is glued first. The top of the edge is trimmed off a tiny bit above the plywood to ensure a good seam. The plywood is then glued and formica applied with the top overlapping the edge. After the formica is rolled, the trimming procedure with the router can be done. Use a tapered formica trimmer bit with guide wheel and adjust the bit in or out by raising or lowering the bit in the router. Practice on a scrap piece first. Be very careful and slow in getting the bit to the exact position without cutting too much of the formica and having too wide a seam. I usually just trim off the formica to feel a slight burr, then sand the burr off with 120 grit sandpaper on a wooden block. Once you have gone too deep with the router bit, you have spoiled the piece, so take it easy and slow.
If you need a joint in the formica counter top pick a place that is the least noticeable. I choose the center of the sink for one spot. With using the plywood for a base, I have found through experience that there is no problem joining the sheets of formica at the sink. This way there is only about a 2" or 3" joint noticeable on each side of the sink, after it is installed.
There are products out there that can be used to fill in bad joints or repairs. These products are expensive, but they do the trick. They match the number on the formica sheet. This product is called FormFill Mitre Joint Sealant & Laminate Repairer, made in Australia. It has a match to the colors of the following brands: Wilsonart, Formica, Arborite, Nevamar, Pionite. They have a US distributor who's website is: https://www.formfillproducts.com and can be found at cabinet supply stores which usually cater to tradesman and kitchen cabinet shops.
Now that you know the basics, experiment a little and be innovative. Mix and match the formica with oak or other species of wood. I've even painted my wooden cap on the splash to compliment the color of the formica top. If you want to share your ideas with other members of this site, send me a picture of your creation and Dan will put them up on the member's photos page of the website.
Almost the End
Read hundreds of diy articles, answered questions and dozens of plans and projects all written by Dave.
Become a Member and Dave will personally eliminate any doubts you might have about your projects by email.
Dan and I thank you for your interest and support of our Website. We hope we can help you with your present and future projects.
Get complete access to our website - Subscribe Now!
We BUILD CONFIDENCE. If you need advice on Building or on your projects at work or home you can make a very small investment and subscribe to our website, then send me any questions or uncertainties you might have via email. There is no extra charge. That is all part of your membership to our site!
Help us with the cost of putting this info out by becoming a member. Subscribe now!
Please tell your friends and family about our site and this Newsletter.
Dan and I wish all our readers and members of our website, all the best in 2021 and stay safe out there and thanks to our Front Line Workers.
Your source for building tips, woodworking & furniture plans, house plans and building advice directly from Dave...
Hi, I'm Dave Osborne. With over 50 years experience as a journeyman carpenter, foreman and contractor in heavy construction I enjoyed working with apprentices and sharing the tricks of the trade that others shared with me. Now I get emails from Members all over the world and we include many of my answers in our Free Monthly Newsletters. Some of my answers include drawings and instructions specific to a project, but may also answer your questions. I use correct construction terminology, so you can confidently inform your building supply dealers or contractors exactly what you need.
ASK DAVE!
The Benefits of Membership
Membership gives you full access to our hundreds of how-to articles, woodworking plans, converters, calculators and tables. Our Stair Calculator is one of the most popular on the internet. We have projects you can build for (and with) your kids, furniture for your wife, and sheds and gazebos. If you run into a problem or need advice your Membership includes unlimited email questions to me through our Ask Dave quick response button.
Join us!
Copyright © 1999-2026 DDFM Enterprises. All Rights Reserved. DDFM ENTERPRISES, DAVE'S SHOP TALK and the Dave Osborne logo are trademarks and service marks owned by DDFM Enterprises. All other trademarks on this site are the property of their respective owners. Site design by Design Strategies, Inc.