Building Confidence
| Volume 19 Issue 8 ISSN 1923-7162 |

Welcome to Dave's Shop Talk's Home Improvement Newsletter of questions from our members on their construction projects, a Tip of the Month and a home remodeling article, both from our website at https://daveosborne.com.
Tip of the Month
Put a paint roller in a plastic bag and seal tightly for next day's use, to avoid having to clean it.
A little candle wax on screws help them go in easier.
Stagger your screws or nails to avoid splitting the grain of the wood.
KEEP BUSY! Now's a good time to catch up on your projects!
Ask Dave!
How much concrete do I need for a 6" post 48" deep?
It depends on the diameter of the hole you drop your post into.
Here is a link to our concrete calculator: Concrete Volume Calculator
Try it out yourself for various diameter holes.
To calculate how much concrete is needed we should subtract the displacement of your 6" x 6" x 48" post which is 0.5' x 0.5' x 4' = 1 cu ft.
| Hole Size | Volume of Hole | Concrete Needed after subtracting the volume of the post |
|---|---|---|
| 8" | 1.4 cu ft | 0.4 cu ft |
| 10" | 2.2 cu ft | 1.2 cu ft |
| 12" | 3.1 cu ft | 2.1 cu ft |
A hole 8" to 10" is good for a 6x6 post.
Our Calculator figures out the number of bags of concrete mix for various weights of bags, as well.
Dave
Hey Dave do you happen to have a gravel calculator to determine how much wash gravel I need in a French drain?
Hi Kelley,
Yes, there is a Concrete Calculator on our website, which simply does volume. This should work for the volume of your drain gravel, as well. Choose cubic yards.
Dave
Hi Dave, We are building a small "inlaw" apartment onto our house and have asked the builder to use pocket doors on each side of the bathroom. My father-in-law had them on his other home and liked them and the new apartment is very limited for space. The builder is dead set against it. He says they're expensive, and will probably give us trouble down the road that will result in tearing a wall out to do repairs. Any suggestions? Dave
Hi Dave,
I have installed pocket doors, one in my own home and never have had any problems with them. The door can be removed by removing stops and releasing it from the rollers on the track. The frame is actually part of the wall with the track attached to it. I've never experienced any problems with any of my installations. The door itself is the same as any other door, the frame and hardware is the only added cost.
They are not my preferred door, but with limited space they are ideal, especially for a small bathroom or closet. We have ours in a walk-in closet off our ensuite. One thing to watch is not screwing in a hanger or shelf into the wall and have the screw penetrate into the door.
Your builder has the right and should explain the pros and cons of your choices, but should also remember that he is working for you and should try to satisfy you to the best of his ability. I don't agree with why he is dead set against installing pocket doors.
Dave
Hi Dave, Thanks for the great info. I bought a log cabin in Idaho and since it wasn't lived in for 20 years, it's taking some work to get it habitable. I used your instructions to do quite a few things. I'm in my 60's, female and haven't really done much wood working. I even made my stringers for stairs and they're great! It was quite a challenge without a decent saw or even workspace. Anyway, I finally have indoor plumbing with a hot shower and that's a treat. Each visit sees great progress. I found your instructions for the stud wall confusing until I realized you build it on the floor, flat and not upright like it is at the end. My daughter said "build a stud wall" so I went to your instruction first and spent a small amount of time to get the message. When I built the stairs, I left a little space for the sheet rock, like you suggested. Several people didn't like that and I defended your reasoning and that made them madder (I don't know why). Anyway, since it looks like I'm doing the sheet rock myself, I appreciate the tip. thanks. Thanks for all the tips. Georgia
Hi Georgia,
Thanks for the nice email.
I find it interesting your friends' reaction to the space in the stringers for the drywall. In construction we work with a lot of different trades. Carpenters are required to layout many things for some of the trades, so we get to work closely together. Anything we can do to help the sub-trades will increase the profit of the general contractor and decrease the bottom line of the owner. You can imagine the extra work involved for the drywall applicator to notch each step going down the stairs instead of just slipping a sloped piece into a space. This is an example of your friends not really understanding the procedure. I'm glad you took my advice and left the space, you will appreciate the consideration doing the drywall yourself.
Thanks again for the email, I love to hear success stories like yours.
Dave
Feature Article of the Month
(taken from our website: DaveOsborne.com)
Concrete Work 1: Exposed Aggregate Driveway
My wife and I recently put in an exposed aggregate driveway. We waited about 19 years, after we built our house, until we got our new driveway. Here are a few tips that I will share with you if you intend to put in a similar driveway.
Exposed aggregate concrete is batched with sand, cement and pea gravel, along with water and the necessary additives. There is no difference in how the concrete is poured but it is not troweled to a smooth finish. After the bullfloat is dragged across it to give it a level and straight surface a retardant is sprayed on to slow down the extreme top layer of the slab from hardening.
This is where the professional guys come in - it is all about timing. When to spray on the retardant or Exposal and when to wash off the cream of the concrete, or laitance to expose the aggregate. To wash too early is to wash the pea gravel away, to wash too late is to not be able to get the laitance off at all.
Some guys seed the top of the concrete with special stones after the placing of the concrete, then trowel them in carefully. In my area, we pour the slab with the pea gravel already in the primary mix. I was going to attempt to try this, being a true do-it-yourselfer, but I'm glad I hired a pro crew, who did an excellent job.
I prepared the surface of the driveway by removing some of the fill near the asphalt pavement at the street, to allow for 4" of concrete. The entire surface, after leveling, was compacted with a rented plate compactor. When the concrete truck backed up the driveway to get close enough to the garage door to spout from the truck, I noticed the tires hardly left any impression in the fill at all. It was a very hard compacted surface, which is very important for any concrete job.
I also drilled out the edge of my existing garage slab at the point of contact with the driveway to install #3 (3/8") rebar between the old and the new concrete. Since my driveway is downhill from the house, I wanted to be sure the driveway slab would not pull away down the slope leaving a gap at the garage door.
I put the rebar in at 12" centers and tied them all together with a long length of rebar. I formed the edges with a slight splay at the street to give a bit more room to turn out. I used 1x4 for the forms and at the splay I cut slots about 1/2" deep every inch apart, on the back side of the 1x4, so that the wood would bend easily.

At the other end of the driveway, the street end, I re-cut the existing pavement to give the guys a clean edge to finish the concrete to.
It worked well.

The finishers put in construction or control joints so that with the expansion and contraction of the concrete any cracks would be formed in the base of these joints and would be less conspicuous.

Below, Rick, the contractor, under the watchful eyes of the boss, is putting in another construction joint. The red flagging tape was to keep the wild deer in our area from walking across the newly poured concrete.

Almost finished. You can see the bull float being used here to smooth the surface of the concrete.

Rick sprays the Exposal or retardant on the wet surface to retard the setting up of the concrete to the top 1/8th inch of the surface.

Rick washes the laitance off carefully, while his helper is sweeping the worst of it off the slab. The young kid dug a hole in the front of our property, at the street, so that the excess cement paste would be trapped in the hole, rather than washing down the street. We washed the street off a while later, as well. Concrete is a messy business.

Here's a photo of our finished driveway.
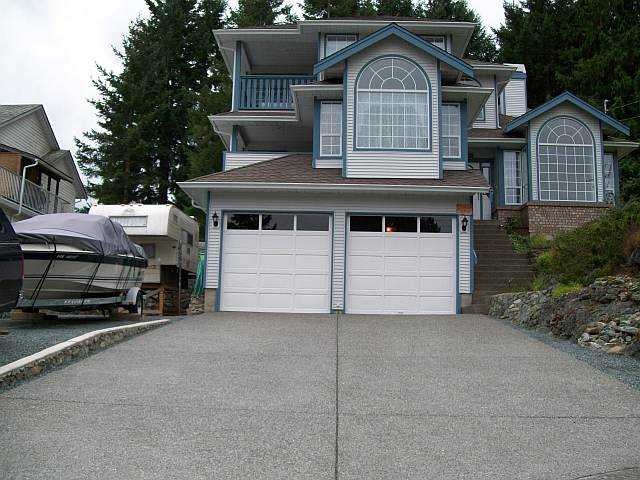
Thanks, Rick and guys, for a job well done!
Almost the End
Read hundreds of diy articles, answered questions and dozens of plans and projects all written by Dave.
Become a Member and Dave will personally eliminate any doubts you might have about your projects by email.
Dan and I thank you for your interest and support of our Website. We hope we can help you with your present and future projects.
Get complete access to our website - Subscribe Now!
We BUILD CONFIDENCE. If you need advice on Building or on your projects at work or home you can make a very small investment and subscribe to our website, then send me any questions or uncertainties you might have via email. There is no extra charge. That is all part of your membership to our site!
Help us with the cost of putting this info out by becoming a member. Subscribe now!
Please tell your friends and family about our site and this Newsletter.
Dan and I wish all our readers and members of our website, all the best in 2021 and stay safe out there and thanks to our Front Line Workers.
Your source for building tips, woodworking & furniture plans, house plans and building advice directly from Dave...
Hi, I'm Dave Osborne. With over 50 years experience as a journeyman carpenter, foreman and contractor in heavy construction I enjoyed working with apprentices and sharing the tricks of the trade that others shared with me. Now I get emails from Members all over the world and we include many of my answers in our Free Monthly Newsletters. Some of my answers include drawings and instructions specific to a project, but may also answer your questions. I use correct construction terminology, so you can confidently inform your building supply dealers or contractors exactly what you need.
ASK DAVE!
The Benefits of Membership
Membership gives you full access to our hundreds of how-to articles, woodworking plans, converters, calculators and tables. Our Stair Calculator is one of the most popular on the internet. We have projects you can build for (and with) your kids, furniture for your wife, and sheds and gazebos. If you run into a problem or need advice your Membership includes unlimited email questions to me through our Ask Dave quick response button.
Join us!
Copyright © 1999-2026 DDFM Enterprises. All Rights Reserved. DDFM ENTERPRISES, DAVE'S SHOP TALK and the Dave Osborne logo are trademarks and service marks owned by DDFM Enterprises. All other trademarks on this site are the property of their respective owners. Site design by Design Strategies, Inc.