Building Confidence
| Volume 19 Issue 9 ISSN 1923-7162 |

Welcome to Dave's Shop Talk's Home Improvement Newsletter of questions from our members on their construction projects, a Tip of the Month and a home remodeling article, both from our website at https://daveosborne.com.
Tip of the Month
An important thing to remember when building stairs is that there is one less tread than riser.
When constructing a project outdoors, use treated lumber for pieces near the ground or on concrete.
Ask Dave!
I was going through some old emails that brought back lots of memories. I want to share them with you for this month's newsletter.
Hello Dave, not sure if you remember me. I bought the Gabled Shed with loft plus a door and 2 windows - it was fun and easy to build. Now I wish to replace my yard doors by something we would build ourselves (I still have teens to keep busy and proud) - we have a vinyl fence but the doors are so weak that just the wind damages them. I wish to build something better in wood we will paint. The doors are 70" tall by 41.5" wide each, the posts are treated 4x4 with 4 bags of concrete for each post so they can take the weight without problem. These doors are mainly to keep the dog in :) and to make the yard entrance beautiful. Hoping you can help as you did for the shed.
Pierre
Hi Pierre,
How is this?
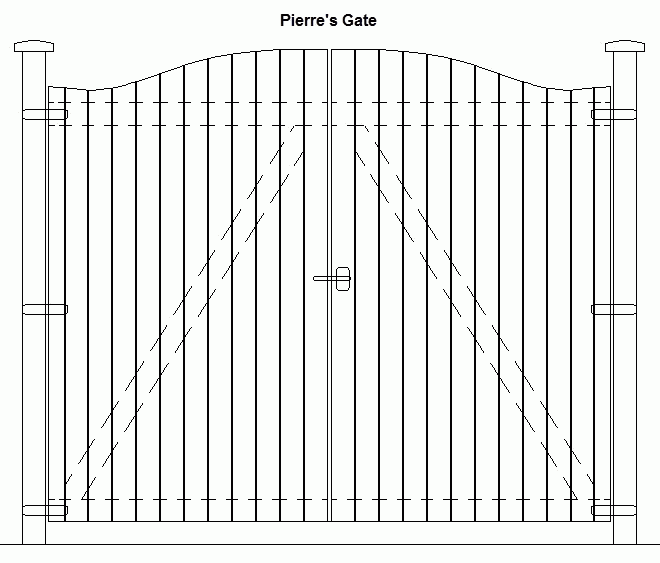
Below is the frame - 2x4s on the flat. Notice the brace with the bottom of the brace against the hinge side. Hinges are 4" strap hinges in black or galvanized. Make sure you have about 1/2 " clearance between the two gates and about 3 or 4 inches on the bottom.
Fasten the boards on the frame first, then cut the tops off to suit.

Dave
That is terrific! How much do I owe you? Can I use Paypal or a Credit card? Thank you,
Pierre.
Hi Pierre,
Thanks, glad you like it. No charge, just enjoy working with your teens.
Dave
Dave, I was interested in the stair calculator and decided to check out what other information you provide on your site. I am a building code official and have found your site to be very friendly and informative. I will recommend your site to home owners wanting to do weekend projects. Thanks Again.
Dave A.
Hi Dave,
Thanks very much for you taking the time to send me this email. I appreciate it. Believe it or not this arrived on my birthday!
Thanks, again,
Dave
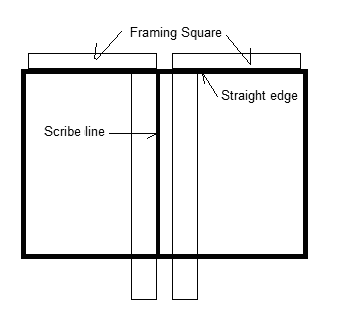
How do you check the accuracy of a framing square, i.e. whether the square is truly 90 degrees.
Ray
Hi Ray,
Get a straight board and place the square in the middle of the board, scribe a line square with the edge of the board. Flip the square over on the same edge of the board and check the line to see if it is square.
Dave
Hi, Dave. Today I replaced the stairs to the basement of my house. The bottom step of the original stairs was about 1/2 the rise of all the others; apparently the basement floor was poured after the stairs already were installed. Now the stair rises are all even. Having lived here 8 years, that first step being the same height as all the others is still a bit of a surprise. I'm sure it won't take long to get used to it. This was a major project for me, and thanks to your videos and your stairs calculator, it was successful. I was able to cut stringers, correctly, on the first try. Given the number of things that could have gone wrong, it's surprising to me that nothing did. This is a project that is well outside my "comfort zone." Your yearly membership was well worth it!
Thank you.
Brian
Feature Article of the Month
(taken from our website: DaveOsborne.com)
Deck 1: Raised Backyard Wood Deck
Most houses today come with a raised backyard wood deck or balcony built off the kitchen or main floor level, raised 6' or 8' off the ground. This is the best place for the family barbeque, close to the kitchen. If you own an older home and always wanted to build a raised backyard wood deck, let's get started.
I designed a raised backyard wood deck 12'x12' to use as an example.
Attaching the Raised Backyard Wood Deck to Your House
On the house side of the backyard wood deck you have the option of using a ledger board as a box joist. This board is bolted to the box joist of the house with 3/8" x 4" lag bolts with two rows every 16" apart, or using a beam with two posts right up against the house. If the ledger board is your option, the stucco or siding should be removed and the 2x8 ledger attached directly over the sheathing into the studs or existing box joist. I prefer the ledger board, myself, since it ties the raised backyard wood deck into the house preventing any movement of the deck. It is easier to prevent leaking through when the raised backyard wood deck is attached, as well. The 2x8 ledger should be kept 2" lower than the top of the existing box joist on the house. The joists are then attached to this ledger with joist hangers. Layout the joist hangers, first before drilling the lags, so they won't be in the way of the hangers.

The Footings of Your Raised Backyard Wood Deck
After installing the ledger, layout the position of the footings and concrete columns of your raised backyard wood deck, keeping in mind the depth of frost. A stake in the ground or erecting batter boards are good ideas to help get the excavation square and accurate. For more info about batter boards see my article How to Build a House 2: The Concrete Foundation
Form and pour the concrete, insert the post saddle into the wet concrete, ensuring it is level. Strip the forms in a day or two and start building the posts and beams of the raised backyard wood deck. A triple beam made up of 2x10s gets pretty heavy after a few feet long. I usually build a beam like this in place, especially when working by myself.
The Posts of Your Raised Backyard Wood Deck
Get the height of the floor of your raised backyard wood deck from the ledger board on the house. The height of the posts can be calculated by leveling over from the house to the post saddle less the thickness of the beam.
Usually a raised backyard wood deck such as this has a slight drain, unless covered with a roof. Figure about 1/4" per foot, so that is 3" in 12 feet. Cut the post off another 3" for runoff.
Temporarily brace up the posts of your raised backyard wood deck to stakes driven into the ground. Nail the beam together using 3" common galvanized nails, two rows every 16" apart. Toe-nail the beam into the post, as well, according to the drawing of the raised backyard wood deck. Use a 2x4 or 2x6 cleat or scab over the joint of the beam and post, with a 45° bottom cut, nailed with 3" galvanized nails, too. Square up the beam with the house by carefully measuring the width of floor on each end and then the diagonals, making them the same length. Add further braces, if necsessary.
The Floor of Your Raised Backyard Wood Deck
Install the 2x8 floor joists of the raised backyard wood deck laying them into the hangers on the house end and 16" on centers on the beam. Toe-nail them into position on the beam from each side of the joist. Nail the outer box joist into position, tying the floor of the raised backyard wood deck together.
Use a sheathing of either 5/8" tongue and groove select plywood, if finishing your raised backyard wood deck with a vinyl decking, my choice, or with 2" decking lumber, (5/4" is acceptable, too). When nailing the sheathing to the floor of your raised backyard wood deck, place nails at 6" along the edges and 12" in the center of the sheet, using a construction adhesive, as well.
If vinyl decking is chosen for your raised backyard wood deck, to be able to make use of storage underneath, talk to your decking person. Some require a cant strip along the house, on top of the sheathing. This enables the vinyl to wrap up the vertical face of the house without an extreme bend. Other vinyl installers just bend it up the wall without a worry. My vinyl decking was installed on my raised backyard wood deck without the cant strip, to my surprise, but without a problem for 13 years. I live on the South West Coast of Canada, where the weather temperatures are not that extreme.

I'll continue with how to build a deck railing for your raised backyard wood deck in my next article.
Check out these drawings and get back with me for any other questions.
Almost the End
Read hundreds of diy articles, answered questions and dozens of plans and projects all written by Dave.
Become a Member and Dave will personally eliminate any doubts you might have about your projects by email.
Dan and I thank you for your interest and support of our Website. We hope we can help you with your present and future projects.
Get complete access to our website - Subscribe Now!
We BUILD CONFIDENCE. If you need advice on Building or on your projects at work or home you can make a very small investment and subscribe to our website, then send me any questions or uncertainties you might have via email. There is no extra charge. That is all part of your membership to our site!
Help us with the cost of putting this info out by becoming a member. Subscribe now!
Please tell your friends and family about our site and this Newsletter.
Dan and I wish all our readers and members of our website, all the best in 2021 and stay safe out there and thanks to our Front Line Workers.
Your source for building tips, woodworking & furniture plans, house plans and building advice directly from Dave...
Hi, I'm Dave Osborne. With over 50 years experience as a journeyman carpenter, foreman and contractor in heavy construction I enjoyed working with apprentices and sharing the tricks of the trade that others shared with me. Now I get emails from Members all over the world and we include many of my answers in our Free Monthly Newsletters. Some of my answers include drawings and instructions specific to a project, but may also answer your questions. I use correct construction terminology, so you can confidently inform your building supply dealers or contractors exactly what you need.
ASK DAVE!
The Benefits of Membership
Membership gives you full access to our hundreds of how-to articles, woodworking plans, converters, calculators and tables. Our Stair Calculator is one of the most popular on the internet. We have projects you can build for (and with) your kids, furniture for your wife, and sheds and gazebos. If you run into a problem or need advice your Membership includes unlimited email questions to me through our Ask Dave quick response button.
Join us!
Copyright © 1999-2026 DDFM Enterprises. All Rights Reserved. DDFM ENTERPRISES, DAVE'S SHOP TALK and the Dave Osborne logo are trademarks and service marks owned by DDFM Enterprises. All other trademarks on this site are the property of their respective owners. Site design by Design Strategies, Inc.