Building Confidence
| Volume 20 Issue 1 ISSN 1923-7162 |

Welcome to Dave's Shop Talk's Home Improvement Newsletter of questions from our members on their construction projects, a Tip of the Month and a home remodeling article, both from our website at https://daveosborne.com.
Tips of the Month
Drill holes for nails near the ends of boards to prevent their splitting. Before drywalling over the cavity holding a pipe chase, place extra pieces of drywall around the pipe to soften the noise of water coming down the pipe. This applies to heating pipes, also.
Ask Dave!
Does the long edge of the aluminum fascia go under or over the drip edge? The roofer didn't nail the drip edge to the roof before he shingled, so I am wondering how the drip edge, fascia, soffit J channel, and eaves trough are fastened.
Thanks
When applying exterior trim, etc., just like shingling a roof, always start at the bottom. The gutter, or eaves trough, is below everything, so everything above the gutter overlaps it. The alum. fascia is installed first, since it goes behind the gutter, then the gutter, the drip edge, then the soffit J, against the installed alum fascia on the inside. Where we don't use a drip edge, we extend the shingles about 1 1/2" past the sheathing of the roof, so that the shingles will eventually bend down over the inside gutter edge.
Here is a drawing:

Dave
Thanks Dave. How do I nail the drip edge? The contractor has already shingled and I don't know how to fasten the drip edge.
You need to get under any roofing nails, along the first few inches up from the eaves. Lift up the nails with a flat bar, carefully. A helper is handy to carefully bend back the first row of shingles, so you can remove the nails and then slip the drip edge under the shingles and roofing felt at the eaves.
Then nail the felt and bottom row of shingles back, nailing the drip edges, as well. Put the nails back in the same holes, if possible. Then fold the top row of shingles over again. There should not be any roofing nails on top of the shingles. There is a mastic strip that should stick the top shingles to the row below it, when the heat of the sun gets to it.
Dave
Dave, I am planning to install 5/16" x 3" x 8' pine paneling in the cabin. Can I install this right on the studs and trusses or do I need to put up drywall first? I am hoping not to put up drywall as this is a cabin, not our permanent home.
Thanks
5/16 isn't very substantial for a wall or ceiling covering on its own, for 16" studs or 24" trusses, it needs backing. Strapping a wall is good with old 1x4 or whatever, it doesn't need to be solid like drywall. How about strapping the wall on 12" centers and install the pine on a 45 or vertically?
Dave
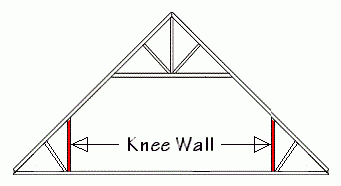
Hi Dave, the attic trusses in my cottage are 2x8 between the ceiling and the knee wall (see diagram), which doesn't allow a lot of room for insulation. I am insulating (all fiberglass) the cottage roof at R-56 which is 17" of insulation. What should I do about the section of the attic truss which is only 7 1/2"?
 Also, do I need to use ventilation chutes when I am insulating?
Thanks
Also, do I need to use ventilation chutes when I am insulating?
Thanks
Also, do I need to use ventilation chutes when I am insulating?
Thanks
This is a very good question.
In a situation, like a vaulted ceiling, like this, you are required to strap the roof with 2x4s to allow for cross ventilation. This is something you should discuss with your building inspector. Of course, this needs to be done before the roof deck is applied.
Check out, in your area, if they have readily available a high density insulation for the 7 1/2" space. You may need to use Styrofoam at this location, whichever gives the higher R-value.
Another option is to drop the ceiling, a bit in this location. Whatever, I'm sure you would need to strap the roof, though. It is important to check this out with the inspector.
The ventilation chutes are used at the soffit to roof line to ensure the insulation doesn't plug up the ventilation from the soffits. They are used when you blow insulation in. Every other truss space is vented. You may be alright with the fibreglass, if you are careful to go just over the outside wall and leave space between the strapping and the top of the insulation, for ventilation from the eaves. With the strapping over the entire roof, you should be okay.
Dave
Dave, as you might remember, I had a pole building put up this past fall. I am in the process of finishing off part of it for a workshop. I am using 2 X 6 framing. What I have noticed about a metal frame building; is the fact that it sweats a lot as the weather changes. My question: I have completed all the wiring and ready to do the insulation. I want to use fiberglass [R-18 or better] in the walls. Since the metal sweats; Should I put something between the bare metal skin and the insulation?? I also plan on using a "vapor barrier" before I put on the sheetrock. Just trying to "second guess" myself because I don't want to run into moisture problems later on. I will be putting heat in the shop as well as insulation and rock in the ceiling. Hope you and yours had a great holiday. Thanks for your help.
Once you put the insulation in, the condensation should stop. To ensure keeping the insulation dry, I would apply only a wall type tarpaper (breathing) against the sheet metal, if not done with the initial installation. Don't put any poly on the cold side, which would cause more condensation.
Dave
I have finished the framing and wiring; my next step is the insulation. There is nothing between my studs and the outside walls.
Before I put in the insulation should I use something like styrofoam sheets [1 inch thick] against the bare wall, then my R-22 or R-28, then a "vapor barrier" and finally the sheetrock to finish the walls. Since this is my first experience with a metal framed building, I'm not sure how to proceed. In the past all my prior buildings have been the conventional "stick frame type". If I had unlimited funds, I would just get a contractor to come in and spray a coating of styrofoam for the insulation; but I don't have that kind of money. Thanks again for your help.
It would have been better during the metal siding installation to apply 2 layers of tarpaper (when no sheathing is installed). Now that the siding is installed without the tarpaper, it still is a good idea to put it in from the inside. Just cut the rolls in half and bend them to fit between the studs and tight to the siding. Staple it in place against the studs. If there is 1x4 strapping on the outside studs, so the siding is fastened to the strapping, no need. The air space will eliminate any condensation. For the choice of tarpaper, use 30 minute or 60 minute and start at the top, so that if there is any overlap, it will lap so any outside moisture runs down the paper to the outside.
I wouldn't use 1" Styrofoam, since it is fairly expensive, as well.
Dave
Hi Dave. Came across your website yesterday and joined immediately. I am doing a total remodel of a home. My question for you involves framing of a fireplace surround. I removed the old brick surround. The wall where the fireplace is framed so I can apply insulation (old brick colonial no original exterior wall insulation). The fireplace is not framed. The goal is to create a stone veneer surround then insert a wood stove (chimney is lined). Question: does the framing around the surround need to be metal or can I use wood if the frame will be covered by cement board and the stone veneer? I am trying to meet code, which I know is governed locally.
Wood framing around a fireplace or stove is okay with these restrictions:
- framing lumber has 2" clearance against the wood stove
- finishing material of sheathing has 1" clearance
- zero clearance between the stove and non-combustibles such as the stone or ceramic tile, etc.
- back clearance is 4" clearance on an inside wall and 2" on an outside wall from the stove
- hearth should be 16" in front of the stove extending 8" beyond the stove opening on each side
- above the opening clearance is 12" to combustibles
- no combustible material within 3" of the face of the stove
The fire department governs the code in our area, as well as the inspections.
Dave
Feature Article of the Month
(taken from our website: DaveOsborne.com)
Deck 5: Deck Stairs with Returns
The construction of the deck stairs as shown in the above Floor Plan is a very complicated build, which incorporates the fundamentals of stair building combined with that of roof construction. If this is your first time in making stairs, refer to the How to Build Stairs articles on the web site. Also, details are given in How to Build a House 2: The Foundation.
I will compare the support of the miter of the steps with a hip rafter in a roof and the supports for the steps between the handrails with common rafters. Notice that the steps are 7' in both directions to produce a 45 degree angle with the deck line.
The height of the deck off the ground is 67", in our example; you can vary yours accordingly. The main thing I would like to accomplish here is to clarify the principle of building steps with mitered returns so you can apply your own measurements to suit your individual needs. I'll use this example of a set of return deck stairs throughout this article, but the chance of your actual project being the same is very unlikely, so I'll explain how the measurements are arrived at as we go.
The Foundation
You can see the perimeter measurements are 20'-4" x 7'-0"; your footing will be inside of that. The top of the deck is the reference for these elevations, so measure 68 1/2" down to the top of the concrete, which is the total rise plus 1 1/2" for the thickness of the 2x8. Concrete should be a minimum of 18" below the soil, depending on the frost depth in your area. The concrete should be 12" wide with a pressure treated 2x8 bolted to the top of it, flush with the outside edge of the footing. The stringer bottoms and supports will be nailed into this 2x8 sill plate. When the concrete is smoothed off on the top, insert 1/2" x 6" anchor bolts, leaving the threads up about 2" to bolt the 2x8 down. Place them no more than 6' apart. The footings in the middle are to support posts for the stringers, the two pads are for posts under the short stringers. Don't just rely on nails holding up the stringers; they should all be supported with posts—2x4 posts are good. Any wood laid down onto concrete should be protected with a 30 pound roofing felt or sill gasket under it or the wood pressure treated.
The Stringers
Under the mitered steps will be a stringer on a 45 degree. The other stringers will come off of this main one similar to jack rafters coming off a hip roof.
The rise and run ratio is 7.44/10.5 or 7 7/16"/10 1/2" on the common stringers. For the 45 degree stringers the ratio is 7.44/14.85 or 7 7/16"/14 7/8". Lay these out as shown in the article Stairs 2: How to Cut a Stair Stringer.
Here is a detail of the 45 stringer:
Notice the 45 stringer starts at the inside corner of the common stringers and has its end cut off on a 45 degree angle, similar to the plumb cut on a hip rafter.
Lay this stringer out with 8 rises of 7.44" and 8 runs of 14.85". After laying it out and cutting it out, remember to cut it off the bottom the thickness of the tread. Measure back from the first riser 11.98" and cut off the end plumb and on a 45. This is a compound angle of 45 and square with the top. You need two stringers like this, so copy one from the other. It's important to be very accurate with this.
Now cut the 7 common stringers; 3 will go in between the ones against the 45 stringers and 2 will be shortened by 1 1/2" at the top end to go up against the common stringers, against the 45 stringer. These are parallel to the deck as shown on the Stringer Layout drawing. These are laid out as normal, 8 rises at 7.44 and 8 runs at 10.5". Cut the bottom off by the tread thickness, 1 1/2" if you're using standard 2x6's for treads. (See How to Cut a Stair Stringer for more info on this.) Lay one out and use it as a pattern to copy the others. You need to make 12 jack stringers, so use the pattern for these, as well. Notice the plan for their different lengths, just subtract the number of runs at 10.5 each to make up the set.
Here is a detail of the Jack Stringers:
Notice how these stringers need to be extended by 1 1/2", then cut off on a 45 degree to fit the 45 degree angle of the 45 stringer. The rest of the stringer is the same as the common stringers. You need 4 sets of 3 with 2 of the sets cut off on the opposite 45 degree (mirror-image to the other 2 sets). The bottoms of these stringers are all alike since they all rest on the concrete pad, just cut them to different lengths.
When ready to assemble start with the common stringers and nail them into the deck starting at the inside edge of the 6'-4" measurement and nail into the 2x8 sill on the concrete. They come down from the deck surface 1 riser of 7.44 plus 1 1/2" tread or 8.94".
Before installing the treads and risers, place posts under the stringers next to the deck and in the middle of the span. This applies to all the stringers including the jack stringer, although a center post is not necessary for the two shorter ones.
The red lines next to this text show the backs of the riser, the same as the 10 1/2" run. Put the risers on first, then the treads over them to allow for a bit of overhang. The treads are mitered on the center of the 45 stringer, as are the risers. Two 2x6's will work well for each tread.
The treads should be 1 1/2" thick material for the spacing of the stringers. The stringers should all be made from pressure treated 2x10, except for the two 45 stringers which should be 2x12 pressure treated.
Almost the End
Read hundreds of diy articles, answered questions and dozens of plans and projects all written by Dave.
Become a Member and Dave will personally eliminate any doubts you might have about your projects by email.
Dan and I thank you for your interest and support of our Website. We hope we can help you with your present and future projects.
Get complete access to our website - Subscribe Now!
We BUILD CONFIDENCE. If you need advice on Building or on your projects at work or home you can make a very small investment and subscribe to our website, then send me any questions or uncertainties you might have via email. There is no extra charge. That is all part of your membership to our site!
Help us with the cost of putting this info out by becoming a member. Subscribe now!
Please tell your friends and family about our site and this Newsletter.
Dan and I wish all our readers and members of our website, all the best in 2021 and stay safe out there and thanks to our Front Line Workers.
Your source for building tips, woodworking & furniture plans, house plans and building advice directly from Dave...
Hi, I'm Dave Osborne. With over 50 years experience as a journeyman carpenter, foreman and contractor in heavy construction I enjoyed working with apprentices and sharing the tricks of the trade that others shared with me. Now I get emails from Members all over the world and we include many of my answers in our Free Monthly Newsletters. Some of my answers include drawings and instructions specific to a project, but may also answer your questions. I use correct construction terminology, so you can confidently inform your building supply dealers or contractors exactly what you need.
ASK DAVE!
The Benefits of Membership
Membership gives you full access to our hundreds of how-to articles, woodworking plans, converters, calculators and tables. Our Stair Calculator is one of the most popular on the internet. We have projects you can build for (and with) your kids, furniture for your wife, and sheds and gazebos. If you run into a problem or need advice your Membership includes unlimited email questions to me through our Ask Dave quick response button.
Join us!
Copyright © 1999-2026 DDFM Enterprises. All Rights Reserved. DDFM ENTERPRISES, DAVE'S SHOP TALK and the Dave Osborne logo are trademarks and service marks owned by DDFM Enterprises. All other trademarks on this site are the property of their respective owners. Site design by Design Strategies, Inc.