Building Confidence
| Volume 20 Issue 5 ISSN 1923-7162 |

Welcome to Dave's Shop Talk's Home Improvement Newsletter of questions from our members on their construction projects, a Tip of the Month and a home remodeling article, both from our website at https://daveosborne.com.
Tips of the Month
When drilling through a finished frame, as when installing door pulls, hold a scrap block of plywood on the inside to prevent the drill from chipping the wood as it goes through the other side.
When cutting a machine screw to length, thread on a proper size nut first, cut the screw and back off the nut which cleans the threads in the process.
Ask Dave!
Hi, I'm currently renovating my entire kitchen and first floor of my home. I'm taking the floor right down to the plywood subfloor that sits on the 16" centers floor joists. There is quite a bit of water damage so I will be removing the subfloor down to the joists where necessary. My question is this: Should I remove ALL the subfloor, even the dry non-compromised areas and just start from scratch? OR Would it be OK to match the existing with new plywood then move up from there? I plan on putting down 1/4" Porcelain tile. What would you do? Thanks, Greg
Hi Greg,
The code says you need 1 1/4" of solid sub-floor for ceramic or porcelain tile.
If it is easier to remove any small pieces of subfloor and replace with a full sheet, I would do that, rather than put down small pieces. All joints should be across the joists. The layer on top of the existing and repaired subfloor should be tongue and grooved, 5/8" utility sheeting. Stagger all joints, keeping the grain of the plywood going across the joists. Add a 1/4" underlay, with a 4"x4" nailing pattern, usually 1 1/8" air staples, if you can. Screws with glue is also recommended.
Dave
Dave, What is the correct way to frame ceiling joists and rafters? Do the joists have to be offset, or can they butt up and be tied together? I have seen instances where rafters were not offset, but a book I looked through shows them offset. I know trusses are more simple, but I want to stick build a roof. Thanks Much, Mike
Hi Mike,
Yes, most definitely the ceiling joist can be butted up to each other over a bearing wall. BUT, you need to apply a scab over the two joists at least 2' on each joist - 4' over all, nailed securely to keep the joist from pulling apart when a load is introduced to the roof. This scab is made of the same material as the joists. Nail at least 6 - 3 1/4" nails on each side of the splice. Depending on the roof span and snow/wind load, the number goes up to 11 nails until trusses are required over large spans and heavy loads. Make sure the nails are spread out, this depends on the length of scab, also.
Dave
Good morning, Dave! How about plans for some window planters? Should be pretty easy, eh?
Yes, they shouldn't be too hard. I just would get some solid 1" rough material, like cedar and cut the ends on an angle, such as in the drawing, below:

If the sides are 2 or 3 boards, instead of a single one, just add vertical studs, on the inside to help tie the sides together. Dave
Dave
We are planning to build a sunroom along the south side of the garage. The garage wall where this sunroom will be built is two stories tall. The proposed sunroom will be approximately 15'X15'. The plan is to use rafters from the existing wall that will be not more than 4/12 pitch. Since we intend to install three large Velux roof windows in the roof, we would prefer to achieve a clear span for the entire length of the rafters. The question is can we use 2x8 for this length or will we need to use something larger, perhaps as much as 2X12? We are located in eastern Maine, so snow load is the consideration that we must be concerned with. My intention is to frame without birds mouth, using clips on top of the south wall to hold the rafters to insure full strength of the rafter material over the whole length. Comments will be much appreciated.
Will you be installing roof joists or rafters and ceiling joists? If this is a lean-to type of roof, which I think it will be, normally you would use roof joists. These are similar to floor joist, but on a slope. On the garage wall, you would fasten a ledger board, at the roof height and secure the roof joists to it and on the other side , 15' away, you would support the joists on a wall or posts and beam. Do I have the right idea?
Also, what is the snow load there?
Dave
My desire is to use roof joists only, 24" on center. You are correct in assuming I would fasten a ledger board to the wall studs and secure roof joists to it. The wall at the end, 15' away will be 2X6 and hold two patio doors. My thought is to use just the floor joists. I am about ten miles from Belfast, Maine on the coast, and I don't really know what the snow load is here, but I think we have to plan for the potential of a pretty good load. I believe you are in Canada so my snow load won't be a whole lot less than yours. Roger
Hi Roger,
I looked up the snow load for Belfast, it is 60 psf, about twice the amount as us. I live on the West Coast of Canada, on Vancouver Island, British Columbia. Our precipitation is about half that of Vancouver, about 30 miles away.
Anyway, based on a snow load of 60 lbs per square foot, for a 15' span, your roof joist could be 2x10 spruce, pine, fir, #2 and better at 16" centers. For 24" centers, you need 2x12s, for sure.
Hope this helps,
Dave
Hello, Dave: Thanks very much. This does help a lot. When I built my former home on the coast further east, we had a cathedral ceiling in the living room. I installed all the insulation in that house but had two professionals handle the framing. The cathedral ceiling was about twelve feet long and the pitch was 8/12 as I recall. Those roof joists were 2X12, I am quite certain. I wish to use 24 inch centers because it vastly simplifies the roof window installation. Thanks so much for the assistance. You have a terrific website. I have been a developer for twenty years in one of my last careers, but the real carpentry was always done by pros. Now in my retirement I get to use what I have learned by observation, trial and error, seventh grade shop skills, sheer determination and now, your fine website with its fountain of information. Tomorrow I use your instructions to cut my very first stair stringers. It should be interesting. Roger
Thanks, Roger.
When cutting the stringer, remember to cut off the bottom of the stringer by the thickness of the treads. Most guys will do this, but they forget to drop the top step of the stringer down the thickness of the tread, as well. Otherwise the treads of the stringer won't be level. When the treads are installed the risers are all the same.
Dave
Dave, I hope you can help. I want to add a Lean-To roof to my shed. I'm not sure how to frame to the shed roof. Also, should I remove the sheathing so framing directly to the trusses is possible? Would rather not. I would rather frame on top of the roof shingles and flash the seam. If possible, could you generate a quick drawing of the framing? I work best with pictures..;) Sincerely, Ern
Hi Ern,
There could be 3 ways to attach a lean-to roof to a shed.
- If the shed is high enough, attach it to the wall with a ledger and roof joists attached to the ledger and a post and beam or wall on the other side.
- If the shed is high enough and the soffits aren't framed in you could lap the existing rafters and extend them to form a lean-to roof.
- If the shed is not high enough, attach the lean-to roof to the existing roof, which sounds like this is what you want to do. The advantage of doing this is you can go up the existing roof, as far as the ridge to get the required height, which gives you the needed slope on the lean-to and the proper head room.
You don't need to remove shingles, but it does a better job of getting the lean-to framing down on the existing roof deck. Obviously, it depends on what condition the shingles are in and if they are laying nice and flat, etc. You may not need flashing between the old and new roofs, just continue the shingles over the lap of the lean-to.
Here is a drawing of the 2nd and 3rd possibilities:

Here is a drawing for a roof supported by a ledger, as in #1:
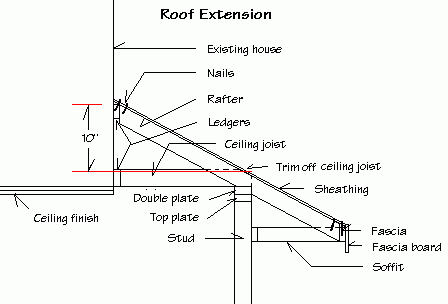
This drawing shows rafters and ceiling joist. You could eliminate the ceiling joist for roof joists. I mainly wanted to show you the ledger idea. I have plans for a Patio Cover which details this idea: Patio Roof Plans
Also a lean-to roof plan
I hope this helps,
Dave
Hi Dave, First let me thank you for posting so many common jobs in layman terms that we all can understand. Not only do they empower us to do these ourselves but, if we have to hire out, we can use pro terms and procedures so they won't think we are ignorant to the whole thing. I have a raised wooden deck (about 42" high) and I want to turn it into a sunroom. The building inspector okayed building the 12x12 structure on the existing deck. However, I did not realize that I do not know how to attach the ledger to the house. I am saying I don't know what the lag bolts would screw into. Is there typically a ledger type board under the gutters that I can tie into? Or, do I need to remove the vinyl siding, and house wrap to see what is under there? Thanks again for all you do. Vic
Hi Vic and thanks for the nice comments.
Here is a link to our Patio Roof plan
The ledger is a board the same size as required for your roof joists that you fasten to the wall, tight to the sheeting. The ledger is attached to framing behind the wall, either vertical members, studs at either 16" or 24" on center. The box or rim joist is part of a floor frame. If you are above the floor level, there won't be a box joist to fasten to, just the studs. You can find these "hidden" studs with a stud finder or remove the vinyl siding and tear back the tarpaper or tyvek to expose the sheeting. You should do this anyway to fasten the ledger directly against the sheeting, into the studs. If there is a window on that wall you could fasten the ledger, above the window, to the window header. Here is a drawing of a wall without the sheeting, so you can see what is there:

Notice that the stud layout is independent of where the window is placed in the wall. We know that at the sides of the windows are a double stud, but you can't measure from these studs 16" to find the next stud. We usually frame all the headers the same - 2x10 tight to the underside of the top plate. This may not be the case in your house. We are only required to put a header in which will support the span, for example a double 2x4 header will support a 3 foot opening, you don't need a 2x10. The rest of the space is filled with upper window studs, just like below the window. Usually, for a house that is built within the past 20 years or so it will have solid 2x10 headers, unless the framers were "old school". You can see this quite clearly by removing the house wrap and seeing where the nails for the sheeting are. Tapping the sheeting will also tell you what is solid and what is not. Dave
Dave, I'm building a soffit around some plumbing along the ceiling, it'll be appx 13ft long x 10" high. I'm planning on building it with some 1x2 to save space, need to get the sheet rock as close to some pipes as possible. What screws are the best for the smaller wood, to prevent splitting and so on. Thanks, Greg
Hi Greg,
Use the standard drywall screw that is #6 x 1 1/4". Go with a 2x2 where possible, especially on the outside corner. This makes it easier to screw from both sides of the corner.
Dave
Feature Article of the Month
(taken from our website: DaveOsborne.com)
Going Green 1: Tips
h2>Starting GreenThese days, everyone should know what the term Going Green represents. As a youth in the 60's, I remember the protests of the hippies against the Vietnam war and the lack of concern and care for our planet. Today we have groups like the Sierra Club and Green Peace whose role is to educate the public. The movement has grown to the point of government changes nationally including International summits on the environment. Wow! Who said the youth of our world can't influence the powers that be.
Rebate Incentives
Our governments have introduced rebate incentives to their residents. They agree that we need to preserve and care for our resources: forests, rivers, lakes and oceans, soil and air, oil and gas and even our ozone layer, which neutralizes the harmful radiation from the sun. We've seen rebates on energy saving light bulbs and appliances, as well as government legislation for manufacturers to save energy on products from vehicles to toilets.
US residents can find out what rebates they qualify for at: the Energy Star site.
Canadian residents can go to this link for Canadian government rebates.
United Kingdom residents can go to this link for energy grants.
Cash Saving Incentives
As people who share the same planet, we don't have to be legislated to care for our resources. Here are some of the things we can do, individually and as a family, that won't cost us a penny:
- When leaving a room, shut off the lights.
- When finished with watching TV or playing games, turn the power off.
- Use the recycle bin for: glass, tin cans, plastics, cardboard, newspapers, engine oil, batteries, tires, electronics and send your clothes to the less fortunate.
- Lower your speed when driving. 55 mph compared to 70 mph saves you up to 50% of your gas bill on the same trip. (Reference: Economy FAQ)
- Use alternate forms of transportation: ride bicycles, walk or use public transit.
- Wash clothes and dishes in warm or cold water, hang up clothes on racks or clotheslines, limiting the use of your dryer.
- Use reusable grocery bags.
- Purchase large packages to save material on containers.
- Use worn out socks for rags to apply stains and old clothes for dusting and cleaning rags and dish cloths.
- Recycle photo film containers and pill bottles for small screws, nails and liquids.
- Collect rain water for watering your livestock, pets and plants.
Purchase Smart
When the time comes to recycle your appliances and electronics look for the Energy Star sticker for the most energy efficient products.
Purchase natural organic compounds instead of chemically produced ones. Choose latex paints rather than oil based. Replace incandescent bulbs and fluorescent tubes with energy saving LED bulbs and strips.
Grow your own vegetables or buy local.
Recycle products and reuse recyclable products.
Drink filtered water rather than purchasing an abundance of small containers or re-fill your own containers for water, coffee and other fluids.
Green Maintenance
Maintaining our homes is not an expensive procedure, but good maintenance will save in energy costs. Since about 45% of our utility expense is for heating and/or cooling:
- Choose energy efficient furnaces.
- Turn down the thermostat to reduce heating costs or turn it up to reduce air conditioning costs.
- Change your furnace filters monthly.
- Fill in cracks in foundation walls and seal around plumbing pipes, vents and wires with caulking, tape or insulation.
- Check the weatherstrip for outside doors, a major source of heat loss.
- Close doors and turn down the heat or air conditioning in unused rooms.
- Close dampers and outside air vents for the fireplace when not in use.
- Close curtains at night over windows and patio doors and open them during a sunny day.
- Install shutters on windows to save 50% of window heat loss.
- Choose energy efficient Low E windows.
- Check caulking between windows and siding or stucco.
- Insulate crawlspaces and attics.
Green Renovations
When renovating our homes, replace existing products for environmentally friendly ones:
- Replace vinyl with natural cork, bamboo, or hardwood tiles and flooring or with ceramic tiles.
- Use area rugs of natural fibers.
- Reuse recycled wood flooring.
- Install tiles of recycled glass, carpet and other recyclable products.
- Choose paint without toluene or xylene, which are very carcinogenic chemicals. Choose latex or milk paints.
- Choose glues without VOCs (volatile organic compounds) which are gases emitted from some liquids and solids.
Conserve Water
And finally, the last tip for going green and one of the easiest to accomplish is to conserve the use of water.
- Use a low flow shower head which saves about 10% of your water heating cost. Limit time in the shower.
- Limit the amount of water used in the tub.
- Use aerators on all faucets to mix air with water to conserve.
- Turn water off while brushing your teeth.
- Men, when shaving put a little water in the sink to rinse off your razor instead of continually running water.
- Fix water leaks in faucets, toilets and appliances as soon as you notice them.
- Purchase low flush toilets for replacements when needed or lower the water level or place a plastic bottle filled with sand or pebbles in the tank to take up water volume.
- Use waterless car washes rather than washing the family vehicle with a water hose.
In order to keep our planet clean and to preserve its resources it takes all of us to work together. It is our responsibility to pass onto our future generations the best environment that we can.
Dave
Almost the End
Read hundreds of diy articles, answered questions and dozens of plans and projects all written by Dave.
Become a Member and Dave will personally eliminate any doubts you might have about your projects by email.
Dan and I thank you for your interest and support of our Website. We hope we can help you with your present and future projects.
Get complete access to our website - Subscribe Now!
We BUILD CONFIDENCE. If you need advice on Building or on your projects at work or home you can make a very small investment and subscribe to our website, then send me any questions or uncertainties you might have via email. There is no extra charge. That is all part of your membership to our site!
Help us with the cost of putting this info out by becoming a member. Subscribe now!
Please tell your friends and family about our site and this Newsletter.
Dan and I wish all our readers and members of our website, all the best in 2022 and stay safe out there and thanks to our Front Line Workers. All of them.
Your source for building tips, woodworking & furniture plans, house plans and building advice directly from Dave...
Hi, I'm Dave Osborne. With over 50 years experience as a journeyman carpenter, foreman and contractor in heavy construction I enjoyed working with apprentices and sharing the tricks of the trade that others shared with me. Now I get emails from Members all over the world and we include many of my answers in our Free Monthly Newsletters. Some of my answers include drawings and instructions specific to a project, but may also answer your questions. I use correct construction terminology, so you can confidently inform your building supply dealers or contractors exactly what you need.
ASK DAVE!
The Benefits of Membership
Membership gives you full access to our hundreds of how-to articles, woodworking plans, converters, calculators and tables. Our Stair Calculator is one of the most popular on the internet. We have projects you can build for (and with) your kids, furniture for your wife, and sheds and gazebos. If you run into a problem or need advice your Membership includes unlimited email questions to me through our Ask Dave quick response button.
Join us!
Copyright © 1999-2026 DDFM Enterprises. All Rights Reserved. DDFM ENTERPRISES, DAVE'S SHOP TALK and the Dave Osborne logo are trademarks and service marks owned by DDFM Enterprises. All other trademarks on this site are the property of their respective owners. Site design by Design Strategies, Inc.