Building Confidence
| Volume 21 Issue 5 ISSN 1923-7162 |

Welcome to Dave's Shop Talk's Home Improvement Newsletter of questions from our members on their construction projects, a Tip of the Month and a home remodeling article, both from our website at https://daveosborne.com. We are into our 21st year putting out this Newsletter. Dan and I would not be able to do this without your input every month. Thank you and keep the questions coming!
Tips of the Month
When cutting or ripping wet lumber you need a blade with a wide set or the blade will bind.
For a straight cut, look at the edge of the circular saw blade to see where it is cutting on the line.
Before staining or finishing woodwork projects, sand lightly all over. Plywood and solid lumber will come with what is called a mill glaze over it. This should be sanded off or roughed up, with the grain, so the stain will cover evenly - use a 120 grit sandpaper before you stain.
Ask Dave!
Dave: You have helped me before with plans for my gazebo. I have no windows in my finished basement. The basement is below ground at the front of the house and on the rear of the house the basement is all above ground. I have a two stories that sit on the basement. The basement has exterior brick finish over 9 in concrete blocks. Interior was framed out with 2x4s and finished with sheet rock. I plan to install two windows on the rear side that are 2 ft x 3 ft and 3 ft x 3 ft. Do I need headers and lintels and how do I frame-out the windows? What size cutout should I make in the wall. The combined thickness of the wall is 19 inches. I am attaching a free hand sketch of the wall looking down from above. Hope this helps. My challenges are: 1. how do I frame out and finish the window 2. for the cut- out do I need "lintels" to keep the bricks up and do I need headers and where do I place the headers Thanks Winston
Hi Winston,
This is going to be a "fun" job cutting through the brick and block.
This is the way I would do this:
First you need to know the rough openings of the windows. As far as I know there are 2 standard openings; the West goes 1" less than the window size, so for a 2436 (2'x3') window the RO is 23" x 35"; the East goes with the actual size: 24" x 36". These rough openings will leave a space around the window jamb of about 5/16" to 3/8". If you don't have the windows yet, you can get this info from the sales person.
I'll assume that you have the Eastern rough opening of the same size as the window size: that is 2'x3' and 3'x3'. This is an assumption on my part, so check this out, yourself.
You need to support the brick, the block and the 2x4 wall with 2x4 headers for a 3' opening, all three will have the same size header or lintel. When I cut a window in an existing wall, especially replacing a window in a stucco wall, I frame around the outside of the window with 1x4, to cover the uneven cut around the stucco and if it chips, which it always does. This is the same technique I would suggest you use for around the joint of the brick and window. I'll draw you a detail to make it a little easier to understand.
Dave
Dave: Got your suggestions. In supporting the brick, the block with the 2x4 headers, is this the same as framing-out the opening? Also on the brick and block openings do I need to make the opening large enough to leave space for the 2x4 headers/frame? Winston
Yes, for both questions. This will come clear with my drawings. All three will have the same size buck, it's called, except the 2x4 walls will be a proper header with cripples or jack studs to support it.
Any rough opening, yet?
Dave
Dave; The rough openings are the same as the window size. Winston
Okay, Winston, here are the drawings:
(Print this first one off to get a good look at it)


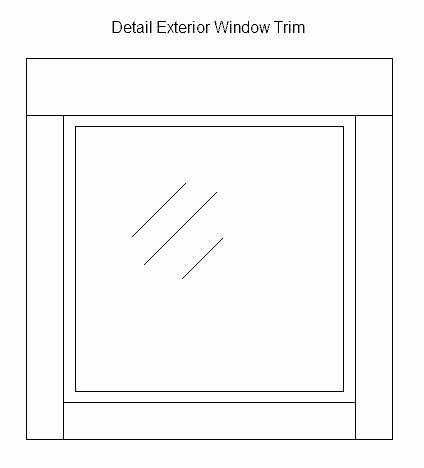
The exterior trim is a 1x6 for the header and 1x4 for the sides and bottom. These can be cedar or spruce painted or stained.
If I missed anything or if you have any questions, please feel free to ask. Even while going through the process and you have a doubt about procedure, I'll try to get back to you as soon as I can. I almost always answer questions in the morning, unless I happen to be on the computer at the time the email comes in.
Hope this helps,
Dave
Dear Dave: I've built a handicap ramp using hem fir, and now I must stain it. I will also attach 6" wide 3M non-skid strips to the ramp. These are sticky back (extra sticky) strips. My question is, should I stain the entire ramp first and then attach the non-skid strips over the stained wood, or should I attach the strips first and then stain around the strips? Best Regards, Roger, in Colorado (7000 ft elevation, high desert)
Hi Roger,
Either way will work, but easier to stain the whole ramp first then stick on the strips. If sticking them on after the staining, just be sure that the stain is good and dry. The stain seals the wood giving it a good base to stick to, as well.
Dave
Have a wooden deck that is in NEED of a new surface - Staining - Painting - ETC. Saw a short clip about Rust-Oleum RESTORE. A two coat top finish for wooden Decks. Have you ever heard about this type of finish? I realize that you must prepare the old surface for any type of Stain/Paint/Etc., and will do my best to clean the surface prior to "Whatever". I will need to replace one or two boards, but otherwise surface is in pretty good shape. Thanks - Greg
Hi Greg,
Rust-Oleum is a good product. I haven't used their deck restore, but their rust paint has always been good. With most deck coating products, you need a lot of product which makes it expensive. Before committing yourself be sure to check out the coverage for a can of the stuff and figure out how much you need and the resultant cost - times two coats.
Dave
Feature Article of the Month
(taken from our website: DaveOsborne.com)
Stairs 7: How to Build Concrete Steps
Top and Bottom Risers
He told me, "If you can build stairs out of wood you can build concrete stairs".
When I was a young carpenter, working on a school project, I was told to build a set of concrete stairs to connect two levels of a sidewalk, not yet in place. I talked to my father who taught me the trade while working on industrial projects in northern Canada, constructing mine buildings and bridges. Somehow I missed the concrete stair session. He told me, "If you can build a wooden set of stairs you can build them out of concrete." He told me two things: the stringers for a concrete stair are on top of the treads and instead of a nosing, the riser is angled to give a wider tread. Armed with my new information, I attempted to build the set of concrete stairs.
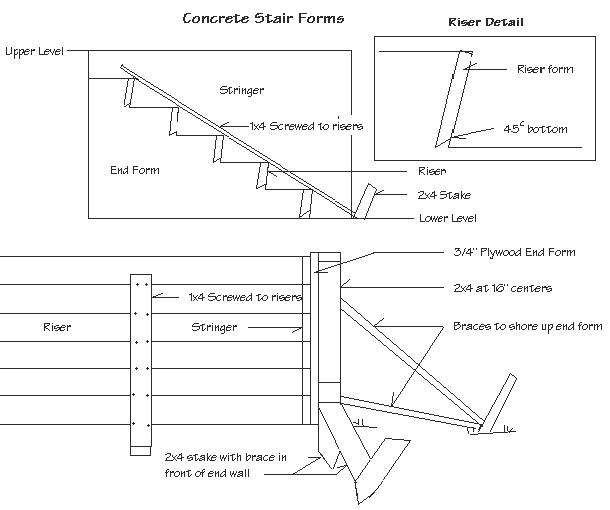
To support the stringers, I built the forms on each side of the stairs, braced them properly in order for them to hold the concrete. I built them tall enough to be able to nail the stringers to them. I measured the total rise between the two levels of proposed sidewalk and calculated the individual rise. I used a low rise of 6" for the kids and chose a run of 12" to complement the rise. I learned that in stair building the pairs 6 and 12, 7 and 11 and 8 and 10 went together. I laid out the stringers. I found it tough at first to get my head around the fact that the stringers are above the treads, acting as a support for the risers that are like bulkheads in a form. I canted the riser back 1" on the bottom to allow more room for the foot on the tread. I used 3/4" form ply on the side forms and for the stringers.
Once the side forms were in place and the stringers fastened in position, I could see that the slope of the earth needed a bit of correction. I wanted at least 4" of concrete under my risers. The dirt was removed to form the correct slope and clearance. It was then compacted well using a plate compactor.
Since this was a commercial project and a union job I just stood by and watched the laborer repair the slope. Actually I stood there just long enough to be sure he understood what I wanted. While I was waiting for the preparation of the slope, I continued on my stairs. I ripped my risers to the right heights and the bottoms on a 45 degree. This was another piece of info my father included: "When the cement finisher comes along to finish the treads, if the risers are not ripped to a 45 on the bottom, since they are are on an angle, the bottom will dig into the tread below it". By ripping the riser material on a 45 degree angle, the bottom of the riser comes to a point, allowing the finisher to trowel right up to the inside bottom corner of the tread and riser. Otherwise there will be a depression left of the 2x8 riser along the tread next to the riser.
I returned to the stair site and noticed the foreman had asked the rebar guys to install a mat of rebar to lay on the slope, after the laborer had finished his compacting. I nailed the risers into position. Since the stairs were about 5' wide I tied all the risers together at the center of their span with a 1x4 nailed down the slope attached to the top of the risers. At the bottom of the 1x4, I drove a stake into the ground to prevent them from moving. I also drove stakes at the edge of the side forms to prevent any movement in the same direction. The risers were all attached to the side walls and I could see the force created by the weight of concrete wanting to deflect the 2x8 riser forms. As I was finishing up, I noticed the rebar guy was back and held the mat off the slope by attaching tie wire to it and hanging it off the risers. He formed a loop around the mat and the riser so the cement finisher could cut the wire and pull it out to get it out of his way. He also added a couple of bars running with the risers in each tread.
Concrete was scheduled late in the day so I stood and watched as the laborers poured the concrete. I loved those union jobs. The forms held well. The finisher started to finish my masterpiece. The concrete was setting up quickly in the heat. The finisher wanted to remove the 1x4 tying the risers together. He got me to remove the 1x4. I had to pry it from the risers0 with extreme care to avoid any movement. I learned a valuable lesson: now I always attach this 1x4 into the riser tops with screws to make it easier to remove during the finishing process.
I've formed many concrete stairs since then. The first one was a good learning experience.
Dave
Almost the End
Read hundreds of diy articles, answered questions and dozens of plans and projects all written by Dave.
Become a Member and Dave will personally eliminate any doubts you might have about your projects by email.
Dan and I thank you for your interest and support of our Website. We hope we can help you with your present and future projects.
Get complete access to our website - Subscribe Now!
We BUILD CONFIDENCE. If you need advice on Building or on your projects at work or home you can make a very small investment and subscribe to our website, then send me any questions or uncertainties you might have via email. There is no extra charge. That is all part of your membership to our site!
Help us with the cost of putting this info out by becoming a member. Subscribe now!
Please tell your friends and family about our site and this Newsletter.
Dan and I wish all our readers and members of our website, all the best in 2023 and stay safe out there and thanks to our Front Line Workers.
Your source for building tips, woodworking & furniture plans, house plans and building advice directly from Dave...
Hi, I'm Dave Osborne. With over 50 years experience as a journeyman carpenter, foreman and contractor in heavy construction I enjoyed working with apprentices and sharing the tricks of the trade that others shared with me. Now I get emails from Members all over the world and we include many of my answers in our Free Monthly Newsletters. Some of my answers include drawings and instructions specific to a project, but may also answer your questions. I use correct construction terminology, so you can confidently inform your building supply dealers or contractors exactly what you need.
ASK DAVE!
The Benefits of Membership
Membership gives you full access to our hundreds of how-to articles, woodworking plans, converters, calculators and tables. Our Stair Calculator is one of the most popular on the internet. We have projects you can build for (and with) your kids, furniture for your wife, and sheds and gazebos. If you run into a problem or need advice your Membership includes unlimited email questions to me through our Ask Dave quick response button.
Join us!
Copyright © 1999-2026 DDFM Enterprises. All Rights Reserved. DDFM ENTERPRISES, DAVE'S SHOP TALK and the Dave Osborne logo are trademarks and service marks owned by DDFM Enterprises. All other trademarks on this site are the property of their respective owners. Site design by Design Strategies, Inc.