Building Confidence
| Volume 21 Issue 9 ISSN 1923-7162 |

Welcome to Dave's Shop Talk's Home Improvement Newsletter of questions from our members on their construction projects, a Tip of the Month and a home remodeling article, both from our website at https://daveosborne.com. We are into our 21st year putting out this Newsletter. Dan and I would not be able to do this without your input every month. Thank you and keep the questions coming!
Tips of the Month
Make a feather board to keep pieces tight against a saw fence when ripping. Also make a push stick to save fingers when ripping narrow pieces on a table saw.
When retro fitting a plumbing fixture that requires its own vent, use a mechanical vent.
Ask Dave!
Dave, I am putting up a wall in a building that has a metal skin. The wall will be 2 X 6 with insulation and sheetrock on the inside. Should I use plastic sheeting during this process? I'm thinking that it might not hurt if I use a vapor barrier between the outside wall and the insulation; What do you think? Would it be better to use a VB between the insulation and the sheetrock? Thanks in advance for your help. Have a great holiday weekend.
No, I would not put poly on the cold side of the wall, always on the warm side - between the insulation and the drywall. No problem with breathable tar paper, though, which keeps moisture in but lets vapor out, or used commonly today Tyvek.
Looking forward to the weekend, although every day is a long weekend when you are retired.
Dave
Hello Dave, not sure if you remember me. I bought the Gabled Shed with loft plus a door and 2 windows - it was fun and easy to build. Now I wish to replace my yard doors by something we would build ourselves (I still have teens to keep busy and proud) - we have a vinyl fence but the doors are so weak that just the wind damages them. I wish to build something better in wood we will paint. The doors are 70" tall by 41.5" wide each, the posts are treated 4x4 with 4 bags of concrete for each post so they can take the weight without problem. These doors are mainly to keep the dog in :) and to make the yard entrance beautiful. Hoping you can help as you did for the shed.
Pierre
Hi Pierre,
How is this?
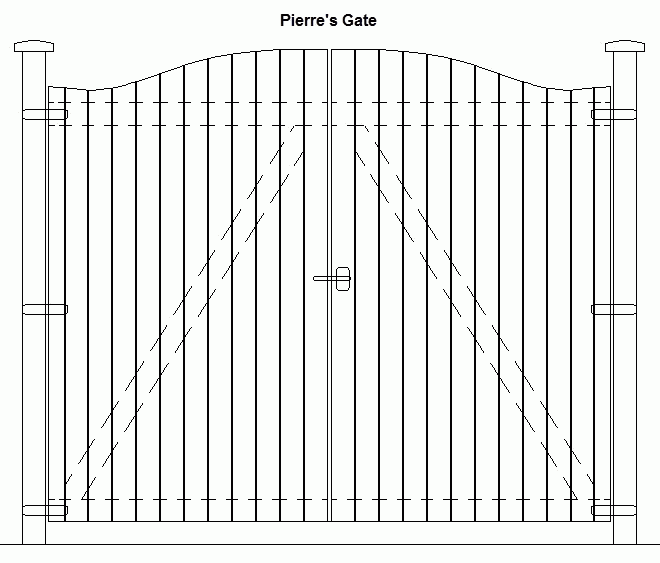
Below is the frame - 2x4s on the flat. Notice the brace with the bottom of the brace against the hinge side. Hinges are 4" strap hinges in black or galvanized. Make sure you have about 1/2 " clearance between the two gates and about 3 or 4 inches on the bottom.
Fasten the boards on the frame first, then cut the tops off to suit.

Dave
That is terrific! How much do I owe you? Can I use Paypal or a Credit card? Thank you,
Pierre.
Hi Pierre,
Thanks, glad you like it. No charge, just enjoy working with your teens.
Dave
Thank you for the design, I really appreciate it. Do you know when my subscription is due? By the way, my teens are all girls lol. You should see them using framing guns and other cool tools!
Ha! You got me there! I had 3 daughters myself, no boys. One was a book worm, and 2 were pretty handy around the house. Their husbands are jealous that they know more about do-it-yourself stuff than they do.
Yes, you renew on Oct. 3rd. It should be automatic unless you cancel.
Dave
How do I measure the angle at the top and the bottom of a handrail so I can put on the cap or end of the railing so it is parallel to the floor when I am done. I have read some articles that say to use a 16 degree cut. Is that correct? Please advise
The angle of your particular handrail depends on the angle of your stairs. Every set of stairs is different. The easiest way to find the angle of your own handrail is to lay a straight edge down the stairs resting on top of each nosing. Get a level and plumb a line (scribe a vertical line) on the straight edge (a 2x4 for example) or a small piece of plywood. This is the angle of the handrail that will match your stairs. If the handrail is already in place, you can level a short board against the handrail and scribe the angle, made by the rail, on the board.
Here is a drawing:
Hope this helps,
Dave
I am building a 28' x 39' cottage/garage on a cement slab on a
lakefront property with a slope about 5 ft in 50 ft. Will have
to use fill to level. What is the best fill to use and how
should it be packed?
Hi and welcome to our website,
The cheapest fill to get is what they call 'pit run'. It is a sand, gravel and rock mix. It compacts not too bad. You can get this from a guy with a dump truck that has access to a gravel pit. I once had a friend of mine with a backhoe who was able to get permission from the department of highways to clean a gravel slide off the gravel road and use it for my driveway. It was close to my property, so I just paid for the backhoe time. This is a rare occurrence, but worth a checkout.
Compaction of fill is very important when pouring concrete over it is concerned. Use a plate compactor, as shown on the left, readily available at most rental yards. Spread the fill in not over 6" layers and run over it with the compactor until the correct level is built up.

The compactor is heavy and needs two men to unload it, unless you back up to a hill and pull it off your truck.
Dave
Feature Article of the Month
(taken from our website: DaveOsborne.com)
Jigs 1: Table Saw Feather Board
A feather board is a handy jig, something you can make yourself or purchase ready made.
Feather boards are used for two purposes. First to hold your work when ripping tight against the table and tight against the table saw fence. Second, they are used to prevent kickbacks when ripping small pieces, if the piece twists between the blade and the table saw fence. There are feather boards out there that you can buy that will do this very well, they either clamp on the table saw fence to hold the work tight to the table or clamp in the miter slot of the table saw to hold the work against the fence. There are other feather boards out there that actually are magnetic and hold securely anywhere on the table. That's the problem of a home made feather board, how to fasten it to the table to hold the work against the table saw fence. Here is a table saw feather board I designed:
 Cut a piece of 3/4" plywood to length the width of your saw table and rip it 7" wide, for now. Lay it in position against the table saw blade and flush on the table ends. Mark out the position of the front of the table saw blade. The feathers should be positioned as shown, with the feathers a bit ahead of the blade. Layout a 3" swath of feathers at a 45 degree angle as shown. Cut the feathers as shown by using your miter fence with the blade set at 45 degrees and about 1 1/2" high.
The cuts for the feathers are about 1 1/2" deep and spaced about 1/8" apart leaving the feathers about 1/8" thick. Push the plywood slowly to avoid breaking up the veneer, use a sharp blade with about a 1/8" kerf.
Make sure there is a 1/8" slot before the first and the last feather. Rip the jig to 6" wide and leave the feathers sticking out on the one side as shown. Be careful coming close to the feathers on each side, finish the rip with a handsaw or jig saw. You should have the finished jig as shown in the sketch. Clamp it to the table as shown, with just a bit of pressure against the work piece. The work piece should only be able to move forward and binds when pulled backwards.
Make a similar model for the table saw fence. This one will be as wide as the table saw fence and long enough to allow two clamps, as well.
Watch those fingers, use our table saw push stick.
Dave
Almost the End
Read hundreds of diy articles, answered questions and dozens of plans and projects all written by Dave.
Become a Member and Dave will personally eliminate any doubts you might have about your projects by email.
Dan and I thank you for your interest and support of our Website. We hope we can help you with your present and future projects.
Get complete access to our website - Subscribe Now!
We BUILD CONFIDENCE. If you need advice on Building or on your projects at work or home you can make a very small investment and subscribe to our website, then send me any questions or uncertainties you might have via email. There is no extra charge. That is all part of your membership to our site!
Help us with the cost of putting this info out by becoming a member. Subscribe now!
Please tell your friends and family about our site and this Newsletter.
Dan and I wish all our readers and members of our website, all the best in 2023 and stay safe out there and thanks to our Front Line Workers.
Your source for building tips, woodworking & furniture plans, house plans and building advice directly from Dave...
Hi, I'm Dave Osborne. With over 50 years experience as a journeyman carpenter, foreman and contractor in heavy construction I enjoyed working with apprentices and sharing the tricks of the trade that others shared with me. Now I get emails from Members all over the world and we include many of my answers in our Free Monthly Newsletters. Some of my answers include drawings and instructions specific to a project, but may also answer your questions. I use correct construction terminology, so you can confidently inform your building supply dealers or contractors exactly what you need.
ASK DAVE!
The Benefits of Membership
Membership gives you full access to our hundreds of how-to articles, woodworking plans, converters, calculators and tables. Our Stair Calculator is one of the most popular on the internet. We have projects you can build for (and with) your kids, furniture for your wife, and sheds and gazebos. If you run into a problem or need advice your Membership includes unlimited email questions to me through our Ask Dave quick response button.
Join us!
Copyright © 1999-2026 DDFM Enterprises. All Rights Reserved. DDFM ENTERPRISES, DAVE'S SHOP TALK and the Dave Osborne logo are trademarks and service marks owned by DDFM Enterprises. All other trademarks on this site are the property of their respective owners. Site design by Design Strategies, Inc.